Page 311 of 416

311 Practical hints
What to do if …?
PRE-SAFE
INACTIVE
VISIT WORKSHOP
If BAS or ESP malfunction messages are
displayed simultaneously, PRE-SAFE has
been deactivated as a result of these mal-
functions. All other occupant safety sys-
tems, such as the airbags, are still
available.
�
Visit an authorized Mercedes-Benz
Center as soon as possible.
PRE-SAFE itself has failed. All other occu-
pant safety systems, such as the airbags,
are still available.
�
Visit an authorized Mercedes-Benz
Center as soon as possible.
A
RESERVE FUEL
The fuel level has dropped below the re-
serve mark.
�
Refuel at the next gas station
(�page 261).
Y
HOOD OPEN!
You are driving with the hood open.
�
Close the hood (
�page 264).
I
REMOVE KEY!
You have forgotten to remove the
SmartKey.
�
Remove the SmartKey from the igni-
tion.
REPLACE KEY!
VISIT WORKSHOP!
The batteries in the SmartKey are dead.
�
Change the batteries (
�page 328).
AUTOM. LIGHT ON
REMOVE KEY!
�
Remove the SmartKey from the start-
er switch.
Display
Possible cause
Suggested solution
Page 312 of 416

312 Practical hintsWhat to do if …?Display
Possible cause
Suggested solution
.
LIGHT SENSOR
VISIT WORKSHOP!
The lamp sensor is malfunctioning. The
headlamps switch on automatically.
�
In the control system, set lamp operation
to manual (
�page 149).
�
Switch on headlamps using the exterior
lamp switch.
BRAKE LIGHT
VISIT WORKSHOP!
Brake lamp illumination is delayed or lamp
is permanently on.
�
Visit an authorized Mercedes-Benz Cen-
ter as soon as possible.
DISPLAY MALFUNCTION
VISIT WORKSHOP!
The display for the lamps or the system is
malfunctioning.
�
Visit an authorized Mercedes-Benz Cen-
ter as soon as possible.
TURN OFF LIGHTS!
Lamps have been turned on although the
SmartKey in the ignition is in position 0.
�
Turn off the headlamps
TURN SIG. MIRROR, L
CHECK LIGHT!
The left turn signal in the side mirror is
malfunctioning. This message will only ap-
pear if all light emitting diodes have
stopped working.
�
Visit an authorized Mercedes-Benz Cen-
ter as soon as possible.
TURN SIG. MIRROR, R
CHECK LIGHT!
The right turn signal in the side mirror is
malfunctioning. This message will only ap-
pear if all light emitting diodes have
stopped working.
�
Visit an authorized Mercedes-Benz Cen-
ter as soon as possible.
TURN SIG., LF
CHECK LIGHT!
BACK-UP LIGHT ON!
The left front turn signal lamp is malfunc-
tioning. A back-up bulb is being used.
�
Replace the bulb as soon as possible.
Page 326 of 416
326 Practical hintsUnlocking/locking in an emergency
Unlocking/locking in an emergencyUnlocking the vehicle
Unlocking the driver’s door
If you are unable to unlock the driver’s
door with the SmartKey, open the door
with the mechanical key as follows:
1Mechanical key locking tab
2Mechanical key�
Move locking tab1 in direction of ar-
row and slide the mechanical key2 out
of the housing.
�
Unlock the door with the mechanical
key. To do so, push the mechanical key
into the lock until it stops and turn it
counterclockwise to position1.
iUnlocking your vehicle with the me-
chanical key will trigger the anti-theft
alarm system. To cancel the alarm, do
one of the following:�
Press button
Œ
or
‹
on the
SmartKey.
�
Insert the SmartKey in the starter
switch.
�
If KEYLESS-GO* card present,
press the KEYLESS-GO* start/stop
button (
�page 33).
Page 327 of 416

327 Practical hints
Unlocking/locking in an emergency
Unlocking the trunk
If you are unable to unlock the trunk with
the SmartKey, open the trunk with the me-
chanical key as follows:Trunk lock�
Insert the mechanical key into the
trunk lid lock.
�
Turn the mechanical key counterclock-
wise to position1.
�
Press button2.
The trunk lid swings open.
Locking the vehicle
If you are unable to lock the vehicle with
the SmartKey or the KEYLESS-GO* card,
lock it with the mechanical key as follows:�
Close the passenger doors and the
trunk lid.
�
Press the central locking switch in the
center console (
�page 103).
�
Check to see whether the locking knob
on the passenger door is still visible. If
necessary push it down manually.
�
Lock the driver’s door with the me-
chanical key.
�
Lock the trunk lid if necessary with the
mechanical key (
�page 326).
!The trunk lid swings open upwards au-
tomatically. Always make sure that
there is sufficient overhead clearance.
A minimum height clearance of 6 ft.
(1.85 m) is required to open the trunk
lid.iUnlocking your vehicle with the me-
chanical key will trigger the anti-theft
alarm system. To cancel the alarm, do
one of the following:�
Press button
Œ
or
‹
on the
SmartKey.
�
Insert the SmartKey in the starter
switch.
�
If KEYLESS-GO* card present,
press the start/stop button
(�page 33).
Page 328 of 416

328 Practical hintsUnlocking/locking in an emergencyChanging batteries
If the batteries in the SmartKey or the
KEYLESS-GO* card are discharged, the ve-
hicle can no longer be locked or unlocked.
It is recommended to have the batteries re-
placed at an authorized Mercedes-Benz
Center.Batteries contain materials that can harm
the environment if disposed of improperly.
Recycling of batteries is the preferred
method of disposal. Many states require
sellers of batteries to accept old batteries
for recycling.SmartKey
1Mechanical key
2Battery compartment
Replacement batteries: Lithium, type
CR 2025 or equivalent.
�
Remove mechanical key1.
�
Insert the mechanical key in side open-
ing and push gray slide.
The battery compartment is unlatched.
�
Pull the battery compartment out of the
SmartKey housing in direction of ar-
row.
�
Remove the batteries.
Warning!
G
Keep the batteries out of reach of children.
If a battery is swallowed, seek medical help
immediately.
iWhen changing batteries, always re-
place both batteries.
The required replacement batteries are
available at any authorized
Mercedes-Benz Center.
Page 329 of 416
329 Practical hints
Unlocking/locking in an emergency
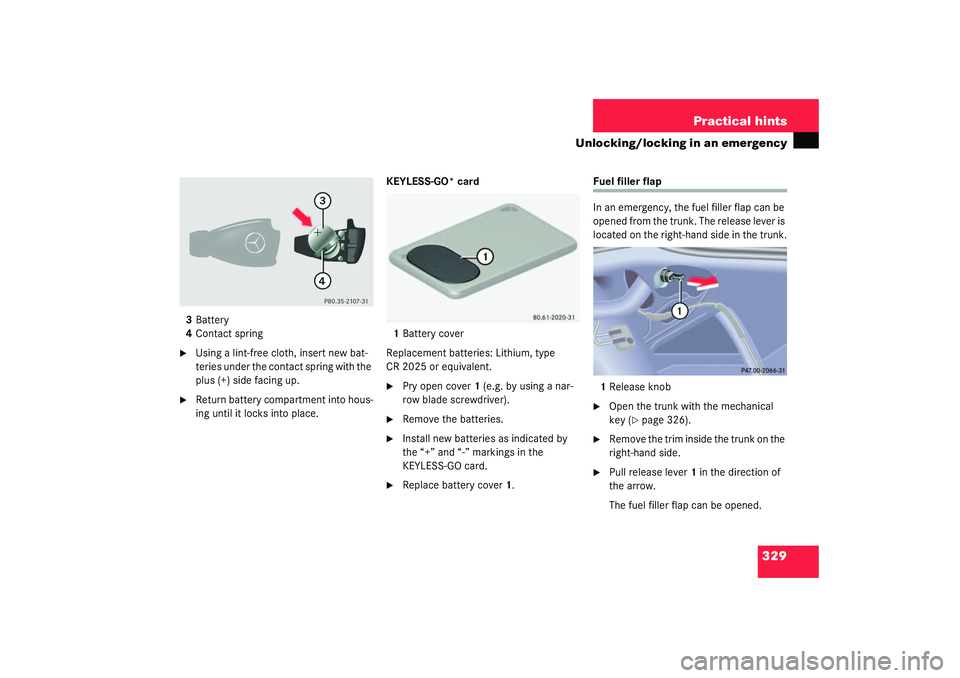
3Battery
4Contact spring�
Using a lint-free cloth, insert new bat-
teries under the contact spring with the
plus (+) side facing up.
�
Return battery compartment into hous-
ing until it locks into place.KEYLESS-GO* card
1Battery cover
Replacement batteries: Lithium, type
CR 2025 or equivalent.
�
Pry open cover 1 (e.g. by using a nar-
row blade screwdriver).
�
Remove the batteries.
�
Install new batteries as indicated by
the “+” and “-” markings in the
KEYLESS-GO card.
�
Replace battery cover 1.
Fuel filler flap
In an emergency, the fuel filler flap can be
opened from the trunk. The release lever is
located on the right-hand side in the trunk.
1Release knob�
Open the trunk with the mechanical
key (
�page 326).
�
Remove the trim inside the trunk on the
right-hand side.
�
Pull release lever1 in the direction of
the arrow.
The fuel filler flap can be opened.
Page 330 of 416
330 Practical hintsOpening/closing in an emergency
Opening/closing in an emergencySliding/pop-up roof
The driving mechanism for the slid-
ing/pop-up roof is located behind the lens
of the interior overhead light.
You can open or close the sliding/pop-up
roof manually should an electrical malfunc-
tion occur.
1Lens
�
Pry off lens1 using a srewdriver.
�
Turn the SmartKey in the starter switch
to position1 or2.
�
Remove the crank from the operator’s
manual pouch.
2Crank
�
Insert crank2 through hole.
�
Turn crank2 clockwise to:�
close slide roof
�
raise roof at the rear
�
Turn crank2 counterclockwise to:�
open slide roof
�
lower roof at the rear
The sliding/pop-up must be resynchro-
nized after being operated manually
(
�page 195).
Page 337 of 416
337 Practical hints
Replacing wiper blades
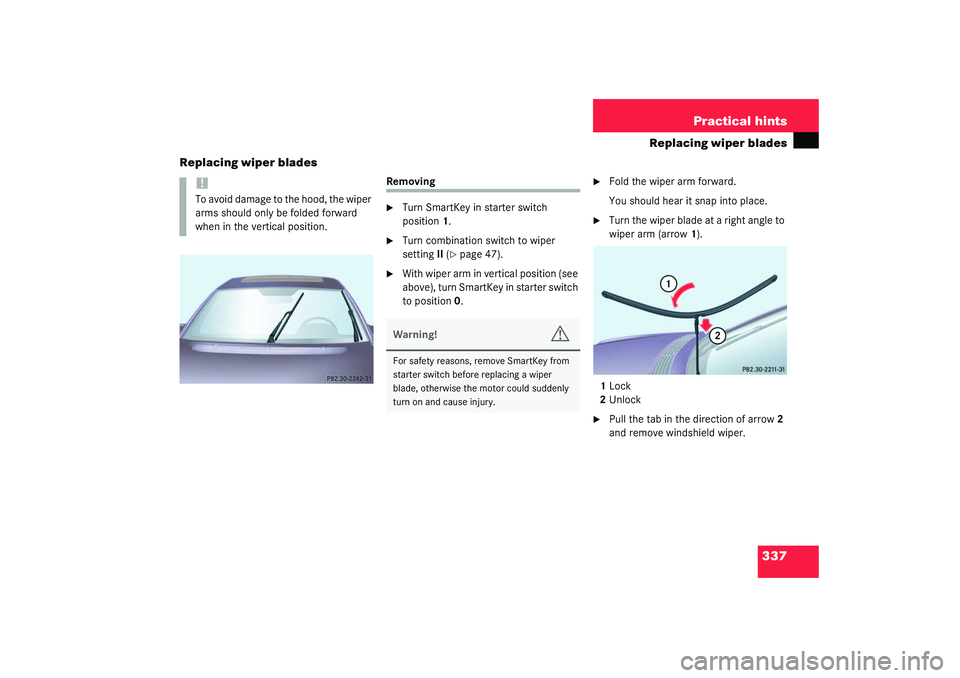
Replacing wiper blades
Removing�
Turn SmartKey in starter switch
position1.
�
Turn combination switch to wiper
settingII (
�page 47).
�
With wiper arm in vertical position (see
above), turn SmartKey in starter switch
to position0.
�
Fold the wiper arm forward.
You should hear it snap into place.
�
Turn the wiper blade at a right angle to
wiper arm (arrow 1).
1Lock
2Unlock
�
Pull the tab in the direction of arrow2
and remove windshield wiper.
!To avoid damage to the hood, the wiper
arms should only be folded forward
when in the vertical position.
Warning!
G
For safety reasons, remove SmartKey from
starter switch before replacing a wiper
blade, otherwise the motor could suddenly
turn on and cause injury.