Page 9 of 416

9
Product information
Introduction
Product informationPlease observe the following in your own
best interest:
We recommend using Mercedes-Benz orig-
inal parts as well as conversion parts and
accessories explicitly approved by us for
your vehicle model.
We have tested these parts to determine
their reliability, safety and their special
suitability for Mercedes-Benz vehicles.We are unable to make an assessment for
other products and therefore cannot be
held responsible for them, even if in indi-
vidual cases an official approval or authori-
zation by governmental or other agencies
should exist. Use of such parts and acces-
sories could adversely affect the safety,
performance or reliability of your vehicle.
Please do not use them.Mercedes-Benz original parts as well as
conversion parts and accessories ap-
proved by us are available at your autho-
rized Mercedes-Benz Center where you will
receive comprehensive information, also
on permissible technical modifications,
and where proper installation will be per-
formed.
Page 98 of 416
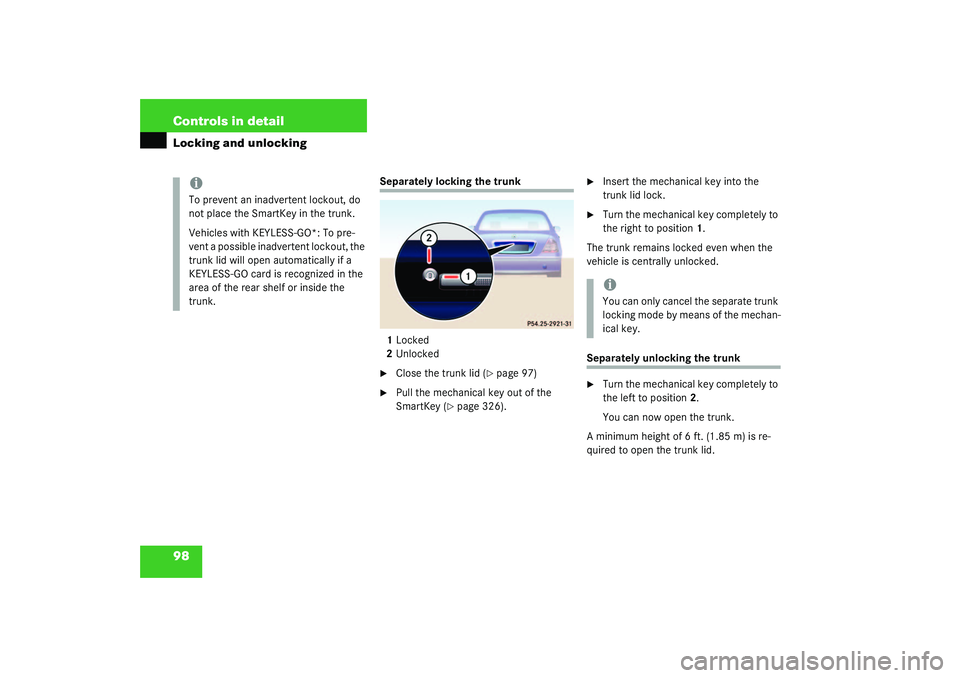
98 Controls in detailLocking and unlocking
Separately locking the trunk
1Locked
2Unlocked�
Close the trunk lid (
�page 97)
�
Pull the mechanical key out of the
SmartKey (
�page 326).
�
Insert the mechanical key into the
trunk lid lock.
�
Turn the mechanical key completely to
the right to position 1.
The trunk remains locked even when the
vehicle is centrally unlocked.
Separately unlocking the trunk�
Turn the mechanical key completely to
the left to position 2.
You can now open the trunk.
A minimum height of 6 ft. (1.85 m) is re-
quired to open the trunk lid.
iTo prevent an inadvertent lockout, do
not place the SmartKey in the trunk.
Vehicles with KEYLESS-GO*: To pre-
vent a possible inadvertent lockout, the
trunk lid will open automatically if a
KEYLESS-GO card is recognized in the
area of the rear shelf or inside the
trunk.
iYou can only cancel the separate trunk
locking mode by means of the mechan-
ical key.
Page 121 of 416
.
A")
121 Controls in detail
Lighting
Manual headlamp mode
The low beam headlamps and parking
lamps can be switched on and off with the
exterior lamp switch. For exterior lamp
switch, see (
�page 120).
Automatic headlamp mode
The parking lamps, low beam headlamps
and license plate lamps switch on and off
automatically depending on the brightness
of the ambient light.
�
Turn the exterior lamp switch to
U
.
iWith the daytime running lamp mode
activated, the low beam headlamps will
not switch off automatically.
iFront fog lamps and rear fog lamp can
not be switched on manually with exte-
rior lamp switch in position
U
. To
activate the fog lamps, turn exterior
lamp switch to position
B
and pull
the exterior lamp switch to first or
second stop (
�page 122).
Warning!
G
In automatic headlamp mode, the head-
lamps will not be automatically switched on
under foggy conditions. To minimize risk to
you and to others, activate headlamps by
turning exterior lamp switch to
B
.
The driver is responsible for the operation of
the vehicle’s lights at all times. The automat-
ic headlamp feature is only an aid to the driv-
er. Switch on the vehicle lights manually
when driving or when traffic conditions re-
quire you to do so.
iIf you drive in countries where vehicles
drive on the other side of the road than
the country where the vehicle is regis-
tered, you must have the headlamps
modified for symmetrical low beams.
Relevant information can be obtained
at your authorized Mercedes-Benz Cen-
ter.
Page 141 of 416

141 Controls in detail
Control system
�
Press button
j
or
k
repeatedly
until the desired name appears in the
display.
The stored names are displayed in in-
creasing or decreasing alphabetical or-
der.
�
Press button
í
.
The system dials the selected phone
number.
If connection is successful, the name of
the party you called and the duration of
the call will appear in the display.
If no connection is made, the control
system stores the dialed number in the
redial memory.Redialing
The control system stores the most recent-
ly dialed phone numbers. This eliminates
the need to search through your entire
phone book.
�
Press button
ÿ
or
è
repeatedly
until you see the
TEL
menu in the dis-
play.
�
Press button
í
.
In the display you see the first number
in the redial memory.
�
Press button
j
or
k
repeatedly
until the desired name appears in the
display.
�
Press button
í
.
The control system dials the selected
phone number.
iIf you press and hold
j
or
k
for
longer than one second, the system
scrolls rapidly through the list of names
until you release the button again.
Cancel the quick search mode by
pressing
ì
.
iIf you do not want to use the telephone,
press button
ì
.
Page 151 of 416
�
Move the selection marker with
the
æ
or
ç
button to the
LIGHT-
ING
submenu.
�
Press button
j
or
k
repeated")
151 Controls in detail
Control system
Setting daytime running lamp mode
(USA only)�
Move the selection marker with
the
æ
or
ç
button to the
LIGHT-
ING
submenu.
�
Press button
j
or
k
repeatedly
until you see this message in the dis-
play:
LAMP CIRCUIT HEADLAMP MODE
.
The selection marker is on the current
setting.
�
Press
æ
or
ç
to select manual
or daytime running lamp (constant)
mode. This function is not available in
countries where daytime running
lamps are mandatory.With daytime running lamp mode se-
lected and the exterior lamp switch at
position0, the following lamps will
come on automatically when the en-
gine is turned on:
�
Parking lamps and low beam head-
lamps
�
License plate lamps (in low ambient
light conditions) Setting locator lighting
During darkness, the following lamps will
come on when the exterior lamp switch is
in position
U
, the locator lighting fea-
ture is activated, and the vehicle is un-
locked by remote control:
�
Parking lamps
�
Tail lamps
�
License plate lamps
�
Front fog lamps
The locator lighting switches off when the
driver’s door is opened. It switches off au-
tomatically after a period of approximately
40 seconds.
�
Move the selection marker with
the
æ
or
ç
button to the
LIGHT-
ING
submenu.
iIf you turn the exterior lamp switch to
another position, the corresponding
lamp(s) will switch on.
For safety reasons, resetting the LIGHTING
submenu to factory settings
(
�page 147) while driving will not re-
set the daytime running lamp mode.
In the display you will then see the mes-
sage:
LIGHTING – CANNOT BE TOTALLY
RESET TO FACTORY SETTINGS WHILE
DRIVING.
��
Page 164 of 416

164 Controls in detailAutomatic transmission
Program mode selector switch
1Program mode selector switch
S Sport For standard driving
C Comfort For comfort driving
�
Press the program mode selector
switch repeatedly until the letter of the
desired shift program appears in the ta-
chometer display field (
�page 130).
Select C for comfort driving:
�
The vehicle starts out in second
gear (both forward and reverse) for
gentler starts. This does not apply if
full throttle is applied or gear
range1 is selected.
�
Traction and driving stability are im-
proved on icy roads.
�
Upshifts occur earlier even when
you give more gas. The engine then
operates at lower rpms and the
wheels are less likely to spin.
�
The power transmission ratio for se-
lector lever positionR changes de-
pending on the program mode
selected (C or S).
Warning!
G
When leaving the vehicle, always remove the
SmartKey from the starter switch, take the
KEYLESS-GO* card (if so equipped) with you
and lock the vehicle. Do not leave children
unattended in the vehicle, or with access to
an unlocked vehicle. Children could move
the selector lever from positionP, which
could result in an accident and/or serious
personal injury.
!Never change the program mode when
the selector lever is out of positionP.
This could result in a change of driving
characteristics for which you may not
be prepared.
Page 165 of 416

165 Controls in detail
Automatic transmission
Accelerator position
Your driving style influences the transmis-
sion’s shifting behavior:
Less throttle Earlier upshifting
More throttle Later upshifting
Kickdown
Use kickdown when you want maximum
acceleration.�
Press the accelerator past the point of
resistance.
The transmission shifts into a lower
gear.
�
Ease on the accelerator when you have
reached the desired speed.
The transmission shifts up again.Emergency operation (Limp home
mode)
If vehicle acceleration worsens or the
transmission no longer shifts, the trans-
mission is most likely operating in limp
h o m e ( e m e r g e n c y o p e r a t i o n ) m o d e . I n t h i s
mode, only 2nd gear and reverse gear can
be activated.�
Stop the vehicle.
�
Move selector lever toP.
�
Turn off the engine.
�
Wait at least ten seconds before re-
starting.
�
Restart the engine.
�
Move selector lever to positionD (for
2nd gear) orR.
�
Have the transmission checked at an
authorized Mercedes-Benz Center as
soon as possible.
Page 175 of 416
175 Controls in detail
Automatic climate control
Automatic climate control panel
Item
1
Swiveling left center air vent
2
Fixed air vent, left
3
Air volume control for left center air
vent
4
Air temperature control for center
air vents
5
Air volume control for right center
air vent
6
Fixed air vent, right
7
Swiveling right center air vent
8
Side defroster vent, left and right,
fixed
9
Swiveling side air vent, left and right
10
Air volume control for side air vents
11
Door air vent, left and right
12
Automatic climate control panel
iFor draft-free ventilation, move the slid-
ers for the center air vents to the mid-
dle position.
Item
1
Windshield defroster
2
Rear window defroster
3
Display
4
Residual engine heat utilization
5
Automatic climate control on/off
6
Air distribution, right
7
Economy mode (AC
OFF
)
8
Temperature control, right
9
Air volume (automatic, manual)
10
Temperature control, left
11
Air recirculation
12
Air distribution, left
13
Activated charcoal filter