Page 152 of 399

152 Controls in detailAutomatic transmissionOne-touch gearshifting
Even with an automatic transmission you
can change the gears yourself when the
selector lever is in positionD.
Downshifting�
Briefly press the selector lever to the
left in the D–direction.
The transmission will shift from the current
gear to the next lower gear. This action si-
multaneously limits the gear range of the
transmission (
�page 153).Upshifting
�
Briefly press the selector lever to the
right in the D+direction.
The transmission will shift from the current
gear to the next higher gear as permitted
by the shift program. This action simulta-
neously extends the gear range of the
transmission.Canceling gear range limit
�
Press and hold the selector lever in the
D+direction until D reappears in the
tachometer display field.
The transmission will shift from the current
gear range directly to gear rangeD.
Shifting into optimal gear range
�
Press and hold the gear selector lever
in the D–direction.
The transmission will automatically select
the gear range suited for optimal accelera-
tion and deceleration. This will involve
shifting down one or more gears.
Warning!
G
On slippery road surfaces, never downshift
in order to obtain braking action. This could
result in drive wheel slip and reduced vehi-
cle control. Your vehicle’s ABS will not pre-
vent this type of loss of control.
iTo avoid overrevving the engine when
the selector lever is moved to the
D–direction, the transmission will not
shift to a lower gear if the engine's
max. speed would be exceeded.
ProCarManuals.com
Page 153 of 399

153 Controls in detail
Automatic transmission
Gear ranges
With the selector lever in positionD, you
can limit the transmission’s gear range by
pressing the lever to the left (D–), and re-
verse the gear range limit by pressing the
lever to the right (D+).
The selected gear range will appear in the
tachometer display field. If you press on
the accelerator when the engine has
reached its rpm limit, the transmission will
upshift beyond any gear range limit
selected.
Gear
range
Effect
é
The transmission shifts
through fourth gear only.
è
The transmission shifts
through third gear only.
With this selection you can
use the braking effect of the
engine.
Gear
range
Effect
ç
The transmission shifts
through second gear only.
Allows the use of the en-
gine’s braking power when
driving �
on steep downgrades
�
in mountainous regions
�
under extreme operating
conditions
æ
The transmission operates
only in first gear.
For maximum use of the en-
gine’s braking effect on very
steep or lengthy down-
grades.
ProCarManuals.com
Page 155 of 399

155 Controls in detail
Automatic transmission
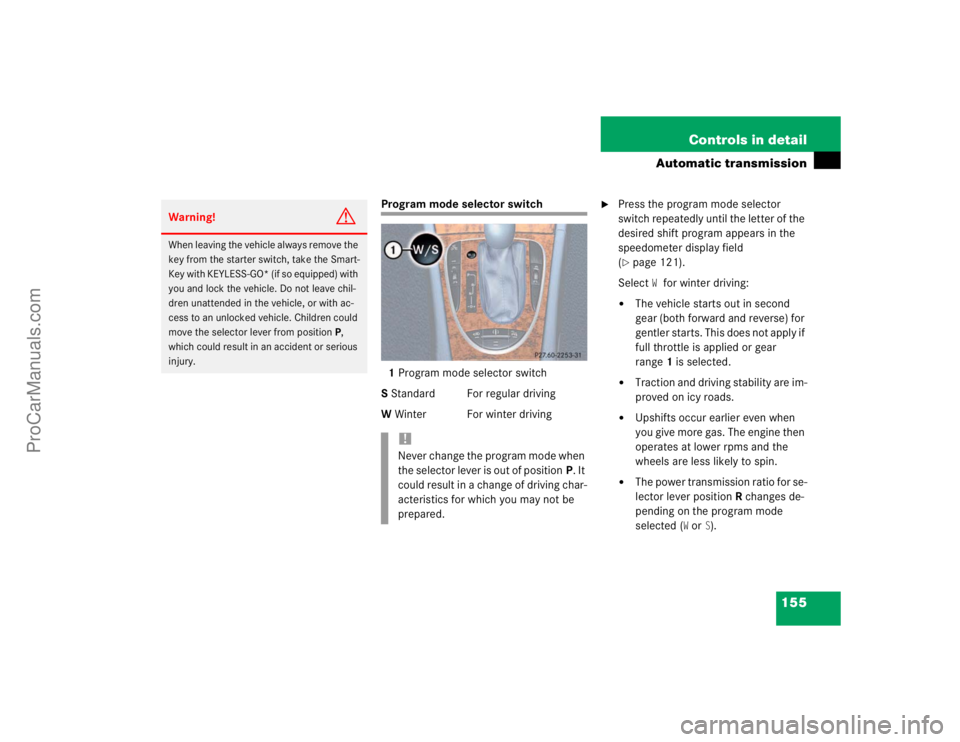
Program mode selector switch
1Program mode selector switch
S Standard For regular driving
W Winter For winter driving
�
Press the program mode selector
switch repeatedly until the letter of the
desired shift program appears in the
speedometer display field
(�page 121).
Select
Wfor winter driving:
�
The vehicle starts out in second
gear (both forward and reverse) for
gentler starts. This does not apply if
full throttle is applied or gear
range1 is selected.
�
Traction and driving stability are im-
proved on icy roads.
�
Upshifts occur earlier even when
you give more gas. The engine then
operates at lower rpms and the
wheels are less likely to spin.
�
The power transmission ratio for se-
lector lever positionR changes de-
pending on the program mode
selected (
W or
S).
Warning!
G
When leaving the vehicle always remove the
key from the starter switch, take the Smart-
Key with KEYLESS-GO* (if so equipped) with
you and lock the vehicle. Do not leave chil-
dren unattended in the vehicle, or with ac-
cess to an unlocked vehicle. Children could
move the selector lever from positionP,
which could result in an accident or serious
injury.
!Never change the program mode when
the selector lever is out of positionP. It
could result in a change of driving char-
acteristics for which you may not be
prepared.
ProCarManuals.com
Page 164 of 399
164 Controls in detailClimate control
1
Temperature, left
2
Windshield defroster
3
Increase airflow
4
MAX COOL display
5
Air distribution rocker switch
6
Rear window defroster
7
Temperature, right
8
Residual heat
9
Economy mode (no cooling)
10
Air distribution display
11
On/off
12
Airflow display
13
Decrease airflow
14
Air recirculation button
15
Air distribution and air volume (au-
tomatic)
ProCarManuals.com
Page 166 of 399

166 Controls in detailClimate controlAdjusting air distribution
Adjusting manually
Use air distribution control5 (
�page 164)
to adjust the air distribution.
�
Press air distribution rocker switch5
(�page 164).
The indicator lamp on the U button
goes out.The current air distribution appears in
the air distribution display10.
Adjusting automatically
�
Press the U button.
The indicator lamp on the button
comes on. The air distribution and vol-
ume is adjusted automatically.
Adjusting center air outlets:
The thumbwheels for left2 and right6
center air outlets are automatically posi-
tioned for optimum interior airflow. In this
position, center air outlet4 and swiveling
left and right center outlets3 and5 are ful-
ly opened.Heating:
Only in manual mode is it possible to lower
the temperature in the headroom by regu-
lating the cold-airflow using thumbwheel7
(
�page 162).
Windshield fogged on the outside
�
Switch the windshield wipers on.
�
Press the U button.
Adjusting air volume
Adjusting manually
Five blower speeds are available.�
Press˜ to decrease orQ to in-
crease air volume to the desired level.
The
Auto
display disappears and the
automatic mode is switched off. The
selected blower speed is shown in the
display.
Symbol
Function
a
Directs air through the
center, side and rear
passenger compartment
air outlets
Z
Directs air to the win-
dows
X
Directs air into the entire
vehicle interior
Y
Directs air to the foot-
wells
ProCarManuals.com
Page 167 of 399

167 Controls in detail
Climate control
Adjusting automatically�
Press the U button.
The air volume is adjusted automatical-
ly.
Maximum cooling MAX COOL
If the left air distribution/airflow volume
control15 (
�page 164) is set to U and
there is a high need for cooling, the display
"MAX COOL"4 (�page 164) appears in
the climate control.
This provides the fastest possible cooling
of the vehicle interior (when windows and
sliding/pop-up roof are closed).
Defrosting
Activating�
Press buttonP.
The indicator lamp on the button
comes on.
or
�
Switch off air recirculation, if selected.
Press buttonO.
The indicator lamp on the button goes
out.
�
Close center air outlets.
�
Open left and right side air outlets and
adjust side air outlets upwards.
Deactivating
�
Press buttonP.The indicator lamp on the button goes
out. Defrosting is turned off.
Air recirculation mode
Switch to air recirculation mode to prevent
unpleasant odors from entering the vehicle
from the outside. This setting cuts off the
intake of outside air and recirculates the
air in the passenger compartment.
iThese settings should only be selected
for a short time.
Warning!
G
When the outside temperature is below
41°F (5°C), only switch to air recirculation
mode for short periods to prevent window
fogging.
ProCarManuals.com
Page 174 of 399
174 Controls in detailAutomatic climate control*
1
Air distribution, left
2
Windshield defroster
3
Temperature rocker switch, left
4
Display
5
Temperature rocker switch, right
6
Rear window defroster
7
Air distribution, right
8
Automatic air distribution, right and
blower speed
9
Activated charcoal filter
10
Rear air-conditioning remote con-
trol
11
Increase airflow
12
On/off
13
Decrease airflow
14
Economy mode (no cooling)
Residual heat
15
Air recirculation button
16
Automatic air distribution, left and
blower speed
ProCarManuals.com
Page 177 of 399

177 Controls in detail
Automatic climate control*
Adjusting air distribution
Adjusting manually�
Turn air distribution controls1 and7
(�page 174) to manually adjust to the
desired air distribution on each side of
the passenger compartment.
The indicator lamp in the U button
goes out.The following pages use symbol set 1 to
explain the operation of the air distribution
control. Please see above chart for refer-
ence to the corresponding function of sym-
bol set 2 should your vehicle show those
on the air distribution control switch.
Adjusting automatically
�
Press left or right U button again.
The indicator lamp in the U button
illuminates. The air distribution is ad-
justed automatically
Windshield fogged on the outside
�
Switch the windshield wipers on.
�
Press the left or right U button.
Adjusting air volume
Adjusting manually
Nine blower speeds are available.�
Press˜ to decrease or Q to in-
crease air volume to the desired level.
The
Auto
display disappears and the
automatic mode is switched off. The
selected blower speed is shown in the
display.
Adjusting automatically
�
Press left or right U button.
The air volume is adjusted automatical-
ly.
Maximum cooling MAX COOL
If the left and right air distribution controls
as well as the airflow volume control are
set toU and there is a high need for
cooling, the display "MAX COOL" appears
in the front and rear display.
Symbol
Function
Set 1
Set 2
Õ
a
Directs air through the
center, side and rear
passenger compartment
air outlets
Ô
Z
Directs air to the win-
dows
Ò
X
Directs air into the entire
vehicle interior
Ó
Y
Directs air to the foot-
wells
ProCarManuals.com