2003 LINCOLN AVIATOR clock
[x] Cancel search: clockPage 215 of 288

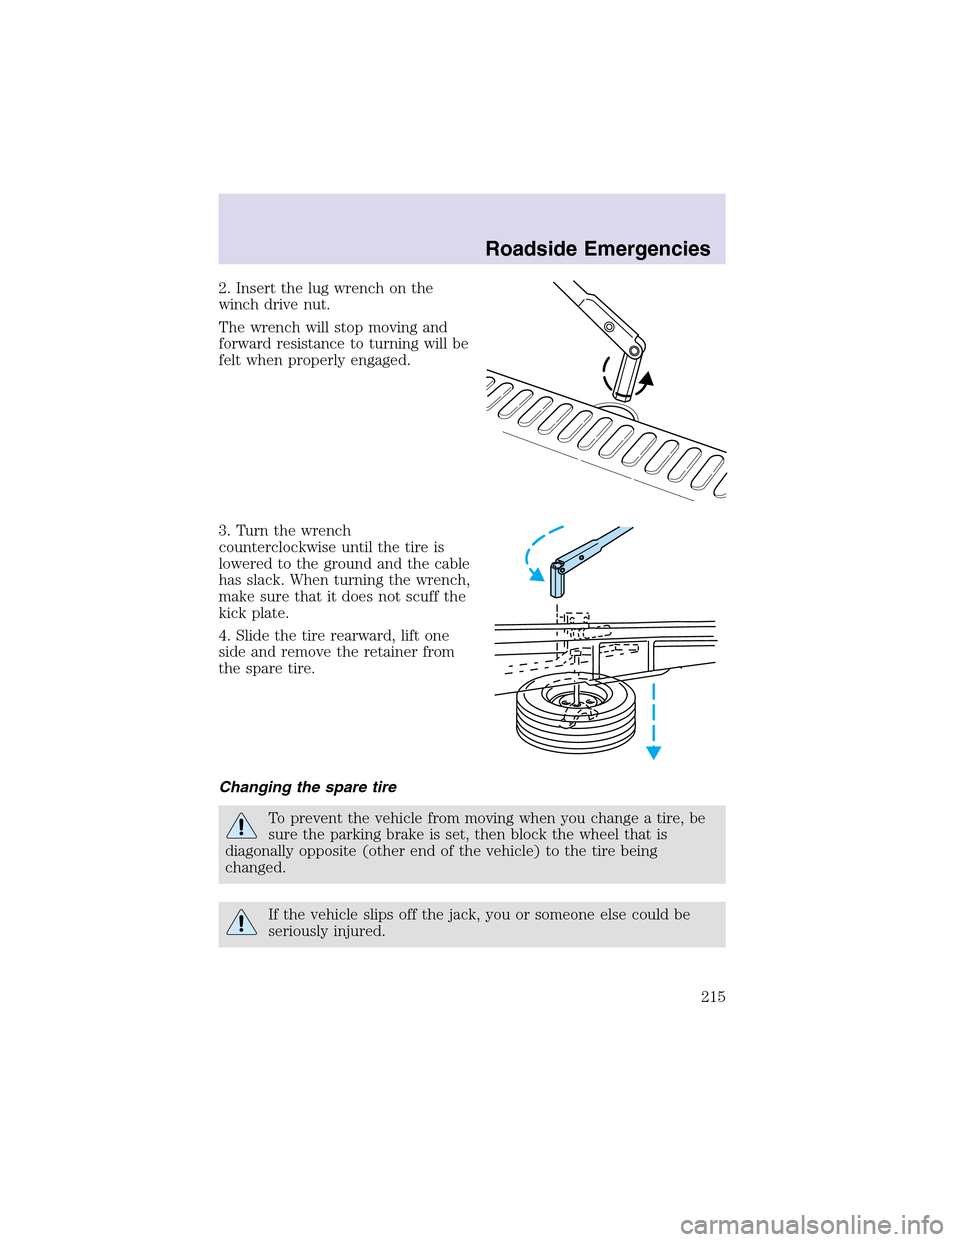
2. Insert the lug wrench on the
winch drive nut.
The wrench will stopmoving and
forward resistance to turning will be
felt when properly engaged.
3. Turn the wrench
counterclockwise until the tire is
lowered to the ground and the cable
has slack. When turning the wrench,
make sure that it does not scuff the
kick plate.
4. Slide the tire rearward, lift one
side and remove the retainer from
the spare tire.
Changing the spare tire
To prevent the vehicle from moving when you change a tire, be
sure the parking brake is set, then block the wheel that is
diagonally opposite (other end of the vehicle) to the tire being
changed.
If the vehicle slips off the jack, you or someone else could be
seriously injured.
Roadside Emergencies
215
Page 217 of 288

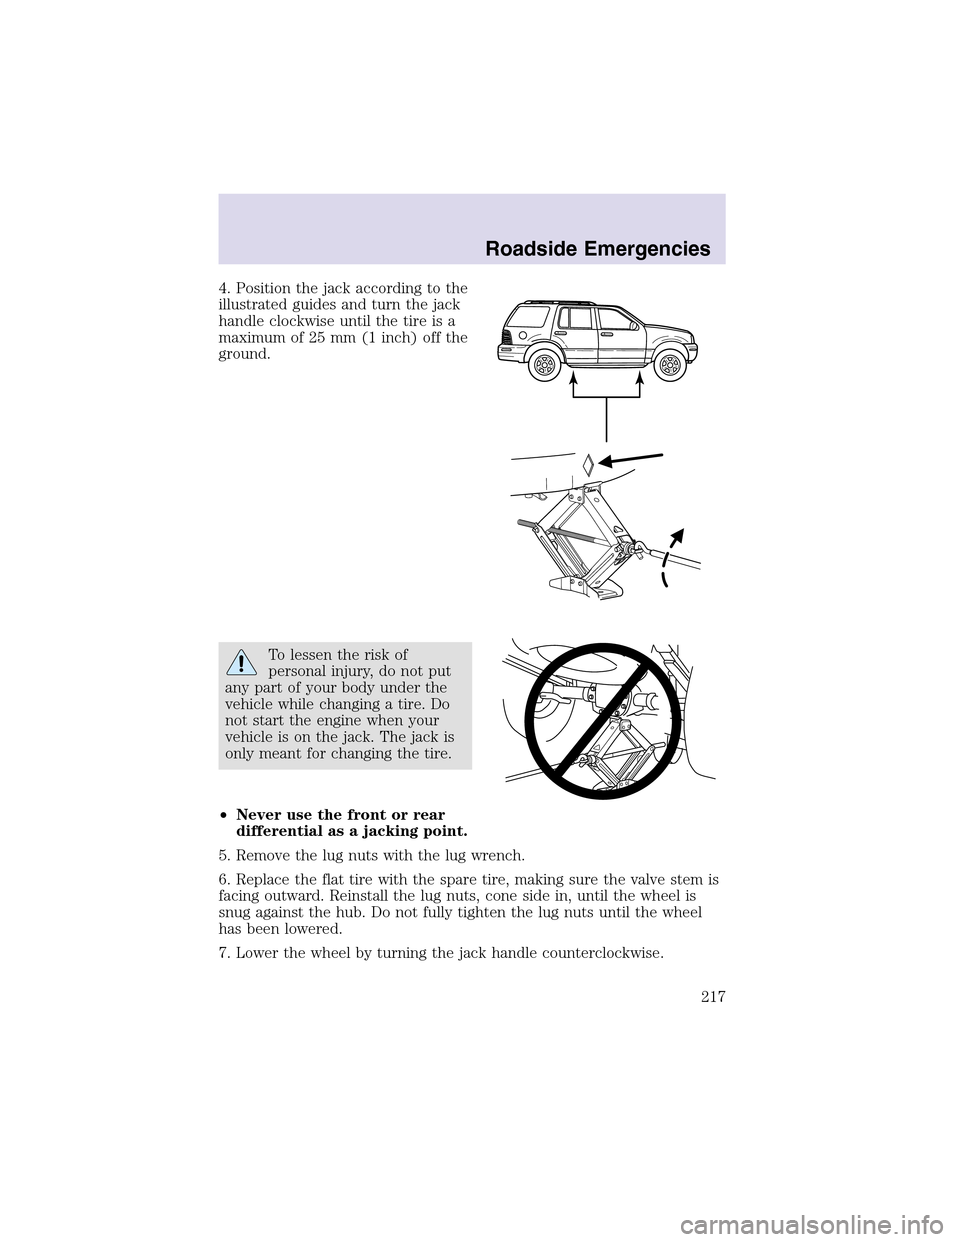
4. Position the jack according to the
illustrated guides and turn the jack
handle clockwise until the tire is a
maximum of 25 mm (1 inch) off the
ground.
To lessen the risk of
personal injury, do not put
any part of your body under the
vehicle while changing a tire. Do
not start the engine when your
vehicle is on the jack. The jack is
only meant for changing the tire.
•Never use the front or rear
differential as a jacking point.
5. Remove the lug nuts with the lug wrench.
6. Replace the flat tire with the spare tire, making sure the valve stem is
facing outward. Reinstall the lug nuts, cone side in, until the wheel is
snug against the hub. Do not fully tighten the lug nuts until the wheel
has been lowered.
7. Lower the wheel by turning the jack handle counterclockwise.
Roadside Emergencies
217
Page 218 of 288

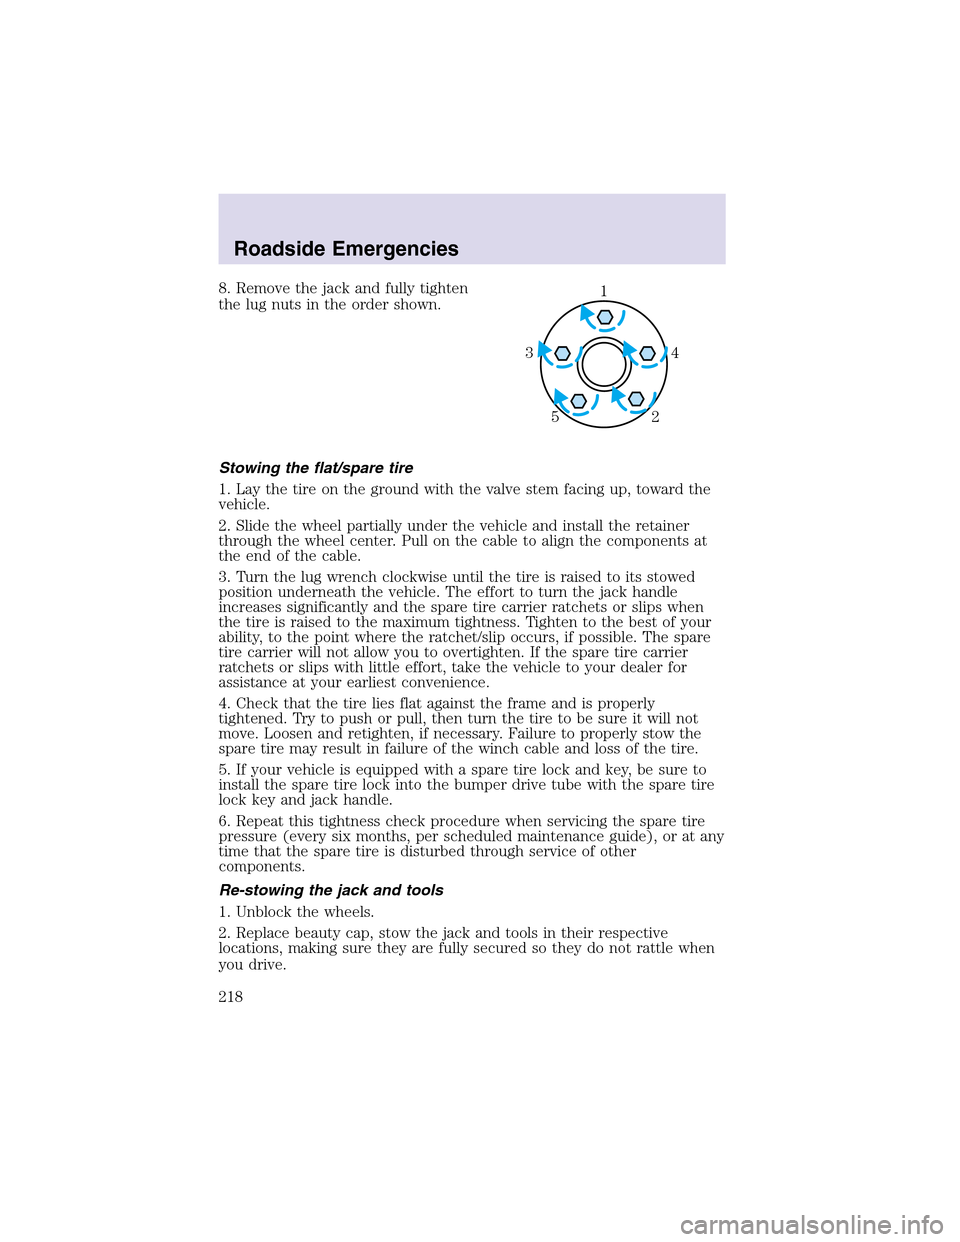
8. Remove the jack and fully tighten
the lug nuts in the order shown.
Stowing the flat/spare tire
1. Lay the tire on the ground with the valve stem facing up, toward the
vehicle.
2. Slide the wheel partially under the vehicle and install the retainer
through the wheel center. Pull on the cable to align the components at
the end of the cable.
3. Turn the lug wrench clockwise until the tire is raised to its stowed
position underneath the vehicle. The effort to turn the jack handle
increases significantly and the spare tire carrier ratchets or slips when
the tire is raised to the maximum tightness. Tighten to the best of your
ability, to the point where the ratchet/slip occurs, if possible. The spare
tire carrier will not allow you to overtighten. If the spare tire carrier
ratchets or slips with little effort, take the vehicle to your dealer for
assistance at your earliest convenience.
4. Check that the tire lies flat against the frame and is properly
tightened. Try to push or pull, then turn the tire to be sure it will not
move. Loosen and retighten, if necessary. Failure to properly stow the
spare tire may result in failure of the winch cable and loss of the tire.
5. If your vehicle is equipped with a spare tire lock and key, be sure to
install the spare tire lock into the bumper drive tube with the spare tire
lock key and jack handle.
6. Repeat this tightness check procedure when servicing the spare tire
pressure (every six months, per scheduled maintenance guide), or at any
time that the spare tire is disturbed through service of other
components.
Re-stowing the jack and tools
1. Unblock the wheels.
2. Replace beauty cap, stow the jack and tools in their respective
locations, making sure they are fully secured so they do not rattle when
you drive.1
4 3
2 5
Roadside Emergencies
218
Page 247 of 288

•If the oil level is below the MIN
mark, add enough oil to raise the
level within the MIN-MAX range.
•Oil levels above the MAX mark may cause engine damage. Some oil
must be removed from the engine by a service technician.
7. Put the indicator back in and ensure it is fully seated.
Adding engine oil
1. Check the engine oil. For instructions, refer toChecking the engine
oilin this chapter.
2. If the engine oil level is not within the normal range, add only certified
engine oil of the recommended viscosity. Remove the engine oil filler cap
and use a funnel to pour the engine oil into the opening.
3. Recheck the engine oil level. Make sure the oil level is not above the
MAX mark on the engine oil level indicator (dipstick).
4. Install the indicator and ensure it is fully seated.
5. Fully install the engine oil filler capby turning the filler capclockwise
1/4 of a turn until three clicks are heard or until the capis fully seated.
To avoid possible oil loss, DO NOT operate the vehicle with the
engine oil level indicator and/or the engine oil filler cap removed.
Maintenance and Specifications
247
Page 251 of 288

If the battery has been disconnected or a new battery has been installed,
the clock and the preset radio stations must be reset once the battery is
reconnected.
•Always dispose of automotive
batteries in a responsible manner.
Follow your local authorized
standards for disposal. Call your
local authorized recycling center
to find out more about recycling
automotive batteries.
ENGINE COOLANT
Checking engine coolant
The concentration and level of engine coolant should be checked at the
mileage intervals listed in the scheduled maintenance guide. The coolant
concentration should be maintained at 50/50 coolant and distilled water,
which equates to a freeze point of -36° C (-34° F). Coolant concentration
testing is possible with a hydrometer or antifreeze tester (such as the
Rotunda Battery and Antifreeze Tester, 014–R1060). The level of coolant
should be maintained at the “cold full” of “cold fill range” level in the
coolant reservoir. If the level falls below, refer to instructions in the
Adding engine coolantsection.
Your vehicle was factory-filled with a 50/50 engine coolant and water
concentration. If the concentration of coolant falls below 40% or above
60%, the engine parts could become damaged or not work properly.A
50–50 mixture of coolant and water provides the following:
•Freeze protection down to -36° C (-34° F).
•Boiling protection up to 129° C (265° F).
•Protection against rust and other forms of corrosion.
•Enables calibrated gauges to work properly.
LEAD
RETURN
RECYCLE
Maintenance and Specifications
251
Page 257 of 288

The flow of fuel through a fuel pump nozzle can produce static
electricity, which can cause a fire if fuel is pumped into an
ungrounded fuel container.
Use the following guidelines to avoid static build-upwhen filling an
ungrounded fuel container:
•Place approved fuel container on the ground.
•DO NOT fill a fuel container while it is in the vehicle (including the
cargo area).
•Keepthe fuel pumpnozzle in contact with the fuel container while
filling.
•DO NOT use a device that would hold the fuel pump handle in the fill
position.
Fuel Filler Cap
Your fuel tank filler caphas an indexed design with a 1/8 turn on/off
feature.
When fueling your vehicle:
1. Turn the engine off.
2. Carefully turn the filler capcounterclockwise 1/8 of a turn until it
stops.
3. Pull to remove the cap from the fuel filler pipe.
4. To install the cap, align the tabs on the cap with the notches on the
filler pipe.
5. Turn the filler capclockwise 1/8 of a turn until it stops.
“CHECK/TIGHTEN FUEL CAP” will display in the message center when
the fuel filler cap is not properly installed. Proper fuel filler cap
installation is checked automatically as the vehicle is driven, but not until
after some fuel is used (fuel gauge drops below full). Once the fuel filler
cap is properly secured, “CHECK/TIGHTEN FUEL CAP” will turn off
after a short period of driving.
If you must replace the fuel filler cap, replace it with a fuel filler
cap that is designed for your vehicle. The customer warranty may
be void for any damage to the fuel tank or fuel system if the
correct genuine Ford or Motorcraft fuel filler cap is not used.
Maintenance and Specifications
257
Page 282 of 288

Child safety restraints ..............151
child safety belts ....................151
Child safety seats ......................154
attaching with tether straps ..159
in front seat ............................156
in rear seat ..............................156
Cleaning your vehicle
engine compartment ..............237
instrument panel ....................239
interior .............................239–240
interior trim ............................240
plastic parts ............................238
washing ....................................236
waxing .....................................236
wheels ......................................237
wiper blades ............................238
Clock ................................27, 38, 69
Compass, electronic
set zone adjustment .................87
Console ........................................99
overhead ..............................67–68
rear ............................................99
Controls
power seat ...............................123
steering column ........................80
Coolant
checking and adding ..............251
coolant temperature light ........13
refill capacities ................253, 270
specifications ..................273, 275
Cruise control
(see Speed control) ....................76
Customer Assistance ................200
Ford accessories for
your vehicle ....................241, 278
Ford Extended Service
Plan ..........................................228
Getting assistance outside
the U.S. and Canada ..............232Getting roadside assistance ...200
Getting the service
you need .................................226
Ordering additional
owner’s literature ...................233
The Dispute Settlement
Board .......................................229
Utilizing the Mediation/
Arbitration Program ...............232
D
Daytime running lamps
(see Lamps) ................................52
Defrost
rear window ..............................49
Dipstick
automatic transmission
fluid ..........................................265
engine oil .................................245
Doors
door ajar warning .....................14
lubricant specifications ..........273
Driving under special
conditions ..........................184, 187
sand .........................................186
snow and ice ...........................188
through water .................186, 190
Dual automatic temperature
control (DATC) ...........................41
E
Electronic message center .........86
Emergencies, roadside
jump-starting ..........................219
Emission control system ..........263
Engine ........................................275
check engine/service engine
soon light ..................................10
Index
282