2003 INFINITI G35 ECO mode
[x] Cancel search: ECO modePage 49 of 256
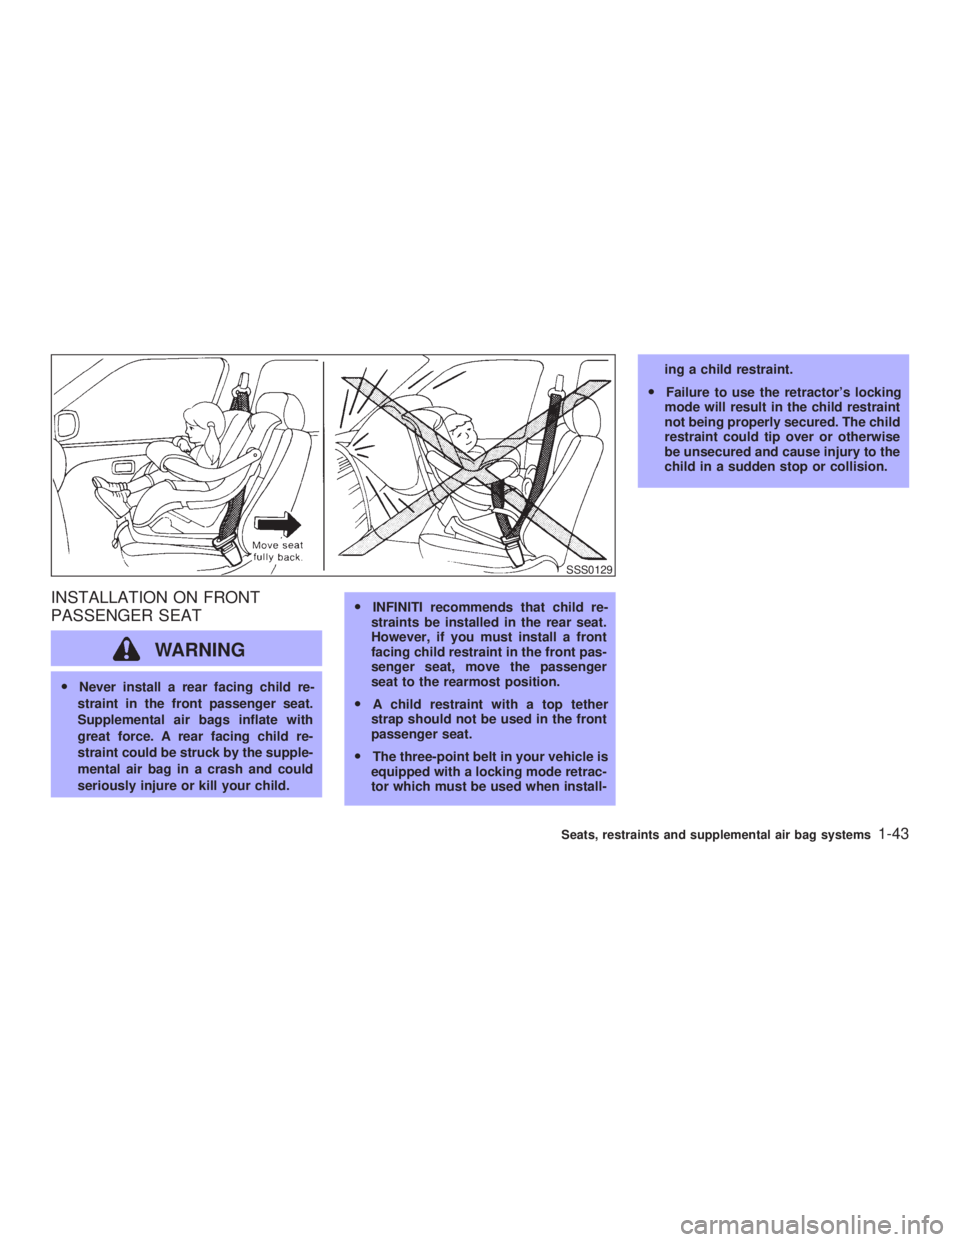
INSTALLATION ON FRONT
PASSENGER SEAT
WARNINGO Never install a rear facing child re-
straint in the front passenger seat.
Supplemental air bags inflate with
great force. A rear facing child re-
straint could be struck by the supple-
mental air bag in a crash and could
seriously injure or kill your child. O INFINITI recommends that child re-
straints be installed in the rear seat.
However, if you must install a front
facing child restraint in the front pas-
senger seat, move the passenger
seat to the rearmost position.
O A child restraint with a top tether
strap should not be used in the front
passenger seat.
O The three-point belt in your vehicle is
equipped with a locking mode retrac-
tor which must be used when install- ing a child restraint.
O Failure to use the retractor's locking
mode will result in the child restraint
not being properly secured. The child
restraint could tip over or otherwise
be unsecured and cause injury to the
child in a sudden stop or collision. SSS0129
Seats, restraints and supplemental air bag systems
1-43
Z 02.7.29/V35-D/V5.0
X
Page 79 of 256

only. The use of the cigarette lighter
socket as a power source for any other
accessory is not recommended.
INSTRUMENT POCKET (Except for
Navigation system equipped
models)
WARNING The instrument pocket should not be
used while driving so full attention may
be given to vehicle operation. POCKET (Manual transmission
model) SIC1843 SIC2026
STORAGE
Instruments and controls
2-25
Z 02.7.29/V35-D/V5.0
X
Page 93 of 256
programmed HomeLink button - releasing
when the device begins to activate.
5. If the indicator light on the HomeLink
blinks rapidly for two seconds and then
turns solid, HomeLink has picked up a
ªrolling codeº garage door opener signal.
You will need to proceed with the next steps
to train the HomeLink to complete the
programming which may require a ladder
and another person for convenience.
6. Press and release the ªsmartº or ªlearnº
program button located on the garage door
opener's motor to activate the ªtraining
modeº. This button is usually located near
the antenna wire that hangs down from the
motor. If the wire originates from under a
light lens, you will need to remove the lens
to access the program button.
NOTE:
Once you have pressed and released the
program button on the garage door open-
er's motor and the ªtraining lightº is lit, you
have 30 seconds in which to perform step
7. Use the help of a second person for
convenience to assist when performing
this step.
7. Quickly within 30 seconds of pressing and
releasing the garage door opener program button, firmly press and release the
HomeLink button you've just pro-
grammed. Press and release the
HomeLink button up to three times to
complete the training.
8. Your HomeLink button should now be
programmed. (To program the remaining
HomeLink buttons for additional door or
gate openers, follow steps 2-8 only.
NOTE:
Do not repeat step one unless you want to
ªclearº all previously programmed
HomeLink buttons).
If you have any questions or are having diffi-
culty programming your HomeLink buttons,
please refer to the HomeLink web site at:
www.homelink.com or call 1-800-662-6200.
PROGRAMMING HomeLink FOR
CANADIAN CUSTOMERS Prior to 1992, D.O.C. regulations required
hand-held transmitters to stop transmitting af-
ter 2 seconds. To program your hand-held
transmitter to HomeLink , continue to press
and hold the HomeLink button (note steps 2
through 4 under ªProgramming HomeLink º)
while you press and re-press (ªcycleº) your
hand-held transmitter every 2 seconds until the indicator light flashes rapidly (indicating
successful programming).
NOTE:
If programming a garage door opener, etc.,
it is advised to unplug the device during
the ªcyclingº process to prevent possible
damage to the garage door opener compo-
nents.
OPERATING THE HomeLink
UNIVERSAL TRANSCEIVER The HomeLink Universal Transceiver (once
programmed) may now be used to activate the
garage door, etc. To operate, simply press the
appropriate programmed HomeLink Univer-
sal Transceiver button. The red indicator light
will illuminate while the signal is being trans-
mitted.
PROGRAMMING TROUBLE
DIAGNOSIS If the HomeLink does not quickly learn the
hand-held transmitter information:
O replace the hand-held transmitter batteries
with new batteries.
O position the hand-held transmitter with its
battery area facing away from the
HomeLink surface. Instruments and controls
2-39
Z 02.7.29/V35-D/V5.0
X
Page 99 of 256
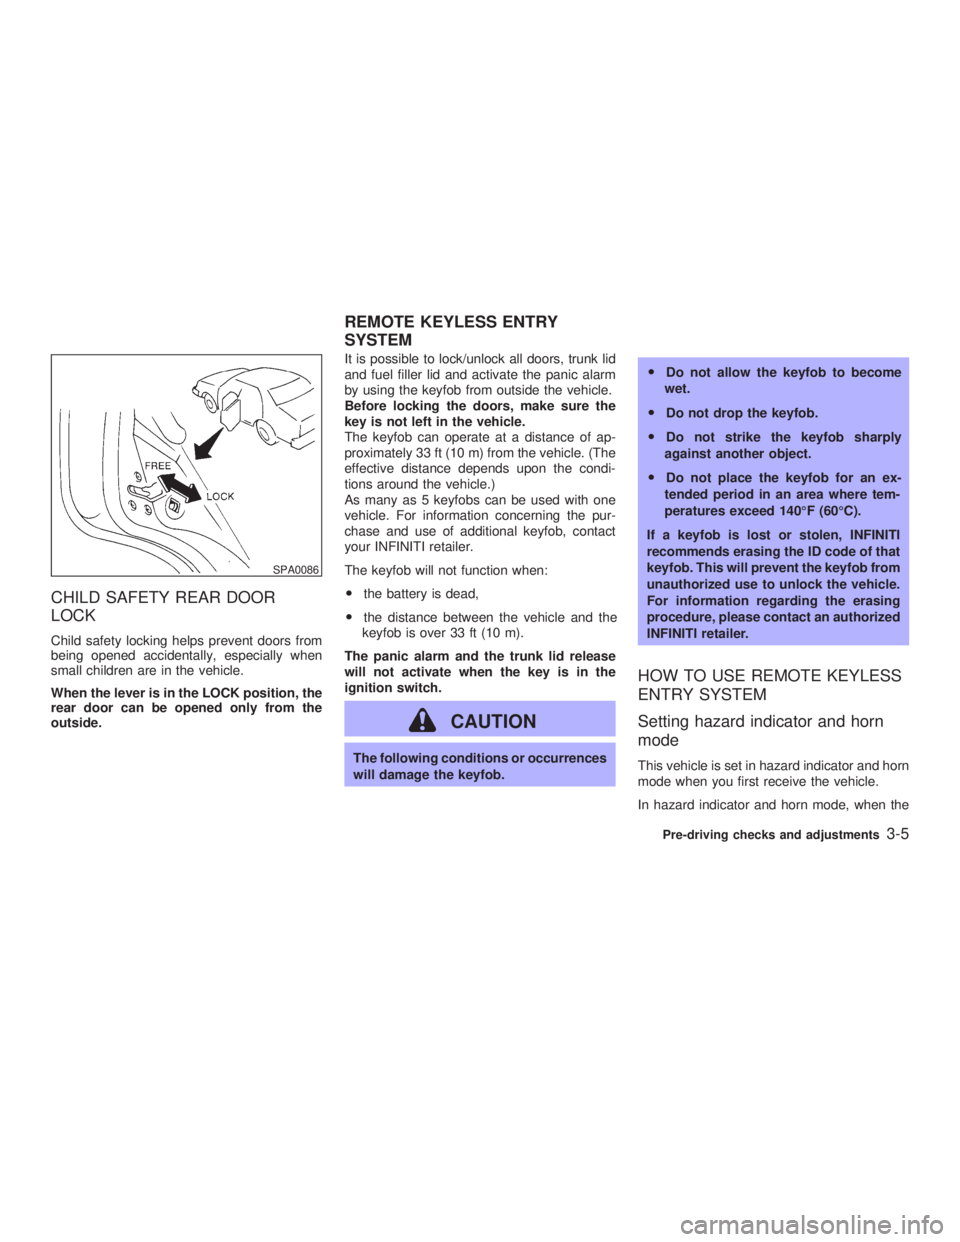
CHILD SAFETY REAR DOOR
LOCK Child safety locking helps prevent doors from
being opened accidentally, especially when
small children are in the vehicle.
When the lever is in the LOCK position, the
rear door can be opened only from the
outside. It is possible to lock/unlock all doors, trunk lid
and fuel filler lid and activate the panic alarm
by using the keyfob from outside the vehicle.
Before locking the doors, make sure the
key is not left in the vehicle.
The keyfob can operate at a distance of ap-
proximately 33 ft (10 m) from the vehicle. (The
effective distance depends upon the condi-
tions around the vehicle.)
As many as 5 keyfobs can be used with one
vehicle. For information concerning the pur-
chase and use of additional keyfob, contact
your INFINITI retailer.
The keyfob will not function when:
O the battery is dead,
O the distance between the vehicle and the
keyfob is over 33 ft (10 m).
The panic alarm and the trunk lid release
will not activate when the key is in the
ignition switch.
CAUTION The following conditions or occurrences
will damage the keyfob. O Do not allow the keyfob to become
wet.
O Do not drop the keyfob.
O Do not strike the keyfob sharply
against another object.
O Do not place the keyfob for an ex-
tended period in an area where tem-
peratures exceed 140ÉF (60ÉC).
If a keyfob is lost or stolen, INFINITI
recommends erasing the ID code of that
keyfob. This will prevent the keyfob from
unauthorized use to unlock the vehicle.
For information regarding the erasing
procedure, please contact an authorized
INFINITI retailer.
HOW TO USE REMOTE KEYLESS
ENTRY SYSTEM
Setting hazard indicator and horn
mode This vehicle is set in hazard indicator and horn
mode when you first receive the vehicle.
In hazard indicator and horn mode, when theSPA0086
REMOTE KEYLESS ENTRY
SYSTEM
Pre-driving checks and adjustments
3-5
Z 02.7.29/V35-D/V5.0
X
Page 101 of 256
is open. However, the hazard indicator
and horn will not function.
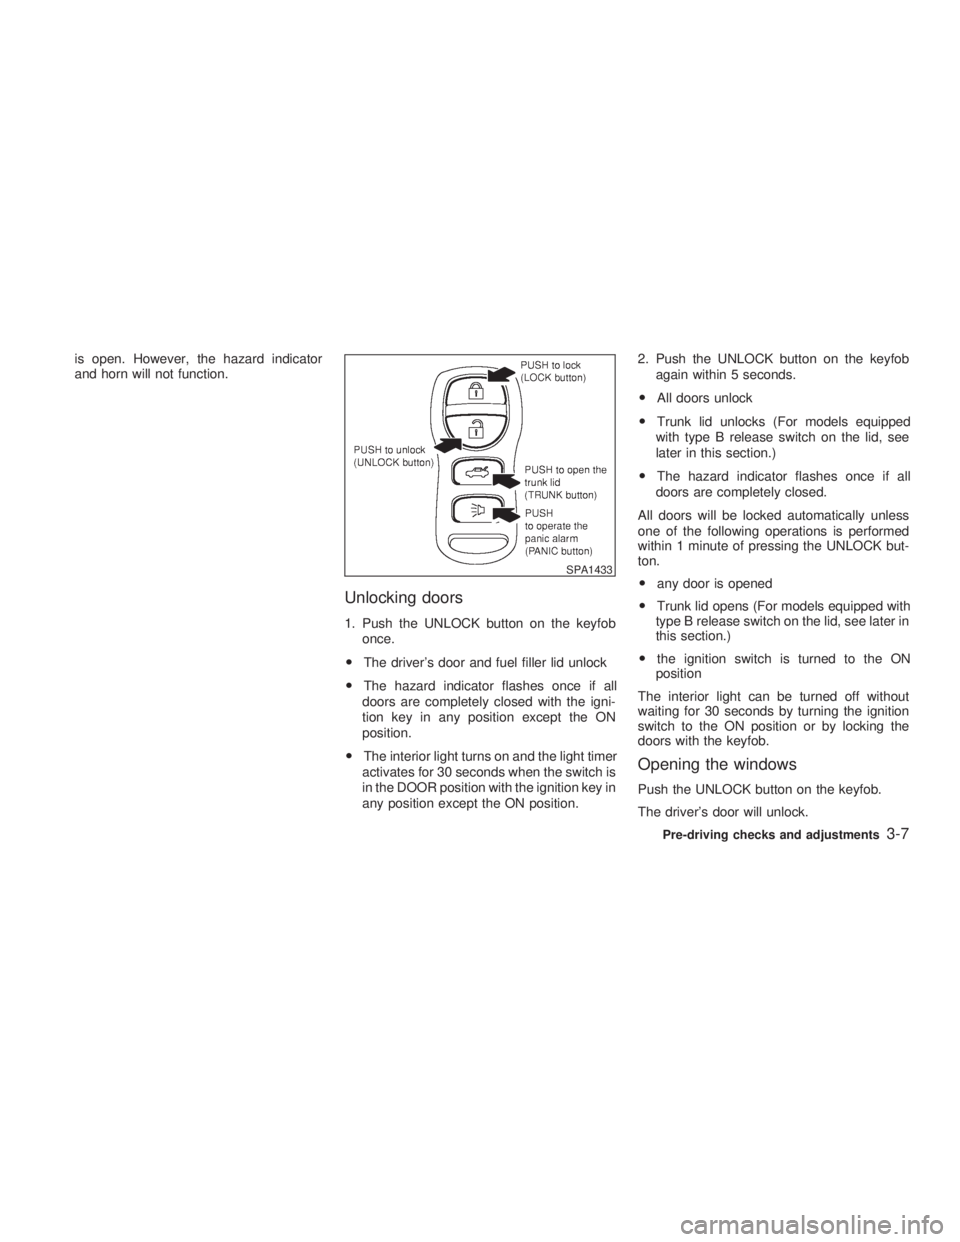
Unlocking doors 1. Push the UNLOCK button on the keyfob
once.
O The driver's door and fuel filler lid unlock
O The hazard indicator flashes once if all
doors are completely closed with the igni-
tion key in any position except the ON
position.
O The interior light turns on and the light timer
activates for 30 seconds when the switch is
in the DOOR position with the ignition key in
any position except the ON position. 2. Push the UNLOCK button on the keyfob
again within 5 seconds.
O All doors unlock
O Trunk lid unlocks (For models equipped
with type B release switch on the lid, see
later in this section.)
O The hazard indicator flashes once if all
doors are completely closed.
All doors will be locked automatically unless
one of the following operations is performed
within 1 minute of pressing the UNLOCK but-
ton.
O any door is opened
O Trunk lid opens (For models equipped with
type B release switch on the lid, see later in
this section.)
O the ignition switch is turned to the ON
position
The interior light can be turned off without
waiting for 30 seconds by turning the ignition
switch to the ON position or by locking the
doors with the keyfob.
Opening the windows Push the UNLOCK button on the keyfob.
The driver's door will unlock. SPA1433
Pre-driving checks and adjustments
3-7
Z 02.7.29/V35-D/V5.0
X
Page 114 of 256

any positions other than ON.
4. Push the SET switch and, within 5 seconds,
push the memory switch 1 or 2 fully for at
least 1 second.
The indicator light for the pushed memory
switch will come on and stay on for approxi-
mately 5 seconds after pushing the switch.
After the indicator light goes off, the se-
lected positions are stored in the selected
memory (1 or 2).
If memory is stored in the same memory
switch, the previous memory will be de-
leted.
Confirming memory storage O Turn the ignition ON and push the SET
switch. If the main memory has not been
stored, the indicator light will come on for
approximately 0.5 seconds. When the
memory has stored the position, the indica-
tor light will stay on for approximately 5
seconds.
O If the battery cable is disconnected, or if the
fuse blows, the memory will be canceled. In
such a case, reset the desired positions
using the following procedures.
1. Open and close the driver's door more than two times with the ignition key in the LOCK
position.
2. Reset the desired position using the previ-
ous procedure.
Selecting the memorized position 1. A/T models:
Set the automatic transmission selector le-
ver to the P (Park) position.
M/T models:
Apply the parking brake securely when the
vehicle is stopped.
2. Turn the ignition ON.
3. Push the memory switch 1 or 2 fully for at
least 1 second.
The driver's seat will move to the memo-
rized position with the indicator light flash-
ing. Then the light will stay on for approxi-
mately 5 seconds.
When memory switch 1 or 2 is pushed with the
driver's door open and then the key inserted
into the ignition switch within approximately 1
minute, the driver's seat will move to the
memorized position. (AT models only) System operation The automatic drive positioner system will not
work or will stop operating under the following
conditions:
O when the vehicle speed is above 4 MPH (7
km/h).
O when any two or more of the memory
switches are simultaneously pressed while
the automatic drive positioner is operating.
O when the adjusting switch for the driver's
seat is turned on while the automatic drive
positioner is operating.
O when the cancel switch is pushed to cancel.
O when the memory switch 1 or 2 is not
pushed for at least 1 second.
O when the seat has already been moved to
the memorized position.
O when no seat position is stored in the
memory switch.
O when the parking brake is not applied. Ð
M/T models
O when the vehicle speed is above 4 MPH (7
km/h) while the parking brake is applied. Ð
M/T models
To restart the drive positioner system,
move the parking brake to off and on.
3-20 Pre-driving checks and adjustments
Z 02.7.29/V35-D/V5.0
X
Page 119 of 256
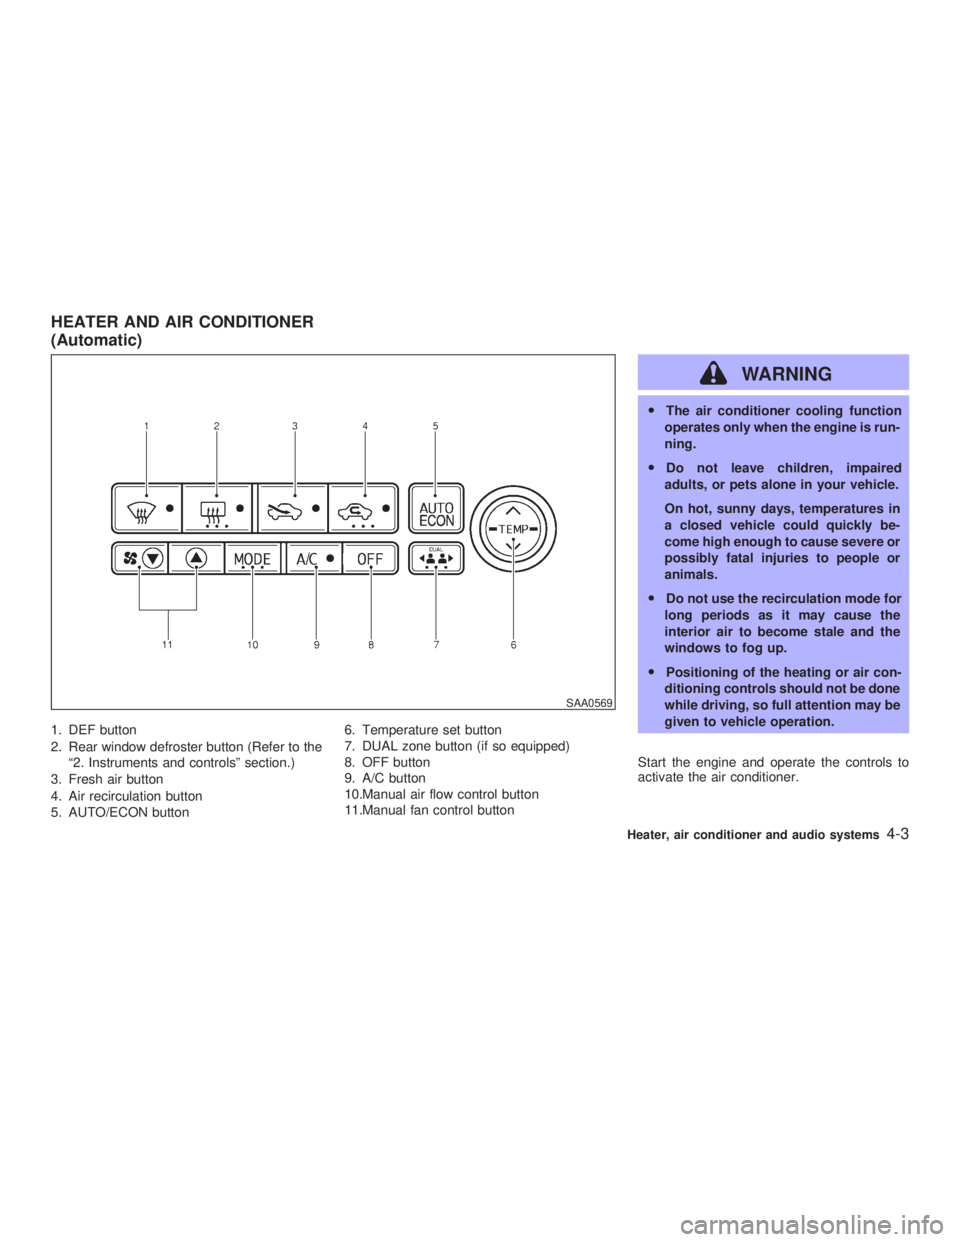
1. DEF button
2. Rear window defroster button (Refer to the
ª2. Instruments and controlsº section.)
3. Fresh air button
4. Air recirculation button
5. AUTO/ECON button 6. Temperature set button
7. DUAL zone button (if so equipped)
8. OFF button
9. A/C button
10.Manual air flow control button
11.Manual fan control button WARNING O The air conditioner cooling function
operates only when the engine is run-
ning.
O Do not leave children, impaired
adults, or pets alone in your vehicle.
On hot, sunny days, temperatures in
a closed vehicle could quickly be-
come high enough to cause severe or
possibly fatal injuries to people or
animals.
O Do not use the recirculation mode for
long periods as it may cause the
interior air to become stale and the
windows to fog up.
O Positioning of the heating or air con-
ditioning controls should not be done
while driving, so full attention may be
given to vehicle operation.
Start the engine and operate the controls to
activate the air conditioner. SAA0569HEATER AND AIR CONDITIONER
(Automatic)
Heater, air conditioner and audio systems
4-3
Z 02.7.29/V35-D/V5.0
X
Page 120 of 256
AUTOMATIC OPERATION
Cooling and/or dehumidified heating
(AUTO) This mode may be normally used all year
round as the system automatically works to
keep a constant temperature. Air flow distribu-
tion and fan speed are also controlled auto-
matically.
1. Push the AUTO/ECON button on. (AUTO
will be displayed.)
2. If the A/C button indicator is off, push the
A/C button to activate air conditioner. The
A/C button indicator will come on.
3. Push the temperature set button to set the
desired temperature.
O Adjust the temperature to about 75ÉF
(24ÉC) for normal operation.
O The temperature of the passenger compart-
ment will be maintained automatically. Air
flow distribution and fan speed are also
controlled automatically.
Economical operation (ECON) Economical operation reduces some load to
the engine to improve the fuel economy. It
allows higher humidity than normal operation. Pushing the AUTO/ECON button changes op-
erations as follows while the A/C button indi-
cator is on. AUTO ! ECON ! AUTO
Heating (A/C off) The air conditioner does not activate. When
you need to heat only, use this mode.
1. Push the AUTO button. (AUTO will be
displayed.)
2. Push the A/C button to turn off the air
conditioner. The A/C button indicator will
turn off.
3. Push the temperature set button to set the
desired temperature.
O The temperature of the passenger compart-
ment will be maintained automatically. Air
flow distribution and fan speed are also
controlled automatically.
O Do not set the temperature lower than the
outside air temperature. Otherwise the sys-
tem may not work properly.
O Not recommended if windows fog up.
Dehumidified defrosting or defogging 1. Push the DEF button on. (The indica-
tor light on the button will come on.) 2. Push the temperature set button to set the
desired temperature.
O To quickly remove ice from the outside of
the windows, push the manual fan control
button m and set to the maximum position.
O As soon as possible after the windshield is
clean, push the AUTO button to return to
the auto mode.
O When the DEF button is pushed, the
air conditioner will automatically be turned
on at outside temperatures above 23ÉF
(þ5ÉC) to defog the windshield, and the air
recirculate mode will automatically be
turned off.
Outside air is drawn into the passenger
compartment to improve the defogging per-
formance.
MANUAL OPERATION
Fan speed control Push the fan control button . or m to manually
control the fan speed.
Push the AUTO button to return to automatic
control of the fan speed.
Fresh air Push the fresh air button to draw outside
4-4 Heater, air conditioner and audio systems
Z 02.7.29/V35-D/V5.0
X