2003 Hyundai H-1 (Grand Starex) 4WD
[x] Cancel search: 4WDPage 132 of 173

IN CASE OF EMERGENCY
IN CASE OF EMERGENCY IN CASE OF EMERGENCY
IN CASE OF EMERGENCY
IN CASE OF EMERGENCY
4-17
1) Horizontal line dimension from ground
MINIBUS 2WD:849 mm (33.43 in.) 4WD:972 mm (38.27 in.)
VAN(2WD) : 855 mm (33.66 in.)
TRUCK Long Wheel base
:847 mm (33.35 in.)Extra long Wheel base:845 mm (33.27 in.)
2) Distance between each vertical line.
MINIBUS/VAN(2WD/4WD):1300mm (51.18 in.)
TRUCK (Long wheel base/Extra long
wheel base) : 1272 mm (50.08 in.)
3) Distance between the headlights and the wall that the lights are tested against: 3000 mm (118.11 in)
And then, draw the parallel line at 30 mm (1.18 in.) place under the horizontal line.
7. Adjust each cut-off line of the low beam to the parallel line with a phillips screwdriver - VERTICAL AIMING
8. Adjust each cut-off line of the low beam to the each vertical line with a phillips screw- driver - HORIZONTAL AIMING.
G290A03P-AATHEADLIGHT AIMING ADJUSTMENT
HEADLIGHT AIMING ADJUSTMENT HEADLIGHT AIMING ADJUSTMENT
HEADLIGHT AIMING ADJUSTMENT
HEADLIGHT AIMING ADJUSTMENT
G290A01P-1
Before performing aiming adjustment, make sure of the following.
1. Keep all tires inflated to the correct pres- sure.
2. Place the vehicle on level ground and press the front bumper & rear bumper down sev-eral times.
3. See that the vehicle is unloaded (except for full levels of coolant, engine oil and fuel, andspare tire, jack, and tools).
4. Clean the head lights lens and turn on the headlight (Low beam).
5. Open the hood.
6. Draw the vertical line (through the center of each headlight) and the horizontal line (through the center of each headlight) on theaiming screen.
Horizontalaiming
Verticalaiming
G270A01S-AAT
HEADLIGHT BULB
HEADLIGHT BULB HEADLIGHT BULB
HEADLIGHT BULB
HEADLIGHT BULB
Replacement instructions:
Replacement instructions: Replacement instructions:
Replacement instructions:
Replacement instructions:
1. Allow the bulb to cool. Wear eye protection.
2. Always grasp the bulb by its plastic base,
avoid touching the glass.
3. Disconnect the power cord from the bulb base in the back of the headlight.
4. Push the bulb spring for removing the head- light bulb.
5. Remove the protective cap from the re- placement bulb and install the new bulb by matching the plastic base with the headlighthole. Retighten the bulb spring and recon-nect the power cord.
6. Use the protective cap and carton to dis- pose of the old bulb.
7. Check for proper headlight aim.
WARNING
WARNING WARNING
WARNING
WARNING
This halogen bulb contains gas under pres-
This halogen bulb contains gas under pres- This halogen bulb contains gas under pres-
This halogen bulb contains gas under pres-
This halogen bulb contains gas under pres- sure and if impacted could shatter, resulting
sure and if impacted could shatter, resulting sure and if impacted could shatter, resulting
sure and if impacted could shatter, resulting
sure and if impacted could shatter, resulting
in flying fragments. Always wear eye pro-
in flying fragments. Always wear eye pro- in flying fragments. Always wear eye pro-
in flying fragments. Always wear eye pro-
in flying fragments. Always wear eye pro-
tection when servicing the bulb. Protect the
tection when servicing the bulb. Protect the tection when servicing the bulb. Protect the
tection when servicing the bulb. Protect the
tection when servicing the bulb. Protect the
bulb against abrasions or scratches and
bulb against abrasions or scratches and bulb against abrasions or scratches and
bulb against abrasions or scratches and
bulb against abrasions or scratches and
against liquids when lighted. Turn on the
against liquids when lighted. Turn on the against liquids when lighted. Turn on the
against liquids when lighted. Turn on the
against liquids when lighted. Turn on the
bulb only when installed in a headlight. Re-
bulb only when installed in a headlight. Re- bulb only when installed in a headlight. Re-
bulb only when installed in a headlight. Re-
bulb only when installed in a headlight. Re-
place the headlight if damaged or cracked.
place the headlight if damaged or cracked. place the headlight if damaged or cracked.
place the headlight if damaged or cracked.
place the headlight if damaged or cracked.
Keep the bulb out of the reach of children
Keep the bulb out of the reach of children Keep the bulb out of the reach of children
Keep the bulb out of the reach of children
Keep the bulb out of the reach of children
and dispose of the used bulb with care.
and dispose of the used bulb with care. and dispose of the used bulb with care.
and dispose of the used bulb with care.
and dispose of the used bulb with care.
Page 133 of 173

IN CASE OF EMERGENCY
IN CASE OF EMERGENCY IN CASE OF EMERGENCY
IN CASE OF EMERGENCY
IN CASE OF EMERGENCY
4-18 E130D01P-GAT
Front combination lamps
Front combination lamps Front combination lamps
Front combination lamps
Front combination lamps
Remove the bezel attaching screw from the front combination lamp. Then turn the bulb socket counterclockwise to remove it. To remove the bulb of the side turn-signal lamps, turn the bulb counterclockwise whilepressing it inward.
E130A01P-1
Truck
Minbus/Van
E130C01P-1
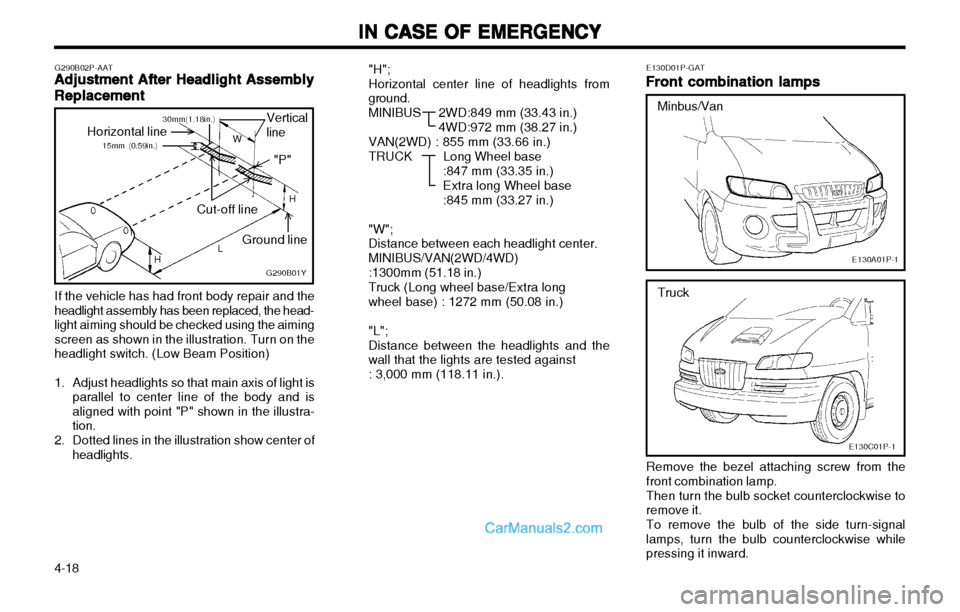
"H"; Horizontal center line of headlights from ground.
MINIBUS 2
WD:849 mm (33.43 in.)
4WD:972 mm (38.27 in.)
VAN(2WD) : 855 mm (33.66 in.)
TRUCK Long Wheel base
:847 mm (33.35 in.) Extra long Wheel base:845 mm (33.27 in.)
"W"; Distance between each headlight center. MINIBUS/VAN(2WD/4WD):1300mm (51.18 in.)Truck (Long wheel base/Extra longwheel base) : 1272 mm (50.08 in.) "L"; Distance between the headlights and the wall that the lights are tested against : 3,000 mm (118.11 in.).
If the vehicle has had front body repair and the
headlight assembly has been replaced, the head- light aiming should be checked using the aimingscreen as shown in the illustration. Turn on theheadlight switch. (Low Beam Position)
1. Adjust headlights so that main axis of light is parallel to center line of the body and is aligned with point "P" shown in the illustra-tion.
2. Dotted lines in the illustration show center of headlights.
G290B02P-AAT
Adjustment After Headlight Assembly
Adjustment After Headlight Assembly Adjustment After Headlight Assembly
Adjustment After Headlight Assembly
Adjustment After Headlight Assembly
Replacement
Replacement Replacement
Replacement
Replacement
G290B01Y
Vertical line
Cut-off line Ground line
Horizontal line
LW
H
H "P"
15mm (0.59in.)30mm(1.18in.)
Page 168 of 173

VEHICLE SPECIFICATIONS
VEHICLE SPECIFICATIONS VEHICLE SPECIFICATIONS
VEHICLE SPECIFICATIONS
VEHICLE SPECIFICATIONS
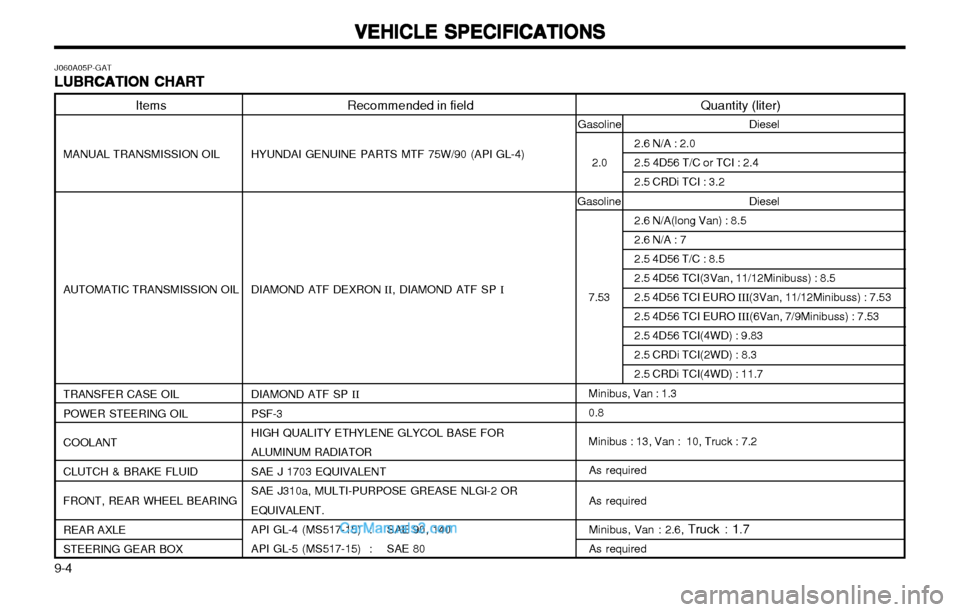
9-4 Quantity (liter)
Minibus, Van : 1.3 0.8
Minibus : 13, Van : 10, Truck : 7.2 As required As required
Minibus, Van : 2.6, Truck : 1.7
As required Diesel
2.6 N/A(long Van) : 8.5 2.6 N/A : 72.5 4D56 T/C : 8.52.5 4D56 TCI(3Van, 11/12Minibuss) : 8.52.5 4D56 TCI EURO III(3Van, 11/12Minibuss) : 7.53
2.5 4D56 TCI EURO III(6Van, 7/9Minibuss) : 7.53
2.5 4D56 TCI(4WD) : 9.832.5 CRDi TCI(2WD) : 8.32.5 CRDi TCI(4WD) : 11.7
Recommended in field
HYUNDAI GENUINE PARTS MTF 75W/90 (API GL-4) DIAMOND ATF DEXRON II, DIAMOND ATF SP I
DIAMOND ATF SP II
PSF-3 HIGH QUALITY ETHYLENE GLYCOL BASE FOR ALUMINUM RADIATORSAE J 1703 EQUIVALENTSAE J310a, MULTI-PURPOSE GREASE NLGI-2 OREQUIVALENT.
API GL-4 (MS517-15) : SAE 90, 140
API GL-5 (MS517-15) : SAE 80
Items
MANUAL TRANSMISSION OIL AUTOMATIC TRANSMISSION OIL TRANSFER CASE OIL POWER STEERING OIL COOLANT CLUTCH & BRAKE FLUIDFRONT, REAR WHEEL BEARING REAR AXLE STEERING GEAR BOX
Gasoline 2.0 Diesel
2.6 N/A : 2.0 2.5 4D56 T/C or TCI : 2.42.5 CRDi TCI : 3.2
Gasoline
7.53
J060A05P-GATLUBRCATION CHART
LUBRCATION CHART LUBRCATION CHART
LUBRCATION CHART
LUBRCATION CHART
Page 170 of 173

INDEX
INDEX INDEX
INDEX
INDEX
10-2 EMISSION CONTROL SYSTEM
........................................................... 7-1
ENGINE ........................................................................................................ 9-2
ENGINE COOLANT .................................................................................. 8-9
ENGINE NUMBER .................................................................................... 1-2
ENGINE OIL .................................................................................... 8 - 7 ~ 8 - 8
ENGINE OVERHEATING ........................................................ 4-11 ~ 4-12
ENGINE RPM ADJUSTMENT KNOB ...............................................2-15
ENGINE WARNING LIGHT ................................................................. 2-10
EXTERIOR AND INTERIOR LAMP OPERATION .........................8-13
F FOUR-WHEEL DRIVE (4WD) ..................................................3-9 ~ 3-10
FOURTH SEAT ....................................................................................... 1-21
FRONT DOOR EDGE WARNING LIGHT .......................................2-15
FRONT DOOR WINDOW GLASS .....................................................1-17
FRONT FOG LAMP SWITCH ........................................................... 2-16
FRONT INTERIOR LIGHT ................................................................... 2-17
FRONT ROOM LAMP ........................................................................... 2-18
FRONT SEATS ....................................................................................... 1-18
FUEL FILTER WARNING LAMP-RED ................................................. 2-9
FUEL GAUGE ............................................................................................. 2-5
FUEL TANK CAPACITY .......................................................................... 9-1
FUEL, ENGINE COOLANT, OIL, AND EXHAUST GAS LEAKAGE .................................................................................... 8-13
FUSES ....................................................................................................... 4-15
G GASOLINE ENGINE ROOM .................................................................. 8-5
GOOD BRAKING PRACTICE ............................................................. 3-11H
HAZARD WARNING LIGHT SWITCH ..............................................2-16
HEADLAMP LEVELING DEVICE SYSTEM ....................................2-14
HEADREST .............................................................................................. 1-22
HEATING AND COOLING ...................................................... 2-24 ~ 2-25
HEATING CONTROLS .......................................................................... 2-25
HEIGHT ADJUSTABLE FRONT SEAT SHOULDER BELT .......1-23
HIGH-BEAM INDICATION LAMP-BLUE .............................................. 2-9
HIGH-BEAM SWITCH ........................................................................... 2-11
HINGED WINDOW .................................................................... 1-16 ~ 1-17
HINGES AND LATCHES LUBRICATION ........................................8-15
"HOLD" MODE SWITCH ......................................................................... 3-7
HOOD RELEASE .................................................................................... 1-12
HORN SWITCH ....................................................................................... 2-17
I IF A TIRE IS FLATENED ............................................................ 4 - 6 ~ 4 - 8
IF THE ENGINE OVERHEATS .............................................4-11 ~ 4-12
IGNITION SWITCH ................................................................................... 3-1
ILLUMINATED IGNITION SWITCH ...................................................... 1-8
IMMOBILIZER SYSTEM .............................................................. 1 - 5 ~ 1 - 8
INCLINOMETER ......................................................................................... 2-6
INDEX ........................................................................................................ 10-1
INDICATION AND WARNING LAMPS ..................................2-9 ~ 2-10
INSIDE REAR-VIEW MIRROR ........................................................... 2-21
INSTALLATION OF ACCESSORIES ................................................... 1-3
INSTRUMENTS .......................................................................................... 2-3
INSTRUMENTS PANEL LIGHT CONTROL (=RHEOSTAT) ......2-14