Page 80 of 392

To clean the windshield, pull back on
the wiper control lever. The washers
spray until you release the lever. The
wipers run at low speed while you’re
pulling the lever, then complete one
more sweep of the windshield af ter
you release it.To turn on the rear window wiper,
turn the rotary switch clockwise to
ON. To also use the rear window
washer, turn the rotary switch
clockwise past ON. The washer will
spray as long as you hold the rotary
switch in this position. If you turn the
rotary switch counterclockwise f rom
the OFF position, the washer will
spray without activating the rear
window wiper.Pushtheredbuttontoturnonthe
hazard warning lights (f our-way
flashers). This causes all four
outside turn signals and both
indicators in the instrument panel to
f lash. Use the hazard warning lights
if you need to park in a dangerous
area near heavy traffic, or if your
vehicle is disabled. Hazard Warning
Rear Window Wiper and Washer
Windshield Washers
Controls Near the Steering Wheel
Inst rument s and Cont rols76
Page 89 of 392

Panic mode allows you to remotely
activate your vehicle’s horn and
lights to attract attention. When
activated, the horn will sound, and
the headlights, parking lights, side
marker lights, taillights and
instrument panel lights will f lash f or
about 30 seconds. To activate panic
mode,pressandholdthePANIC
button f or about one second.When the remote transmitter’s
battery begins to get weak, it may
take several pushes on the button to
lock or unlock the doors and the
tailgate, and the LED will get dim.
Replace the battery as soon as
possible.
Battery type: CR2025
To cancel Panic mode bef ore 30
seconds, press any button on the
remote transmitter. You can also
turn the ignition switch to ON (II).
Panic mode will not activate if the
key is in the ON (II) position.
To replace the battery, remove the
round cover on the back of the trans-
mitter by turning it counterclockwise
with a coin.
CONT INUED
Panic Mode
Replacing t he Bat t ery
Keys and Locks
Inst rument s and Cont rols85
ROUND
COVERBATTERY
Page 90 of 392
 This devicemay not cause harmf ul interf erence, and(2)")
�´
�Õ �Ü
As required by the FCC:
This device complies with Part 15 of theFCC rules. Operation is subject to thef ollowing two conditions: (1) This devicemay not cause harmf ul interf erence, and(2) this device must accept anyinterf erence received, includinginterf erence that may cause undesiredoperation.
Changes or modif ications not expresslyapproved by the party responsible f orcompliance could void the user’sauthority to operate the equipment.
This device complies with IndustryCanada Standard RSS-210.Operation is subject to the f ollowing twoconditions: (1) this device may not causeinterf erence, and (2) this device mustaccept any interf erence that may causeundesired operation of the device.
Avoid severe shock to the trans-
mitter, such as dropping or throwing
it. Also, protect it f rom extreme hot
or cold temperatures.
Clean the transmitter case with a
sof t cloth. Do not use strong
cleaners or solvents that could harm
the case. Immersing the transmitter
in any liquid will harm the trans-
mitter and cause it to not f unction
properly.
Remove the old battery and note the
polarity. Make sure the polarity of
the new battery is the same ( side
f acing up), then insert it in the
transmitter.
Align the mark on the cover
with the mark on the
transmitter, then set the cover in
place and turn it clockwise.
If you lose a transmitter, you will
need to have the replacement
programmed to your vehicle’s
system by your Honda dealer. Any
other transmitters you have will also
need to be reprogrammed.
Transmitter Care
Keys and Locks
Inst rument s and Cont rols86
Page 121 of 392

.....................
Heating and Cooling .118
.........
What Each Control Does . 118
............
How to Use the System . 122
..........
To Turn Everything Of f . 127
...............
Climate Control System . 128
(EX model) .......
Fully-automatic Operation . 130
.......
Semi-automatic Operation . 131
Sunlight Sensor/ ............
Temperature Sensor . 134
...........................
Rear A/C Unit .135
.......................
Audio System (LX) .137
AM/FM/CD ........................
Audio System .137
.................
Operating the Radio . 137
.................
Adjusting the Sound . 141
..............................
Digital Clock .142
............
Audio System Lighting . 143
.........
Operating the CD Player . 143
.....
Operating the CD Changer . 145
....
CD Player Error Indications . 147
CD Changer Error .............................
Indications .148
Operating the Cassette .....................................
Player .149
............
Tape Search Functions . 151.......................
Audio System (EX) .153
AM/FM/Cassette/CD Audio ....................................
System .153
.................
Operating the Radio . 154
.................
Adjusting the Sound . 158
..............................
Digital Clock .159
............
Audio System Lighting . 159
Operating the Cassette .....................................
Player .160
............
Tape Search Functions . 162
.........
Operating the CD Player . 163
.....
Operating the CD Changer . 165
....
CD Player Error Indications . 166
CD Changer Error .............................
Indications .167
Audio System (Optional on U.S. ..............................
EX model) .168
AM/FM/Cassette/CD/DVD ........................
Audio System .168
.................
Operating the Radio . 170
.................
Adjusting the Sound . 174
..............................
Digital Clock .175
............
Audio System Lighting . 175
....................
Radio Frequencies . 176
........................
Radio Reception .176 Operating the Cassette
.....................................
Player .178
Caring f or the Cassette .....................................
Player .181
.........
Operating the CD Player . 182
.....
Operating the CD Changer . 184
.......
Protecting Compact Discs . 185
....
CD Player Error Indications . 186
CD Changer Error .............................
Indications .187
...........
Remote Audio Controls . 188
.......................
Thef t Protection .189
........
Rear Entertainment System . 190
............................
Security System .206
...............................
Cruise Control .207
HomeLink Universal ................................
Transceiver .210
Comf ort and Convenience Features
Comf ort and Convenience Feat ures117
Page 122 of 392
Proper use of the Heating and
Cooling system can make the
interior dry and comf ortable, and
keep the windows clear f or best
visibility.
Turning this dial clockwise increases
the f an’s speed, which increases air
flow.
Turning this dial clockwise increases
the temperature of the air flow.
This button turns the air condi-
tioning ON and OFF. The indicator
in the button lights when the A/C is
on.
Comf ort and Convenience Feat ures
Heating and Cooling
What Each Control Does
Fan Control Dial
T emperature Control Dial
Air Conditioning (A/C) Button
On L X model
118
TEMPERATURE
CONTROL DIALRECIRCULATION
BUTTON
FAN CONTROL
DIAL
REAR WINDOW
DEFOGGER BUTTON
AIR CONDITIONING
BUTTON MODE CONTROL DIAL
Page 146 of 392
 or ON
(II). It shows the operation mode of
the radio, CD player, or optional
cassette player or CD changer")
The audio system display usually
shows the time when the ignition
switch is in ACCESSORY (I) or ON
(II). It shows the operation mode of
the radio, CD player, or optional
cassette player or CD changer when
you operate them, then goes back to
the time display af ter f ive seconds.You can quickly set the time to the
nearest hour. If the displayed time is
bef ore the half hour, pressing and
holding the clock button, then
pressing the RESET button (preset
6) sets the clock back to the previous
hour. If the displayed time is af ter
the half hour, the clock is set
f orward to the beginning of the next
hour.If your vehicle’s battery is
disconnected or goes dead, the time
setting will be lost. To set the time
again, follow the setting procedure. For example:
1:06 will reset to 1:00
1:52 will reset to 2:00
To set the clock, press and hold the
CLOCK (SCAN/RPT) button.
Change the hours by pressing the H
(preset 4) button until the numbers
advance to the desired time. Change
the minutes by pressing the M
(preset 5) button until the numbers
advance to the desired time.
Audio System
Comf ort and Convenience Feat ures
Digital Clock
142
RESET
MH
CLOCK BUTTON
Page 162 of 392
�µ
�µ
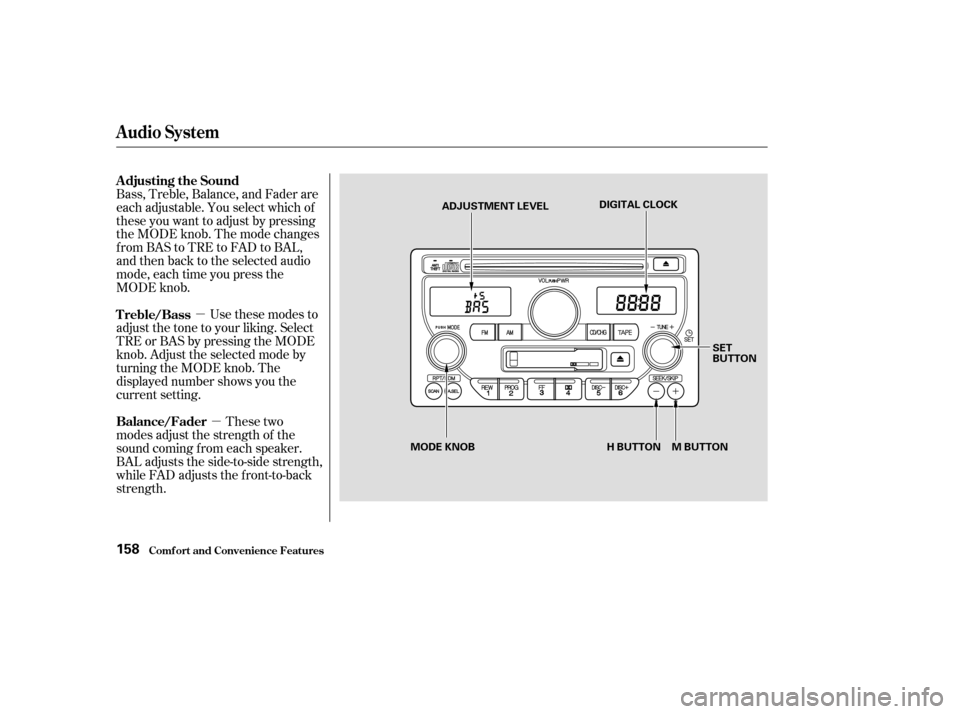
These two
modes adjust the strength of the
sound coming f rom each speaker.
BAL adjusts the side-to-side strength,
while FAD adjusts the f ront-to-back
strength. Bass, Treble, Balance, and Fader are
each adjustable. You select which of
these you want to adjust by pressing
the MODE knob. The mode changes
fromBAStoTREtoFADtoBAL,
and then back to the selected audio
mode, each time you press the
MODE knob.
Use these modes to
adjust the tone to your liking. Select
TRE or BAS by pressing the MODE
knob. Adjust the selected mode by
turning the MODE knob. The
displayed number shows you the
current setting. Adjusting the Sound
Balance/Fader Treble/Bass
Audio System
Comf ort and Convenience Feat ures158
ADJUSTMENT LEVEL DIGITAL CLOCK
SET
BUTTON
H BUTTON M BUTTON
MODE KNOB
Page 163 of 392

�µ
�´
The system will automatically return
the display to the selected audio
mode about f ive seconds af ter you
stop adjusting a mode with the
TUNE knob. Select BAL or FAD by pressing the
MODE knob. Adjust the Balance or
Fader to your liking by turning the
MODE knob.
The displayed number shows you
the current setting.
When the adjustment level reaches
the center, you will see ‘‘ ’’.
For inf ormation, see page . You can use the instrument panel
brightness control knob to adjust the
illumination of the audio system (see
page ). The audio system
illuminates when the parking lights
are on, even if the radio is turned of f .
Therightdisplayshowsthetime
when the ignition is in ACCESSORY
(I) or ON (II).
To set the clock, press and hold the
SET (TUNE) button until the
numbers f lash. Change the hours by
pressing the H ( ) button until the
numbers advance to the desired time.
Change the minutes by pressing the
M ( ) button until the numbers
advance to the desired time. When
you are f inished, press the SET
button again.
C
73
176
Audio System
Comf ort and Convenience Feat ures
A udio System L ighting
Radio Frequencies and Reception
Digital Clock
159