Page 178 of 392
�µ�µ
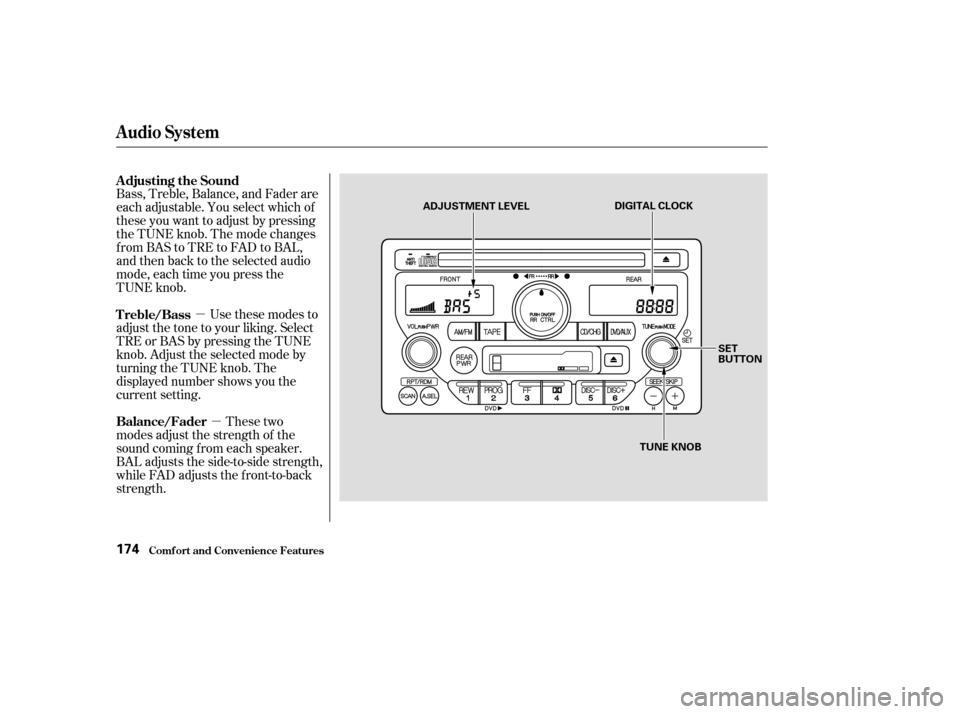
Bass, Treble, Balance, and Fader are
each adjustable. You select which of
these you want to adjust by pressing
the TUNE knob. The mode changes
fromBAStoTREtoFADtoBAL,
and then back to the selected audio
mode, each time you press the
TUNE knob.
Use these modes to
adjust the tone to your liking. Select
TRE or BAS by pressing the TUNE
knob. Adjust the selected mode by
turning the TUNE knob. The
displayed number shows you the
current setting.
These two
modes adjust the strength of the
sound coming f rom each speaker.
BAL adjusts the side-to-side strength,
while FAD adjusts the f ront-to-back
strength. Adjusting the Sound
Treble/Bass
Balance/Fader
Audio System
Comf ort and Convenience Feat ures174
DIGITAL CLOCK
SET
BUTTON
TUNE KNOB
ADJUSTMENT LEVEL
Page 179 of 392

�µ
�´
Select BAL or FAD by pressing the
TUNE knob. Adjust the Balance or
Fader to your liking by turning the
TUNE knob.
The displayed number shows you
the current setting.
When the adjustment level reaches
the center, you will see ‘‘ ’’.
The system will automatically return
the display to the selected audio
mode about f ive seconds af ter you
stop adjusting a mode with the
TUNE knob.
You can use the instrument panel
brightness control knob to adjust the
illumination of the audio system (see
page ). The audio system
illuminates when the parking lights
are on, even if the radio is turned of f .
The right display usually shows the
time when the ignition is in
ACCESSORY (I) or ON (II). It
shows the operation mode of the
radio, cassette player, CD player, or
rear entertainment system when you
operate them, then goes back to the
time display af ter f ive seconds.
To set the clock, press and hold the
SET (TUNE) button until the
numbers f lash. Change the hours by
pressing the H ( ) button until the
numbers advance to the desired time.
Change the minutes by pressing the
M ( ) button until the numbers
advance to the desired time. When
you are f inished, press the SET
button again.
C
73
Audio System
Comf ort and Convenience Feat ures
A udio System L ighting
Digital Clock
175
Page 197 of 392
To return f ront panel control to the
front audio system, turn the knob
counterclockwise. The system will
automatically change back to the
f ront system several seconds af ter
you stop pressing the buttons. To operate the rear entertainment
system f rom the f ront panel, you
must first turn the RR CTRL knob
clockwise to enable the panel. The
amber RR LED will come on to show
that the control panel is now enabled.
CONT INUED
Operating the DVD Player f rom
the Front Control Panel
Rear Entertainment System
Comf ort and Convenience Feat ures193
REAR PWR
BUTTONRR CTRL SELECTOR
KNOB
RR LED
RPT
BUTTON PLAY
BUTTONPAUSE
BUTTONSEEK/SKIP
BAR
RDM
BUTTON
Page 205 of 392

�Û�Ý
An audio CD can be played in either
the main CD player in the f ront panel,
in the DVD/CD player below the
f ront panel, or in the optional CD
changer. This allows the f ront and
rear passengers to listen to dif f erent
CDs.
Select the rear system by turning the
RR CTRL knob clockwise. If the CD
is loaded in the main CD player, or
CD changer, select CD/CHG. If the
CD is loaded in the lower player,
select DVD/AUX.
If theCDisloadedinthemainCD
player or CD changer, ref er to pagesand f or operating
instructions. If the CD is loaded in
the DVD/AUX player, ref er to page . If theCDisloadedinthemainCD
player or optional CD changer, select
it by pressing the CD/CHG button.
If it is loaded in the lower player,
press DVD/AUX.
Pressthe buttontoskiptothe
beginning of the next track. Press
the button to return to the
beginning of current track. Press it
again to go to the beginning of the
previous track.
If the CD changer is selected, use
the and buttons to change
discs.
If theCDisloadedinthemainCD
player or optional CD changer, select
it by pressing the CD/CHG button.
If it is loaded in the lower player,
press DVD/AUX. To move rapidly within a track, press
andholdeithertheFWDorREW
buttons. When you press FWD, you
will see ‘‘CUE’’ in the display. When
you press REW, you will see ‘‘REW’’
in the display. Release the button
when the system reaches the desired
point.
Pressthe buttontoskiptothe
beginning of the next track. Press
the button to return to the
beginning of the current track. Press
it again to go to the beginning of the
previous track.
182 184 193
Playing a CD With the Rear
Entertainment System
Playing a CD Wit h t he Front Panel
Playing a CD Wit h t he Rear Cont rol
Panel
Playing a CD Wit h t he Remot eCont rol
Rear Entertainment System
Comf ort and Convenience Feat ures201
Page 292 of 392
Make sure the engine and radiator
are cool.
Turn the radiator cap counter-
clockwise, without pressing down
on it, until it stops. This relieves
any pressure remaining in the
cooling system.
Remove the radiator cap by
pushing down and turning
counterclockwise.The coolant level should be up to
the base of the f iller neck. Add
coolant if it is low.Do not add any rust inhibitors or
other additives to your vehicle’s
cooling system. They may not be
compatible with the coolant or
engine components.
Pour coolant into the reserve tank.
Fill it to half way between the MAX
and MIN marks. Put the cap back
on the reserve tank.
Pourthecoolantslowlyand
caref ully so you do not spill. Clean
up any spills immediately. Spilled
coolant could damage components
in the engine compartment.
Put the radiator cap back on.
Tighten it f ully.
3. 4.
5.6.
1.
2.
Cooling Syst em
Maint enance288
RESERVE TANK
Page 303 of 392
Loosen the two holding clips by
turning the heads one-quarter turn
counterclockwise with a f lat-tipped
screwdriver. Remove the cover on
the f ront cylinder bank by pulling
it straight up.
Clean off any dirt and oil that have
collected around the ignition coils.
The spark plugs in your vehicle are a
special platinum-tipped design f or
longer lif e. The spark plugs should
be replaced according to the time
and distance recommendations in
the maintenance schedule.
Remove the f our bolts using a
hexagon socket wrench, then
remove the engine cover.
1.
2.
3.
CONT INUED
Replacement
Maint enance
Spark Plugs
299
HOLDING CLIP
Page 305 of 392
�´
�µ
Torque the spark plug. (If you do
not have a torque wrench, tighten
the spark plug two-thirds of a turn
af ter it contacts the cylinder head.)
Tightening torque:Spark Plug Gap:
Install the ignition coil. Reinstall
the hexagon socket head cap bolt.
Push the wire connector onto the
ignition coil. Make sure it locks in
place.
Repeat this procedure f or the
other f ive spark plugs.
Reinstall the cover on the front
cylinder bank while putting its
mounting clip in the hole on the
passenger’s side. Secure the cover
by turning the heads of the two
holding clips one-quarter turn
clockwise with a f lat-tipped
screwdriver. NGK:
DENSO:
8. 9.
10.
11. 12. Specif ications:
Spark Plugs
Maint enance301
13 lbf·ft (18 N·m , 1.8 kgf·m)
0.04 in (1.1 mm)
PKJ16CR-L11 PZFR5F-11
0
0.1 mm
Tighten the spark plugs caref ully. A
spark plug that is too loose can
overheat and damage the engine.
Overtightening can cause damage to
the threads in the cylinder head.
Page 322 of 392
Insert the new bulb into the hole,
making sure the bulb is right side
up and the nubs on the base f it
into the indentations in the
headlight assembly. Pivot the hold-
down wire back in place, and clip
the end into the slot.
Install the rubber seal over the
back of the headlight assembly.
Make sure one of its arrows is
pointing up.
Push the electrical connector onto
the new bulb.
Turn on the headlights to test the
new bulb.Remove the socket from the
headlight assembly by turning it
one-quarter turn counterclockwise.
To remove the f ront turn signal
bulb, push it in slightly and turn it
counterclockwise.Install the new bulb into the
socket.
Insert the socket back into the
headlight assembly. Turn it
clockwise to lock it in place.
Turn on the lights to make sure
the new bulb is working.
1.
2. 3.
4.
5.
5.
6.
7.
Lights
Maint enance
Replacing a Front T urn Signal/
Parking L ight Bulb
318