Page 323 of 392
If you are changing the bulb on
the driver’s side, start the engine,
turn the steering wheel all the way
to the right, and turn off the
engine. If you are changing the
bulb on the passenger’s side, turn
the steering wheel to the left.
Use a f lat-tipped screwdriver to
remove the f ive holding clips f rom
the inner f ender.Pull the inner f ender cover away
f rom the f ender and bumper.
Remove the socket from the
headlight assembly by turning it
one-quarter turn counterclockwise.Pull the burned out bulb straight
out of its socket.
Push the new bulb straight into
the socket until it bottoms.
Insert the socket back into the
headlight assembly. Turn it
clockwise to lock it in place.
Turn on the lights to make sure
the new bulb is working.
Put the inner f ender in place.
Install the f ive holding clips. Lock
each clip in place by pushing on
the center.
1.
2. 3.
4.
8. 6.
7. 5.
Lights
Replacing a Front Side Marker
Light Bulb
Maint enance319
HOLDING CLIP
Page 324 of 392
Remove the socket by turning it
one-quarter turn counterclockwise.
Remove the two screws, then pull
the rear light assembly straight
back to remove it from the body.
Determine which of the three
bulbs is burned out: stop/taillight,
turn signal/hazard lights, or side
marker light. Remove the burned out bulb by
pulling it straight out of its socket.Install the new bulb into the
socket.
Push the socket into the light
assembly and turn it clockwise
until it locks.
Turn on the lights to make sure
the new bulb is working.
Make sure all the wires are
correctly routed on the rear light
assembly, then install the
assembly on the body.
Open the tailgate.
1.
2.
3. 4.
5.6.
7.
8.
9.
Lights
Maint enance
Replacing Rear Bulbs
320
Page 325 of 392
Removethelensbycarefully
prying on its lef t edge with a f lat-
tip screwdriver.
Remove the bulb by pulling it
straight out. Push a new bulb into
the socket.
Reinstall the lens, lef t side f irst.Open the tailgate. Place a cloth on
the edge of back-up light cover.
Remove it by caref ully prying in
the notch on its edge with a small
f lat-tipped screwdriver.
Remove the socket by turning it
one-quarter turn counterclockwise.
Pull the bulb straight out of its
socket. Push a new bulb straight
into the socket until it bottoms.Insert the socket back into the
light assembly. Turn it clockwise
to lock it in place.
Testthelightstomakesurethe
new bulb is working.
Reinstall the back-up light cover.
1.
2.
3. 1.
2.
3.4.
5.
6.
CONT INUED
Replacing a Rear License Plate
Bulb
Replacing a Back-up light bulb
Lights
Maint enance321
Page 326 of 392
The individual map lights, tailgate
light, and the vanity mirror lights
come apart the same way. They do
not all use the same bulb.Removethelensbycarefully
prying on the edge of the lens with
a f ingernail f ile or a small f lat-tip
screwdriver. Do not pry on the
edge of the housing around the
lens.
Pull the light assembly out of the
tailgate.
Remove the socket f rom the light
assembly by turning it one-quarter
turn counterclockwise.
Pull the bulb straight out of its
socket. Push a new bulb straight
into the socket until it bottoms.
Place a cloth on the middle edge
of a part of the lens on the
passenger’s side. Remove a part of
the lens by caref ully prying on its
edge with a small f lat-tipped
screwdriver.
Use a Phillips-head screwdriver to
remove the screw under the lens.
1.
1.
2. 3.
4.
5.
Lights
Maint enance
Replacing Bulbs in the Interior
Lights
Replacing a High-mount Brake
Light Bulb
322
FRONT INDIVIDUAL MAP LIGHT
SCREW
Page 340 of 392
Open the tailgate.Take the tools out of the storage
compartment.
Turn the jack’s end bracket
counterclockwise to loosen it, then
remove the jack.
Thetoolsandjackarebehinda
cover in the cargo area on the
driver’s side. Remove the cover by
pushing the top of the cover. The spare tire is stored
underneath the rear cargo area.
Remove the plastic cover on the
cargo area lining to access the
shaft for the spare tire hoist.
3.
4.
5.
6.7.
Changing a Flat T ire
T aking Care of t he Unexpect ed336
COVER
COVER
Page 341 of 392
Loosen the f ive wheel nuts 1/2
turn with the wheel wrench.
Put the wheel nut wrench on the
hoist shaf t. Turn the wrench
counterclockwise to lower the
spare tire to the ground. Keep turning the wheel wrench to
create slack in the cable.
Remove the bracket from the
spare tire.11.
10.
8.
9.
CONT INUED
Changing a Flat T ire
T aking Care of t he Unexpect ed337
SPARETIREWRENCH BRACKET
Page 342 of 392
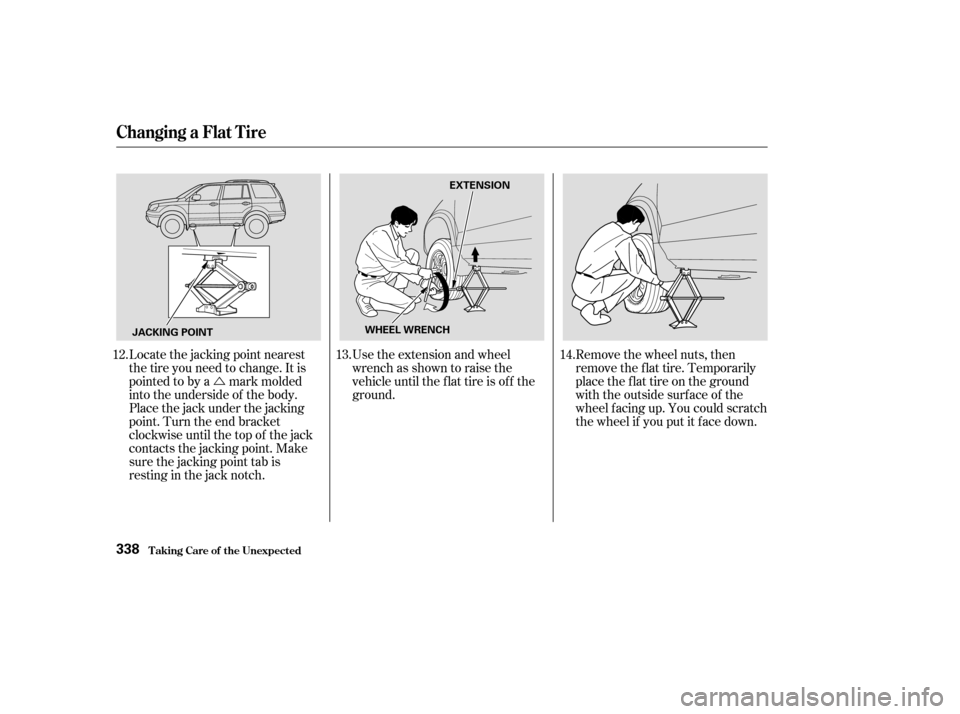
�ÚUse the extension and wheel
wrench as shown to raise the
vehicle until the f lat tire is of f the
ground. Remove the wheel nuts, then
remove the f lat tire. Temporarily
place the f lat tire on the ground
with the outside surface of the
wheel f acing up. You could scratch
the wheel if you put it f ace down.
Locate the jacking point nearest
thetireyouneedtochange.Itis
pointed to by a mark molded
into the underside of the body.
Place the jack under the jacking
point. Turn the end bracket
clockwise until the top of the jack
contacts the jacking point. Make
sure the jacking point tab is
restinginthejacknotch.
12.
13. 14.
Changing a Flat T ire
T aking Care of t he Unexpect ed338
JACKING POINT WHEEL WRENCHEXTENSION
Page 344 of 392
Tighten the wheel nuts securely in
the same crisscross pattern. Have
the wheel nut torque checked at
the nearest automotive service
f acility.
Tighten the wheel nuts to:
Remove the center cap from the
flat tire.Place the f lat tire f ace up under
the hoist.
Slowly turn the wheel wrench
clockwisetotakeuptheslackof
the hoist cable. Make sure the
bracketisseatedinthecenter
hole of the spare tire.
Turn the wheel wrench clockwise
until the f lat tire rests against the
underbody of the vehicle and you
hear the hoist click.
Insert the hoist bracket into the
center hole of the f lat tire.
18.
19. 20.
21.
22.
23.
Changing a Flat T ire
T aking Care of t he Unexpect ed340
80 lbf·ft (108 N·m , 11 kgf·m)