Page 1 of 392
 to navigate through\
this reference.
For a printed owners manual, click on authorized manuals or go to www.h\
elminc.com.
Contents
Owners Id")
Use these links (and links throughout this manual) to navigate through\
this reference.
For a printed owner's manual, click on authorized manuals or go to www.h\
elminc.com.
Contents
Owner's Identification Form
Introduction ........................................................................\
................................................................. i
A Few Words About Safet y........................................................................\
.........................................ii
Important Handling Information........................................................................\
.............................iii
Your Vehicle at a Glanc e........................................................................\
............................................ .2
Driver and Passenger Safety ........................................................................\
..................................... .5
Proper use and care of your vehicle's seat belts, and Supplemental Restr\
aint System.
Instrume nt panel indicator and gauge, and how to use dashboard and steering colu\
mn controls.
Comfort and Convenience Features ........................................................................\
..................... .117
How to operate the climate control system, the audio system, and other c\
onvenience features.
What gasoline to use, how to break -in your new vehicle, and how to load luggage and other cargo.
The proper way to start the engine, shift the transmission, and park, pl\
us towing a trailer.
The Maintenance Schedule shows you when you need to take you r vehicle to the dealer.
Appearance Car e........................................................................\
..................................................... .267
Tips on cleaning and protecting your vehicle. Things to look for if your\
vehicle ever needs body repairs.
This section covers several problems motorists sometimes experience, an d how to handle them.
ID numbers, dimensions, capacities, and technical information.
A summary of the warranties covering your new Acura, and how to contact \
us.
How to order manuals and other technical literature.
Index........................................................................\
........................................................................\
...... I
Service Information Summary
A summary of information you need when you pull up to the fuel pump.
Before Driving........................................................................\
..........................................................215
Driving ........................................................................\
..................................................................... .229
Maintenance........................................................................\
.............................................................269
Taking Care of the Unexpecte d........................................................................\
..............................325
Warranty and Customer Relations (U.S. and Canada)................................................................373
Authorized Manuals (U.S. only)........................................................................\
..............................377 Technical Informatio n........................................................................\
............................................ .359
2003 Pilot Online Reference Owner's Manual
Instruments and Controls........................................................................\
........................................ .59
Page 6 of 392
Your Vehicle at a Glance
2
INDICATOR LIGHTSGAUGES
POWER DOOR LOCK
SWITCHES
MIRROR
CONTROLS
POWER WINDOW
SWITCHES
HOOD RELEASE
HANDLE AUDIO SYSTEM
CLIMATE CONTROL
SYSTEM
(P.61)
(P.67)
(P.82)
(P.103)
(P.99)
(P.218) (P.110)(P.118,
128)
(P.137,
153,168)
FUEL FILL DOOR
RELEASE (P.217) PARKING BRAKE
PEDAL
(P.104)
REAR A/C CONTROL
(P.135) ACCESSORY POWER SOCKETS
Page 64 of 392
Control L ocations
Inst rument s and Cont rols60
INDICATOR LIGHTS (P.61)GAUGES (P.67)
POWER DOOR LOCK
SWITCHES (P.82)
MIRROR
CONTROLS
POWER WINDOW
SWITCHES
HOOD RELEASE
HANDLE AUDIO SYSTEM
ACCESSORY POWER SOCKET CLIMATE CONTROL
SYSTEM
(P.103)
(P.99)
(P.218) (P.110)(P.137,
153.168)
(P.118, 128)
FUEL FILL DOOR
RELEASE
(P.217) PARKING BRAKE
PEDAL
(P.104)REAR A/C CONTROL
(P.135)
Page 65 of 392
�Î
�Î�Î
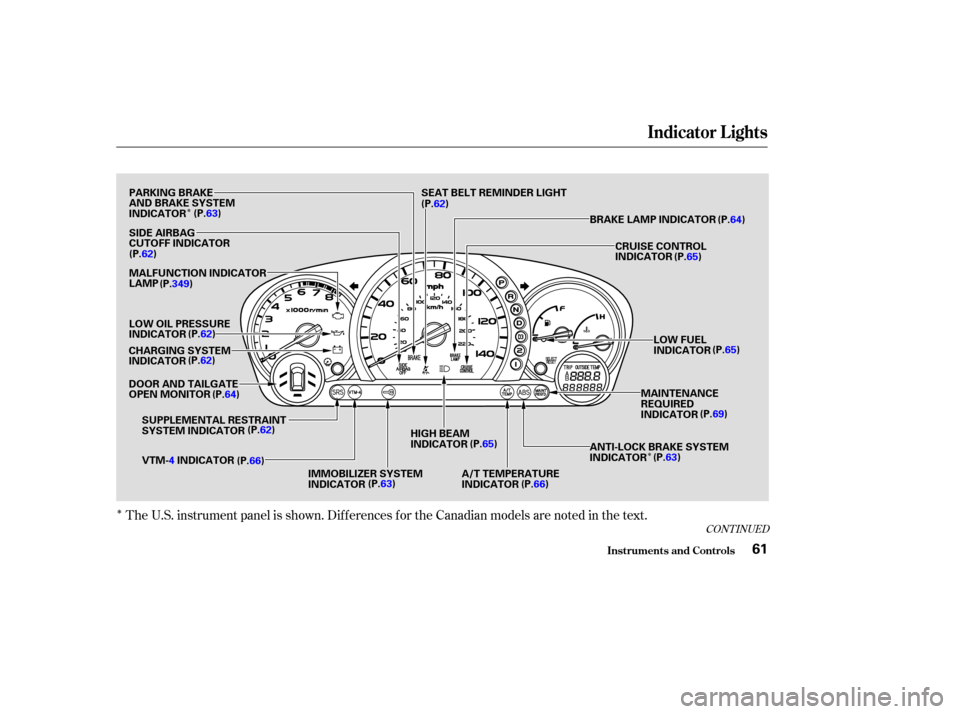
The U.S. instrument panel is shown. Dif f erences f or the Canadian models are noted in the text.
CONT INUED
Indicator L ights
Inst rument s and Cont rols61
PARKING BRAKE
AND BRAKE SYSTEM
INDICATOR(P.63)
SIDE AIRBAG
CUTOFF INDICATOR
(P.62)
MALFUNCTION INDICATOR
LAMP
LOW OIL PRESSURE
INDICATOR (P.62)
CHARGING SYSTEM
INDICATOR (P.62)
DOOR AND TAILGATE
OPEN MONITOR (P.64)
SUPPLEMENTAL RESTRAINT
SYSTEM INDICATOR (P.62)
VTM- 4INDICATOR
(P.66)
IMMOBILIZER SYSTEM
INDICATOR(P.63)HIGH BEAM
INDICATOR
(P.65)
A/T TEMPERATURE
INDICATOR (P.66) ANTI-LOCK BRAKE SYSTEM
INDICATOR
(P.
63)
MAINTENANCE
REQUIRED
INDICATOR
(P.
69)
LOW FUEL
INDICATOR
(P.
65)
CRUISE CONTROL
INDICATOR
(P.
65)
BRAKE LAMP INDICATOR (P.64)
SEAT BELT REMINDER LIGHT
(P. 62)
(P.349)
Page 69 of 392
 with
the headlight switch of f and the
parking brake set. It should go of f if
youturnontheh")
Canadian models onlyCanadian models only
This indicator lights when you turn
the ignition switch to ON (II) with
the headlight switch of f and the
parking brake set. It should go of f if
youturnontheheadlightsorrelease
the parking brake. If it comes on at
any other time, it means there is a
problem with the DRL. There may
also be a problem with the high
beam headlights.This light comes on with the high
beam headlights. See page for
inf ormation on the headlight
controls.
On Canadian models, this indicator
comes on with reduced brightness
when the Daytime Running Lights
(DRL) are on (see page ).
This lights when you set the cruise
control. See page f or inf ormation
on operating the cruise control. This light comes on when the
washer f luid level is low. Add washer
f luid when you see this light come on
(see page ).
This light comes on as a reminder
that you must ref uel soon. 72
73
207 292
‘‘Daytime Running
Lights’’ Indicator
High Beam Indicator
Cruise Control Indicator Washer Level Indicator
Low Fuel Indicator
Indicator L ights
Inst rument s and Cont rols65
Page 71 of 392
U.S. ModelsCanadian Models
This shows your speed in miles per
hour (mph). The smaller inner
numbers are the speed in kilometers
per hour (km/h).
This shows your speed in kilometers
per hour (km/h). The smaller inner
numbers are the speed in miles per
hour (mph). The tachometer shows the engine
speed in revolutions per minute
(rpm). To protect the engine f rom
damage, never drive with the
tachometer needle in the red zone.The odometer shows the total dis-
tance your vehicle has been driven.
It measures miles in U.S. models and
kilometers in Canadian models.
It is illegal under U.S. f ederal law and
Canadian provincial regulations to
disconnect, reset, or alter the
odometer with the intent to change
the number of miles or kilometers
indicated.
Speedometer Odometer
T achometer
Gauges
Inst rument s and Cont rols67
TACHOMETER SPEEDOMETER FUEL GAUGE TEMPERATURE
GAUGE
MAINTENANCE
REQUIRED INDICATOR TRIP METER
SELECT/RESET
BUTTON
TRIP METER
ODOMETER
Page 72 of 392
 or kilometers (Canada)
driven since you last reset it.This shows how much f uel you have.
It is most accurate when the vehicle
is on level ground. It may sh")
This meter shows the number of
miles (U.S.) or kilometers (Canada)
driven since you last reset it.This shows how much f uel you have.
It is most accurate when the vehicle
is on level ground. It may show
slightly more or less than the actual
amount when you are driving on
curvy or hilly roads.
The needle returns to the bottom
after you turn off the ignition. The
gauge shows the f uel level reading
immediately af ter you turn the
ignition switch back ON (II).
There are two trip meters: Trip A
and Trip B. Switch between these
displays and the outside temperature
display (EX model only) by pressing
the Select/Reset button repeatedly.
Each trip meter works independently,
so you can keep track of two
dif f erent distances. To reset a trip meter, display it and
then press and hold the Select/Reset
button until the number resets to
‘‘0.0’’. Both trip meters will reset if
the vehicle’s battery goes dead or is
disconnected.
This shows the temperature of the
engine’s coolant. During normal
operation, the pointer should rise
from the bottom white mark to about
the middle white mark. In severe
driving conditions, such as very hot
weather or a long period of uphill
driving, the pointer may rise to the
upper white mark. If it reaches the
red (Hot) mark, pull saf ely to the
side of the road. Turn to page f or
instructions and precautions on
checking the engine’s cooling
system.
345
Trip Meter
Fuel Gauge
Temperature Gauge
Inst rument s and Cont rols
Gauges
68
TRIP METER SELECT/
RESET BUTTON
Avoid driving with an extremely low
f uel level. Running out of f uel could
cause the engine to misf ire, damaging
the catalytic converter.
Page 219 of 392
Bef ore you begin driving your Honda,
youshouldknowwhatgasolineto
use, and how to check the levels of
important f luids. You also need to
know how to properly store luggage
or packages. The inf ormation in this
section will help you. If you plan to
add any accessories to your vehicle,
please read the inf ormation in this
section f irst..............................
Break-in Period .216
.........................................
Gasoline .216
.........
Service Station Procedures . 217
................
Filling the Fuel Tank . 217
....................
Opening the Hood .218
...............................
Oil Check .220
.........
Engine Coolant Check . 221
...............................
Fuel Economy .222
.....................
Vehicle Condition .222
...........................
Driving Habits .222
...
Accessories and Modif ications . 223
.............................
Carrying Cargo .225
.................................
Load Limit .226
Bef ore Driving
Bef ore Driving215

(P.67)
(P.82)
(P.103)
(P")
GAUGES (P.67)
POWER DOOR LOCK
SWITCHES (P.82)
MIRROR
CONTROLS
POWER WINDOW
SWITCHES
HOOD RELEASE
HANDLE AUDIO SYSTEM
ACCESSORY P")
. The smaller inner
numbers are the speed in kilometers
per hour (km/h).
This shows your speed in kilometers
per hour (km/h). Th")
