Page 108 of 415

To open a sliding door, make sure
the door is unlocked. Then press the
appropriate button. If you forget to unlock the
door f irst, you will hear three beeps.
Unlock the door and try again.
To close a sliding door, press the
appropriate button f or at least two
seconds.
To stop the power sliding door’s
movement, push the appropriate
door button on the remote
transmitter. The door will stop, and
you will hear three beeps.
If you push the same button again,
the door will reverse direction.
To open a door, make sure the door
is unlocked. Then push and release
the bottom of the switch. If you
f orget to unlock the door f irst, you
will hear three beeps. Unlock the
door and try again.
To close a sliding door, push and
release the top of the appropriate
switch.
To stop the power sliding door’s
movement, push either the top or the
bottom of the appropriate switch.
The door will stop, and you will hear
three beeps.
To start the door moving again, push
the switch again: bottom to open, or
toptoclose.
You can open or close each sliding
door with the remote transmitter.
The right button controls the
passenger’s side sliding door, and
the left button controls the driver’s
side sliding door.
f or at least two
seconds
CONT INUED
Operat ing t he Doors Wit h t he Remote Transmitter
Power Sliding Doors (EX, EX-L Models)
Inst rument s and Cont rols105
DRIVER’S
SIDE
SLIDING
DOOR
BUTTON LED
PASSENGER’S
SIDE
SLIDING
DOOR
BUTTON
Page 109 of 415

Each power sliding door has an auto-
reverse f eature. If a door meets
resistance while closing, it will beep
three times and automatically
reverse direction. However, the door
may not immediately reverse
direction (like some elevator doors),
and the f orce of a closing door may
cause bruising or discomf ort. Always
make sure passengers and any
objects are well away f rom the power
sliding doors bef ore closing them.
Also check that passengers,
especially children, do not have their
hands on the edge of the sliding door
or on the door pillar. The auto-
reverse f eature stops working when
the door is about to latch so the
motor can pull the door shut.
With the sliding door f ully-closed or
f ully-open, pull the outside or inside
door handle, then release it.
Once the door begins to move, the
door handles cannot be used to stop
the door. If you need to stop the door
f or any reason, use the dashboard
switches or the remote transmitter. Each sliding door has a lock knob
under the inside door handle. Slide
the lock knob f orward to unlock, and
backward to lock the doors. You can
also use the lock and unlock buttons
on the remote transmitter.
Whenyoudrivewithchildreninyour
vehicle, use the childproof door
locks (see page ). This will
prevent children f rom opening the
doors accidentally.
98
Operat ing t he Doors Wit h t he Door
Handles L ocking t he Doors
Sliding Doors and Obst acles
Power Sliding Doors (EX, EX-L Models)
Inst rument s and Cont rols106
OUTSIDE
INSIDE LOCK KNOB
Unlock Lock
Page 110 of 415

If a person or object is in the way
af ter the door begins to close, the
door handles cannot be used to stop
the door. To stop the door, use the
dashboard switches or the remote
transmitter.When parking f acing downhill on a
steep grade, the power sliding doors
may not open or close as they do
normally.
Make sure the MAIN switch is in
the ON position. This allows the
power assist to keep the doors
f rom slamming shut.
If the MAIN switch is off, the door
can slam shut and possibly injure
someone.
Make sure the power sliding doors
are latched in the f ully-open
position, then hold the door open
while allowing your passengers to
enter or exit the vehicle. Do not
pull the inside or outside door
handle, or the latch will release
and the door will close.
Bef ore ref ueling, make sure the
driver’s side sliding door is f ully
closed. When you release the f uel f ill
door, the driver’s side sliding door
automatically locks so it cannot open
and interfere with the fuel door. If a
passenger attempts to unlock the
door by cycling the lock knob several
times, the door may unlock and can
be opened.
If a passenger needs to get out of the
vehicle while you are ref ueling,
instruct that person to exit on the
passenger’s side, not the driver’s
side.
Af ter you close the f uel f ill door, the
sliding door does not automatically
unlock. You must unlock it manually.
CONT INUED
Parking Facing Downhill
A Not e A bout Ref ueling
Power Sliding Doors (EX, EX-L Models)
Inst rument s and Cont rols107
Page 111 of 415
If the Power Sliding Door indicator
comes on and stays on, it indicates a
problem in the system. Turn the
MAIN switch of f to turn of f the
indicator. Have the system inspected
by your Honda dealer as soon as
possible.
If your vehicle’s battery is
disconnected or goes dead while a
sliding door is open, the power
sliding door system needs to be reset.
Af ter reconnecting the battery:
If the power sliding doors are closed,
the system will reset itself
automatically once the battery has
been reconnected.
If the power sliding doors do not
operate properly af ter resetting,
have your vehicle checked by a
Honda dealer.
Close each sliding door completely
by hand; or
Move the MAIN switch on the
dashboard to the ON position.
Push and hold the top of each door
switch until each sliding door
closes completely.
Power Sliding Door Indicat or
How t o Reset t he Power Sliding
Doors
Power Sliding Doors (EX, EX-L Models)
Inst rument s and Cont rols108
POWER SLIDING DOOR INDICATOR
Page 116 of 415
�µ
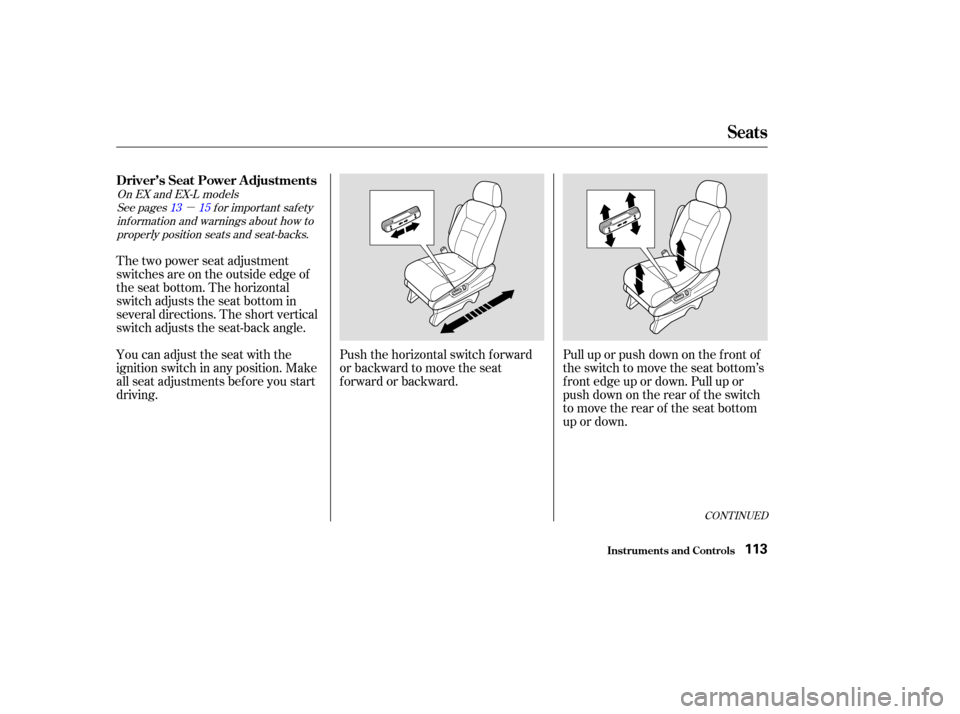
Pull up or push down on the f ront of
the switch to move the seat bottom’s
f ront edge up or down. Pull up or
push down on the rear of the switch
to move the rear of the seat bottom
up or down.
Push the horizontal switch forward
or backward to move the seat
forward or backward.
The two power seat adjustment
switches are on the outside edge of
the seat bottom. The horizontal
switch adjusts the seat bottom in
several directions. The short vertical
switch adjusts the seat-back angle.
You can adjust the seat with the
ignition switch in any position. Make
all seat adjustments bef ore you start
driving.
See pages f or important saf ety
inf ormation and warnings about how toproperly position seats and seat-backs.
On EX and EX-L models
13 15
CONT INUED
Driver’s Seat Power A djustments
Seats
Inst rument s and Cont rols113
Page 117 of 415
Pull the center of the horizontal
switch up to raise the seat. Push it
down to lower the seat.Adjust the seat-back angle by
pushing the rear switch in the
direction you want to move.
Vary the lumbar support by moving
the lever on the right side of the
seat-back. Move the lever forward or
backward to adjust the lumbar
support through its f ull range.
On EX and EX-L models
Driver’s L umbar Support
Seats
Inst rument s and Cont rols114
Page 118 of 415

The head restraints adjust f or height.
You need both hands to adjust the
restraint.Donotattempttoadjustit
while driving. To raise it, pull upward.
To lower the restraint, push the
release button sideways and push
the restraint down.
Your vehicle is equipped with head
restraints in all seating positions.
The head restraints help protect you
and your passengers f rom whiplash
and other injuries. They are most
ef f ective when you adjust them so
the back of the occupant’s head rests
against the center of the restraint. A
taller person should adjust the
restraint as high as possible.
An armrest is located on each of the
frontseatsandoneachsideof the
second row seats. Pivot it down to
use it. When you remove the bucket
seats in the second row, pivot the
armrests up out of the way.
See page f or important saf ety
inf ormation and a warning about how toproperly position the head restraints. 16
CONT INUED
Head Restraints
Armrests
Seats
Inst rument s and Cont rols115
RELEASE
BUTTON
Page 126 of 415

The HI or LO indicator lights and
remains lit until you turn it of f by
pushing the opposite side of the
switch lightly. The indicator will turn
off.
In HI, the heater turns of f when the
seat gets warm, and turns back on
after the seat’s temperature drops. It
continues to cycle as long as you
leave it set on HI. The HI indicator
remains lit as a reminder that you
have the heater on.
In LO, the heater runs continuously.
It does not cycle with temperature
changes.Do not use the seat heaters, even
on the LO setting, if the engine is
lef t idling f or an extended period.
They can weaken the battery,
causing hard starting. Use the HI setting only to heat the
seats quickly. Select the LO
setting when the seats f eel warm.
The HI setting draws large
amounts of current f rom the
battery.
Follow these precautions whenever
you use the seat heaters:
Because of the sensors f or the side
airbag system, there is no heater in
the passenger’s seat-back.
Both f ront seats are equipped with
seat heaters. The ignition switch
must be ON (II) to use them.The
seat heater switch is located on each
f ront door. Push the f ront of the
switch, HI, to rapidly heat up the seat.
After the seat reaches a comfortable
temperature, select LO by pushing
the back of the switch. This will keep
the seat warm.
On EX-L model
Seat Heaters
Inst rument s and Cont rols123