2003 HONDA CIVIC o2 sensor
[x] Cancel search: o2 sensorPage 273 of 1139

PGM-FISystem
aDTC Troubleshooting (cont'dl
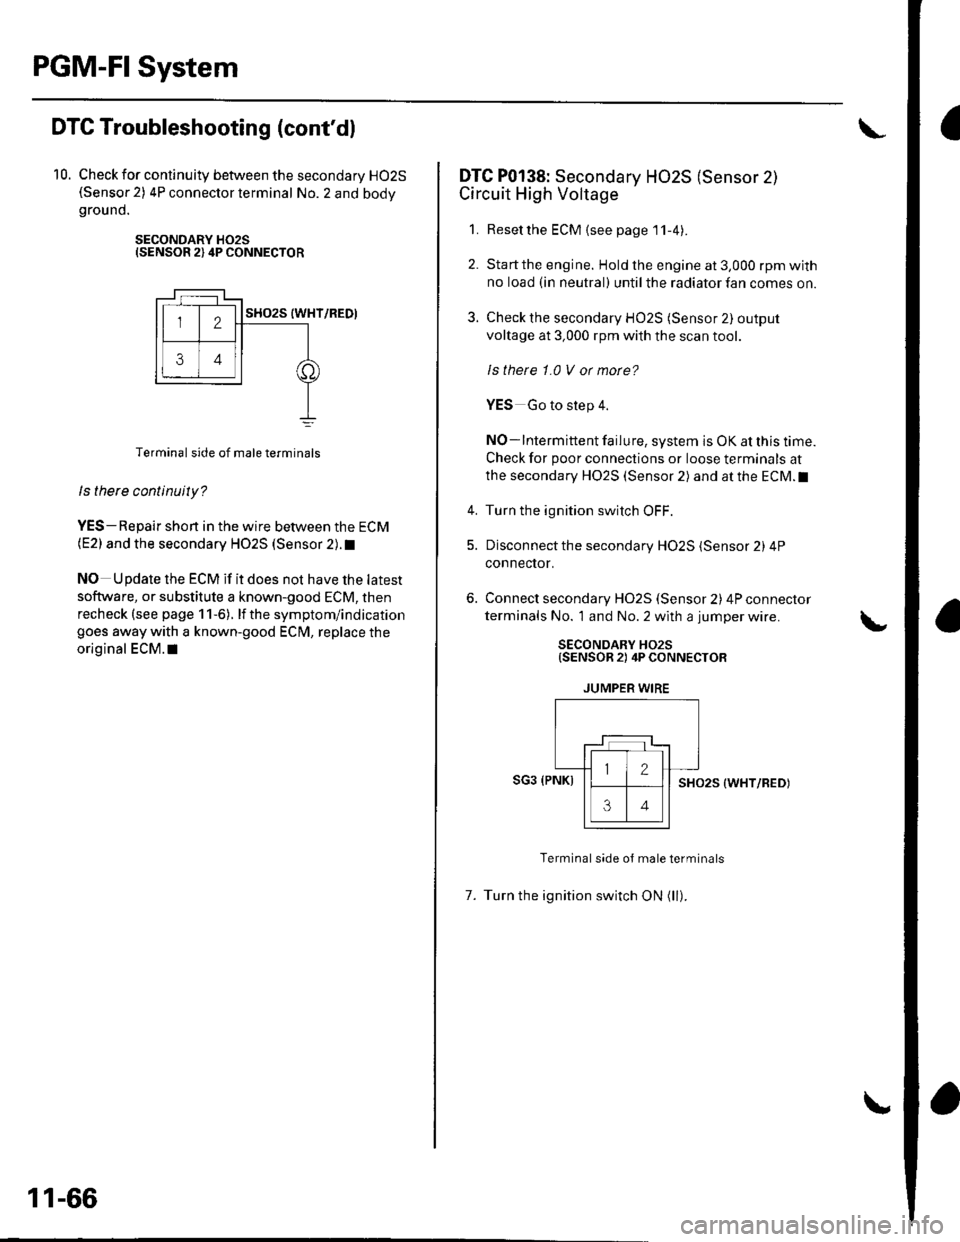
10. Check for continuity between the secondary HO2S(Sensor 2) 4P connector terminal No. 2 and bodygrou nd.
SECONDARY H02SISENSOR 2) 4P CONNECTOR
Terminal side of male terminals
ls there continuity?
YES-Repair shon in the wire between the ECM(E2) and the secondary HO2S (Sensor 2). t
NO Update the ECM if it does not have the latest
software, or substitute a known-good ECM, then
recheck (see page 1 1-6). lf the symptom/indication
goes away with a known-good ECM, replace the
original ECM.I|
11-66
DTC P0138: Secondary HO2S (Sensor 2)
Circuit High Voltage
1. Resetthe ECM {see page'11-4).
2. Startthe engine. Hold the engine at 3,000 rpm with
no load (in neutral) until the radiator fan comes on.
3. Check the secondary HO2S (Sensor 2) output
voltage at 3,000 rpm with the scan tool.
ls thete 1.0 V or morc?
YES Go to step 4.
NO-lntermittent failure, system is OK at this time.
Check for poor connections or loose terminals at
the secondary HO2S (Sensor 2) and at the ECM.I
4. Turn the ignition switch OFF.
5. Disconnect the secondary HO2S (Sensor 2) 4P
connector.
Connect secondary H02S (Sensor 2) 4P connector
terminals No. 1 and No. 2 with a jumper wire.
SECONDARY HO2S{SENSOR 2) 4P CONNECTOR
JUMPER WIRE
SG3 (PNKISHO25 (WHT/RED)
Terminal side oJ male terminals
7. Turn the ignition switch ON (ll).
Page 274 of 1139

8.Check the secondary H02S (Sensor 2) output
voltage with the scan tool,
ls there 1.0 V ot mote?
YES-Go to step 9.
NO Replace the secondary HO2S (Sensor 2).1
Turn the ignition switch OFF.
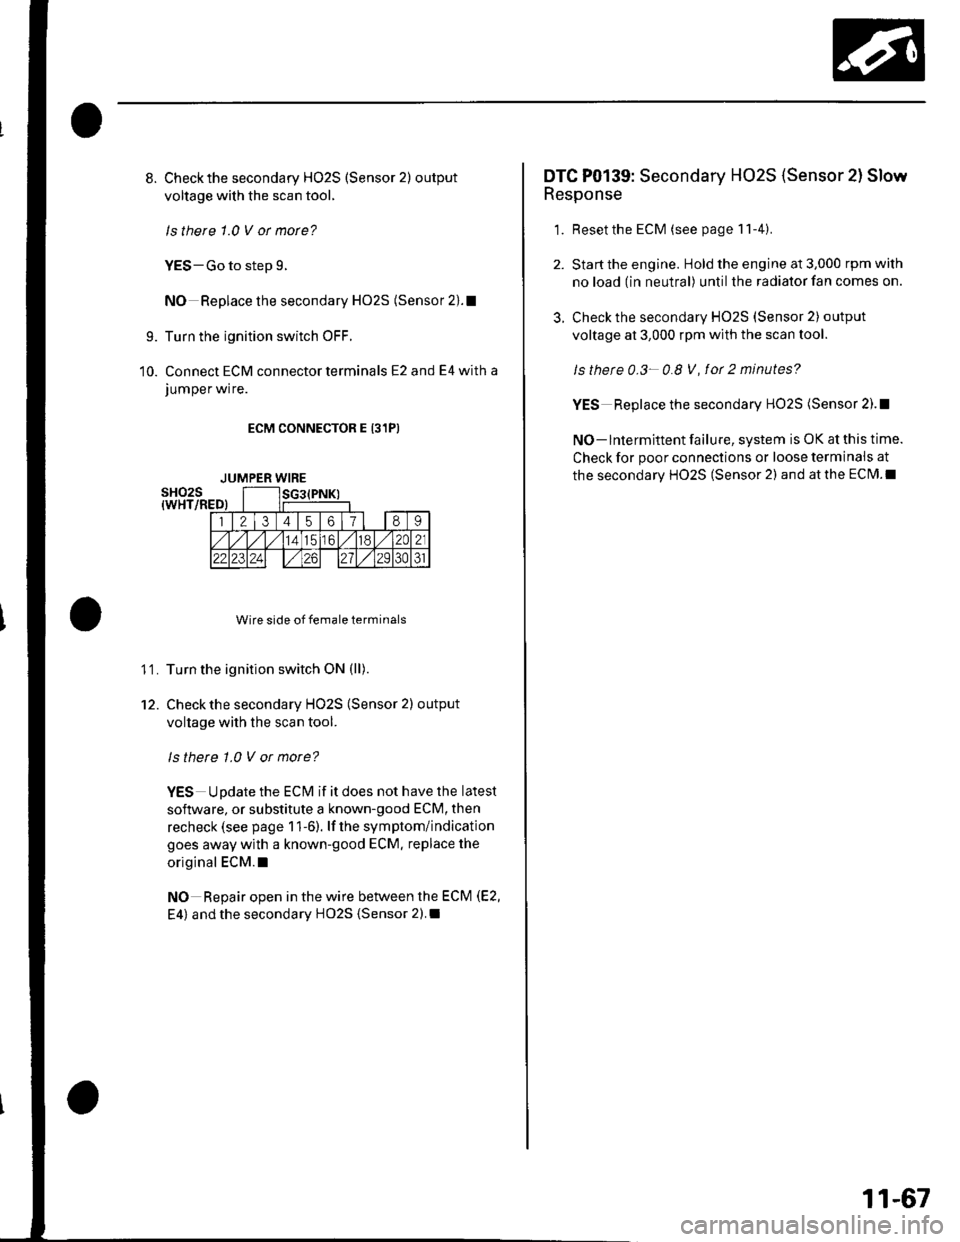
Connect ECM connector terminals E2 and E4 with a
JUmper wrre.
ECM CONNECTOR E 131PI
Wire side of female terminals
Turn the ignition switch ON (ll).
Check the secondary HO2S (Sensor 2) output
voltage with the scan tool.
ls there 1.0 V or more?
YES Update the ECM if it does not have the latest
soflware, or substitute a known-good ECM, then
recheck (see page 1 1-6). lf the symptom/indication
goes away with a known-good ECM. replace the
original ECM.I
NO Repair open in the wire between the ECM (E2,
E4) and the secondary HO2S {Sensor 2).I
9.
10.
11.
12.
JUMPER WIRE
3.
DTC P0139: Secondary HO2S (Sensor 2l Slow
Response
1. Resetthe ECM (see page 11-4).
Start the engine. Hold the engine at 3,000 rpm with
no load (in neutral) until the radiator fan comes on.
Check the secondary HO2S (Sensor 2) output
voltage at 3,000 rpm with the scan tool.
ls thete 0.3- 0.8 V, fot 2 minutes?
YES Replace the secondary HO2S (Sensor 2).!
NO- lntermittent failure, system is OK at this time.
Check for poor connections or loose terminais at
the secondary HO2S (Sensor 2) and at the ECM.I
11-67
Page 275 of 1139

PGM-FISystem
3.
DTC Troubleshooting (cont'dl
DTC P0141: Secondary HO2S (Sensor 2l
Heater Circuit Malfunction
1. Reset the ECM (see page 1 l-4)
2. Start the engine.
ls DTC P0141 indicated?
YES-Go to step 3.
NO-lntermittent failure, system is OK at this time.
Check for poor connections or loose terminals at
the secondary HO2S (Sensor 2) and at the ECM.I
Turn the ignition switch OFF.
Disconnect the secondary H02S (Sensor 2) 4P
connecror.
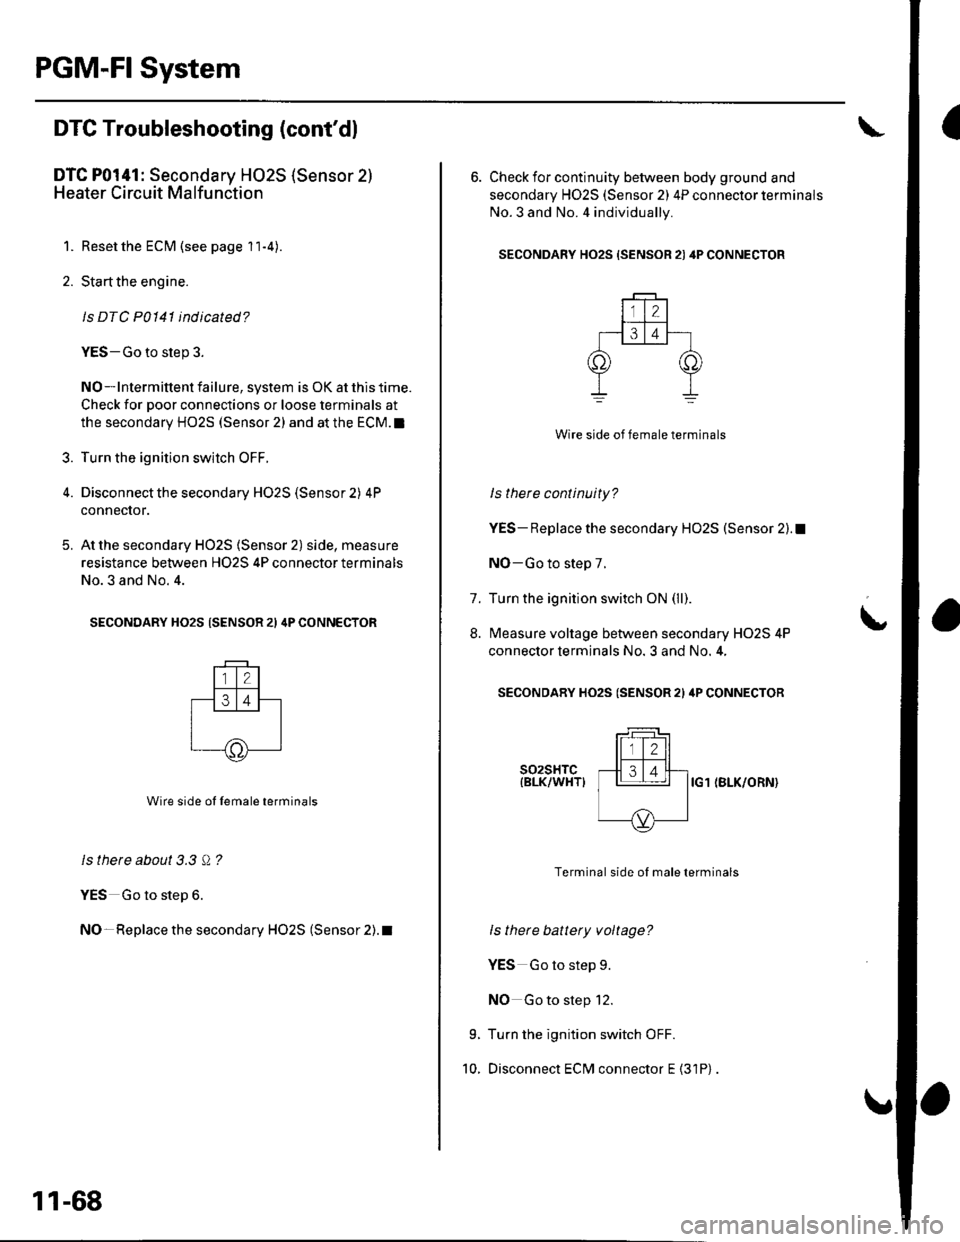
At the secondary HO2S (Sensor 2) side, measure
resistance between H02S 4P connector terminals
No.3 and No. 4.
SECONDARY HO2S (SENSOR 21 4P CONNECTOR
Wire side ol lemale terminals
ls there about 3.3 Q ?
YES Go to step 6.
NO- Replace the secondary HO2S (Sensor 2). t
5.
11-68
6. Check for continuity between body ground and
secondary H02S (Sensor 2) 4P connector terminals
No.3 and No. 4 individually.
SECONDARY HO2S {SENSOR 21 4P CONNECTOR
Wire side of female terminals
ls there continuity?
YES- Replace the secondary HO2S (Sensor 2).1
NO-Go to step 7.
Turn the ignition switch ON (ll).
Measure voltage between secondary H02S 4P
connector terminals No. 3 and No. 4,
SECONDARY HO2S (SENSOR 2l ilP CONNECTOR
t
7.
8.
9.
10.
s02sHTc{BLK/WHTIIG1 (BLK/ORN}
Terminal side of male terminals
ls there battery voltage?
YES Go to step 9.
NO Go to step 12.
Turn the ignition switch OFF.
Disconnect ECM connector E {31P)
Page 276 of 1139

1 1. Check for continuity between ECM connector
terminal E6 and body ground.
ECM CONNECTOR E {31PI
Wire side o{f Iemale terminals
ls therc continuity?
YES-Repair short in the wire between the ECM
(E6) and the secondary HO2S (Sensor 2).1
NO-Update the ECM if it does not have the latest
soflware, or substitute a known-good ECM, then
recheck (see page 1 1-6). lf the symptom/indication
goes away with a known-good ECM, replace the
original ECM.I
Measure voltage between secondary HO2S
(Sensor 2) 4P connector terminal No. 4 and body
g rou nd.
SECONDARY HO2S {SENSOR 2I 4P CONNECTOR
tFff I
l[faJl--ro'14 | IBLK/OFN)
YI
Terminal side of male terminals
ls there battety voltage?
YES Go to step 13.
NO-Checkthe No. 4 ACG (10A) fuse in the under-
dash fuse/relay box. lf the fuse is OK, repair open in
the wire between the secondary HO2S (Sensor 2)
and No. 4 ACG (10A) fuse.l
13.
14.
t5.
to.
Turn the ignition switch OFF.
Reconnect the secondary HO2S (Sensor 2) 4P
connector.
Disconnect ECM connector E (31P).
Turn the ignition switch ON (ll).
Measure voltage between ECM connector terminal
E6 and A5.
ECM CONNECTORS
A (31 P)
E {31 P}
Wire side ot female terminals
Is there 0-1 V or less?
YES-Repair open in the wire between the ECM
(E6) and the secondary HO2S (Sensor 2). !
NO Update the ECM if it does not have the latest
software, or substitute a known-good ECM, then
recheck (see page 1 1-6). lf the symptom/indication
goes away with a known-good ECM, replace the
original ECM. a
17.
11-69
Page 277 of 1139

PGM-FI System
DTC Troubleshooting (cont'dl
DTC P0171: Fuel System Too Lean
DTC P0172: Fuel System Too Rich
NOTE: lf some of the DTCS listed below are stored at
the same time as DfC PO17'l and/ot PO172,
troubleshoot those DTCS first, then recheck for P0171
andlot P0112.
P0107, P0108. P1 128. P1 129: Manifold absolute
pressure (MAP) sensor
P1 162. P1 166, P 1 167: 4,,/F sensor (Sensor 1 ) heater
P0137, P0138: Secondary HO2S (Sensor 2)
P014'l: Secondary HO2S (Sensor 2) heater
P1259: VTEC system
1. Check the fuel pressure (see page 11-'145).
ls luel pressure OK?
YES Go to step 2.
NO Check these items:
. lf the pressure is too high, replace the fuel
pressure regulator (see page 11-152).1. lf the pressure istoo low.checkthefuel pump,
the fuel feed pipe, the fuel filter, and replace the
fuel pressure regulator (see page 11-152).I
2. Start the engine. Hold the engine at 3,000 rpm with
no load (in neutral) until the radiator fan comes on.
11-70
3. Turn the ignition switch OFF.
4. With a vacuum pump, apply vacuum to the
evaporative emission (EVAP) canister purge valve
(A) from the evaporative emission (EVAP) canister
side.
' A973AX-041-XXXXX
Does it hold vacuum?
YES-Check the engine valve clearances and adjust
if necessary, lf the valve clearances are OK, replace
the injectors (see page 1 1-1 1 1).1
NO-Replace the EVAP canister purge valve.l
Page 278 of 1139

DTC P0300: Random Misfire and Any Combination of the Following:
DTC P0301: No. 1 Cylinder Misfire
DTC P0302: No. 2 Cvlinder Misfire
DTC P0303: No, 3 Cvlinder Misfire
DTC P0304: No. 4 Cvlinder Misfire
NOTE:. lfthe misfiring is frequent enough to trigger detection of increased emissions during two consecutive driving cycles.
the MIL will come on, and DTC P0300 (and some comlrination of P0301 through P0304) will be stored.. lf the misfiring is frequent enough to damage the catalyst, the MIL will blink whenever the misfiring occurs, and OTC
P0300 (and some combination of P0301 through P0304) will be stored. When the misfirlng stops, the MIL will remain
on.
1. Troubleshoot the following DTCs first if any of them were stored along with the random misfire DTC(s):
P0'107, P0108, P1128, P1129r N4anifold absolute pressure (MAP) sensor
P0111. P0'172t Fuel svstem
P0335. P0336: Crankshaft position (CKP) sensor
P0505: ldle control system
P1 149, Pl 162, P1 163, P1 164, P 1 165: Air fuel ratio (Ay'F) sensor
P1259: VTEC system
P1361, P1362: Camshaft position (CMP) sensor B {Top dead center (TDC) sensor)
P1519: ldle air control (lAC) valve
2. Test-drive the vehicle to verify the symptom.
3. Findthesymptom inthechart below, and dothe related procedures in the order listed until you find the cause.
SymptomProcedure(slAlso check foi:
Random misfire only
at low RPM and
under load
Check fuel pressure (see page 1 1-145).. Low compressron.. Low quality fuel.
Random misfire only
du ring acceleration
Check fuel pressure (see page 11-145).Malfunction in the
VTEC system (see page
1'�t-123).
Random misfire at
high RPM, under
load, or under
random conditions
Check fuel pressure (see page 11-145).Correct engine valve
clearances (see page 6-
91.
11-71
Page 284 of 1139

DTG P0325: Malfunction in Knock Sensor
Circu it
1. Reset the ECM (see page 11-4).
2. Start the engine. Hold the engine at 3,000 rpm with
no load (in neutral) until the radiator fan comes on,
then let it idle.
3. Hold the engine at 3,000-4,000 rpm for at least
60 seconds.
ls DTC P0325 indicated?
YES-Go to step 4.
NO Intermittent failure, system is OK at this time.
Check for poor connections or loose terminals at
the knock sensor and at the ECM.I
4. Turn the ignition switch OFF.
5. Disconnect the starter subharness 6P connector.
6. Check for continuity between ECM connector
terminal Ag and body ground.
ECM CONNECTOR A 131P)
Wire side of lemale terminals
ls there continuity?
YES-Repair short in the wire between the ECM(A9) and the starter subharness 6P connector.l
NO Go to step 7.
7. Connect staner subharness 6P connector terminal
No. 5 to body ground with a jumper wire.
8.
STARTER SUAHARNESS6P CONNECTOR
l1l213ll,/l5l6l._
KS IJUMPER|RED/BLU) IW|REI
Wire side of female terminals
Check for continuity between body ground and
ECM connector terminal A9.
9.
ECM CONNECTOR A {31PI
Wire side of female terminals
ls there continuity?
YES-Go to step 9.
NO Repair open in the wire between the ECM (A9)
and the starter subharness 6P connector.l
Check the starter subharness between the 6P
connector and the knock sensor for an open or
short. lf it's OK, substitute a known-good knock
sensor and recheck.
ls DTC P0325 indicated?
YES Update the ECM if it does not have the latest
software. or substitute a known-good ECM, then
recheck {see page '11-6). lf the sym ptomlindication
goes away with a known good ECM, replace the
original ECM.I
NO Replace the original knock sensor and/or
sta rte r subharness.l
11-77
Page 285 of 1139

PGM-FI System
a
a
DTC Troubleshooting (cont'd)
DTC P0335: CKP Sensor No Signal
DTC P0336: CKP Sensor Intermittent
Interruption
'1. Reset the ECM (see page 1 '1-4).
2. Sta rt the engine.
ls DTC P0335 and/or P0336 indicated?
YES Go to step 3.
NO Intermittent failure, system is OK at this time.
Check for poor connections or loose terminals at
the CKP sensor and at the ECM.I
3. Turn the ignition switch OFF.
4. Disconnect the CKP sensor 3P connector.
5. Turn the ignition switch ON {ll).
6. Measure voltage between CKP sensor 3P connector
terminal No.3 and body ground.
CKP SENSOR 3P CONNECTOF
(YEL/BLK}
Wire sade of female terminals
Is there battery voltage?
YES- Go to step 7.
NO Repair open ln the wire between PGM-Fl main
relay 1 and the CKP sensor.!
IGP
123
11-78
7. Measure voltage between CKP sensor 3P connector
terminal No, 1 and body ground
CKP SENSOR 3P CONNECTOR
Wire side of female tef minals
ls there about 5 V?
YES Go to step L
NO Go to step 10.
8. Measure voltage between CKP sensor 3P connector
terminals No.2 and No. 3.
CKP SENSOR 3PCONNECTOR
,llYtLL"l
(LGl{BRN/YELI
Wire side of female terminals
ls there battery voltage?
YES Go to step 9.
NO Repair open in the wire between the CKP
sensor and G 101 .I
9. Substitute a known-good CKP sensor and recheck.
ls DTC P0335 and/or P0336 indicated?
YES Update the ECM if it does not have the latest
software. or substitute a known good ECM, then
recheck {see page 1 1-6). lf the symptom/indication
goes away with a known-good ECM, replace the
original ECM.I
NO Replace the original CKP sensor.l