Page 99 of 1139
Cylinder Head
Component Location Index (cont'd)
CAMSHAFT POSITIONICMP} SENSOR
TOP DEAD CENTER(TDC) SENSOR
CAMSHAFTHOLDER
f\
fr
T
F]
Fg
Y
R
LI
CAM CHAINGUIDE B
/EEI
g----- -"-oowetew
EXHAUST CAMSHAFTSPROCKETRemoval, page 6 24Installation, page 6-25
EXHAUST CAMSHAFT
ROCKER ARMASSEMBLYOverhaul, page 6 27Inspection, page 6-28
6-4
Page 102 of 1139

WEC Rocker Arms Test
Special Tools Required. Air pressure regulator 07AAJ-PNAA100. VTEC air adaoter 07ZAJ-PNAA100. WEC air stoDoer 07ZAJ-PNAA200. Air joint adapter 07ZAJ-PNAA300
1. Remove the cylinder head cover (see page 6-22).
2. Set the No. 1 piston at top dead center (TDC) (see
step 1 on page 6-12).
3. Verify that the intake primary rocker arm (A) moves
independently of the intake secondary rocker arm
(B).
. lf the intake primary rockerarm does not move,
remove the primary and secondary rocker arms
as an assembly and check that the pistons in the
secondary and primary rocker arms move
smoothly. lf any rocker arm needs replacing,
replace the primary and secondary rocker arms
as an assemblv, and test.. lfthe intake primary rocker arm moves freely, go
to step 4.
6.
Repeat step 3 on the remaining intake primary
rocker arms with each piston at TDC. When all the
primary rocker arms pass the test, go to step 5.
Check that the air pressure on the shop air
compressor gauge indicates over 400 kPa
(4 kgflcm', 57 psi).
Inspect the valve clearance (see page 6-9).
Remove the sealing bolt (A)from the relief hole,
and install the VTEC air stopper (B).7.
OTAAJ.PNAAlOODOTZAJ-PNAA3OO
Remove the No. 2 and No. 3 camshaft holder bolts,
and installthe VTEC air adapters (C) finger-tight.
Connect the air joint adapter (D), and air pressure
regulator with a 0-100 psi gauge (E).
(cont'd)
OTZAJ.PNAAlOO
6-7
Page 104 of 1139
9. Apply air to the advance hole to release the lock.
Check that the VTC actuator moves smoothly. lf the
VTC actuator does not move smoothly, replace the
VTC acluator.
10.
Valve Glearance Adiustment
NOTE: Adjust the valves only when the cylinder head
temperature is less than 100'F (38'C).
1. Remove the cylinder head cover (see page 6-22).
2. Set the No. 1 piston at top dead center (TDC). The
punch mark (A) on the variable valve timing control
(VTC) actuator and the punch mark (B) on the
exhaust camshaft sprocket should be at the top.
Align the TDC marks (C) on the VTC actuator and
exhaust camshaft sprocket.
{cont'd)
6-9
Page 107 of 1139

Cylinder Head
Crankshaft Pulley Removal and
Installation (cont'dl
Installation
1. Clean the crankshaft pulley (A), crankshaft (B), bolt(C). and washer (D). Lubricate as shown below.
. .: Clean
O; Lubricate
Installthe crankshaft pulley, and hold the pulley
with holder handle (A) and holder attachment {B).
B07NAB-0010iroA
A07JAB-001020A
Tighten the bolt to 245 N.m (25.0 kgf.m, 181 tbf.ft)with a torque wrench and 19 mm socket (C). Do notuse an impact wrench.
Install the splash shield (see step 20 on page 5-12).
Insta ll front tires/wh eels.
ll
ll
t[] rL-'....-----=a
(-, ,
5U-1JItt-
5.
6-12
\-
Cam Chain Removal
NOTE: Keep the cam chain away from magnetic fields.
1. Turn the crankshaft pulley so ils top dead center(TDC) mark (A) lines up with the poinrer (B).
Remove the front tires/wheels.
Remove the splash shield.
a
2.
3.
-,,--.=.-----__--_
4. Remove the drive belt (see page 4-26).
5. Remove the cylinder head cover (see page 6-22).
6. Remove the crankshaft pulley (see page 6-11).
\
Page 110 of 1139
t
18. Remove the cam chain guide A (A) and tensioner
arm (B).
g"'-
19. Remove the cam chain.
,ot./6. | \{n$1J;
Cam Chain Installation
NOTE: Keep the cam chain away from magnetic fields.
1. Set the crankshaft to top dead center (TDC). Align
the TDC mark {A) on the crankshaft sprocket with
the pointer (B) on the cylinder block.
Setthe camshafts to TDC. The punch mark (A) on
the variable valve timing control {VTC) actuator and
the punch mark (B) on the exhaust camshaft
sprocket should be at the top. Align the TDC marks
(C) on the VTC actuator and exhaust camshaft
sprocKet.
(cont'd )
6-15
Page 118 of 1139

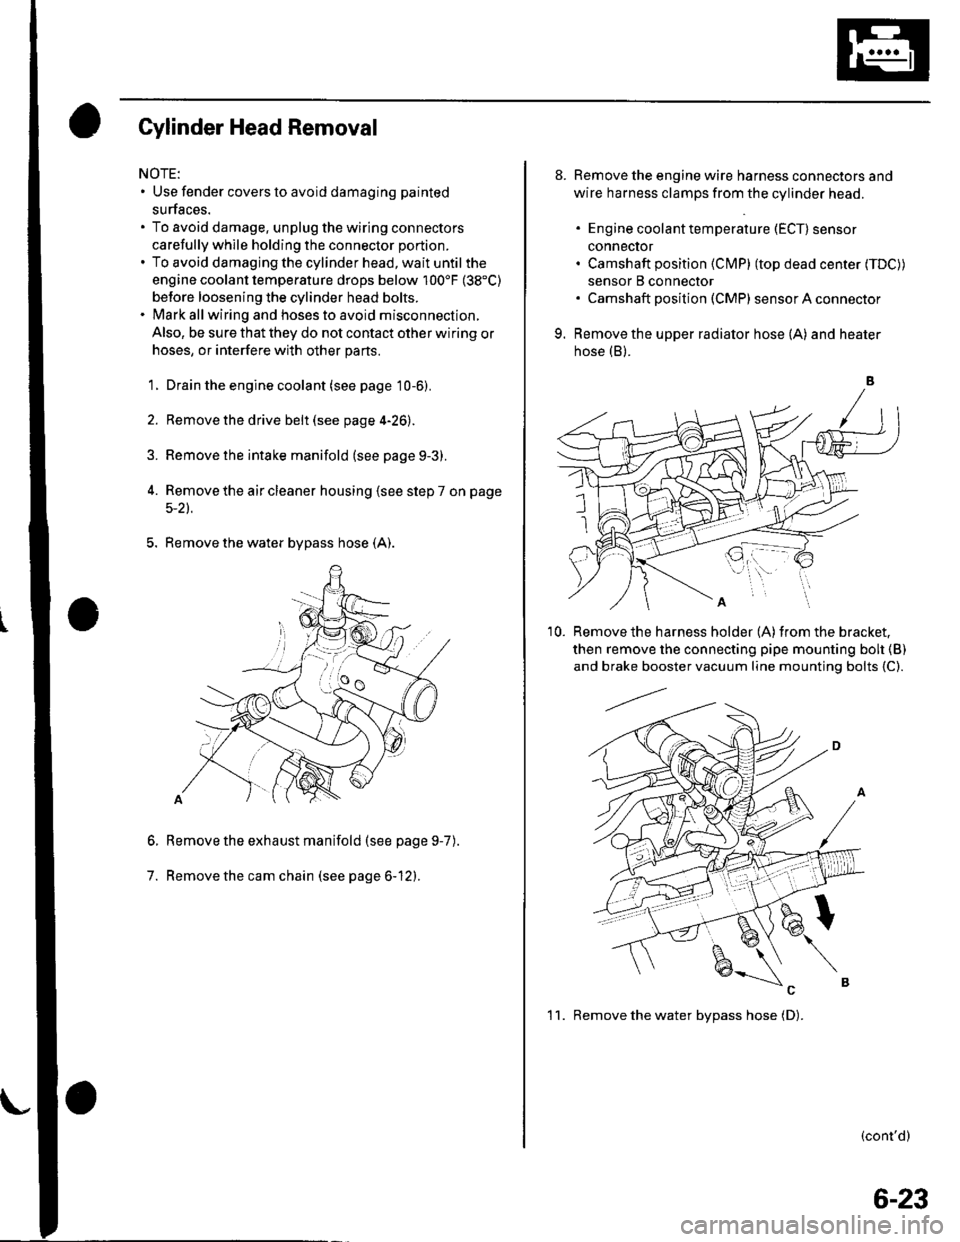
Gylinder Head Removal
NOTE:. Use fender covers to avoid damaging painted
surfaces.
To avoid damage, unplug the wiring connectors
carefully whlle holding the connector portion.
To avoid damaging the cylinder head, wait until the
engine coolant temperature drops below 100'F (38"C)
betore loosening the cylinder head bolts.
Mark all wiring and hoses to avoid misconnection.
Also, be sure that they do not contact other wiring or
hoses, or interfere with other parts.
'1.
2.
3.
Drain the engine coolant (see page 10-6).
Remove the drive belt (see page 4-26).
Remove the intake manifold {see page 9-3).
Remove the air cleaner housing (see step 7 on page
5-2t.
5. Remove the water bypass hose (A).
Remove the exhaust manifold (see page 9-7
Remove the cam chain (see page 6-12).
6.
7.
).
8. Remove the engine wire harness connectors and
wire harness clamps from the cylinder head.
. Engine coolant temperature (ECT) sensor
conneclor. Camshaft position (Cl\4P) (top dead center (TDC))
sensor B connector. Camshaft posilion (CMP) sensor A connector
9. Remove the upper radiator hose (A) and heater
hose (B).
'10. Remove the harness holder (A)from the bracket,
then remove the connecting pipe mounting boh {B)
and brake booster vacuum line mounting bolts {C).
(cont'd)
1 1. Remove the water bvpass hose (D).
6-23
Page 134 of 1139
Cylinder Head Installation
Install the cylinder head in the reverse order of
removat:
1. Clean the cylinder head and block surface.
2. Install the new cylinder head gasket (A) anddowel
pins (B) on the cylinder block. Always use a new
cylinder head gasket.
Set the crankshaft to top dead center {TDC). Align
the TDC mark (A) on the crankshaft sprocket with
the pointer (B) on the cylinder block.
4. Install the cylinder head on the block.
5. Measure the diameter of each cylinder head bolt at
ooint A and Doint B.
a 50 mm (2.0 in.l
f.f )>-
A '15 mm {'1.8 in.)"<>.
lf either diameter is less than 10.6 mm {0.42 in.),
replace the cvlinder head bolt.
(cont d)
6-39
Page 161 of 1139

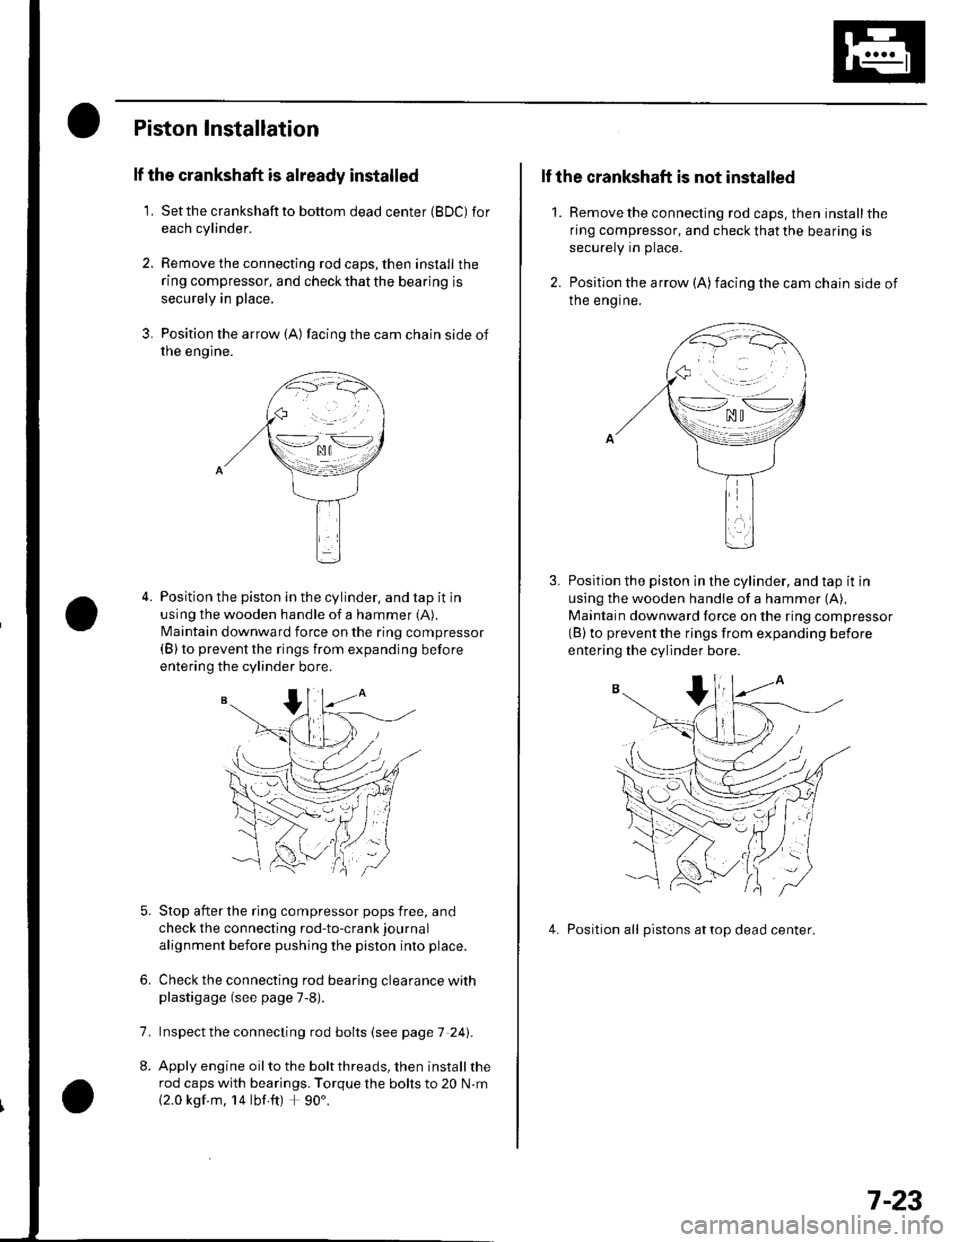
Piston Installation
lf the crankshaft is already installed
1. Setthe crankshaftto bottom dead center (BDC) for
each cylinder.
2. Remove the connecting rod caps, then install the
ring compressor, and check that the bearing is
securely in place,
3. Position the arrow {A) facing the cam chain side of
rne engtne.
Position the piston in the cylinder, and tap it in
using the wooden handle of a hammer (A).
N4aintain downward force on the ring compressor(B) to prevent the rings from expanding before
entering the cylinder bore.
Stop after the ring compressor pops free, and
check the connecting rod-to-crank journal
alignment before pushing the piston into place.
Check the connecting rod bearing clearance withplastigage (see page 7-8).
lnspect the connecting rod bolts (see page 7 241.
Apply engine oil to the bolt threads, then install the
rod caps with bearings. Torque the bolts to 20 N.m
{2.0 kgf m, 14 lbf ft) + 90'.
6.
7.
2.
1.
lf the crankshaft is not installed
Remove the connecting rod caps. then install the
ring compressor, and check that the bearing is
securely in place.
Position the arrow (A)facing the cam chain side of
Ine engrne.
Position the piston in the cylinder, and tap it in
using the wooden handle of a hammer (A),
Maintain downward force on the ring compressor(B) to prevent the rings from expanding before
entering the cylinder bore.
4. Position all pistons attop dead center.
\--lno n\-.--l. ^u t
>-*/zi
.,.'_\pf{
wr
(( 'V,/ :
7-23