Page 85 of 395
When the remote transmitter’s
battery begins to get weak, it may
take several pushes on the button to
lock or unlock the doors, and the
LED will not light. Replace the
battery as soon as possible.
Battery type: CR1616To replace the battery:
Separate the transmitter by prying
its middle seam with your
f ingernail. Remove the screw at the base of
the transmitter with a small
Phillips-head screwdriver.
To cancel Panic mode bef ore 30
seconds, press any button on the
remote transmitter. You can also
turn the ignition switch to ON (II). Panic mode allows you to remotely
activate your car’s horn and exterior
lights to attract attention. The horn
sounds and the exterior lights f lash
f or about 30 seconds. To activate
panic mode, press and hold the
PANIC button f or about two seconds.
1.
2.On all models except U.S. and CanadaDX Replacing the Battery
Panic Mode
Keys and Locks
Inst rument s and Cont rols82
SCREW
Page 102 of 395

Turnthekeyclockwiseagain,and
hold it. All f our windows start to
open. To stop the windows,
release the key.
To close the windows f urther, turn
andholdthekeyagain. Turn the key counterclockwise
again, and hold it. All four
windowsstarttoclose.Tostopthe
windows, release the key. Turn the key counterclockwise,
then release it. Insert the key in the driver’s door
lock.
To close: To open the windows f urther, turn
andholdthekeyagain.
You can open and close the windows
with the key in the driver’s door lock.
To open: Insert the key in the driver’s door
lock.
Turn the key clockwise, then
release it.
You cannot close the windows with
the remote transmitter. Press the UNLOCK button once
to unlock the driver’s door.
Press the UNLOCK button a
second time, and hold it. The
passenger’s doors unlock, and all
f our windows start to open. To
stop the windows, release the
button.
To open the windows f urther,
press the button again.
You can open all of the windows
from the outside with the remote
transmitter.
1.
2.
3.
1.
2.
3.
4.
1.
2. 3.
4.
All models except U.S. and Canada DX
Power Windows
Inst rument s and Cont rols
Opening t he Windows wit h t he
Remote Transmitter
Opening/Closing t he Windows wit hthe Key
Power Window Control
Operations
99
UNLOCK BUTTON
CloseOpen
Page 107 of 395
Be caref ul when you are using the
beverage holders. A spilled liquid
that is very hot can scald you or your
passengers. Liquid can also spill
f rom the door pocket beverage
holders when you close the doors.
Useonlyresealablecontainersinthe
door pockets.The rear seat also has a beverage
holder in the center armrest. To use
it, pivot the armrest down.On all models except U.S. and Canada
DX
Beverage Holders
Inst rument s and Cont rols104
FRONT DOOR
REAR DOOR
Page 112 of 395
After all doors are closed tightly, the
light dims slightly, then f ades out in
about 30 seconds. In the ON position,
the ceiling light stays on
continuously.Turn on the spotlight by pushing the
lens. Push the lens again to turn it
of f . You can use the spotlights at all
times.
The ceiling light (with the switch in
the center position) also comes on
when you unlock the door with the
remote transmitter (see page ).
The light f ades out af ter all doors are
closed.
The courtesy light between the
spotlights comes on when you turn
the parking lights on. To adjust its
brightness, turn the Select/Reset
knob on the instrument panel.
80
All models except DX
Interior Lights
Inst rument s and Cont rols
Spotlights
109
On LX models
On EX and EX-V6 modelsCOURTESY LIGHT
Page 113 of 395
Your car also has a courtesy light in
the ignition switch. This light comes
on when you open the driver’s door.
It remains on f or several seconds
af ter the door is closed. Each f ront door has a courtesy light.
This light comes on when you open
the door.
On all models except U.S. and CanadaDX
Interior Lights
Inst rument s and Cont rols
Courtesy Lights
110
IGNITION SWITCH LIGHT
DOOR LIGHT
Page 140 of 395

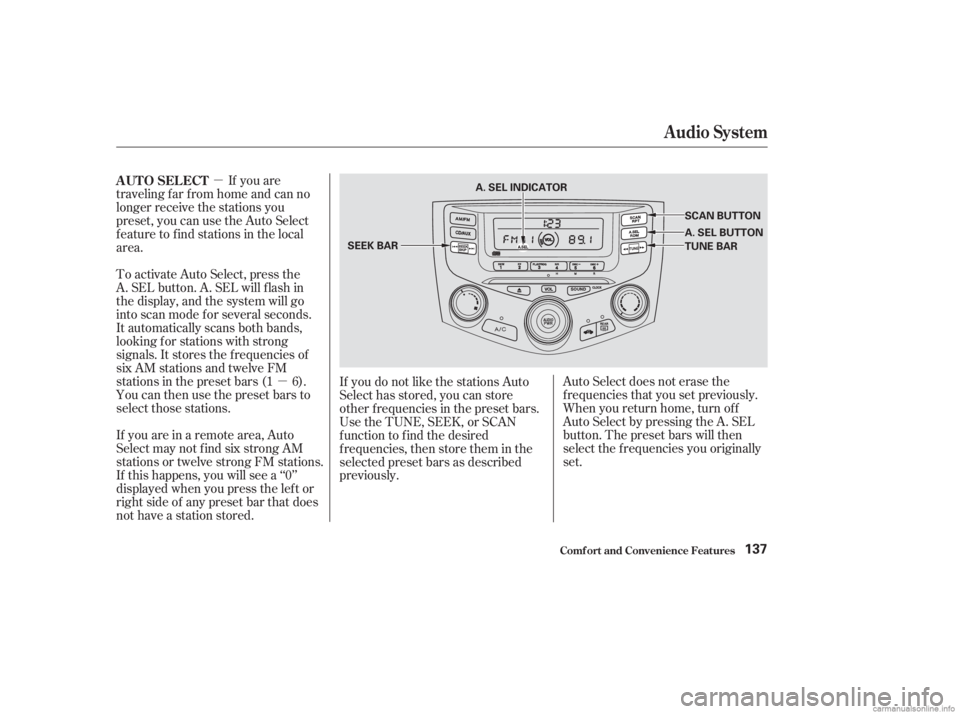
�µ�µ
If you are
traveling far from home and can no
longer receive the stations you
preset, you can use the Auto Select
feature to find stations in the local
area.
Auto Select does not erase the
f requencies that you set previously.
When you return home, turn of f
Auto Select by pressing the A. SEL
button. The preset bars will then
select the f requencies you originally
set.
To activate Auto Select, press the
A. SEL button. A. SEL will f lash in
the display, and the system will go
into scan mode f or several seconds.
It automatically scans both bands,
looking f or stations with strong
signals. It stores the f requencies of
six AM stations and twelve FM
stations in the preset bars (1 6).
You can then use the preset bars to
select those stations.
If you are in a remote area, Auto
Select may not f ind six strong AM
stations or twelve strong FM stations.
If this happens, you will see a ‘‘0’’
displayed when you press the lef t or
right side of any preset bar that does
not have a station stored.
If you do not like the stations Auto
Select has stored, you can store
other f requencies in the preset bars.
UsetheTUNE,SEEK,orSCAN
function to find the desired
f requencies, then store them in the
selected preset bars as described
previously.
AUTO SELECT
Audio System
Comf ort and Convenience Feat ures137
SCAN BUTTON
A. SEL BUTTON
TUNE BAR
A. SEL INDICATOR
SEEK BAR
Page 142 of 395

If your car’s battery is disconnected
or goes dead, the time setting will be
lost. To set the time again, f ollow the
setting procedure.
The audio system usually shows the
time when the ignition switch is in
ACCESSORY (I) or ON (II). It
shows the operation mode of the
radio, CD player, or optional CD
changer when you operate them,
then goes back to the time display
af ter three seconds.
You can use the R (Preset 6) side of
the bar to quickly set the time to the
nearest hour. Press the R (Preset 6)
side of the bar while pressing the
SOUND button. If the displayed time
is bef ore the half hour, pressing R
sets the clock back to the previous
hour. If the displayed time is af ter
the half hour, pressing R sets the
clock f orward to the beginning of the
next hour.
To set the time, press and hold the
SOUND button until the audio
system beeps and the clock f lashes.
To set the hours, press and hold the
H (Preset 4) side of the bar until the
numbers advance to the desired time.
To set the minutes, press and hold
the M (Preset 5) side of the bar until
the numbers advance to the desired
time.
When you are f inished, press the
SOUND button again.
For example:
1:06 will reset to 1:00
1:52 will reset to 2:00
Digital Clock
Audio System
Comf ort and Convenience Feat ures139
DIGITAL CLOCK
PRESET BARS
SOUND BUTTON
Page 144 of 395

You can use the SEEK/SKIP bar
while a disc is playing to select
passages and change tracks.
Press the eject button to remove the
disc f rom the drive.
If you eject the disc, but do not
remove it from the slot, the system
will automatically reload the disc
af ter 15 seconds and put the CD
player in pause mode. To begin
playing the disc, press the CD button.
You can switch to the radio while a
CD is playing by pressing the AM/
FM button. Press the CD button to
return to playing the CD. The CD
will begin playing where it lef t of f . When the system reaches the end of
the disc, it will return to the begin-
ning and play the disc again.
If you turn the system of f while a CD
is playing, either with the PWR/VOL
knob or by turning off the ignition,
the disc will stay in the drive. When
youturnthesystembackon,theCD
will begin playing where it lef t of f . To move rapidly within a track, press
andholdtheSEEK/SKIPbar.Press
the sidetomoveforward.Press
the sidetomovebackward.
Release the bar when the system
reaches the point you want.
Each time you press and release the
side of the SEEK/SKIP bar,
the system skips forward to the
beginning of the next track. Press
and release the side to skip
backward to the beginning of the
current track. Press it again to skip
to the beginning of the previous
track.
CONT INUED
Comf ort and Convenience Feat ures
Audio System
141