Page 150 of 395
 �Û
The tape direction indicator will light
to show you which side of the
cassette is playing. The indicates
thesideyouinsertedfacingupward
is now playing. If you want to play
the other side, press th")
�Û
The tape direction indicator will light
to show you which side of the
cassette is playing. The indicates
thesideyouinsertedfacingupward
is now playing. If you want to play
the other side, press the Preset 3
(PLAY/PROG) side of the preset
bar. Dolby noise reduction turns on when
you insert a cassette. The indi-
cator will light in the display. If the
tape was not recorded with Dolby
noise reduction, turn it of f by
pressing the Preset 4 (NR) side of
the preset bar.
Noise reduction remains of f until you
turn it on by pressing the button
again.If you turn the system of f while a
tape is playing, either with the PWR/
VOL knob or by turning of f the
ignition, the cassette will remain in
the drive. When you turn the system
back on, the cassette player will be in
pause mode. To begin playing, press
thePreset3(PLAY/PROG)sideof
the preset bar.
To switch to the radio or CD player
while a tape is playing, press the
AM/FM, or CD/AUX button. To
change back to the cassette player,
push the CD/AUX button.
When the system reaches the end of
the tape, it will automatically reverse
direction and play the other side. If
you want to remove the cassette
from the drive, press the eject button
on the cassette player.
Audio System
Comf ort and Convenience Feat ures147
Page 156 of 395
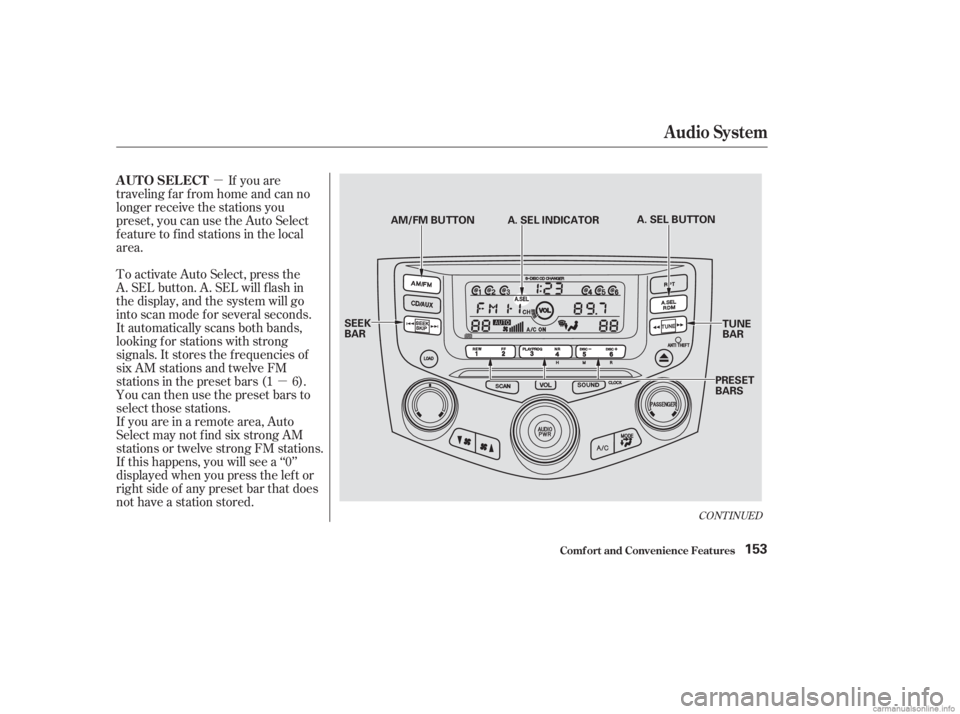
�µ�µ
If you are
traveling far from home and can no
longer receive the stations you
preset, you can use the Auto Select
feature to find stations in the local
area.
If you are in a remote area, Auto
Select may not f ind six strong AM
stations or twelve strong FM stations.
If this happens, you will see a ‘‘0’’
displayed when you press the lef t or
right side of any preset bar that does
not have a station stored. To activate Auto Select, press the
A. SEL button. A. SEL will f lash in
the display, and the system will go
into scan mode f or several seconds.
It automatically scans both bands,
looking f or stations with strong
signals. It stores the f requencies of
six AM stations and twelve FM
stations in the preset bars (1 6).
You can then use the preset bars to
select those stations.
CONT INUED
AUTO SELECT
Audio System
Comf ort and Convenience Feat ures153
PRESET
BARS
AM/FM BUTTON A. SEL INDICATOR
A. SEL BUTTON
TUNE
BAR
SEEK
BAR
Page 158 of 395
 �µ
�µ
These two
modes adjust the strength of the
sound coming f rom each speaker.
BAL adjusts the side-to-side strength,
while FAD adjusts the f ront-to-back
strength. For inf ormation, see page .
S")
�µ
�µ
These two
modes adjust the strength of the
sound coming f rom each speaker.
BAL adjusts the side-to-side strength,
while FAD adjusts the f ront-to-back
strength. For inf ormation, see page .
Select BAL or FAD by pressing the
SOUND button. Adjust the Balance
or Fader to your liking by turning
the VOLUME knob.
The displayed number shows you
the current setting.
When the adjustment level reaches
the center, you will see ‘‘ ’’. The system will automatically return
the display to the selected audio
mode about f ive seconds af ter you
stop adjusting a mode with the
SOUND button.
Bass, Treble, Balance, and Fader are
each adjustable. You select which of
these you want to adjust by pressing
the SOUND button. The mode
changes from BAS to TRE to FAD to
BAL,andthenbacktotheselected
audio mode, each time you press the
SOUND button.
Use these modes to
adjust the tone to your liking. Select
TRE or BAS by pressing the SOUND
button. Adjust the desired mode by
turning the VOLUME knob.
The displayed number shows you
the current setting.
When the adjustment level reaches
the center, you will see ‘‘ ’’.
175
Adjusting the Sound
Balance/Fader
Radio Frequencies and Reception
Treble/Bass
Audio System
Comf ort and Convenience Feat ures155
SOUND
BUTTON
ADJUSTMENT LEVEL
VOLUME KNOB
Page 159 of 395
 For example:1:06 would RESET to 1:00.
1:52 would RESET to 2:00.
If your car’s battery is disconnected
or goes dead, the time setting will be
lost. To set the time again, f ollow the
setting procedur")
For example:1:06 would RESET to 1:00.
1:52 would RESET to 2:00.
If your car’s battery is disconnected
or goes dead, the time setting will be
lost. To set the time again, f ollow the
setting procedure.
The audio system usually shows the
time when the ignition switch is in
ACCESSORY (I) or ON (II). It
shows the operation mode of the
radio, or CD changer when you
operate them, then goes back to the
time display af ter three seconds.
You can use the R (Preset 6) side of
the bar to quickly set the time to the
nearest hour. Press R while pressing
the SOUND button. If the displayed
time is before the half hour, pressing
Rsetstheclockbacktotheprevious
hour. If the displayed time is af ter
the half hour, pressing R sets the
clock f orward to the beginning of the
next hour.
To set the time, press and hold the
SOUND button until the audio
system beeps and the clock f lashes.
To set the hours, press and hold the
H (Preset 4) side of the bar until the
numbers advance to the desired time.
To set the minutes, press and hold
the M (Preset 5) side of the bar until
the numbers advance to the desired
time.
When you are f inished, press the
SOUND button again. Digital Clock
Audio System
Comf ort and Convenience Feat ures156
DIGITAL CLOCK
SOUND BUTTON PRESET BARS
Page 165 of 395
To remove the disc that is currently
playing, press the eject button. You
will see ‘‘EJEC’’ in the display. When
you remove the disc f rom the slot,
the system automatically begins the
Load sequence so you can load
another CD in that position. If you do
not load another CD, af ter 15
seconds, the system selects the
previous mode (AM, FM1, or FM2).
If you do not remove the disc f rom
the slot, the system will reload the
disc af ter 15 seconds, and select the
previous mode (AM or FM). To
begin playing the disc, press the CD
button.
To remove a different CD from the
changer,firstselectitwiththeleftor
right side of the appropriate preset
bar. When that CD begins playing,
press the eject button.
Removing CDs f rom t he Changer
Audio System
Comf ort and Convenience Feat ures162
CD BUTTONCD SLOTEJECT BUTTON
Page 169 of 395
 �Û
The tape direction indicator will light
to show you which side of the
cassette is playing. The indicates
thesideyouinsertedfacingupward
is now playing. If you want to play
the other side, press th")
�Û
The tape direction indicator will light
to show you which side of the
cassette is playing. The indicates
thesideyouinsertedfacingupward
is now playing. If you want to play
the other side, press the Preset 3
(PLAY/PROG) side of the preset
bar. Dolby noise reduction turns on when
you insert a cassette. The indi-
cator will light in the display. If the
tape was not recorded with Dolby
noise reduction, turn it of f by
pressing the Preset 4 (NR) side of
the preset bar.
Noise reduction remains of f until you
turn it on by pressing the button
again.If you turn the system of f while a
tape is playing, either with the PWR/
VOL knob or by turning of f the
ignition, the cassette will remain in
the drive. When you turn the system
back on, the cassette player will be in
pause mode. To begin playing, press
thePreset3(PLAY/PROG)sideof
the preset bar.
When the system reaches the end of
the tape, it will automatically reverse
direction and play the other side. If
you want to remove the cassette
from the drive, press the eject button
on the cassette player. To switch to the radio or CD player
while a tape is playing, press the
AM/FM, or CD/AUX button. To
change back to the cassette player,
push the CD/AUX button.
Audio System
Comf ort and Convenience Feat ures166
Page 175 of 395
 �µIf you are
traveling far from home and can no
longer receive the stations you
preset, you can use the Auto Select
feature to find stations in the local
area.
To activate Auto Select, touch the
Auto")
�µIf you are
traveling far from home and can no
longer receive the stations you
preset, you can use the Auto Select
feature to find stations in the local
area.
To activate Auto Select, touch the
Auto Select icon on the display. The
A.SEL indicator will f lash in the
upper display, and the system will go
into scan mode f or several seconds.
It automatically scans both bands,
looking f or stations with strong
signals. It stores the f requencies of
six AM stations and twelve FM
stations in the preset icons. You can
then use the preset icons to select
those stations.
If you are in a remote area, Auto
Select may not f ind six strong AM
stations or twelve strong FM stations.
If this happens, you will not see a
station number on the corresponding
preset icon. If you do not like the stations Auto
Select has stored, you can store
other f requencies in the preset icons.
UsetheTUNE,SEEK,orSCAN
function to find the desired
f requencies, then store them in the
selected preset icons as described
previously.Auto Select does not erase the
f requencies that you preset pre-
viously. When you return home, turn
of f Auto Select by touching the
AUTO SELECT icon. The preset
icons will then select the f requencies
you originally set.
AUTO SELECT
Audio System
Comf ort and Convenience Feat ures172
TUNE KNOB
A. SEL INDICATOR
AM/FM BUTTON
SEEK BAR SCAN BUTTON UPPER DISPLAY
PWR/VOL KNOB AUTO SELECT
(A. SEL) ICON AUDIO DISPLAY
BUTTON
PRESET ICONS
SCAN ICON
Page 176 of 395
 �µ�µTo adjust the bass
and treble, touch the or arrows next to the BASS or
TRE icons. The adjustment bar
above each button shows you the
current setting.
These two
modes adjust the strength of the
s")
�µ�µTo adjust the bass
and treble, touch the or arrows next to the BASS or
TRE icons. The adjustment bar
above each button shows you the
current setting.
These two
modes adjust the strength of the
sound coming f rom each speaker.
BAL adjusts the side-to-side strength,
while FAD adjusts the f ront-to-back
strength.
To see the audio screen when you
are f inished adjusting the sound,
touch the RETURN icon or wait five
seconds.
To adjust the balance, touch the left
or right arrows on the sound grid.
When you touch an arrow, the pink
bars on the grid move toward it,
changing the balance left or right. To
equalize the balance, touch the lef t or right arrow until each side has a
pink bar at the center of the sound
grid.
To adjust the fader, touch the front
or rear arrows on the sound grid.
When you touch an arrow, the blue
bars on the grid move toward it,
changing the f ader to the f ront orrear. To equalize the f ader, touch the
f ront or rear arrow until each side
has a blue bar at the center of the
sound grid.
Bass, Treble, Balance, and Fader are
each adjustable. To adjust them,
enter the sound grid by touching the
SOUNDicononthedisplayor
pressing the TUNE knob.
CONT INUED
Adjusting the Sound
Treble/Bass
Balance/Fader
Audio System
Comf ort and Convenience Feat ures173
TUNE/MODE KNOB
AUDIO DISPLAY
BUTTON
SOUND GRID
BASS ADJUST
ICONS
TREBLE ADJUST
ICONS FADER ADJUST
ICONS
BALANCE ADJUST
ICONS
RETURN ICON
 To remove the disc that is currently
playing, press the eject button. You
will see ‘‘EJEC’’ in the display. When
you remove the disc f rom the slot,
the system automatically begins the
Load se")