Page 294 of 395
Install the ignition coil into the
hole.
Connect the wire connector to the
ignition coil. Make sure it locks in
place.
Push the ignition coil down all the
way. Install the bolt.
Repeat this procedure f or the
other three spark plugs.
Reinstall the coil cover, and
tighten the f our nuts.The spark plugs in your car are a
special iridium-tipped design f or
longer lif e. The spark plugs should
be replaced according to the distance
recommendation in the maintenance
schedule.
9.
10.
11.
12.
13. NGK:
DENSO:
NGK:
DENSO:
On some models
CONT INUED
Specif ications:
Spark Plugs (6-cylinder Models)
Spark Plugs (4-cylinder Models), Spark Plugs (6-cylinder Models)
Maint enance291
IZFR6K-11
SKJ20DR-M11
IZFR6K-13
SKJ20DR-M13
Tighten the spark plugs caref ully. A
spark plug that is too loose can
overheat and damage the engine.
Overtightening can cause damage to
the threads in the cylinder head.
Page 298 of 395
�µIf you need to connect the battery to
a charger, disconnect both cables to
prevent damage to the car’s
electrical system.
If the terminals are severely cor-
roded, clean them with baking soda
and water. Then use a wrench to
loosen and remove the cables f rom
the terminals. Always disconnect the
negative ( ) cable f irst and recon-
nect it last. Clean the battery termi-
nals with a terminal cleaning tool or
wire brush. Reconnect and tighten
the cables, then coat the terminals
with grease.
Battery posts,
terminals, and related accessories
contain lead and lead compounds.
CONT INUED
WARNING:
Wash hands af ter handling.
Battery
Maint enance295
4-cylinder models 6-cylinder models
Page 305 of 395
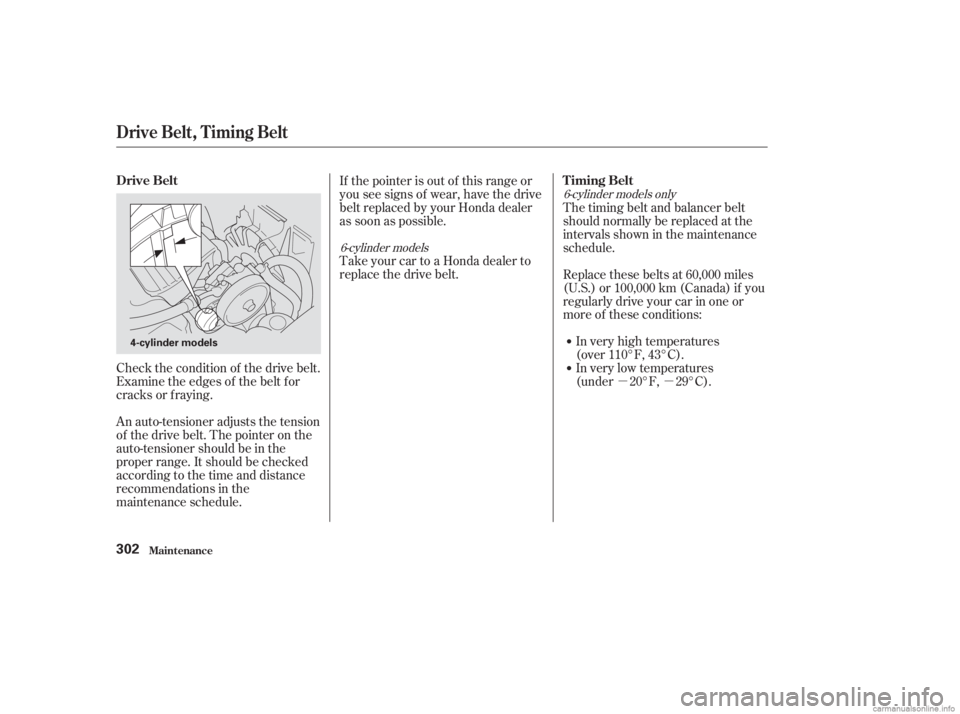
�µ�µ
An auto-tensioner adjusts the tension
of the drive belt. The pointer on the
auto-tensioner should be in the
proper range. It should be checked
accordingtothetimeanddistance
recommendations in the
maintenance schedule. Take your car to a Honda dealer to
replacethedrivebelt. If the pointer is out of this range or
you see signs of wear, have the drive
belt replaced by your Honda dealer
as soon as possible.
Check the condition of the drive belt.
Examine the edges of the belt f or
cracks or fraying. In very high temperatures
(over 110°F, 43°C).
In very low temperatures
(under 20°F, 29°C).
Replace these belts at 60,000 miles
(U.S.) or 100,000 km (Canada) if you
regularly drive your car in one or
more of these conditions: The timing belt and balancer belt
should normally be replaced at the
intervals shown in the maintenance
schedule.
6-cylinder models
6-cylinder models only
Timing Belt
Drive Belt
Maint enance
Drive Belt, Timing Belt
302
4-cylinder models
Page 307 of 395
 �Î
�Î
�Î
�Î
The following chart shows the
recommended cold tire pressures f or
most normal driving conditions and
speeds. Tire pressures f or high
speed driving are the same as f or
normal driving")
�Î
�Î
�Î
�Î
The following chart shows the
recommended cold tire pressures f or
most normal driving conditions and
speeds. Tire pressures f or high
speed driving are the same as f or
normal driving.
If you check the pressure when the
tires are hot (the car has been driven
several miles), you will see readings
4 to 6 psi (30 to 40 kPa, 0.3 to 0.4
kgf /cm ) higher than the cold
reading. This is normal. Do not let
air out to match the specified cold
pressure. The tire will be
underinf lated.
Youshouldgetyourowntire
pressure gauge and use it whenever
you check your tire pressures. This
will make it easier f or you to tell if a
pressure loss is due to a tire problem
and not due to a variation between
gauges.
Tubeless tires have some ability to
self -seal if they are punctured.
However, because leakage is of ten
very slow, you should look closely
for punctures if a tire starts losing
pressure. These pressures are also given on
thetireinformationlabelonthe
driver’s doorjamb. Thecompactsparetirepressureis: LX model
All models except LX
Tire Size Cold Tire Pressure for Normal Driving Tire Size Cold Tire Pressure
for Normal Driving
1
2DX model Front:
Rear: Front:
Rear:
EX and V6 models
1
2
Recommended T ire Pressures f or Normal Driving
Tires
Maint enance304
60 psi (420 kPa , 4.2 kgf/cm)
P205/65R15 92H
32 psi (220 kPa , 2.2 kgf/cm
)
30 psi (210 kPa , 2.1 kgf/cm
) 30 psi (210 kPa ,
2.1 kgf/cm
)
29 psi (200 kPa , 2.0 kgf/cm
)
P205/60R16 91V
P195/65R15 89H
Page 310 of 395
 It is best to replace all f our tires at
thesametime.If thatisnotpossible
or necessary, then replace the two
f ront tires or the two rear tires as a
pair. Replacing just one tire can
seriously af f ec")
It is best to replace all f our tires at
thesametime.If thatisnotpossible
or necessary, then replace the two
f ront tires or the two rear tires as a
pair. Replacing just one tire can
seriously af f ect your car’s handling.
TheABSworksbycomparingthe
speed of the wheels. When replacing
tires, use the same size originally
supplied with the car. Tire size and
construction can af f ect wheel speed
and may cause the system to workinconsistently.
If you ever need to replace a wheel,
make sure the wheel’s specif ications
match those of the original wheel
that came on your car. Replacement
wheels are available at your Honda
dealer.
Wheel:
Tire:
See page f or inf ormation about
DOT Tire Quality Grading.
DX and LX models
All EX models
LX-V6 model LX model
All EX and V6 models DX model
367
Wheels and T ires
Tires
Maint enance307
15x61/2JJ P195/65R15 89H
16x61/2JJ(Aluminumwheels
only) P205/65R15 92H
P205/60R16 91V
16x61/2JJ(Steelwheelsonly)
Installing improper tires on your
car can affect handling and
stability. This can cause a crash
in which you can be seriously
hurt or killed.
Always use the size and type of
tires recommended in this
owner’s manual.
Page 337 of 395
 Thecompactsparetirehasashorter
tread lif e than a regular tire. Replace
it when you can see the tread wear
indicator bars. The replacement
should be the same size and design
tire, mounted on the same")
Thecompactsparetirehasashorter
tread lif e than a regular tire. Replace
it when you can see the tread wear
indicator bars. The replacement
should be the same size and design
tire, mounted on the same wheel.
Thecompactsparetireisnot
designed to be mounted on a regular
wheel, and the compact wheel is not
designed f or mounting a regular tire.
Check the inf lation pressure of the
compact spare tire every time you
check the other tires. It should be
inf lated to: Your car has a compact spare tire
that takes up less space. Use this
sparetireasatemporaryreplace-
ment only. Get your regular tire
repaired or replaced and put it back
on your car as soon as you can.
Follow these precautions whenever
you are using the compact spare tire:
Do not exceed 50 mph (80 km/h)
under any circumstances. This tire gives a harsher ride and
less traction on some road sur-
f aces than the regular tire. Use
greater caution while driving on
this tire.
Do not mount snow chains on the
compact spare.
Turn off the Traction Control
System (see page ). Driving
withthecompactsparetiremay
activate the TCS. The wheel of the compact spare
tire is designed especially to f it
your car. Do not use your spare
tire on another car unless it is the
same make and model.
232
On all LX-V6 and EX-V6 models
Compact Spare Tire
T aking Care of t he Unexpect ed334
INDICATOR LOCATION MARK
TREAD WEAR INDICATOR BAR
60 psi (420 kPa , 4.2 kgf/cm)
Page 346 of 395
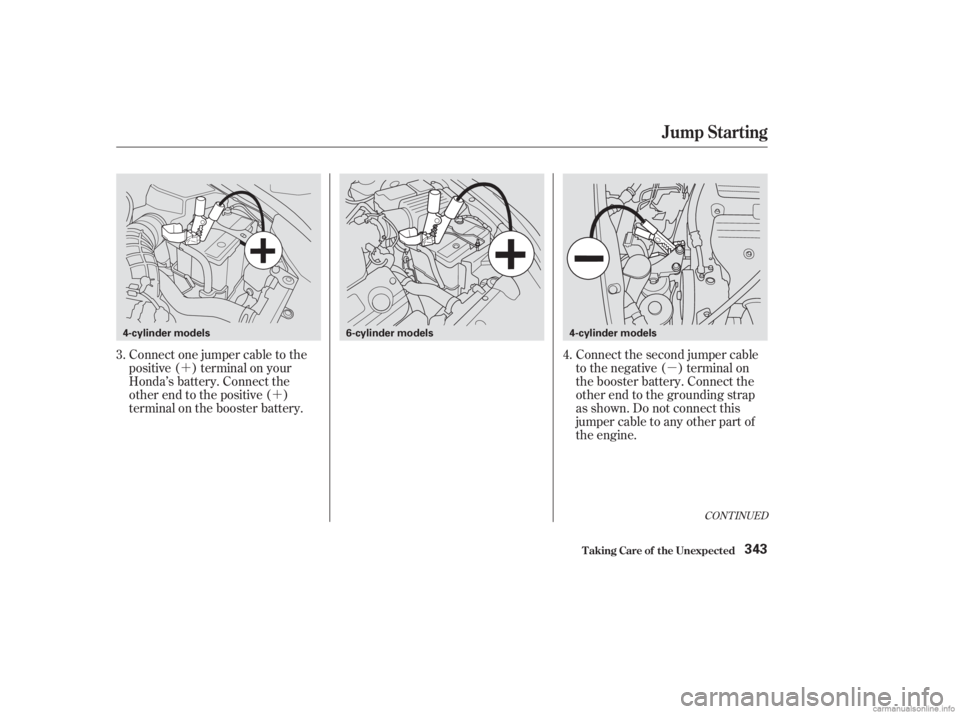
�µ
�´
�´ Connect the second jumper cable
to the negative ( ) terminal on
the booster battery. Connect the
other end to the grounding strap
as shown. Do not connect this
jumper cable to any other part of
the engine.
Connect one jumper cable to the
positive ( ) terminal on your
Honda’s battery. Connect the
other end to the positive ( )
terminal on the booster battery.
3.
4.
CONT INUED
Jump Starting
T aking Care of t he Unexpect ed343
4-cylinder models6-cylinder models4-cylinder models
Page 352 of 395
 If the indicator remains on past three
driving trips, or the f uel cap was not
loose or missing, have the car
checked by the dealer as soon as
possible. Drive moderately until the
dealer has inspected")
If the indicator remains on past three
driving trips, or the f uel cap was not
loose or missing, have the car
checked by the dealer as soon as
possible. Drive moderately until the
dealer has inspected the problem.
Avoid full-throttle acceleration and
driving at high speed.
Youshouldalsohavethedealer
inspect your car if this indicator
comes on repeatedly, even though it
may turn of f as you continue driving.
This indicator should light when the
ignition switch is ON (II), and go out
af ter the engine starts. If it comes on
at any other time, it indicates one of
the engine’s emissions control
systems may have a problem. Even
though you may f eel no dif f erence in
your car’s perf ormance, it can
reduce your f uel economy and cause
your car to put out excessive
emissions. Continued operation may
cause serious damage. If you have recently ref ueled your
car, the cause of this indicator
coming on could be a loose or
missing f uel f ill cap. Check the cap
and tighten it until it clicks several
times. Replace the f uel f ill cap if it is
missing. Tightening the cap will not
make the indicator turn of f
immediately; it takes at least three
driving trips.
Malf unction Indicator L amp
T aking Care of t he Unexpect ed349
MALFUNCTION INDICATOR LAMP
If you keep driving with the
malf unction indicator lamp on, you can
damage your car’s emissions controls
and engine. Those repairs may not be
covered by your car’s warranties.
 Install the ignition coil into the
hole.
Connect the wire connector to the
ignition coil. Make sure it locks in
place.
Push the ignition coil down all the
way. Install the bolt.
Repeat this procedure")