Page 114 of 395
 .....................
Heating and Cooling .112
.........
What Each Control Does . 112
............
How to Use the System . 115
..........
To Turn Everything Of f . 118
...............
Climate Control")
.....................
Heating and Cooling .112
.........
What Each Control Does . 112
............
How to Use the System . 115
..........
To Turn Everything Of f . 118
...............
Climate Control System . 119
.......
Fully-automatic Operation . 121
.......
Semi-automatic Operation . 122
.......
Fully-automatic Operation . 127
.....................
Manual Operation .128
Sunlight Sensor/ .............
Temperature sensor . 133
................................
Audio System .134
.................
Operating the Radio . 134
.................
Adjusting the Sound . 138
..........................
Digital Clock .139
.........
Operating the CD Player . 140
.......
Protecting Compact Discs . 142
.....
Operating the CD Changer . 142
....
CD player Error Indications . 144
CD Changer Error .............................
Indications .145
Operating the Cassette ....................................
Player .146 ...........
Tape Search Functions . 148
Caring f or the Cassette ....................................
Player .149
................................
Audio System .150
.................
Operating the Radio . 151
.................
Adjusting the Sound . 155
..............................
Digital Clock .156
.....
Operating the CD Changer . 157
.......
Protecting Compact Discs . 163
CD Changer Error .............................
Indications .164
Operating the Cassette ....................................
Player .165
...........
Tape Search Functions . 167
Caring f or the Cassette ....................................
Player .168
................................
Audio System .169
.................
Operating the Radio . 170
................
Adjusting the Sound . 173
.............................
Digital Clock .174
...................
Radio Frequencies . 175
.......................
Radio Reception .175
.....
Operating the CD Changer . 177
.......
Protecting Compact Discs . 184CD Changer Error
.............................
Indications .185
......
Protecting Compact Discs . 186
Operating the Cassette ....................................
Player .187
...........
Tape Search Functions . 189
Caring f or the Cassette ....................................
Player .191
...........
Remote Audio Controls . 192
.......................
Thef t Protection .193
............................
Security System .194
...............................
Cruise Control .195
Homelink Wireless Control ........................................
System .198
Without Navigation System
With Navigation System
DX and LX models Without Navigation System
With Navigation System
Comf ort and Convenience Features
Comf ort and Convenience Feat ures111
Page 143 of 395
 For best results when using CD-R
discs, use only high quality discs
labeled f or audio use. When
recording a CD-R, the recording
must be closed in order f or the disc
to be used by CD players. CD-RW
d")
For best results when using CD-R
discs, use only high quality discs
labeled f or audio use. When
recording a CD-R, the recording
must be closed in order f or the disc
to be used by CD players. CD-RW
discs will not work in this unit.
For inf ormation, see page .
You operate the CD player with the
same controls used f or the radio.
Play only standard round discs. Odd-
shaped CDs may jam in the drive or
cause other problems. You can also
play 3-inch (8-cm) discs without
using an adapter ring. Avoid using
CDs that have adhesive-type labels.
The edges can curl up and cause the
CD to jam in the drive.
Examine the CD f or any labels or
other contamination on it that could
causeittojaminthedrive.Withthe
ignition switch in ACCESSORY (I)
or ON (II), insert the disc into the
CD slot. Push the disc in half way;
the drive will pull it in the rest of the
way and begin to play. The number
of the track that is playing is shown
in the display.
175
Audio System
Comf ort and Convenience Feat ures
Radio Frequencies and Reception
Operating the CD Player
140
CD SLOT
AM/FM BUTTON
CD/AUX BUTTON
SEEK/SKIP BAR
EJECT BUTTON RPT BUTTON
RDM BUTTON
PWR/VOL KNOB
Page 153 of 395
The in-dash CD changer holds up to
six discs. You operate the CD
changer with the same controls used
f or the radio. See page f or CD
changer operation.
The anti-thef t f eature will disable the
system if it is disconnected f rom the
car’s battery. To get the system
working again, you must enter a
code number (see page ). Your Honda’s audio system provides
clear reception on both AM and FM
bands, while the preset bars allow
you to easily select your f avorite
stations.157
193
For EX, EX-V6, and LX-V6 models
A M/FM/CD Changer
Audio System
Without Navigation System
Audio System
Comf ort and Convenience Feat ures150
AM/FM BUTTON
PRESET
BARS
TUNE BAR
SCAN BUTTON STEREO INDICATOR
PWR/VOL KNOB
SEEK BAR
Page 160 of 395
Your Honda’s audio system has an
in-dash CD changer that holds up to
six discs, providing several hours of
continuous entertainment. You
operate this CD changer with the
same controls used f or the radio.
To load CDs or operate the CD
changer, the ignition switch must be
in ACCESSORY (I) or ON (II).
Load and play only standard round
discs. Odd-shaped CDs may jam in
the drive or cause other problems.
You cannot load and play 3-inch
(8-cm)discsinthissystem.
For best results when using CD-R
discs, use only high quality discs
labeled f or audio use. When
recording a CD-R, the recording
must be closed in order f or the disc
to be used by CD players. CD-RW
discs will not work in this unit.
CONT INUED
Operating the CD Changer
Audio System
Comf ort and Convenience Feat ures157
CD BUTTONEJECT
BUTTON
RPT BUTTON
DISC NUMBER
CD SLOT
LOAD BUTTON CD LOAD INDICATOR
Page 172 of 395
The in-dash CD changer holds up to
six discs. You operate the CD
changer with the same controls used
f or the radio. See page f or CD
changer operation.
The anti-thef t f eature will disable the
system if it is disconnected f rom the
car’s battery. To get the system
working again, you must enter a
code number (see page ). Your Honda’s audio system provides
clear reception on both AM and FM
bands, while the preset icons in the
audio display allow you to easily
select your favorite stations.193
177
A M/FM/CD Changer
Audio System
With Navigation System
Audio System
Comf ort and Convenience Feat ures169
AM/FM BUTTON
TUNE/
MODE
KNOB
SEEK BAR SCAN
BUTTON
PWR/VOL
KNOB UPPER
DISPLAY
AUDIO
DISPLAY
BUTTON
PRESET
ICONS
Page 180 of 395
Your Honda’s audio system has an
in-dash CD changer that holds up to
six discs, providing several hours of
continuous entertainment. You
operate this CD changer with the
same controls used f or the radio.
To load CDs or operate the CD
changer, the ignition switch must be
in ACCESSORY (I) or ON (II).
Load and play only standard round
discs. Odd-shaped CDs may jam in
the drive or cause other problems.
You cannot load and play 3-inch
(8-cm)discsinthissystem.
For best results when using CD-R
discs, use only high quality discs
labeled f or audio use. When
recording a CD-R, the recording
must be closed in order f or the disc
to be used by CD players. CD-RW
discs will not work in this unit.
CONT INUED
Operating the CD Changer
Audio System
Comf ort and Convenience Feat ures177
LOAD BUTTON CD/AUX
BUTTON
PWR/VOL
KNOBCD LOAD
INDICATOR
UPPER DISPLAY
Page 195 of 395
�Û�Ý
�´�µ
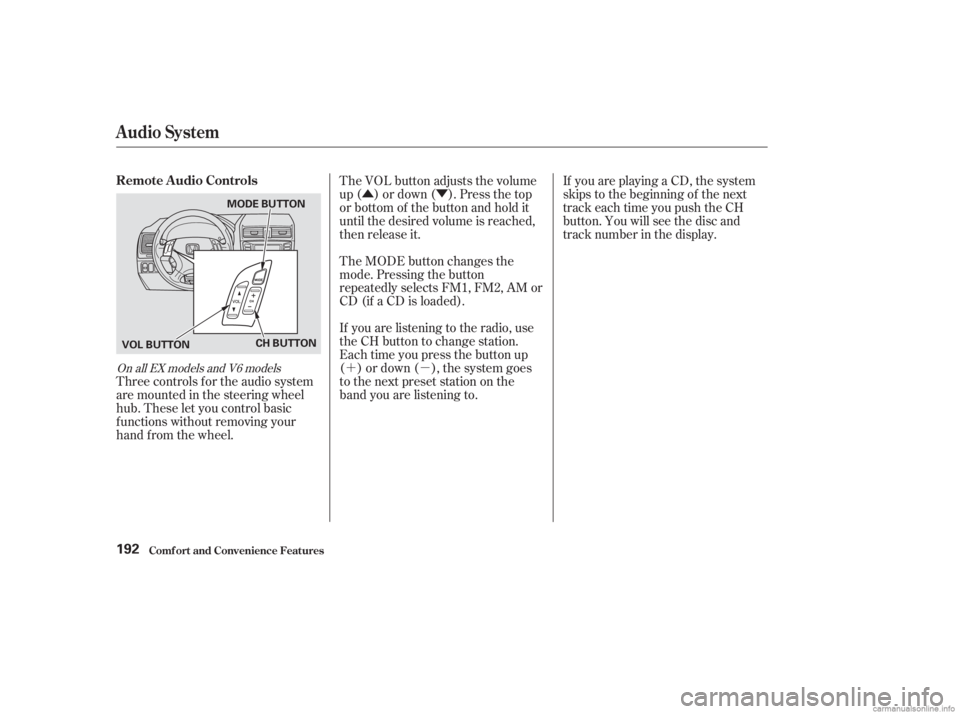
Three controls f or the audio system
are mounted in the steering wheel
hub. These let you control basic
f unctions without removing your
hand f rom the wheel. The VOL button adjusts the volume
up ( ) or down ( ). Press the top
or bottom of the button and hold it
until the desired volume is reached,
then release it.
If youareplayingaCD,thesystem
skips to the beginning of the next
track each time you push the CH
button. You will see the disc and
track number in the display.
The MODE button changes the
mode. Pressing the button
repeatedly selects FM1, FM2, AM or
CD (if a CD is loaded).
If you are listening to the radio, use
the CH button to change station.
Each time you press the button up
()ordown(),thesystemgoes
to the next preset station on the
band you are listening to.
On all EX models and V6 models
Remote Audio Controls
Audio System
Comf ort and Convenience Feat ures192
CH BUTTON
VOL BUTTON MODE BUTTON
Page 351 of 395
By eliminating as much of the
electrical load as possible, you can
drive several miles (kilometers)
before the battery is too discharged
to keep the engine running. Drive to
a service station or garage where
you can get technical assistance.
Immediately turn of f all electrical
accessories: radio, heater, A/C, rear
def ogger, cruise control, etc. Try not
to use other electrically-operated
controls such as the power windows.
Keep the engine running and take
extra care not to stall it. Starting the
engine will discharge the battery
rapidly.
This indicator should come on when
the ignition switch is ON (II), and go
out af ter the engine starts. If it
comes on brightly when the engine
is running, it indicates that the
charging system has stopped
charging the battery.
T aking Care of t he Unexpect ed
Charging System Indicator
348
CHARGING SYSTEM INDICATOR
 The in-dash CD changer holds up to
six discs. You operate the CD
changer with the same controls used
f or the radio. See page f or CD
changer operation.
The anti-thef t f eature will disable the
syste")
 Your Honda’s audio system has an
in-dash CD changer that holds up to
six discs, providing several hours of
continuous entertainment. You
operate this CD changer with the
same controls used f or the")
 By eliminating as much of the
electrical load as possible, you can
drive several miles (kilometers)
before the battery is too discharged
to keep the engine running. Drive to
a service station or garag")