2003 GMC SIERRA DENALI reset
[x] Cancel search: resetPage 119 of 428
Using HomeLink@
Press and hold the appropriate HomeLink@ button for at
least half
of a second. The indicator light will come
on while the signal
is being transmitted.
Erasing HomeLink@ Buttons
To erase programming from the three buttons do the
following:
1. Press and hold down the two outside buttons until
the indicator light begins to flash, after
20 seconds.
2. Release both buttons. Do not hold for longer than
30 seconds.
HomeLink@ is now
in the train (learning) mode and can
be programmed at any time beginning with Step
2
under “Programming HomeLink@.”
individual buttons can not be erased, but they can be
reprogrammed. See “Reprogramming
a Single
HomeLink@ Button” next.
Reprogramming a Single HomeLink@
Button
To program a device to HomeLink@ using a HomeLink@
button previously trained, follow these steps:
1. Press and hold the desired HomeLink@ button. Do
2. The indicator light will begin to flash after
not release
the button.
20 seconds. While still holding the HomeLink@
button, proceed with Step
2 under “Programming
HomeLink@.”
Resetting Defaults
To reset HomeLink@ to default settings do the following:
1. Hold down the two outside buttons for about
20 seconds until the indicator light begins to flash.
2. Continue to hold both buttons until the HomeLink@
indicator light turns
off.
3. Release both buttons.
For questions or comments, contact HomeLink@ at
1-800-355-3515, or on the internet at
www.home1ink.com.
2-38
Page 123 of 428

Vehicle Personalization
Memory Seat
If your vehicle has this
feature, then the controls for the memory function
are located on the
driver’s door.
I
~
These buttons are used to program and recall memory
settings for the driver’s seat, both the driver’s and
passenger’s outside mirror, and the radio station
presets. The settings for these features can be
personalized for both driver
1 and driver 2. Driver 1 or
driver
2 corresponds to the memory buttons labeled
land
2 on the driver’s door. To store
your memory seat, mirrors and radio presets,
do the following:
1. Adjust the driver’s seat (including the seatback
recliner, lumbar, and side wing area), both of the
outside mirrors, and the radio station presets to your
preference.
2. Press and hold the 1 or 2 (for driver lor 2) button
of the memory control for three seconds.
A double
chime will sound to let you know that the position
has been stored.
To repeat the procedure for a second driver, follow the
preceding steps, but press the other numbered
memory control button.
Each time button
1 or 2 is pressed and released while
the vehicle is in PARK (P), a single chime will sound and
the memory position will be recalled.
If you use the unlock button on the remote keyless entry
transmitter to enter your vehicle, the preset driver’s
seat, mirror positions and the radio station presets will
be recalled
if programmed to do so through the
Driver Information Center (DIC). The numbers on the
back of the transmitters,
1 or 2, correspond to the
numbers on the memory controls.
2-42
Page 132 of 428
You can set the wiper speed for a long or short delay
between wipes. This can be very useful in light rain
or snow. Turn the band to choose the delay time. The
closer
to the top of the lever, the shorter the delay.
For steady wiping at low speed, turn the band away from
you to the first solid band past the delay settings.
position. For high-speed wiping, turn the band further, to
the second solid band past the delay settings.
To
stop the wipers, move the band to off position.
Be sure to clear ice and snow from the wiper blades
before using them.
If they’re frozen to the windshield,
carefully loosen or thaw them. If your blades do become
worn or damaged, get new blades or blade inserts.
Windshield Washer
There is a paddle marked with the windshield washer
symbol at the top of the multifunction lever. To
spray washer fluid on the windshield, push the paddle.
The wipers will clear the window and then either
stc~- 3r return to your preset -reed.
In freezing weather, don’t use your washer
until the windshield is warmed. Otherwise the
washer fluid can form ice on the windshield,
blocking your vision.
3-7
Page 134 of 428
Setti- - Yruise Control
If you leave your cruise control on when you’re
not using cruise, you might hit a button and
go
into cruise when you don’t want to. You could
be startled and even lose control. Keep the
cruise control switch
off until you want to use
cruise control.
1. Move the cruise control switch to on
2. Get up to the speed you want.
3. Press in the set button at the end of the lever and
4. Take your foot off the accelerator pedal.
release it. The cruise light
on the instrument panel will illuminate
when the cruise control is engaged.
Resuming a Set Speed
Suppose you set your cruise control at a desired speed
and then you apply the brake or press the clutch
pedal (if equipped). This, of course, disengages the
cruise control. But you don’t need to reset it.
Once you’re going about 25 mph
(40 km/h) or more,
you can move the cruise control switch from on to
resume/accelerate briefly.
You’ll go right back up to your chosen speed and stay
there.
If you hold the switch at resume/accelerate briefly, the
vehicle will keep going faster until you release the switch
or apply the brake.
So unless you want to go faster,
don’t hold the switch at resume/accelerate.
3-9
Page 151 of 428
Speedometer and Odometer
Your speedometer lets you see your speed in both
miles per hour (mph) and kilometers per hour (km/h).
Your odometer shows how far your vehicle has
been driven, in either miles (used in the United States)
or kilometers (used in Canada).
Trip Odometer
The trip odometer can tell you how far your vehicle has
been driven since you last set the trip odometer
to zero.
Press the reset button, located on the instrument panel
cluster next to the trip odometer display, to toggle
between the trip odometer and the regular odometer.
Holding the reset button for two seconds while the
trip odometer is displayed will reset it.
To display the odometer reading with the ignition
off,
press the reset button.
Engine Hour Meter Display
The odometer can also display the number of hours the
engine has run. To display the hour meter, turn the
ignition
off, press and hold the reset button for at least
four seconds. The hour meter will be displayed for
up to
30 seconds, or until the ignition is turned on.
Tachometer
Your tachometer displays the engine speed ip
revolutions per minute (rpm).
Notice: Do not operate the engine with the
tachometer in the red area,
or engine damage may
occur.
Safety Belt Reminder Light
When the key is turned to RUN or START, a chime will
come on for several seconds to remind people to
fasten their safety belts, unless the driver’s safety belt is
already buckled.
The safety belt light will also come on and stay on
for several seconds, then it will flash for
several more.
If the driver’s belt is already buckled, neither the chime
nor the light will come on.
3-26
Page 168 of 428
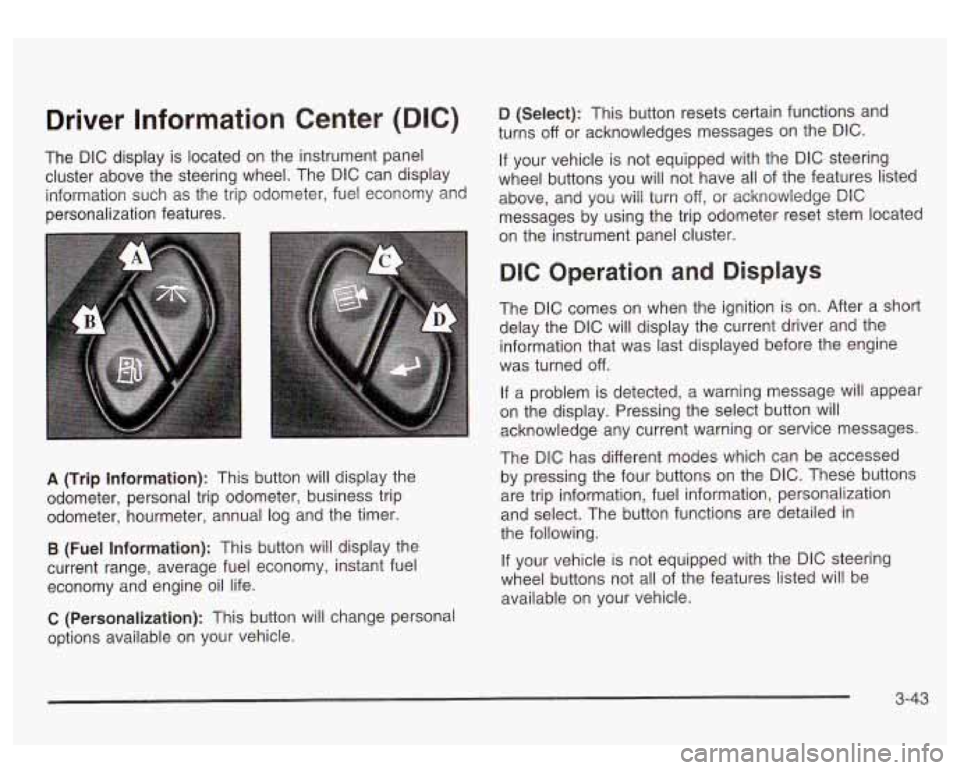
Driver Information Center (DIC)
The DIC display is located on the instrument panel
cluster above the steering wheel. The DIC can display
information such as the trip odometer, fuel economy and
personalization features.
A (Trip Information): This button will display the
odometer, personal trip odometer, business trip
odometer, hourmeter, annual log and the timer.
B (Fuel Information): This button will display the
current range, average fuel economy, instant fuel
economy and engine oil life.
C (Personalization): This button will change personal
options available on your vehicle.
D (Select): This button resets certain functions and
turns
off or acknowledges messages on the DIC.
If your vehicle is not equipped with the DIC steering
wheel buttons you will not have all of the features listed
above, and you will turn off,
or acknowledge DIC
messages by using the trip odometer reset stem located
on the instrument panel cluster.
DIC Operation and Displays
The DIC comes on when the ignition is on. After a short
delay the DIC will display the current driver and the
information that was last displayed before the engine
was turned
off.
If a problem is detected, a warning message will appear
on the display. Pressing the select button will
acknowledge any current warning or service messages.
The DIC has different modes which can be accessed
by pressing the four buttons on the DIC. These buttons
are trip information, fuel information, personalization
and select. The button functions are detailed in
the following.
If your vehicle is not equipped with the DIC steering
wheel buttons not all of the features listed will be
available on your vehicle.
3-43
Page 169 of 428
Trip Information Button
Use the trip information button to scroll through the
SEASON ODOMETER, PERSONAL TRIP ON/OFF,
BUSINESS TRIP ON/OFF, HOURMETER, ANNUAL
LOG and TIMER.
If the personal trip and/or the business
trip are set to ON, you will also be able to scroll
through more messages. See
Personal Trip and
Business Trip next for more information.
If your vehicle is not equipped with the DIC steering
wheel buttons you can select the trip information
by pressing the trip odometer reset stem
on the
instrument panel cluster.
Personal Trip
If the PERSONAL TRIP is on (turn it on or off by
pressing the select button) you will also be able to scroll
through the following:
e
e
e
PERSONAL: XX MI - This shows the current
distance traveled since the last reset for the
personal trip odometer in either miles or kilometers.
PERSONAL: XX.X MPG
- This shows the amount
of fuel used for the personal trip.
PERSONAL: AVG ECONOMY
- This shows how
many miles per gallon of fuel your vehicle is
getting for the personal trip based on current and
past driving conditions.
PERSONAL: AVG MPH - This shows the vehicle’s
average speed for the personal trip.
PERSONAL: % ANNUAL - This shows the ratio of
personal trip miles to annual miles as a percent.
You can reset the personal trip odometer by pressing
and holding the trip odometer reset stem.
Business Trip
If the BUSINESS TRIP is on (turn it on or off by
pressing the select button) you will also be able
to scroll
through the following:
e
e
e
BUSINESS: XX MI - This shows the current
distance traveled since the last reset for the
business trip odometer in either miles or kilometers.
BUSINESS: XX.X MPG
- This shows the amount
of fuel used for the business trip.
BUSINESS: AVG ECONOMY
- This shows how
many miles per gallon
of fuel your vehicle is
getting for the business trip based on current and
past driving conditions.
BUSINESS: AVG MPH
- This shows the vehicle’s
average speed for the business trip.
BUSINESS:
Yo ANNUAL - This shows the ratio of
business trip miles to annual miles as a percent.
3-44
Page 170 of 428
To reset the personal or business trip information, do
the following: press and hold select button for two
seconds while in one of the personal or business trip
modes. This will reset all of the information for the
personal or business trip, or
if your vehicle does not
have the DIC steering wheel control buttons, press the
reset stem on the instrument panel cluster.
You can also reset the PERSONAL:
XX MI, or
BUSINESS:
XX MI, while they are displayed by pressing
the reset stem on the cluster.
If you press and hold
the reset stem or select button for four seconds,
the display
will show the distance traveled since the last
ignition cycle for the personal or business trip.
Season Odometer
Press the trip information button, or the trip odometer
reset step, until SEASON ODOMETER appears on
the display. This shows the total distance the vehicle has
been driven in either miles or kilometers. Pressing the
reset stem located on the instrument cluster with
the vehicle
off will also display the season odometer.
Hourmeter
Press the trip button to scroll to the hourmeter. The
hourmeter shows the total number of hours the engine
has run. Pressing the reset stem on the instrument
cluster will also display the hourmeter after the season
odometer is displayed.
Annual Log
Press the trip button, or the reset stem on the instrument
panel cluster, to scroll to the annual
log. The annual
log shows the mileage accumulated since
it was
last reset.
Po reset the annual log, press and hold the
select button, or the trip odometer reset stem for
approximately two seconds.
Timer
The DIC can be used as a stopwatch. Press the select
button, or the trip odometer reset stem, while TIMER
is displayed to start the timer. The display will show the
amount of time that has passed since the timer was
last reset (not including time the ignition is
off). Time will
continue to be counted as long as the ignition is on,
even
if another display is being shown on the DIC. The
timer will record up to 99 hours, 59 minutes and
59 seconds (99:59:59) after which the display will roll
back to zero.
To stop the counting of time, press the select button
briefly while TIMER is displayed.
To reset the timer to zero, press and hold the select
button, or the trip odometer reset stem, while TIMER is
displayed.
3-45