Page 322 of 428
A. Low-Beam Headlamp
B. High-Beam Headlamp
Front Turn Signal, Sidemarker and
Daytime Running Lamps
2. Pull the headlamp assembly out.
3. Unplug the electrical connector.
4. Turn the old bulb counterclockwise and remove it
from the headlamp assembly.
5. Put the new bulb into the assembly and turn it
clockwise until it is tight. Use care not to touch
the bulb with your fingers or hands.
6. Plug in the electrical connector.
A. Sidemarker Lamp
B. Retainer Clip
C. Front Turn Signal Lamp
D. Daytime Running Lamp (DRL)
1. Remove the headlamp assembly as mentioned
previously.
7. Put the headlamp assembly back into the vehicle.
Install and tighten the two pins.
5-53
Page 323 of 428
2. Press the retainer clip (B), located behind the turn
signal housing, towards the outside
of the vehicle.
3. Pull the turn signal housing out of the vehicle.
4. Press the locking release lever, turn the bulb socket
counterclockwise and remove it from the turn signal
housing.
5. Remove the old bulb from the bulb socket.
6.
7.
8.
9.
Put a new bulb into the bulb socket. Use care not
to touch the bulb with your fingers or hands.
Put the bulb socket back into the turn signal
housing and turn it clockwise until it locks.
Put the turn signal housing back into the vehicle
placing the hook and posts on the inner side into
the alignment holes first, then the outer side into the
retainer bracket until you hear a click.
Put the headlamp assembly back into the vehicle.
Roof Marker Lamps
5-54
Page 324 of 428
2. Remove the six screws on the center roof marker
lamps.
from the socket.
3. Turn the old bulb counterclockwise to remove it
4. Put a new bulb into the
socket and turn
clockwise until it locks
in place.
5-55
Page 326 of 428
A. Cargo Lamps
B. Center High-Mounted Stoplamps
2. Remove the CHMSL bulb holder back plate from
the housing by pressing the release tabs.
3. Remove the CHMSL bulb by pulling the bulb
straight out from the holder back plate. Remove
a cargo bulb by turning the socket counterclockwise
and pulling the bulb straight out.
4. If a CHMSL bulb is replaced, put the new bulb into
the socket and press it in until
it is tight.
If a cargo lamp is replaced, put a new cargo lamp
bulb into the socket and press it in until it is
tight before turning the socket counterclockwise.
5. Put the bulb holder back plate into the lamp
housing.
6. Reinstall the lamp assembly and tighten the screws.
5-57
Page 328 of 428
3. Press the release tab and turn the bulb socket
counterclockwise to remove it from the taillamp
housing.
4. Pull the old bulb straight out from the socket.
5. Press a new bulb into the socket and turn the socket
clockwise into the taillamp housing until it clicks.
6. Reinstall the rear lamp assembly.
7. Close the tailgate.
Replacement Bulbs
For anv bulb not listed here contact your dealer.
5-59
Page 340 of 428
2. The wheel blocks and the wheel block retainer can
be removed by turning the wing nut
counterclockwise.
3. To release the bottle jack from its holder, turn the
knob on
the bottle jack eotintercloekwise to lower
the jack head slightly.
4. There is also a wing nut used to retain the storage
bag and tools. To remove it, turn the wing nut
counterclockwise.
You’ll use the jack handle and the wheel wrench to
remove the underbody-mounted spare tire.
A. Hoist Assembly
B. Wheel Wrench
C. Extensions
D. Hoist Shaft
E. Valve Stem, Pointed
Down
F. Spare Tire
G. Tire Retainer
H. Hoist Cable
I. Hoist Lock
(If Equipped)
J. Hoist Shaft Access
Hole
K. Hoist End
5-71
Page 341 of 428

Follow these instructions to lower the spare tire:
1. If your vehicle is equipped with a hoist lock, open
the spare tire lock cover on the bumper and use
the ignition key to remove the lock.
2. Assemble the wheel wrench and the two jack
handle extensions as shown. Insert the hoist
end (open end) of the extension through the hole in
the rear bumper. Be sure the hoist end of the
extension connects into the hoist shaft.
3. Turn the wheel wrench counterclockwise to lower
the spare tire to the ground. Continue to turn the
wheel wrench until the spare tire can be pulled out
from under the vehicle. The wheel wrench has a
hook that allows you to pull the hoist cable towards
you, to assist in reaching the spare tire.
If the spare tire does not lower to the ground, the
secondary latch is engaged causing the tire
not to lower. See Secondary Latch System next.
4. When the tire has been lowered, tilt the retainer at
the end of the cable
so it can be pulled up through
the wheel opening.
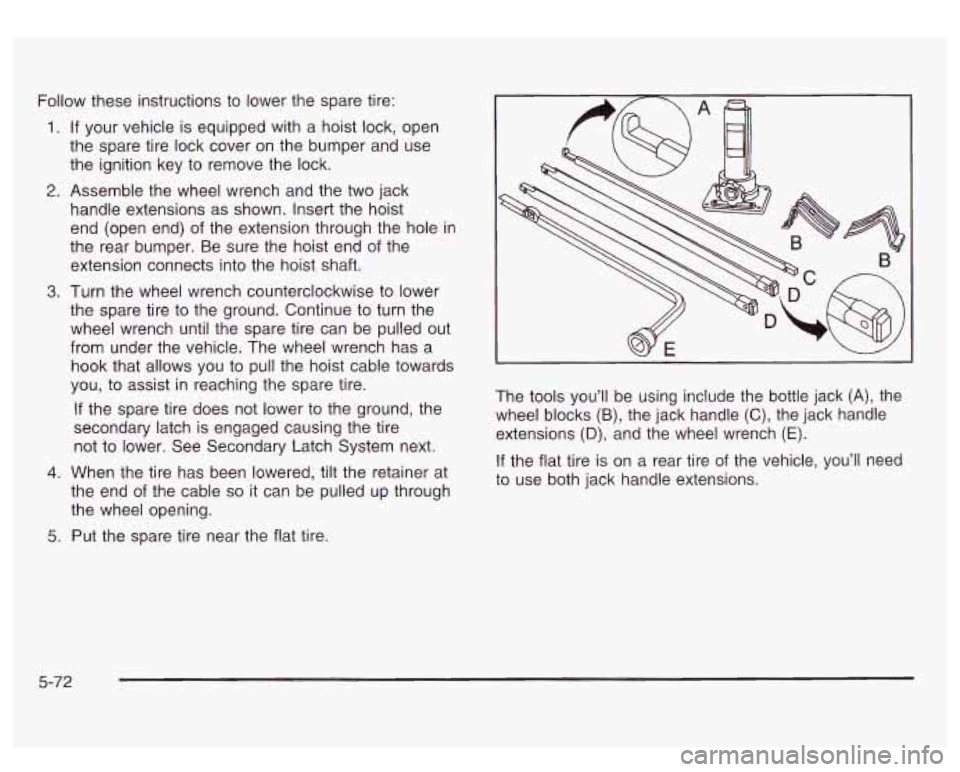
5. Put the spare tire near the flat tire. The
tools you’ll be using include the bottle jack
(A), the
wheel blocks
(B), the jack handle (C), the jack handle
extensions
(D), and the wheel wrench (E).
If the flat tire is on a rear tire of the vehicle, you’ll need
to use both jack handle extensions.
5-72
Page 342 of 428
Attach the wheel wrench to the jack handle extensions
(as needed). Attach the jack handle to the jack. Turn the
wheel wrench clockwise to raise the jack lift
head a little.
5-73