2003 FORD SUPER DUTY ignition
[x] Cancel search: ignitionPage 84 of 256
In order to avoid inadvertent activation of the switch, always
remove the ignition keyfrom the passenger air bag ON/OFF
switch.
Turning the passenger air bag back on
The passenger air bag remains OFF until you turn it back ON.
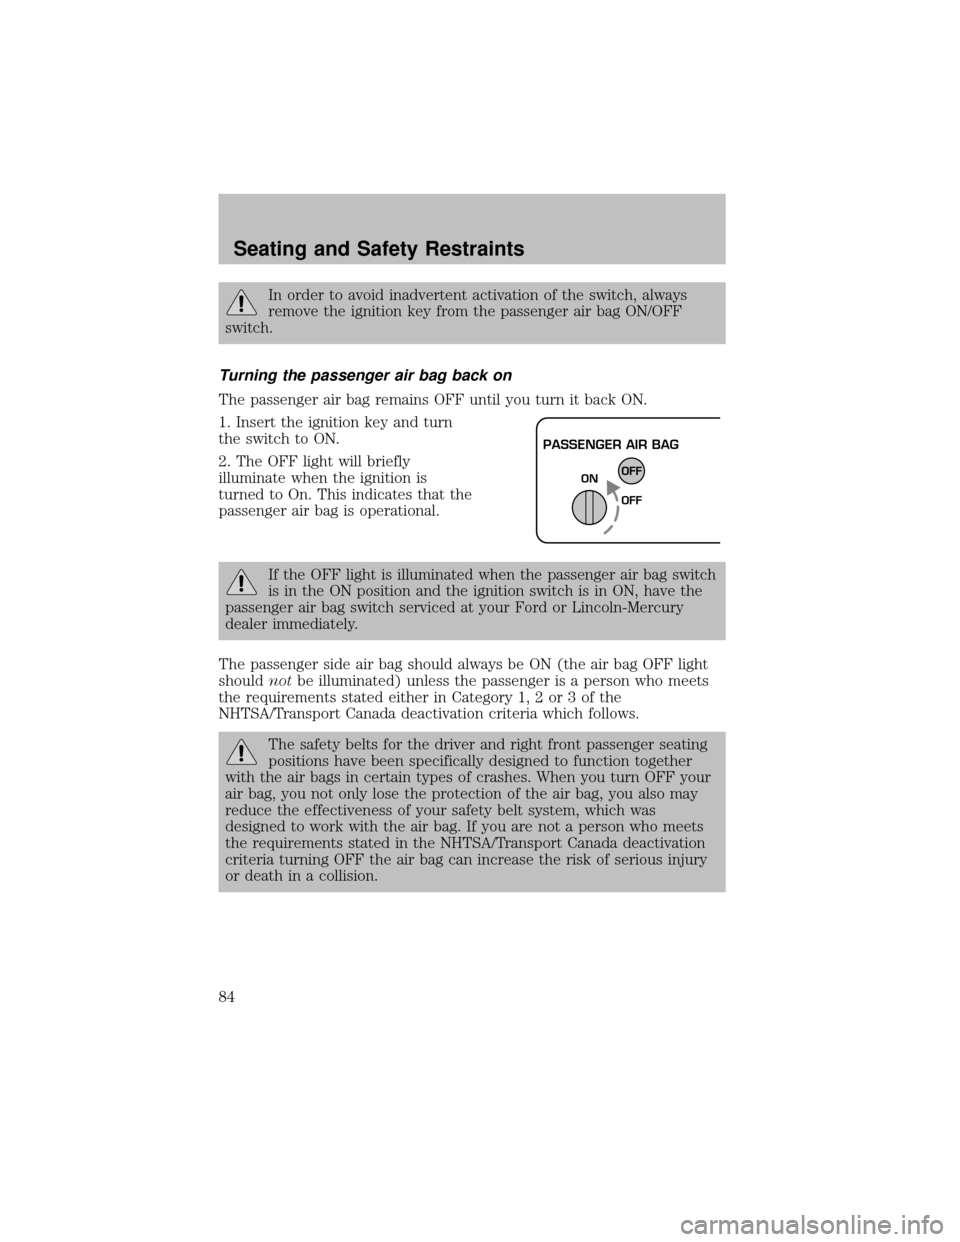
1. Insert the ignition keyand turn
the switch to ON.
2. The OFF light will briefly
illuminate when the ignition is
turned to On. This indicates that the
passenger air bag is operational.
If the OFF light is illuminated when the passenger air bag switch
is in the ON position and the ignition switch is in ON, have the
passenger air bag switch serviced at your Ford or Lincoln-Mercury
dealer immediately.
The passenger side air bag should always be ON (the air bag OFF light
shouldnotbe illuminated) unless the passenger is a person who meets
the requirements stated either in Category1, 2 or 3 of the
NHTSA/Transport Canada deactivation criteria which follows.
The safetybelts for the driver and right front passenger seating
positions have been specificallydesigned to function together
with the air bags in certain types of crashes. When you turn OFF your
air bag, you not only lose the protection of the air bag, you also may
reduce the effectiveness of your safety belt system, which was
designed to work with the air bag. If you are not a person who meets
the requirements stated in the NHTSA/Transport Canada deactivation
criteria turning OFF the air bag can increase the risk of serious injury
or death in a collision.
PASSENGER AIR BAG
OFF
OFF ON
Seating and Safety Restraints
84
Page 98 of 256
STARTING
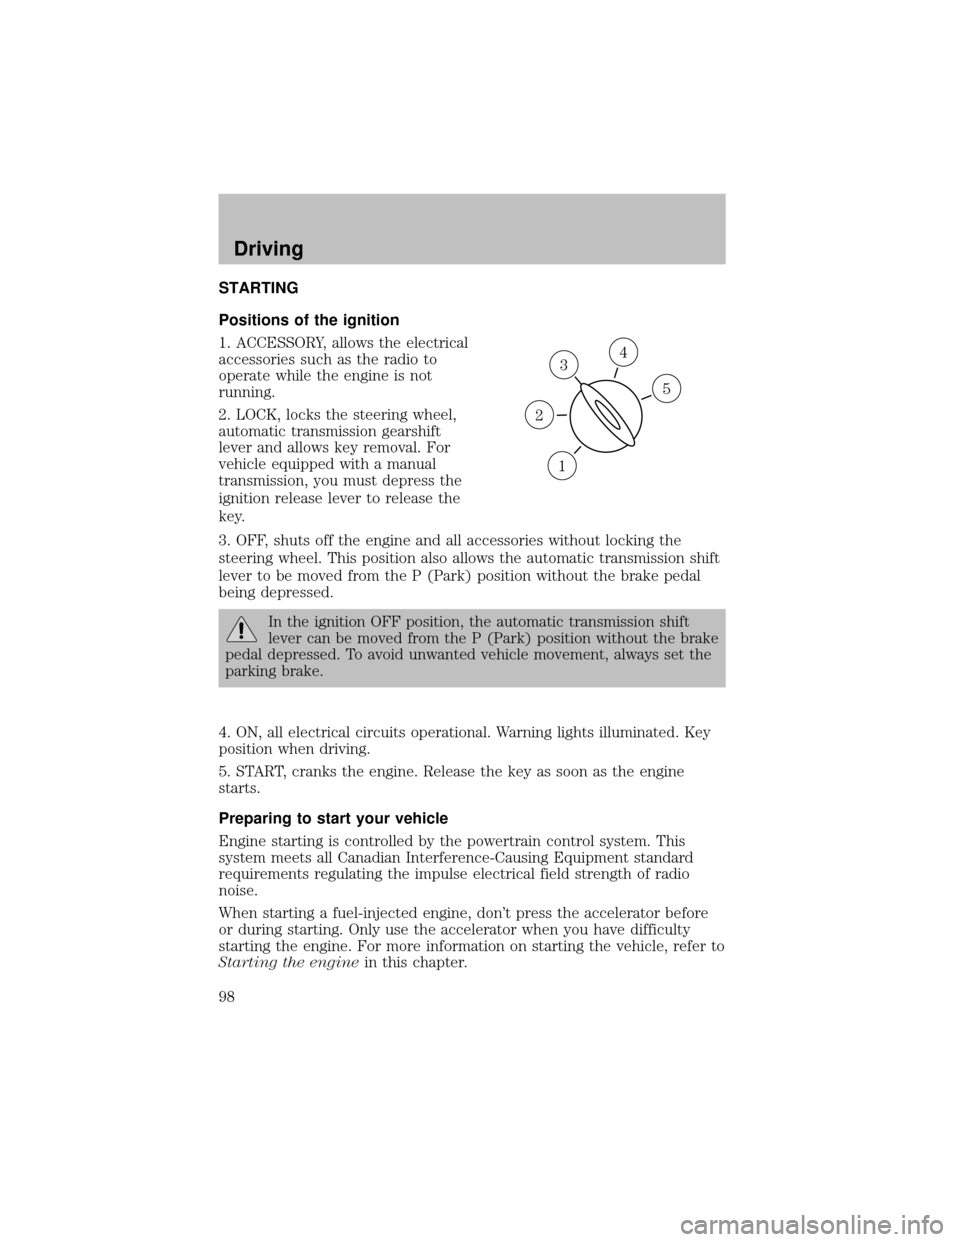
Positions of the ignition
1. ACCESSORY, allows the electrical
accessories such as the radio to
operate while the engine is not
running.
2. LOCK, locks the steering wheel,
automatic transmission gearshift
lever and allows keyremoval. For
vehicle equipped with a manual
transmission, you must depress the
ignition release lever to release the
key.
3. OFF, shuts off the engine and all accessories without locking the
steering wheel. This position also allows the automatic transmission shift
lever to be moved from the P (Park) position without the brake pedal
being depressed.
In the ignition OFF position, the automatic transmission shift
lever can be moved from the P (Park) position without the brake
pedal depressed. To avoid unwanted vehicle movement, always set the
parking brake.
4. ON, all electrical circuits operational. Warning lights illuminated. Key
position when driving.
5. START, cranks the engine. Release the keyas soon as the engine
starts.
Preparing to start your vehicle
Engine starting is controlled bythe powertrain control system. This
system meets all Canadian Interference-Causing Equipment standard
requirements regulating the impulse electrical field strength of radio
noise.
When starting a fuel-injected engine, don’t press the accelerator before
or during starting. Onlyuse the accelerator when you have difficulty
starting the engine. For more information on starting the vehicle, refer to
Starting the enginein this chapter.
3
1
2
5
4
Driving
98
Page 103 of 256

emergencystops bykeeping the rear brakes from locking. The front
wheels, however, maystill lock since theyare not controlled bythe
RABS. Noise from the ABS pump motor and brake pedal pulsation may
be observed during ABS braking; this is normal.
RABS warning lamp
The
ABSwarning lamp in the instrument cluster momentarilyilluminates
when the ignition is turned to the ON position. If the light does not
illuminate momentarilyat start up, remains on or continues to flash, the
ABS needs to be serviced.
With the ABS light on, the anti-lock
brake system is disabled and normal
braking is still effective unless the
brake warning light also remains
illuminated with parking brake released. (If your brake warning lamp
illuminates, have your vehicle serviced immediately.)
Using RABS
In an emergency, apply ing full pressure may cause the front wheels to
lock.If the front brakes lock, the vehicle cannot be steered.Yo u
should applythe brakes with steadilyincreasing force, as if “squeezing”
the brakes. If you feel the front wheels begin to lock, momentarily
release the pedal and repeat the “squeeze” technique.
Four-wheel anti-lock brake system (ABS) (if equipped)
Your vehicle maybe equipped with an Anti-lock Braking System (ABS).
This system helps you maintain steering control during emergency stops
bykeeping the brakes from locking. Noise from the ABS pump motor
and brake pedal pulsation maybe observed during ABS braking; any
pulsation or mechanical noise you may feel or hear is normal.
ABS warning lamp
ABS
TheABSlamp in the instrument cluster momentarilyilluminates when
the ignition is turned to ON. If the light does not illuminate during start
up, remains on or flashes, the ABS maybe disabled and the ABS may
need to be serviced.
Even when the ABS is disabled,
normal braking is still effective. (If
your BRAKE warning lamp
illuminates with the parking brake
released, have your brake system serviced immediately.)
Driving
103
Page 106 of 256
Vehicles with a higher center of gravitysuch as utilityand
four-wheel drive vehicles handle differentlythan vehicles with a
lower center of gravity. Utility and four-wheel drive vehicles arenot
designed for cornering at speeds as high as passenger cars anymore
than low-slung sports cars are designed to perform satisfactorilyunder
off-road conditions. Avoid sharp turns, excessive speed and abrupt
maneuvers in these vehicles. Failure to drive cautiouslycould result in
an increased risk of loss of vehicle control, vehicle rollover, personal
injuryand death.
Loaded vehicles, with a higher center of gravity, may handle
differentlythan unloaded vehicles. Extra precautions, such as
slower speeds and increased stopping distance, should be taken when
driving a heavilyloaded vehicle.
AUTOMATIC TRANSMISSION OPERATION (IF EQUIPPED)
Brake-shift interlock
This vehicle is equipped with a brake-shift interlock feature that prevents
the gearshift lever from being moved from P (Park) when the ignition is
in the ON position unless brake pedal is depressed.
If you cannot move the gearshift lever out of P (Park) with ignition in
the ON position and the brake pedal depressed:
1. Applythe parking brake, turn ignition keyto LOCK, then remove the
key.
2. Insert the keyand turn it to OFF.Apply the brake pedal and shift
to N (Neutral).
In the ignition OFF position, the automatic transmission shift
lever can be moved from the P (Park) position without the brake
pedal depressed. To avoid unwanted vehicle movement, always set the
parking brake.
3. Start the vehicle.
If it is necessaryto use the above procedure to move the gearshift lever,
it is possible that a fuse has blown or the vehicle’s brakelamps are not
operating properly. Refer toFuses and relaysin theRoadside
emergencieschapter.
Driving
106
Page 107 of 256
Do not drive your vehicle until you verify that the brakelamps
are working.
Always set the parking brake fully and make sure the gearshift is
latched in P (Park). Turn the ignition to the LOCK position and
remove the key whenever you leave your vehicle.
If the parking brake is fullyreleased, but the brake warning lamp
remains illuminated, the brakes maynot be working properly.
See your dealer or a qualified service technician.
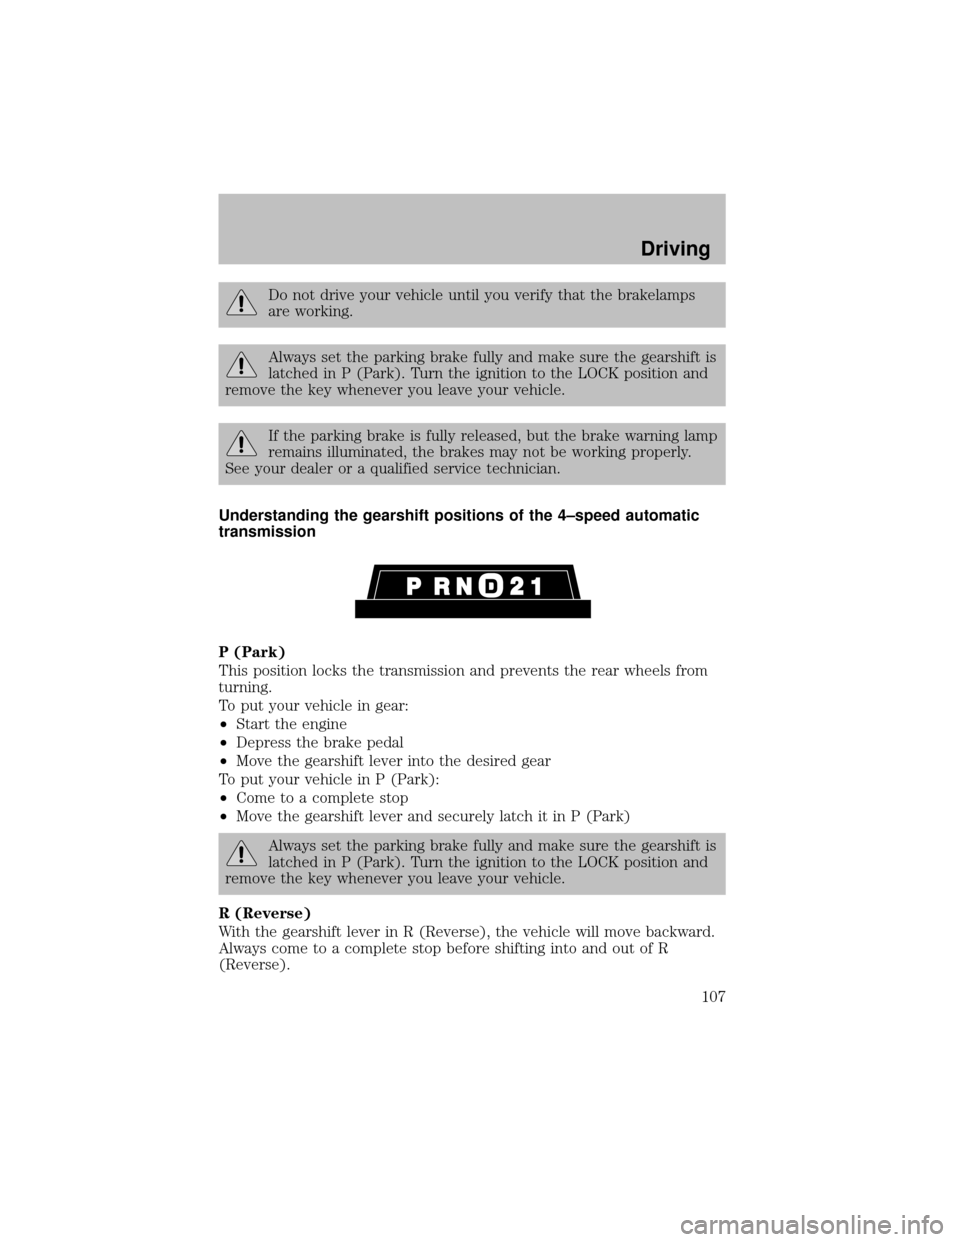
Understanding the gearshift positions of the 4–speed automatic
transmission
P (Park)
This position locks the transmission and prevents the rear wheels from
turning.
To put your vehicle in gear:
•Start the engine
•Depress the brake pedal
•Move the gearshift lever into the desired gear
To put your vehicle in P (Park):
•Come to a complete stop
•Move the gearshift lever and securelylatch it in P (Park)
Always set the parking brake fully and make sure the gearshift is
latched in P (Park). Turn the ignition to the LOCK position and
remove the key whenever you leave your vehicle.
R (Reverse)
With the gearshift lever in R (Reverse), the vehicle will move backward.
Always come to a complete stop before shifting into and out of R
(Reverse).
Driving
107
Page 110 of 256

3. Start the engine, then press the brake pedal and release the parking
brake.
4. Move the gearshift lever to the desired gear, then slowlyrelease the
clutch pedal while slowlypressing on the accelerator.
Do not drive with your foot resting on the clutch pedal or use the clutch
pedal to hold your vehicle at a standstill while waiting on a hill. These
actions will reduce the life of the clutch.
Recommended shift speeds
Downshift according to the following charts for your specific
engine/drivetrain combination:
Maximum downshift speeds1
6-speed transmission
Shift from: Transfer case position (if equipped)2
2H or 4H 4L
D(Overdrive) - 472 km/h (45 mph) 26 km/h (16 mph)
4 - 3 56 km/h (35 mph) 19 km/h (12 mph)
3 - 2 32 km/h (20 mph) 13 km/h (8 mph)
2 - 1 8 km/h (5 mph) 3 km/h (2 mph)
1 - LO Onlyshift to LO when at a stop.
1Use 2H or 4H for 4WD equipped vehicles.2Downshift at lower speeds when driving on slipperysurfaces.
Reverse
1. Make sure that your vehicle is at a complete stop before you shift into
R (Reverse). Failure to do so maydamage the transmission.
2. Move the gearshift lever into the neutral position and wait at least
three seconds before shifting into R (Reverse).
•The gearshift lever can onlybe moved into R (Reverse) bymoving it
from left of 3 (Third) and 4 (Fourth) before shifting into R (Reverse).
This is a lockout feature that protects the transmission from
accidentallybeing shifted into R (Reverse) from
(Overdrive).
Parking your vehicle
1. Applythe brake and shift into the neutral position.
2. Fullyapplythe parking brake, then shift into 1 (First).
3. Turn the ignition off.
Driving
110
Page 111 of 256
Do not park your vehicle in Neutral, it may move unexpectedly
and injure someone. Use 1 (First) gear and set the parking brake
fully.
Removing the key
Turn the ignition off, push the release lever (located above the ignition),
then turn the keytoward you and remove the key.
REVERSE SENSING SYSTEM (IF EQUIPPED)
The Reverse Sensing System (RSS) sounds a tone to warn the driver of
obstacles near the rear bumper when the R (Reverse) is selected and the
vehicle is moving at speeds less than 5 km/h (3 mph). The system is not
effective at speeds above 5 km/h (3 mph) and maynot detect certain
angular or moving objects.
To help avoid personal injury, please read and understand the
limitations of the reverse sensing system as contained in this
section. Reverse sensing is onlyan aid for some (generallylarge and
fixed) objects when moving in reverse on a flat surface at “parking
speeds”. Inclement weather mayalso affect the function of the RSS;
this mayinclude reduced performance or a false activation.
To help avoid personal injury, alway s use caution when in
reverse and when using the RSS.
This system is not designed to prevent contact with small or
moving objects. The system is designed to provide a warning to
assist the driver in detecting large stationaryobjects to avoid damaging
the vehicle. The system may not detect smaller objects, particularly
those close to the ground.
Driving
111
Page 112 of 256
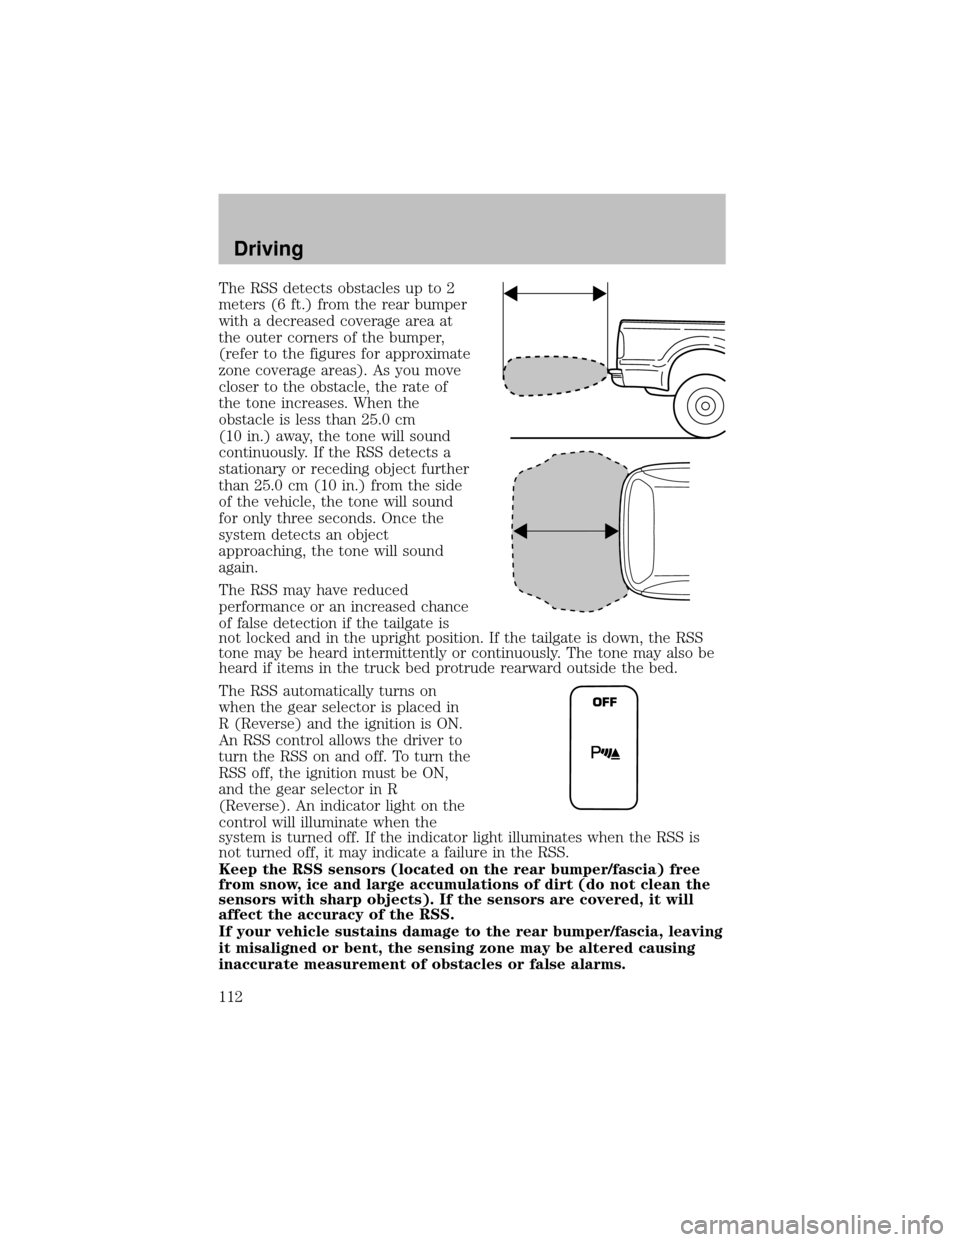
The RSS detects obstacles up to 2
meters (6 ft.) from the rear bumper
with a decreased coverage area at
the outer corners of the bumper,
(refer to the figures for approximate
zone coverage areas). As you move
closer to the obstacle, the rate of
the tone increases. When the
obstacle is less than 25.0 cm
(10 in.) away, the tone will sound
continuously. If the RSS detects a
stationaryor receding object further
than 25.0 cm (10 in.) from the side
of the vehicle, the tone will sound
for onlythree seconds. Once the
system detects an object
approaching, the tone will sound
again.
The RSS mayhave reduced
performance or an increased chance
of false detection if the tailgate is
not locked and in the upright position. If the tailgate is down, the RSS
tone maybe heard intermittentlyor continuously. The tone mayalso be
heard if items in the truck bed protrude rearward outside the bed.
The RSS automaticallyturns on
when the gear selector is placed in
R (Reverse) and the ignition is ON.
An RSS control allows the driver to
turn the RSS on and off. To turn the
RSS off, the ignition must be ON,
and the gear selector in R
(Reverse). An indicator light on the
control will illuminate when the
system is turned off. If the indicator light illuminates when the RSS is
not turned off, it mayindicate a failure in the RSS.
Keep the RSS sensors (located on the rear bumper/fascia) free
from snow, ice and large accumulations of dirt (do not clean the
sensors with sharp objects). If the sensors are covered, it will
affect the accuracy of the RSS.
If your vehicle sustains damage to the rear bumper/fascia, leaving
it misaligned or bent, the sensing zone may be altered causing
inaccurate measurement of obstacles or false alarms.
OFF
Driving
112