Page 1095 of 4378
7. Install the camshaft thrust plate.
1. Position the camshaft thrust plate.
2. Install the bolts.
8. Turn the camshaft so that the timing mark is at 12 o'clock and install the engine dynamic balance shaft assembly into the cylinder block. Turn the engine balance shaft driven gear so
that the timing mark aligns up with the timing mark on the engine balance shaft drive gear.
9. NOTE: If correctly aligned, the engine dynamic balance shaft keyway will be at 12 o'clock and
the camshaft keyway will be at 6 o'clock on the camshaft.
Install the bolts.
10. CAUTION: Make sure the components are installed in the correct location.
NOTE: Lubricate the crankshaft main bearings prior to installation.
Install the crankshaft upper main bearings and the crankshaft upper thrust main bearing. �K�l�j . 4 �b�a
282003 Mustang Workshop Manual
17. 11. 2011file:///C:/Ford/2000 - 2004/tsocache/SHEF_4464/S3B~us~en~ ...
Page 1100 of 4378
23. Rotate the crankshaft so the number one piston is at top dead center (TDC) and the key is at
the 12 o'clock position.
24. Turn the camshaft sprocket so that the keyway is on the bottom of the camshaft.
25. Install the timing chain, the camshaft sprocket and the crankshaft sprocket as an assembly.
26. Make sure the timing marks and the keyways are aligned.
27. Install the camshaft position sensor drive gear and retaining bolt. �K�l�j . 9 �b�a
282003 Mustang Workshop Manual
17. 11. 2011file:///C:/Ford/2000 - 2004/tsocache/SHEF_4464/S3B~us~en~ ...
Page 1104 of 4378
Nm (21 lb-
ft).
37. NOTE: Lubricate the parts with clean engine oil before assembly.
Using the special tool, install the front crankshaft seal.
38. Install the crankshaft position sensor.
39. Apply a bead of silicone gasket and sealant to the keyway in the crankshaft damper. Using the special tool, position and install the crankshaft damper. �K�l�j . 13 �b�a
282003 Mustang Workshop Manual
17. 11. 2011file:///C:/Ford/2000 - 2004/tsocache/SHEF_4464/S3B~us~en~ ...
Page 1141 of 4378

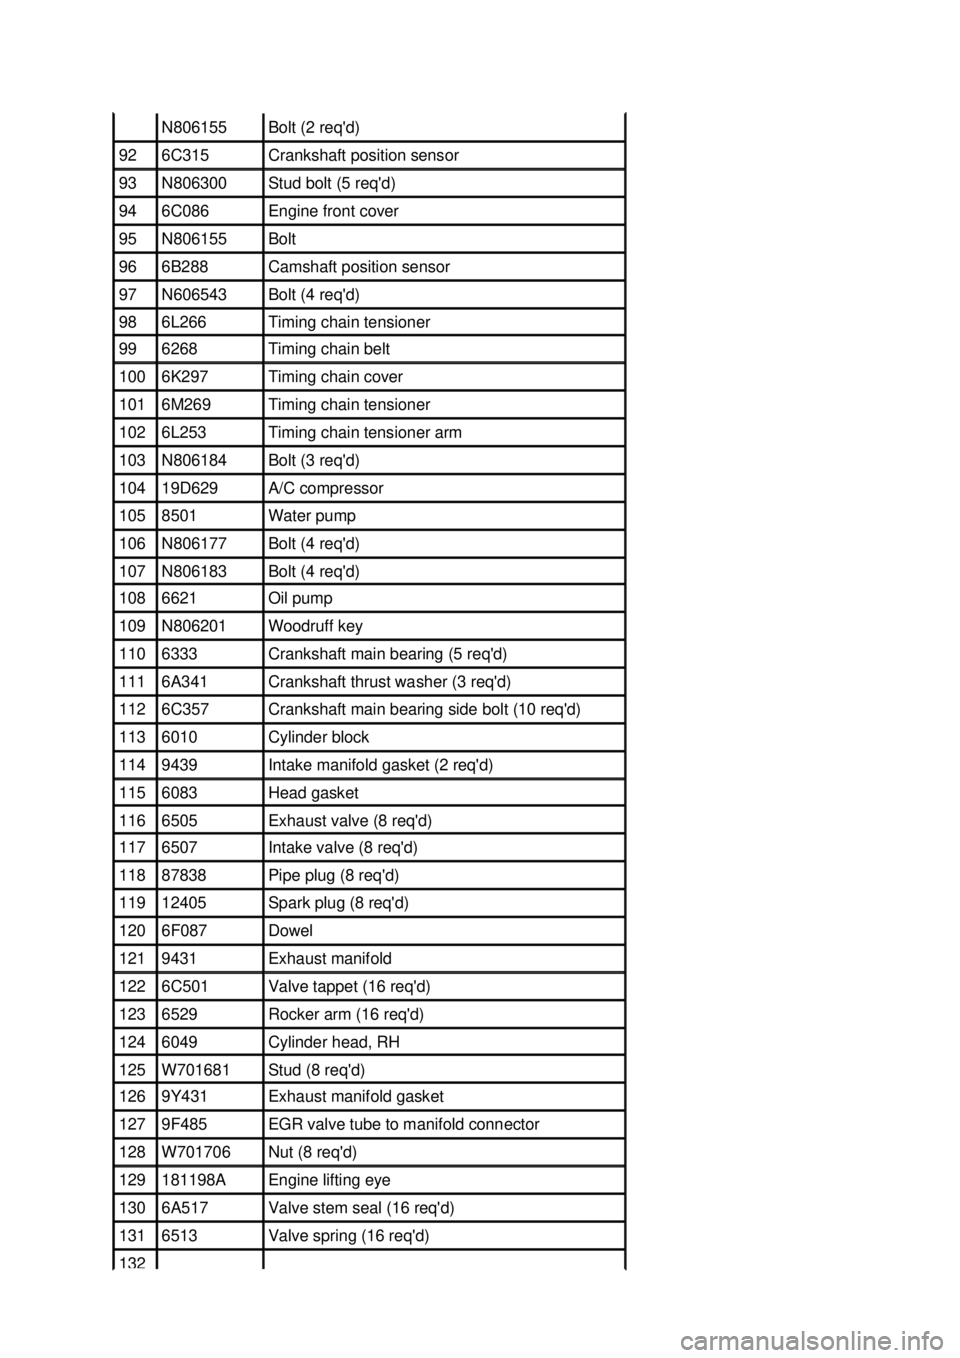
N806155 Bolt (2 req'd)
92 6C315 Crankshaft position sensor
93 N806300 Stud bolt (5 req'd)
94 6C086 Engine front cover
95 N806155 Bolt
96 6B288 Camshaft position sensor
97 N606543 Bolt (4 req'd)
98 6L266 Timing chain tensioner
99 6268 Timing chain belt
100 6K297 Timing chain cover
101 6M269 Timing chain tensioner
102 6L253 Timing chain tensioner arm
103 N806184 Bolt (3 req'd)
104 19D629 A/C compressor
105 8501 Water pump
106 N806177 Bolt (4 req'd)
107 N806183 Bolt (4 req'd)
108 6621 Oil pump
109 N806201 Woodruff key
110 6333 Crankshaft main bearing (5 req'd)
111 6A341 Crankshaft thrust washer (3 req'd)
112 6C357 Crankshaft main bearing side bolt (10 req'd)
113 6010 Cylinder block
114 9439 Intake manifold gasket (2 req'd)
115 6083 Head gasket
116 6505 Exhaust valve (8 req'd)
117 6507 Intake valve (8 req'd)
118 87838 Pipe plug (8 req'd)
119 12405 Spark plug (8 req'd)
120 6F087 Dowel
121 9431 Exhaust manifold
122 6C501 Valve tappet (16 req'd)
123 6529 Rocker arm (16 req'd)
124 6049 Cylinder head, RH
125 W701681 Stud (8 req'd)
126 9Y431 Exhaust manifold gasket
127 9F485 EGR valve tube to manifold connector
128 W701706 Nut (8 req'd)
129 181198A Engine lifting eye
130 6A517 Valve stem seal (16 req'd)
131 6513 Valve spring (16 req'd)
132 �K�l�j . 6 �b�a
92003 Mustang Workshop Manual
17. 11. 2011file:///C:/Ford/2000 - 2004/tsocache/SHEF_4464/S3B~us~en~ ...
Page 1142 of 4378

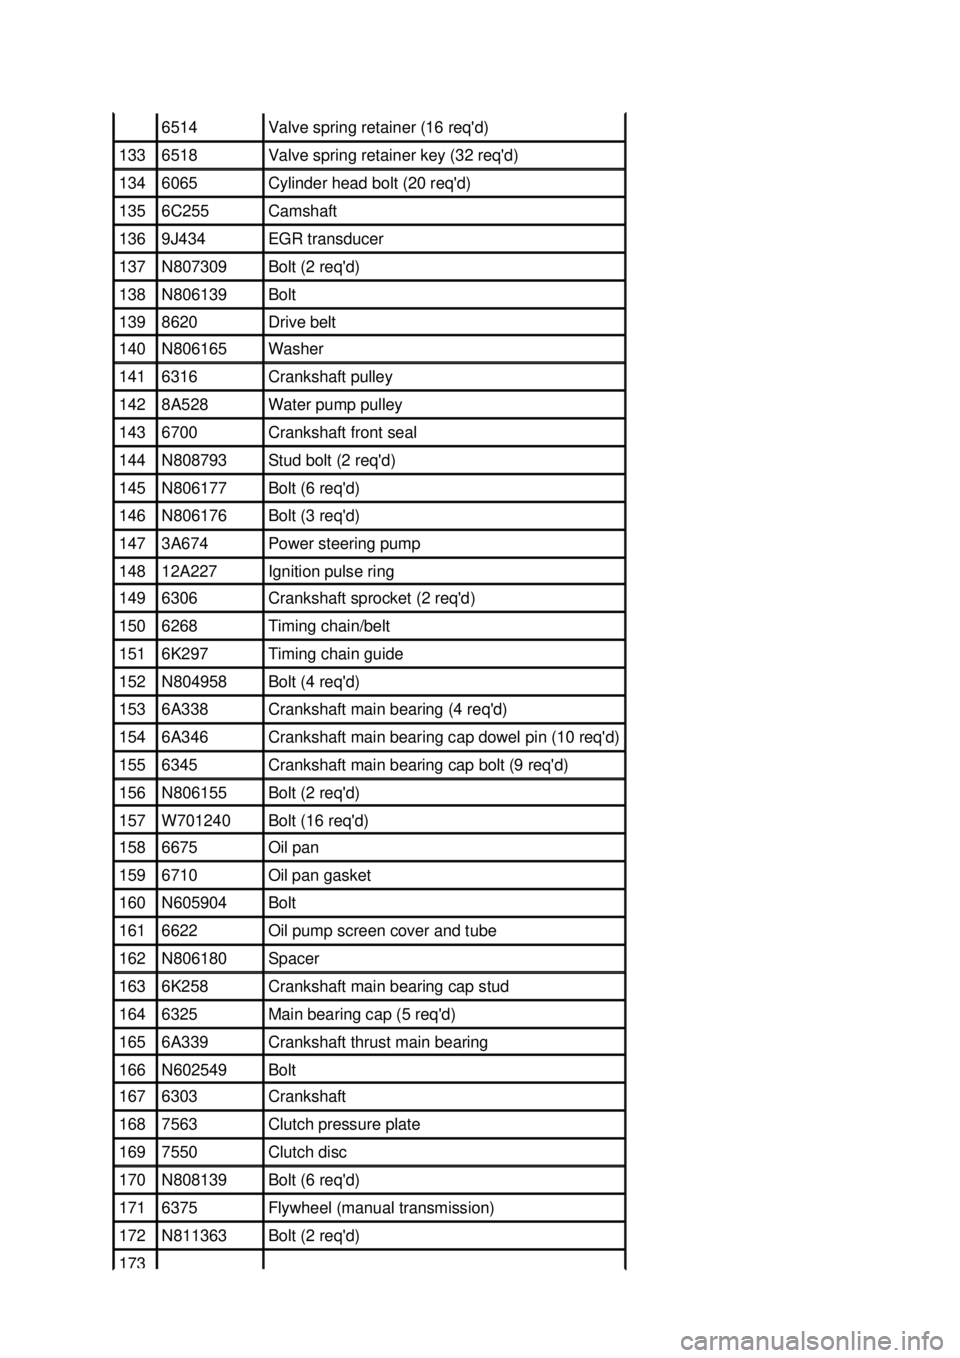
6514 Valve spring retainer (16 req'd)
133 6518 Valve spring retainer key (32 req'd)
134 6065 Cylinder head bolt (20 req'd)
135 6C255 Camshaft
136 9J434 EGR transducer
137 N807309 Bolt (2 req'd)
138 N806139 Bolt
139 8620 Drive belt
140 N806165 Washer
141 6316 Crankshaft pulley
142 8A528 Water pump pulley
143 6700 Crankshaft front seal
144 N808793 Stud bolt (2 req'd)
145 N806177 Bolt (6 req'd)
146 N806176 Bolt (3 req'd)
147 3A674 Power steering pump
148 12A227 Ignition pulse ring
149 6306 Crankshaft sprocket (2 req'd)
150 6268 Timing chain/belt
151 6K297 Timing chain guide
152 N804958 Bolt (4 req'd)
153 6A338 Crankshaft main bearing (4 req'd)
154 6A346 Crankshaft main bearing cap dowel pin (10 req'd)
155 6345 Crankshaft main bearing cap bolt (9 req'd)
156 N806155 Bolt (2 req'd)
157 W701240 Bolt (16 req'd)
158 6675 Oil pan
159 6710 Oil pan gasket
160 N605904 Bolt
161 6622 Oil pump screen cover and tube
162 N806180 Spacer
163 6K258 Crankshaft main bearing cap stud
164 6325 Main bearing cap (5 req'd)
165 6A339 Crankshaft thrust main bearing
166 N602549 Bolt
167 6303 Crankshaft
168 7563 Clutch pressure plate
169 7550 Clutch disc
170 N808139 Bolt (6 req'd)
171 6375 Flywheel (manual transmission)
172 N811363 Bolt (2 req'd)
173 �K�l�j . 7 �b�a
92003 Mustang Workshop Manual
17. 11. 2011file:///C:/Ford/2000 - 2004/tsocache/SHEF_4464/S3B~us~en~ ...
Page 1173 of 4378
Installation
1. NOTE: The crankshaft pulley must be installed within four minutes of applying the sealant.
Apply sealant to the woodruff key slot on the crankshaft pulley.
2. Using the special tool, install the crankshaft pulley.
3. Install the washer and the bolt. Tighten the bolt in four stages. �zStage 1: Tighten the bolt to 90 Nm (66 lb- ft).
�z Stage 2: Loosen the bolt one full turn.
�z Stage 3: Tighten the bolt to 50 Nm (37 lb- ft).
�z Stage 4: Tighten the bolt an additional 90 degrees. �K�l�j . 2 �b�a
32003 Mustang Workshop Manual
17. 11. 2011file:///C:/Ford/2000 - 2004/tsocache/SHEF_4464/S3B~us~en~ ...
Page 1201 of 4378
6.
NOTE: Valve stem seals should be visually inspected if not installing new seals.
Remove the valve stem seals. 1. Remove the valve spring retainer keys.
2. Remove the valve spring retainers.
3. Remove the valve springs.
4. Remove the valve stem seals.
7. NOTE: Lubricate the lip of the new seal with clean engine oil prior to installation.
To install, reverse the removal procedure. �K�l�j . 2 �b�a
22003 Mustang Workshop Manual
17. 11. 2011file:///C:/Ford/2000 - 2004/tsocache/SHEF_4464/S3B~us~en~ ...
Page 1256 of 4378
50. Position the crankshaft with the keyway at the 12 o'clock position.
51. Remove the RH and LH timing chain tensioning system from both timing chains.
1. Remove the bolts.
2. Remove the timing chain tensioners.
3. Remove the timing chain tensioner arms.
52. Remove the LH and RH timing chains and the crankshaft sprocket. �zRemove the RH timing chain from camshaft sprocket.
�z Remove the RH timing chain from the crankshaft sprocket.
�z Remove the LH timing chain from the camshaft sprocket.
�z Remove the LH timing chain and crankshaft sprocket. �K�l�j . 16 �b�a
212003 Mustang Workshop Manual
17. 11. 2011file:///C:/Ford/2000 - 2004/tsocache/SHEF_4464/S3B~us~en~ ...