Page 1640 of 4378
4. Connect the wiring harness to the valve cover stud bolt.
5. Connect the evaporative emissions (EVAP) return tube.
6.
NOTE: Lubricate O- ring with clean PAG oil or equivalent.
Install the A/C tube. 1. Install the A/C tube.
2. Connect the pin- type retainer. �K�l�j . 6 �b�a
92003 Mustang Workshop Manual
17. 11. 2011file:///C:/Ford/2000 - 2004/tsocache/SHEF_4464/S3B~us~en~ ...
Page 1646 of 4378
11. Remove the bolt and position the oil level indicator tube aside.
12. Disconnect the positive crankcase ventilation (PCV) valve hose and the electrical connector.
13. Disconnect the wiring harness anchor from the valve cover.
14. Remove the LH valve cover. �K�l�j . 3 �b�a
82003 Mustang Workshop Manual
17. 11. 2011file:///C:/Ford/2000 - 2004/tsocache/SHEF_4464/S3B~us~en~ ...
Page 1648 of 4378
3. Tighten the LH valve cover bolts in the sequence shown.
4. Connect the wiring harness anchor to the valve cover stud bolt.
5. Connect the positive crankcase ventilation (PCV) valve hose and electrical connector. �K�l�j . 5 �b�a
82003 Mustang Workshop Manual
17. 11. 2011file:///C:/Ford/2000 - 2004/tsocache/SHEF_4464/S3B~us~en~ ...
Page 1660 of 4378
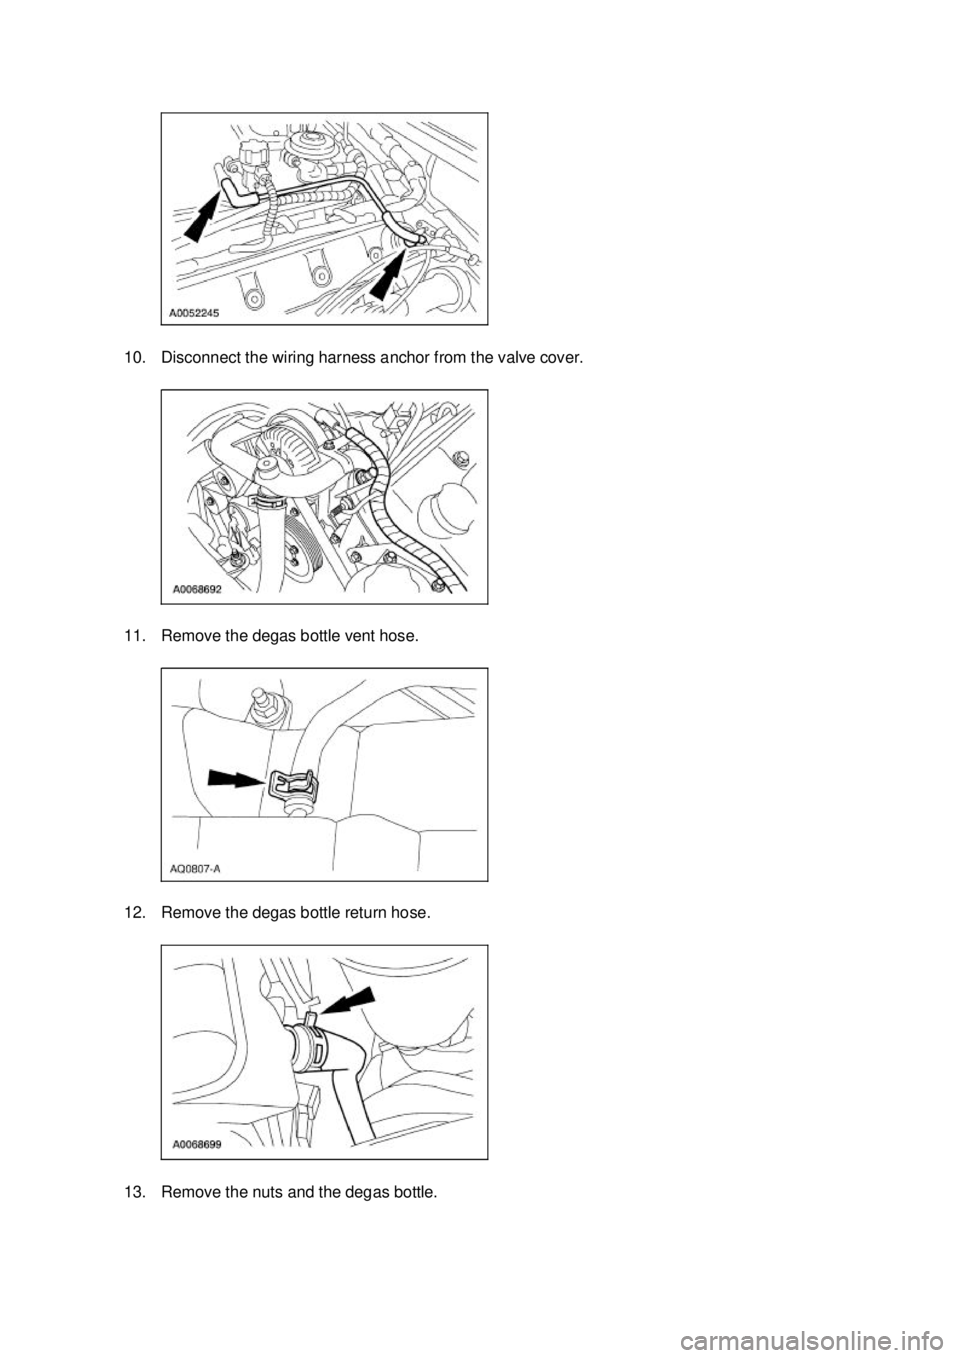
10. Disconnect the wiring harness anchor from the valve cover.
11. Remove the degas bottle vent hose.
12. Remove the degas bottle return hose.
13. Remove the nuts and the degas bottle. �K�l�j . 3 �b�a
212003 Mustang Workshop Manual
17. 11. 2011file:///C:/Ford/2000 - 2004/tsocache/SHEF_4464/S3B~us~en~ ...
Page 1661 of 4378
14. Disconnect the upper radiator hose from the bypass tube.
15. Disconnect the lower radiator hose from the bypass tube.
16. Disconnect the cooling fan electrical connector.
17. Separate the cooling fan wiring harness from the fan shroud. �K�l�j . 4 �b�a
212003 Mustang Workshop Manual
17. 11. 2011file:///C:/Ford/2000 - 2004/tsocache/SHEF_4464/S3B~us~en~ ...
Page 1663 of 4378
power steering pump aside.
23. Remove the A/C muffler bracket nut.
24. Remove the bolts and position the A/C compressor aside.
25. Disconnect the crankshaft position (CKP) sensor electrical connector.
26. Remove the wiring harness nuts and position the wiring harness aside. �K�l�j . 6 �b�a
212003 Mustang Workshop Manual
17. 11. 2011file:///C:/Ford/2000 - 2004/tsocache/SHEF_4464/S3B~us~en~ ...
Page 1671 of 4378
12. Install the clutch release cable shield and the bolt.
All vehicles 13. Loosely install the four oil pan bolts. Tighten the bolts in three stages, and in the sequence shown. 1. Stage 1: Tighten the bolts to 2 Nm (18 lb- in).
2. Stage 2: Tighten the bolts to 20 Nm (15 lb- ft).
3. Stage 3: Tighten the bolts an additional 90 degrees (1/4 turn). 14. Position the wiring harness and install the nuts. �K�l�j . 14 �b�a
212003 Mustang Workshop Manual
17. 11. 2011file:///C:/Ford/2000 - 2004/tsocache/SHEF_4464/S3B~us~en~ ...
Page 1673 of 4378
19. Install the crankshaft front oil seal. For additional information, refer to
Crankshaft Front Oil Seal in this section.
20. Position the cooling fan and shroud in the installed position.
21. Install the RH cooling fan bolt.
22. Install the LH cooling fan bolt.
23. Attach the cooling fan wiring harness to the fan shroud. �K�l�j . 16 �b�a
212003 Mustang Workshop Manual
17. 11. 2011file:///C:/Ford/2000 - 2004/tsocache/SHEF_4464/S3B~us~en~ ...
 return tube.
6.
NOTE: Lubricate O- ring with clean PAG oil or equivalent.
Install the A/C tu")
 valve hose and the electrical connector.
13. Disconnect the wiring harnes")
 valve hose and elect")

 sensor electrical connect")

