Page 2664 of 4378
5. Remove the two bolts and the inspection cover.
6. Remove the seven bolts and the clutch housing.
7.
CAUTION: Loosen the bolts evenly to prevent damage to the pressure plate.
NOTE: If the pressure plate is to be reused, index- mark the pressure plate to the flywheel.
Remove the six bolts and the pressure plate and disc. �K�l�j . 2 �b�a
42003 Mustang Workshop Manual
18. 11. 2011file:///C:/Ford/2000 - 2004/tsocache/SHEF_2308/S3B~us~en~ ...
Page 2665 of 4378
Installation
1. NOTE: Clean the clutch pressure plate and flywheel with a commercial alcohol- based solvent
so surfaces are free from oil film. Do not use cleaners with a petroleum base.
NOTE: Before installing the transmission, the ball stud, the clutch release lever and the input
shaft must be cleaned and lubricated with grease.
To install, reverse the removal procedure.
�zUsing the special tool, align the clutch disc and pressure plate to the flywheel.
2. Tighten the pressure plate bolts in two stages. �zStage 1: Tighten the bolts to 45 Nm (33 lb- ft).
�z Stage 2: Tighten the bolts an additional 60 degrees. �K�l�j . 3 �b�a
42003 Mustang Workshop Manual
18. 11. 2011file:///C:/Ford/2000 - 2004/tsocache/SHEF_2308/S3B~us~en~ ...
Page 2667 of 4378
REMOVAL AND INSTALLATION
Pilot Bearing
1. Remove the clutch disc and the clutch pressure plate. For additional information, refer to Disc and Pressure Plate — 3.8L and 4.6L (2V) Engines or
Disc and Pressure Plate — 4.6L (4V) Engine
in this section.
2. Using the special tool, remove the pilot bearing from the flywheel.
Installation 1. Insert the pilot bearing into the crankshaft.
2. Install the clutch disc and the clutch pressure plate. For additional information, refer to Disc and Pressure Plate — 3.8L and 4.6L (2V) Engines or
Disc and Pressure Plate — 4.6L (4V) Engine in
this section.
SECTION 308-
01: Clutch 2003 Mustang Workshop Manual Special Tool(s)
Puller with Slide Hammer
308-
001 (T58L-101- B) �K�l�j . 1 �b�a
22003 Mustang Workshop Manual
18. 11. 2011file:///C:/Ford/2000 - 2004/tsocache/SHEF_2308/S3B~us~en~ ...
Page 2669 of 4378

REMOVAL AND INSTALLATION
Flywheel Ring Gear
Removal
1. Remove the flywheel. For additional information, refer to Section 303 - 01A ,
Section 303 - 01B or
Section 303 - 01C .
2. WARNING: This procedure should be carried out only by a correctly equipped and
experienced acetylene torch operator. Tongs must be used or asbestos gloves worn
when handling the heated flywheel ring gear. Failure to follow these instructions can
result in personal injury.
CAUTION: Tap the flywheel ring gear evenly to prevent binding.
Remove the flywheel ring gear from the flywheel. �zEvenly heat the flywheel ring gear with an acetylene torch and use a brass drift to drive
the flywheel ring gear off the flywheel.
Installation
1. WARNING: This procedure should be carried out only by a properly equipped and
experienced acetylene torch operator. Tongs must be used or asbestos gloves worn
when handling the heated flywheel ring gear. Failure to follow these instructions can
result in personal injury.
CAUTION: Do not heat the flywheel ring gear beyond 261°C (500°F). Use heat-
indicating crayons to prevent overheating.
CAUTION: Keep the torch moving to prevent hot spots.
Evenly heat the flywheel ring gear with an acetylene torch. �zInstall the flywheel ring gear with the bevel on the flywheel ring gear facing the rear of the
flywheel.
�z Use a brass drift to tap the flywheel ring gear into position, reheat as necessary.
2. Install the flywheel. For additional information, refer to Section 303 - 01A ,
Section 303 - 01B or
Section 303 - 01C . SECTION 308-
01: Clutch 2003 Mustang Workshop Manual �K�l�j . 1 �b�a
22003 Mustang Workshop Manual
18. 11. 2011file:///C:/Ford/2000 - 2004/tsocache/SHEF_2308/S3B~us~en~ ...
Page 2692 of 4378

Transmission Identification
The transmission identification tag is located under the lower left bolt that retains the extension 50 7230 Reverse shift fork
51 7240 Reverse gear shift rail
52 7230 Fifth gear shifter fork
53 357479-S15 Split pin
54 371197-
S Reverse gearshift lever retaining clip
55 7K002 Reverse gearshift lever
56 7E485 Reverse positioning spring
57 7005 Case
58 87675-
S Case plug
59 74113-
S Plug
60 15520 Reversing lamp switch
61 7K024 Shift lever reverse pin
62 7E397 Reverse gear overtravel stop
63 7141 Reverse idler gear and bushing
64 7140 Reverse idler gear shaft
65 357479-S15 Pin
66 7K316 Fifth speed driven gear
67 7H150 Output shaft speed wheel
68 7034 Vent
69 E800152-S72 Bolt
70 7A039 Extension housing
71 7K381 Extension plug
72 7052 Extension housing fluid seal
73 372720-
S Detent ball
74 7234 Shifter detent spring
75 7F018 Gearshift offset lever
76 7K453 Gearshift shaft bushing
77 7A443 Bolt
78 7C108 Gearshift lower boot clamp
79 7210 Gearshift lever
80 7277 Gearshift lever boot
81 N602187-
S100 Bolt
82 7050 Input shaft bearing retainer
83 7052 Input shaft seal
84 7025 Input bearing assembly
85 7017 Input shaft
86 7118 Roller bearing (15 req'd)
87 7L357 Input shaft bearing spacer �K�l�j . 4 �b�a
52003 Mustang Workshop Manual
18. 11. 2011file:///C:/Ford/2000 - 2004/tsocache/SHEF_2308/S3B~us~en~ ...
Page 2713 of 4378
18. Remove the reversing lamp switch (15520).
19. Remove the reverse gear shift rail.
1. Rotate the reverse gear shift rail clockwise to disengage the ball stud from the reverse gearshift lever.
2. Pull the reverse gear shift rail rearward slightly.
3. Rotate the reverse gear shift rail counterclockwise to align the ball stud with the slot in the case and remove the reverse gear shift rail.
20. Remove the snap ring and the output shaft speed wheel (7H150). �K�l�j . 6 �b�a
112003 Mustang Workshop Manual
18. 11. 2011file:///C:/Ford/2000 - 2004/tsocache/SHEF_2308/S3B~us~en~ ...
Page 2749 of 4378
25. Install the output shaft speed wheel and the snap ring.
26.
CAUTION: Do not under any circumstance apply silicone sealant to the top of the
transmission case. The sealant could fall into the transmission and affect transmission
operation.
Apply a 3.2- mm (1/8-in) bead of silicone rubber to the sealing surface on the case cover.
27. NOTE: Verify that all of the synchronizers are in the NEUTRAL position and the gear shifter
forks in the cover are in the NEUTRAL position.
Install the case cover.
�zPosition the cover toward the filler plug side of the transmission and lower it until the gear
shifter forks engage the synchronizers. Continue to lower the cover and move it into
position to engage the reverse gearshift lever.
28. Install the bolts. �K�l�j . 9 �b�a
142003 Mustang Workshop Manual
18. 11. 2011file:///C:/Ford/2000 - 2004/tsocache/SHEF_2308/S3B~us~en~ ...
Page 2785 of 4378
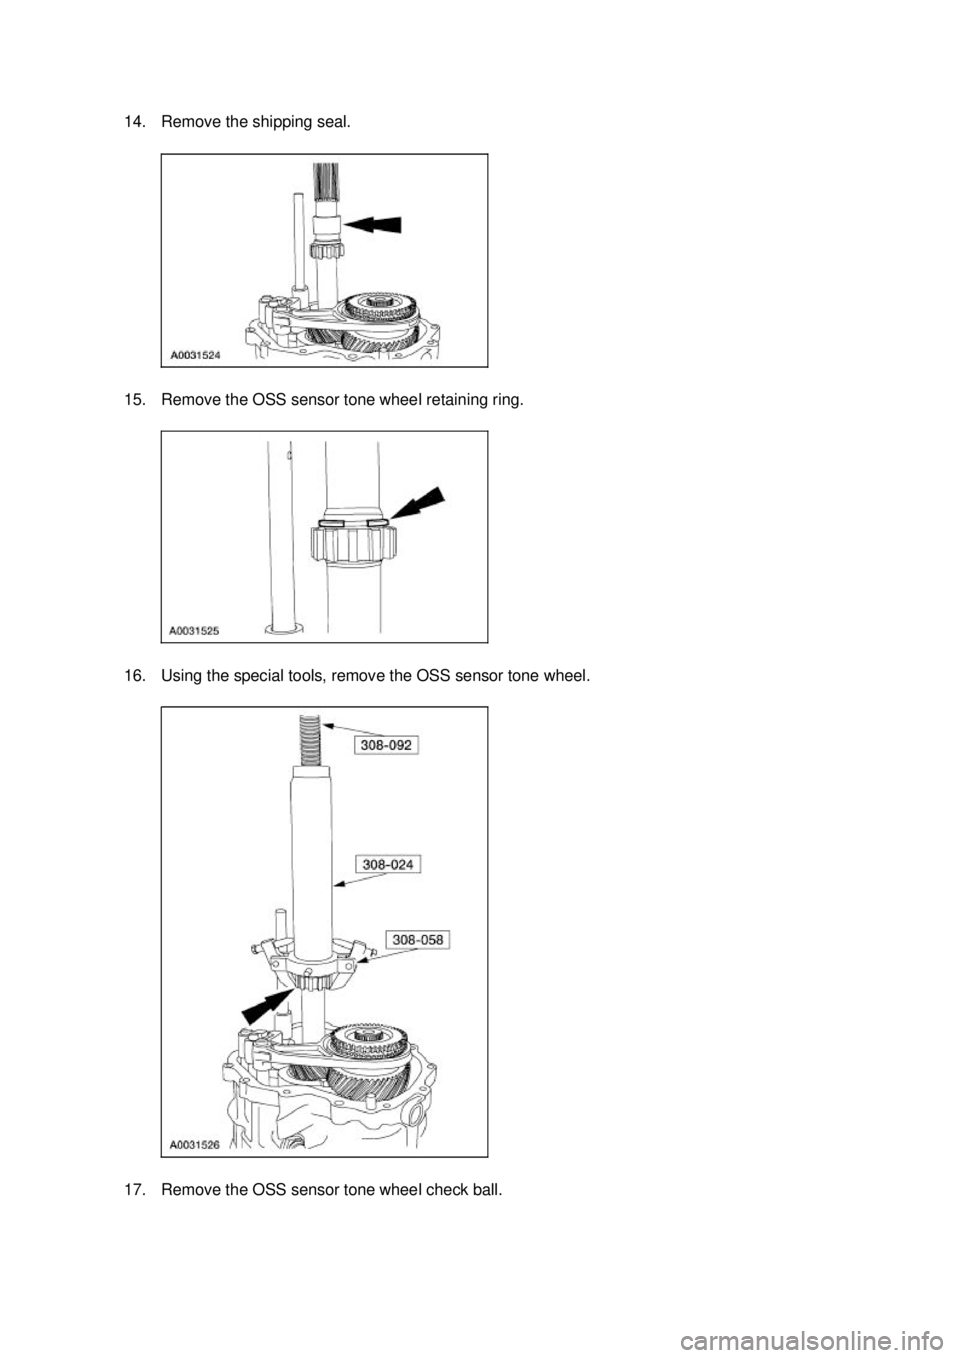
14. Remove the shipping seal.
15. Remove the OSS sensor tone wheel retaining ring.
16. Using the special tools, remove the OSS sensor tone wheel.
17. Remove the OSS sensor tone wheel check ball. �K�l�j . 5 �b�a
152003 Mustang Workshop Manual
18. 11. 2011file:///C:/Ford/2000 - 2004/tsocache/SHEF_2308/S3B~us~en~ ...


 Engines or
Disc")
.
19. Remove the reverse gear shift rail.
1. Rotate the reverse gear shift rail clockwise to disengage the ball stud from the reverse gearshift lever.
2.")