Page 2550 of 4378

DISASSEMBLY AND ASSEMBLY OF SUBASSEMBLIES
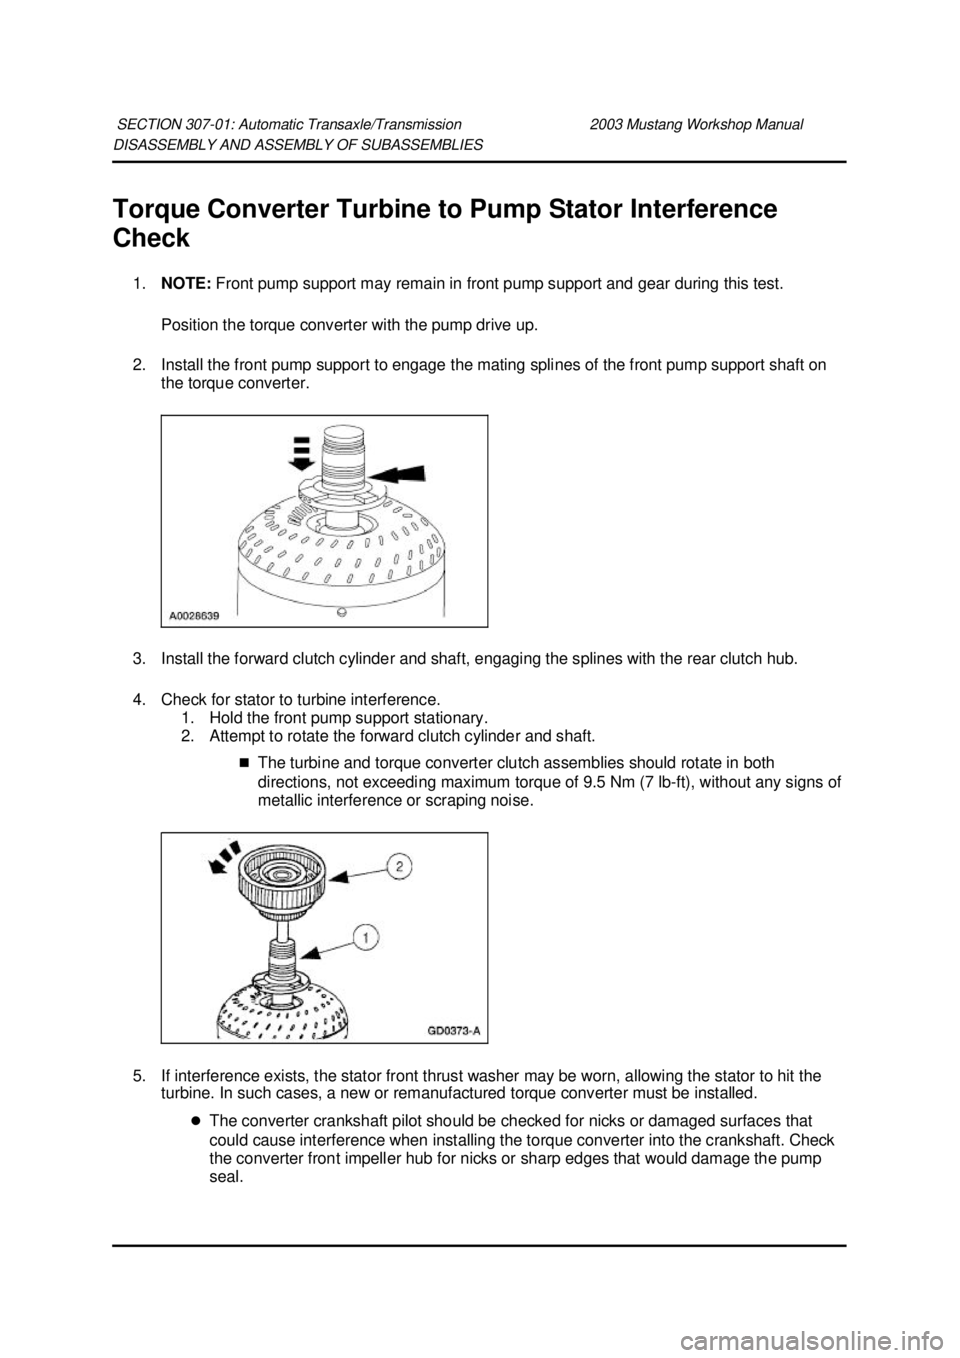
Torque Converter Turbine to Pump Stator Interference
Check
1. NOTE: Front pump support may remain in front pump support and gear during this test.
Position the torque converter with the pump drive up.
2. Install the front pump support to engage the mating splines of the front pump support shaft on the torque converter.
3. Install the forward clutch cylinder and shaft, engaging the splines with the rear clutch hub.
4. Check for stator to turbine interference. 1. Hold the front pump support stationary.
2. Attempt to rotate the forward clutch cylinder and shaft.
�„The turbine and torque converter clutch assemblies should rotate in both
directions, not exceeding maximum torque of 9.5 Nm (7 lb- ft), without any signs of
metallic interference or scraping noise.
5. If interference exists, the stator front thrust washer may be worn, allowing the stator to hit the turbine. In such cases, a new or remanufactured torque converter must be installed.
�zThe converter crankshaft pilot should be checked for nicks or damaged surfaces that
could cause interference when installing the torque converter into the crankshaft. Check
the converter front impeller hub for nicks or sharp edges that would damage the pump
seal.
SECTION 307-
01: Automatic Transaxle/Transmission 2003 Mustang Workshop Manual �K�l�j . 1 �b�a
22003 Mustang Workshop Manual
18. 11. 2011file:///C:/Ford/2000 - 2004/tsocache/SHEF_2748/S3B~us~en~ ...
Page 2552 of 4378
ASSEMBLY
Transmission
SECTION 307-
01: Automatic Transaxle/Transmission 2003 Mustang Workshop Manual Special Tool(s)
Dial Indicator Gauge with
Holding Fixture
100-
002 (TOOL- 4201-C) Rubber Tip Air Nozzle
100-
D009 (D93L-7000- A) Alignment Gauge, TR Sensor
307-
351 (T97L-70010- A) Slide Hammer
100-
001 (T50T-100- A) Installer, Shift Shaft Fluid Seal
307-
050 (T74P-77498- A) Shim Selection Gauge
307-
072 (T80L-77003- A) Installer, Servo Piston
307-
073 (T80L-77030- A) Remover/Installer,
Transmission Extension
Housing �K�l�j . 1 �b�a
252003 Mustang Workshop Manual
18. 11. 2011file:///C:/Ford/2000 - 2004/tsocache/SHEF_2748/S3B~us~en~ ...
Page 2553 of 4378
307-
077 (T80L-77110- A) Handle, Torque Converter
307-
091 (T81P-7902- C) Test Plate Screw Set,
Transmission
307-
126 (T82P-7006- C) Air Test Plate, Transmission
307-
246 (T92P-7006- A) Remover/Installer, Servo
Piston
307-
251 (T92P-70023- A) Retainer, Torque Converter
307-
346 (T97T-7902- A) Installer, Transmission
Extension Housing Oil Seal
308-
002 (T61L-7657- A) Gauge, Transmission Solenoid
Connectors
307-426
Material Item Specification
Multi-
Purpose Grease ESB-
M1C93- �K�l�j . 2 �b�a
252003 Mustang Workshop Manual
18. 11. 2011file:///C:/Ford/2000 - 2004/tsocache/SHEF_2748/S3B~us~en~ ...
Page 2554 of 4378

CAUTION: Before beginning assembly, carry out and inspect the following:
When building up subassemblies and assembling the transmission, ALWAYS use new gaskets
and seals.
All fasteners must be tightened to the torque specification indicated. In addition to appearing in
the section, the necessary torques can be found in the General Specifications Chart.
When building up subassemblies, each component part should be lubricated with clean
transmission fluid. It is also good practice to lubricate the subassemblies as they are installed
in the case.
Needle bearings, thrust washers and seals should be lightly coated with petroleum jelly during
subassembly buildup or transmission assembly.
Many components and surfaces in the transmission are precision machined. Careful handling
during disassembly, cleaning, inspection and assembly can prevent unnecessary damage to
machined surfaces.
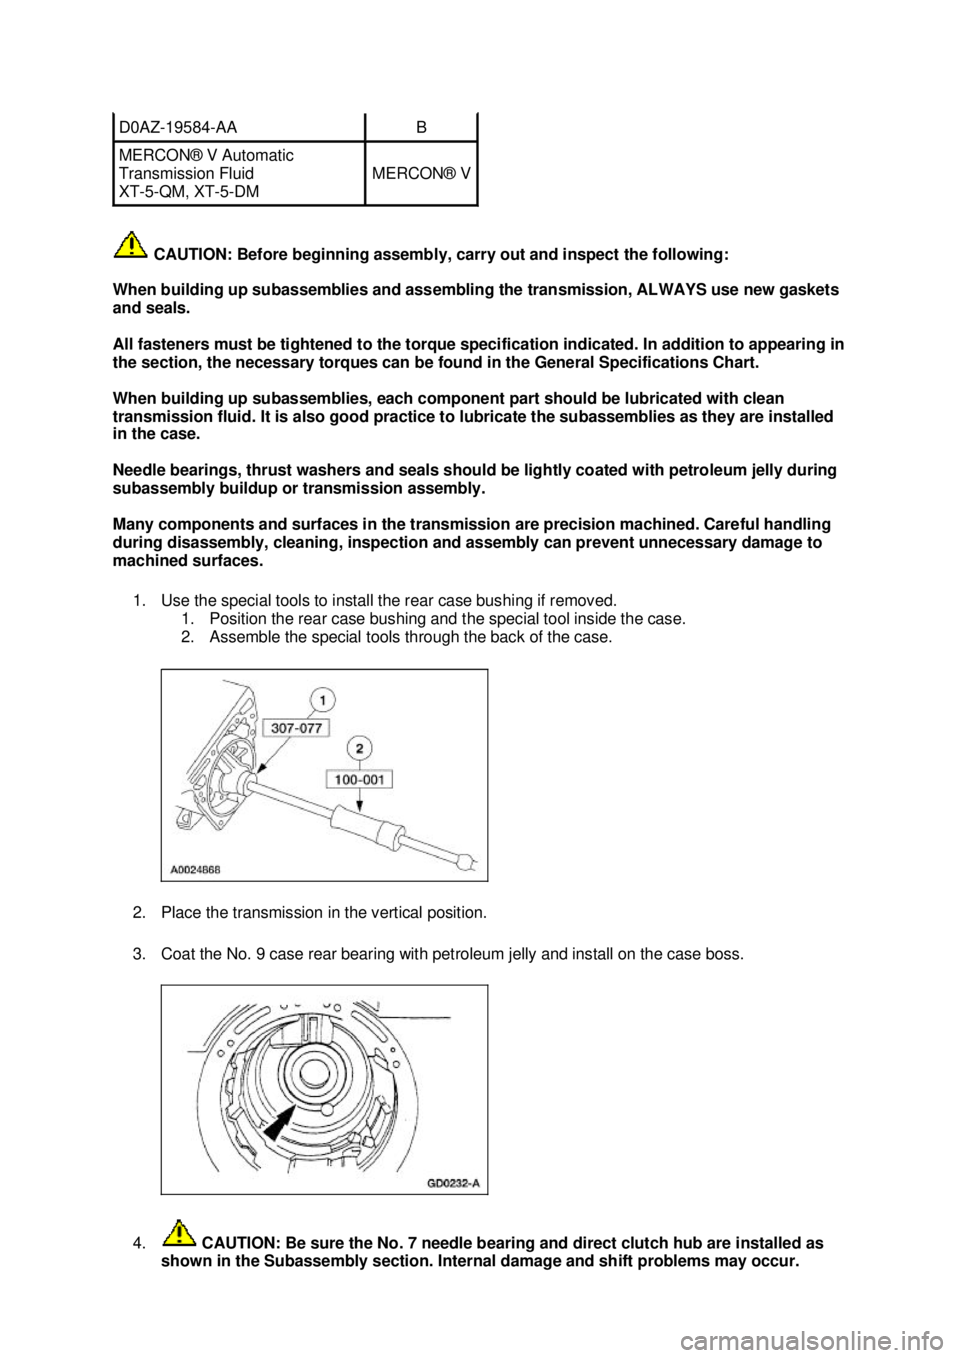
1. Use the special tools to install the rear case bushing if removed. 1. Position the rear case bushing and the special tool inside the case.
2. Assemble the special tools through the back of the case.
2. Place the transmission in the vertical position.
3. Coat the No. 9 case rear bearing with petroleum jelly and install on the case boss.
4. CAUTION: Be sure the No. 7 needle bearing and direct clutch hub are installed as
shown in the Subassembly section. Internal damage and shift problems may occur. D0AZ-
19584- AA B
MERCON® V Automatic
Transmission Fluid
XT
-5-QM, XT -5-DM MERCON® V �K�l�j . 3 �b�a
252003 Mustang Workshop Manual
18. 11. 2011file:///C:/Ford/2000 - 2004/tsocache/SHEF_2748/S3B~us~en~ ...
Page 2555 of 4378
Install the output shaft and output shaft ring gear.
5. Install the No. 8 bearing.
6. Install the direct clutch.
7. NOTE: The reverse band support retaining ring is used for assembly purposes during
production. The reverse band support retaining ring is not required during assembly and it will
not affect the operation of the transmission.
Install the reverse band support retaining ring. �K�l�j . 4 �b�a
252003 Mustang Workshop Manual
18. 11. 2011file:///C:/Ford/2000 - 2004/tsocache/SHEF_2748/S3B~us~en~ ...
Page 2560 of 4378
23.
NOTE: Before assembly, soak the new clutch discs in clean automatic transmission fluid for 15
minutes.
Install the intermediate clutch pack and selective steel plate.
24. Using the special tool, check the intermediate clutch clearance. 1. Position the special tool on the pump case mounting surface.
2. Maintaining downward pressure, use a depth micrometer to measure and verify intermediate clutch clearance is within specification.
If the intermediate clutch is not within specification, install a correct selective plate.
25. Install the intermediate anti- rattle clip, if equipped. Selective Steel Plates
Specification
1.80-
1.70 mm (0.071- 0.067 inch) 2.05-
1.95 mm (0.081- 0.077 inch) 2.31-
2.20 mm (0.091- 0.087 inch) 2.56-
2.46 mm (0.101- 0.097 inch) �K�l�j . 9 �b�a
252003 Mustang Workshop Manual
18. 11. 2011file:///C:/Ford/2000 - 2004/tsocache/SHEF_2748/S3B~us~en~ ...
Page 2563 of 4378
32. Rotate the transmission to the horizontal position.
33. Install the parking pawl.
1. Position the parking pawl return spring.
2. Position the parking pawl.
3. Install the parking pawl shaft.
34. Install a new extension housing gasket and the extension housing. 1. Position the extension housing.
2. Install the four bolts and two nuts.
35. Using the special tool, install a new extension housing seal. �K�l�j . 12 �b�a
252003 Mustang Workshop Manual
18. 11. 2011file:///C:/Ford/2000 - 2004/tsocache/SHEF_2748/S3B~us~en~ ...
Page 2564 of 4378
36. Install the output shaft speed (OSS) sensor.
1. Position the OSS sensor.
2. Install the bolt.
37. Using the special tool, install the manual control lever seal.
38. NOTE: Lubricate the electronic pressure control (EPC) solenoid O- rings with clean automatic
transmission fluid.
Install the EPC solenoid.
1. Install the EPC solenoid.
2. Install the EPC solenoid bracket and bolt. �K�l�j . 13 �b�a
252003 Mustang Workshop Manual
18. 11. 2011file:///C:/Ford/2000 - 2004/tsocache/SHEF_2748/S3B~us~en~ ...