Page 1557 of 4378
NOTE:
Lubricate the piston rings, cylinder walls and connecting rod bearings with clean engine
oil.
Using the special tool push the pistons through the top of the cylinder block.
14. CAUTION: Do not scratch the cylinder walls or the crankshaft journals with the
connecting rod.
NOTE: Make sure the crankshaft is at top dead center (TDC).
Using the special tool, install the connecting rod assemblies.
15. NOTE: The rod bearing cap bolts are torque- to-yield. Install new bolts, each time they are
serviced.
Install the connecting rod bearing caps and bolts. and tighten in three stages.
�zStage 1: Tighten to 25 Nm (18 lb- ft).
�z Stage 2: Tighten to 45 Nm (33 lb- ft).
�z Stage 3: Tighten an additional 90 degrees. �K�l�j . 8 �b�a
352003 Mustang Workshop Manual
17. 11. 2011file:///C:/Ford/2000 - 2004/tsocache/SHEF_4464/S3B~us~en~ ...
Page 1561 of 4378
28. Pre-position the camshafts.
1. Rotate the LH camshaft until the timing mark is approximately at 12 o'clock.
2. Rotate the RH camshaft until the timing mark is approximately at 11 o'clock.
29. Install the special tool. �K�l�j . 12 �b�a
352003 Mustang Workshop Manual
17. 11. 2011file:///C:/Ford/2000 - 2004/tsocache/SHEF_4464/S3B~us~en~ ...
Page 1562 of 4378
30.
CAUTION: Unless otherwise instructed, at no time when the timing chains are
removed and the cylinder heads are installed is the crankshaft or camshaft to be rotated.
Severe piston and valve damage will occur.
CAUTION: Rotate the crankshaft counterclockwise only. Do not rotate past position
shown or severe piston and/or valve damage will occur.
Using the special tool, position the crankshaft.
�zRemove the special tool.
31. Install the crankshaft sprocket with the flange facing forward.
32. Position the LH (inner) timing chain onto the crankshaft sprocket, aligning the one copper link on the timing chain with the slot on the crankshaft sprocket. �K�l�j . 13 �b�a
352003 Mustang Workshop Manual
17. 11. 2011file:///C:/Ford/2000 - 2004/tsocache/SHEF_4464/S3B~us~en~ ...
Page 1582 of 4378
99. Install the special tools.
100. Attach the special tool to a floor crane and the engine, and remove the engine from the stand.
101. NOTE: If not secured within four minutes, the sealant must be removed and the sealing surface
must be cleaned with metal surface cleaner. Allow the surface to dry until there is no sign of
wetness or four minutes, whichever is longer. Failure to follow this procedure can result in future
oil leakage.
Apply a 4 mm (0.16 in) bead of silicone gasket and sealant around the rear oil seal retainer
plate sealing surface. Also apply a bead of silicone gasket and sealant at the junction where the
cylinder block, oil pan and rear oil seal retainer plate meet. �K�l�j . 33 �b�a
352003 Mustang Workshop Manual
17. 11. 2011file:///C:/Ford/2000 - 2004/tsocache/SHEF_4464/S3B~us~en~ ...
Page 1585 of 4378
INSTALLATION
Engine
Installation
1. Install the engine in the vehicle and remove the floor crane and the special tool.
SECTION 303-
01C: Engine — Cobra 4.6L (4V) 2003 Mustang Workshop Manual Special Tool(s)
Lifting Bracket, Engine
303-
D087 (D93P-6001- A1) Lifting Bracket, Engine
303-
D088 (D93P-6001- A2) Spreader Bar
303-
D089 (D93P-6001- A3) or
equivalent
Material Item Specification
SAE 5W-
20 Premium Synthetic
Blend Engine Oil
XO- 5W20- QSP or equivalent WSS-
M2C153-
H Motorcraft Premium Engine
Coolant
VC
-4-A (in Canada CXC- 10; in
Oregon VC- 5) or equivalent ESE-
M97B44-
A Motorcraft Premium Gold
Engine Coolant
VC
-7-A (in Oregon VC-7- B) or
equivalent WSS-
M97B51-
A1 Threadlock and Sealer
E0AZ-
19554- AA WSK-
M2G351-
A5 PAG Refrigerant Compressor
Oil (R-
134a Systems)
F7AZ- 19589- DA (MC YN-12- C) WSH-
M1C231-
B �K�l�j . 1 �b�a
172003 Mustang Workshop Manual
17. 11. 2011file:///C:/Ford/2000 - 2004/tsocache/SHEF_4464/S3B~us~en~ ...
Page 1598 of 4378
51. Connect the accelerator controls.
�zConnect the accelerator cable.
�z If equipped, connect the speed control cable.
52. Connect the fuel tube spring lock coupling. For additional information, refer to Section 310 - 00 .
53. Connect the A/C pressure switch electrical connector.
54. Connect the vacuum hose. �K�l�j . 14 �b�a
172003 Mustang Workshop Manual
17. 11. 2011file:///C:/Ford/2000 - 2004/tsocache/SHEF_4464/S3B~us~en~ ...
Page 1602 of 4378

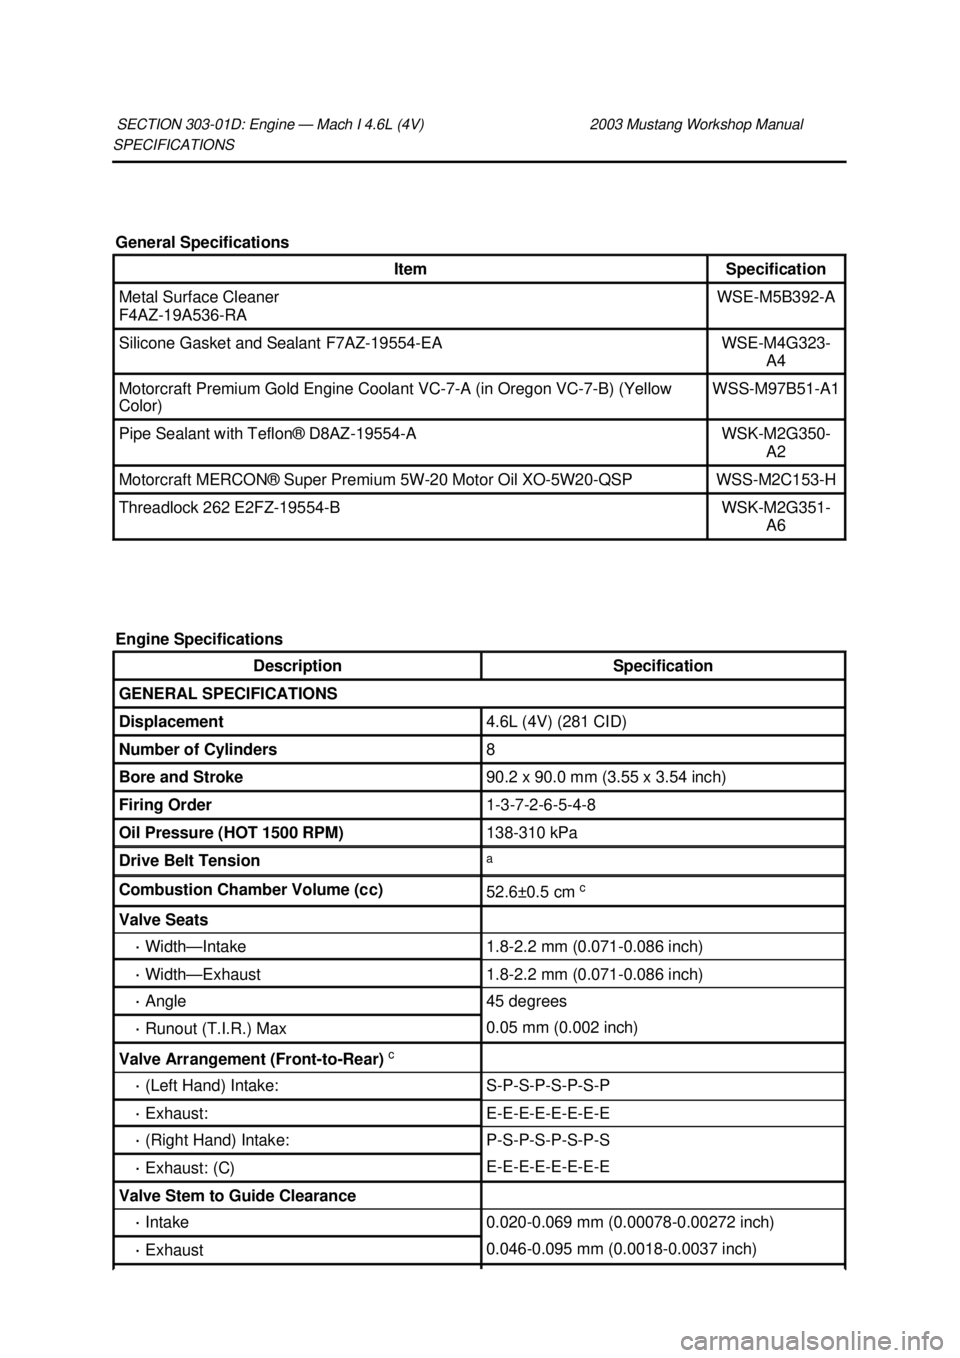
SPECIFICATIONS
SECTION 303-
01D: Engine — Mach I 4.6L (4V) 2003 Mustang Workshop Manual General Specifications
Item Specification
Metal Surface Cleaner
F4AZ-
19A536- RA WSE-
M5B392- A Silicone Gasket and Sealant F7AZ-19554-
EA WSE-
M4G323-
A4 Motorcraft Premium Gold Engine Coolant VC-7-
A (in Oregon VC-7-B) (Yellow
Color) WSS-
M97B51- A1 Pipe Sealant with Teflon® D8AZ-19554-
A WSK-
M2G350-
A2 Motorcraft MERCON® Super Premium 5W-
20 Motor Oil XO-5W20-QSP WSS-
M2C153- H Threadlock 262 E2FZ-19554-
B WSK-
M2G351-
A6
Engine Specifications Description Specification
GENERAL SPECIFICATIONS
Displacement 4.6L (4V) (281 CID)
Number of Cylinders 8
Bore and Stroke 90.2 x 90.0 mm (3.55 x 3.54 inch)
Firing Order 1-3-7-2-6-5-4-
8 Oil Pressure (HOT 1500 RPM) 138-
310 kPa Drive Belt Tension a
Combustion Chamber Volume (cc)
52.6±
0.5 cm c Valve Seats
·
Width— Intake 1.8-
2.2 mm (0.071- 0.086 inch) ·
Width— Exhaust 1.8-
2.2 mm (0.071- 0.086 inch) ·
Angle 45 degrees
·
Runout (T.I.R.) Max 0.05 mm (0.002 inch)
Valve Arrangement (Front-
to-Rear) c ·
(Left Hand) Intake: S-P-S-P-S-P-S-P
·
Exhaust: E-E-E-E-E-E-E-E
·
(Right Hand) Intake: P-S-P-S-P-S-P-S
·
Exhaust: (C) E-E-E-E-E-E-E-E
Valve Stem to Guide Clearance
·
Intake 0.020-
0.069 mm (0.00078- 0.00272 inch) ·
Exhaust 0.046-
0.095 mm (0.0018- 0.0037 inch) �K�l�j . 1 �b�a
62003 Mustang Workshop Manual
17. 11. 2011file:///C:/Ford/2000 - 2004/tsocache/SHEF_4464/S3B~us~en~ ...
Page 1604 of 4378

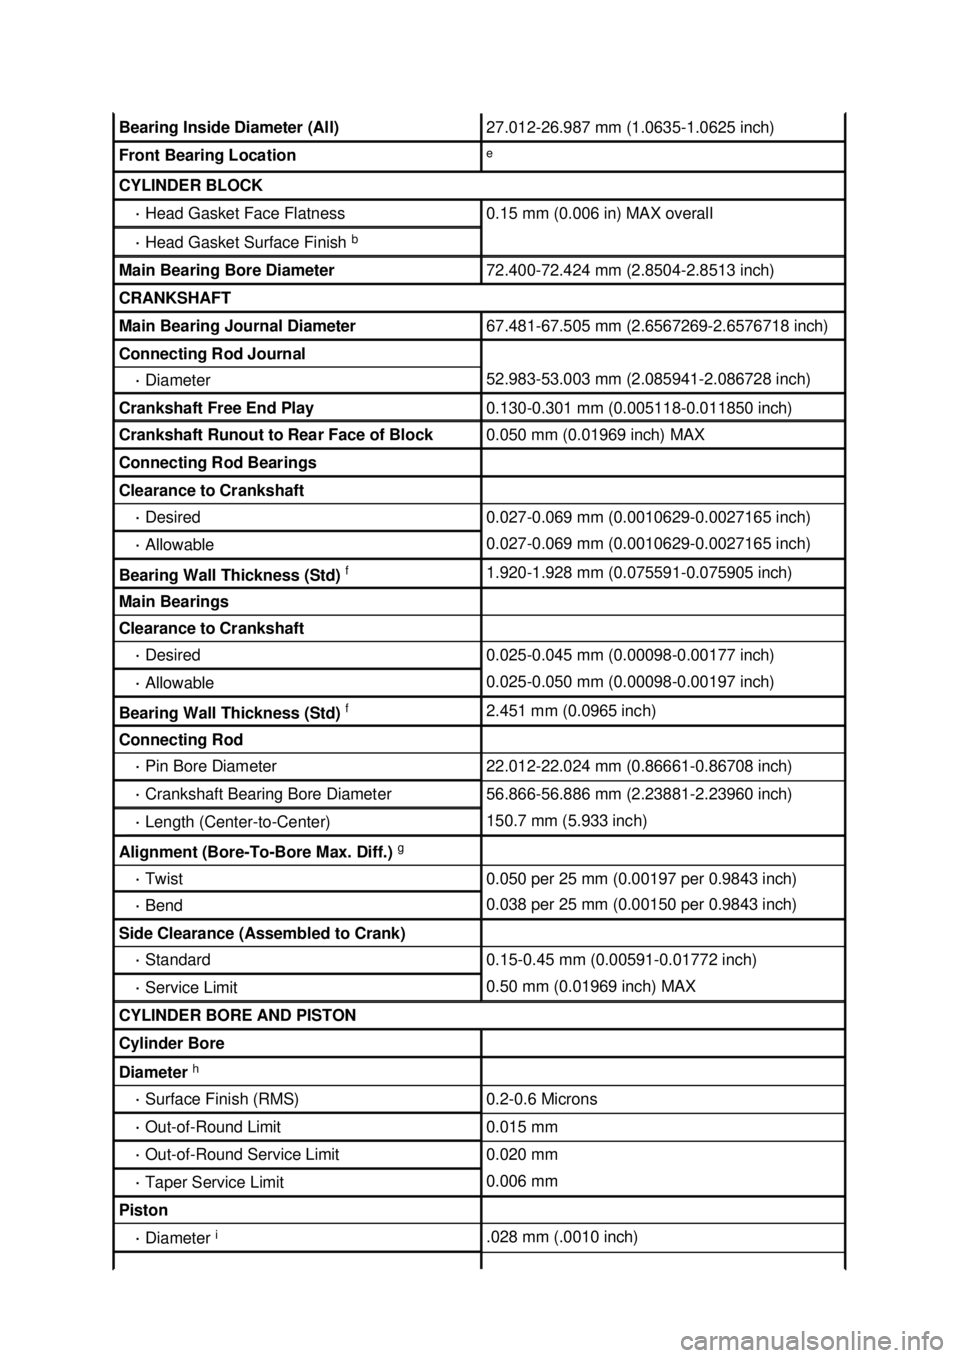
Bearing Inside Diameter (All) 27.012-
26.987 mm (1.0635- 1.0625 inch) Front Bearing Location e
CYLINDER BLOCK
·
Head Gasket Face Flatness 0.15 mm (0.006 in) MAX overall
·
Head Gasket Surface Finish b Main Bearing Bore Diameter 72.400-
72.424 mm (2.8504- 2.8513 inch) CRANKSHAFT
Main Bearing Journal Diameter 67.481-
67.505 mm (2.6567269- 2.6576718 inch) Connecting Rod Journal
·
Diameter 52.983-
53.003 mm (2.085941- 2.086728 inch) Crankshaft Free End Play 0.130-
0.301 mm (0.005118- 0.011850 inch) Crankshaft Runout to Rear Face of Block 0.050 mm (0.01969 inch) MAX
Connecting Rod Bearings
Clearance to Crankshaft
·
Desired 0.027-
0.069 mm (0.0010629- 0.0027165 inch) ·
Allowable 0.027-
0.069 mm (0.0010629- 0.0027165 inch) Bearing Wall Thickness (Std)
f 1.920-
1.928 mm (0.075591- 0.075905 inch) Main Bearings
Clearance to Crankshaft
·
Desired 0.025-
0.045 mm (0.00098- 0.00177 inch) ·
Allowable 0.025-
0.050 mm (0.00098- 0.00197 inch) Bearing Wall Thickness (Std)
f 2.451 mm (0.0965 inch)
Connecting Rod
·
Pin Bore Diameter 22.012-
22.024 mm (0.86661- 0.86708 inch) ·
Crankshaft Bearing Bore Diameter 56.866-
56.886 mm (2.23881- 2.23960 inch) ·
Length (Center- to-Center) 150.7 mm (5.933 inch)
Alignment (Bore-To-
Bore Max. Diff.) g ·
Twist 0.050 per 25 mm (0.00197 per 0.9843 inch)
·
Bend 0.038 per 25 mm (0.00150 per 0.9843 inch)
Side Clearance (Assembled to Crank)
·
Standard 0.15-
0.45 mm (0.00591- 0.01772 inch) ·
Service Limit 0.50 mm (0.01969 inch) MAX
CYLINDER BORE AND PISTON
Cylinder Bore
Diameter
h ·
Surface Finish (RMS) 0.2-
0.6 Microns ·
Out- of-Round Limit 0.015 mm
·
Out- of-Round Service Limit 0.020 mm
·
Taper Service Limit 0.006 mm
Piston
·
Diameter i .028 mm (.0010 inch) �K�l�j . 3 �b�a
62003 Mustang Workshop Manual
17. 11. 2011file:///C:/Ford/2000 - 2004/tsocache/SHEF_4464/S3B~us~en~ ...