Page 1736 of 4378
18. Rotate the drive belt tensioner clockwise and attach the drive belt to the generator pulley.
�zMake sure the drive belt is routed correctly and is aligned correctly installed on each
pulley.
19. Connect the battery ground cable. For additional information, refer to Section 414 - 01 .
20. Install the coolant bypass tube. For additional information, refer to Section 303 - 03A . �K�l�j . 10 �b�a
102003 Mustang Workshop Manual
17. 11. 2011file:///C:/Ford/2000 - 2004/tsocache/SHEF_4464/S3B~us~en~ ...
Page 1739 of 4378
9. Disconnect the electrical connector.
10. Drain the engine cooling system. For additional information, refer to Section 303 - 03A .
11. Disconnect the fuel tube spring lock coupling. For additional information, refer to Section 310 -
00 .
12. Remove the upper radiator hose (8260).
13. Disconnect the throttle cable, and the speed control cable, and remove the throttle return spring. �K�l�j . 3 �b�a
192003 Mustang Workshop Manual
17. 11. 2011file:///C:/Ford/2000 - 2004/tsocache/SHEF_4464/S3B~us~en~ ...
Page 1745 of 4378
36. Index-
mark the driveshaft flange and the rear axle pinion flange.
37. Remove the four bolts
38. Index- mark the driveshaft at the six o'clock position.
39. CAUTION: the driveshaft flange fits tightly on the rear axle pinion flange pilot. Never
hammer on the driveshaft or any of its components to disconnect the driveshaft flange
from the pinion flange. Pry only in the area shown, with a suitable tool, to disconnect the driveshaft flange from the pinion flange. �K�l�j . 9 �b�a
192003 Mustang Workshop Manual
17. 11. 2011file:///C:/Ford/2000 - 2004/tsocache/SHEF_4464/S3B~us~en~ ...
Page 1746 of 4378
NOTE:
Do not rotate the driveshaft.
Using a suitable tool, disconnect the driveshaft flange from the rear axle flange and remove the
driveshaft.
40. Index- mark the transmission output shaft at the six o'clock position.
41. Remove the starter motor terminal cover.
42. Disconnect the starter wiring. 1. Remove the nut and disconnect the battery positive cable.
2. Remove the nut and disconnect the starter solenoid wire. �K�l�j . 10 �b�a
192003 Mustang Workshop Manual
17. 11. 2011file:///C:/Ford/2000 - 2004/tsocache/SHEF_4464/S3B~us~en~ ...
Page 1765 of 4378
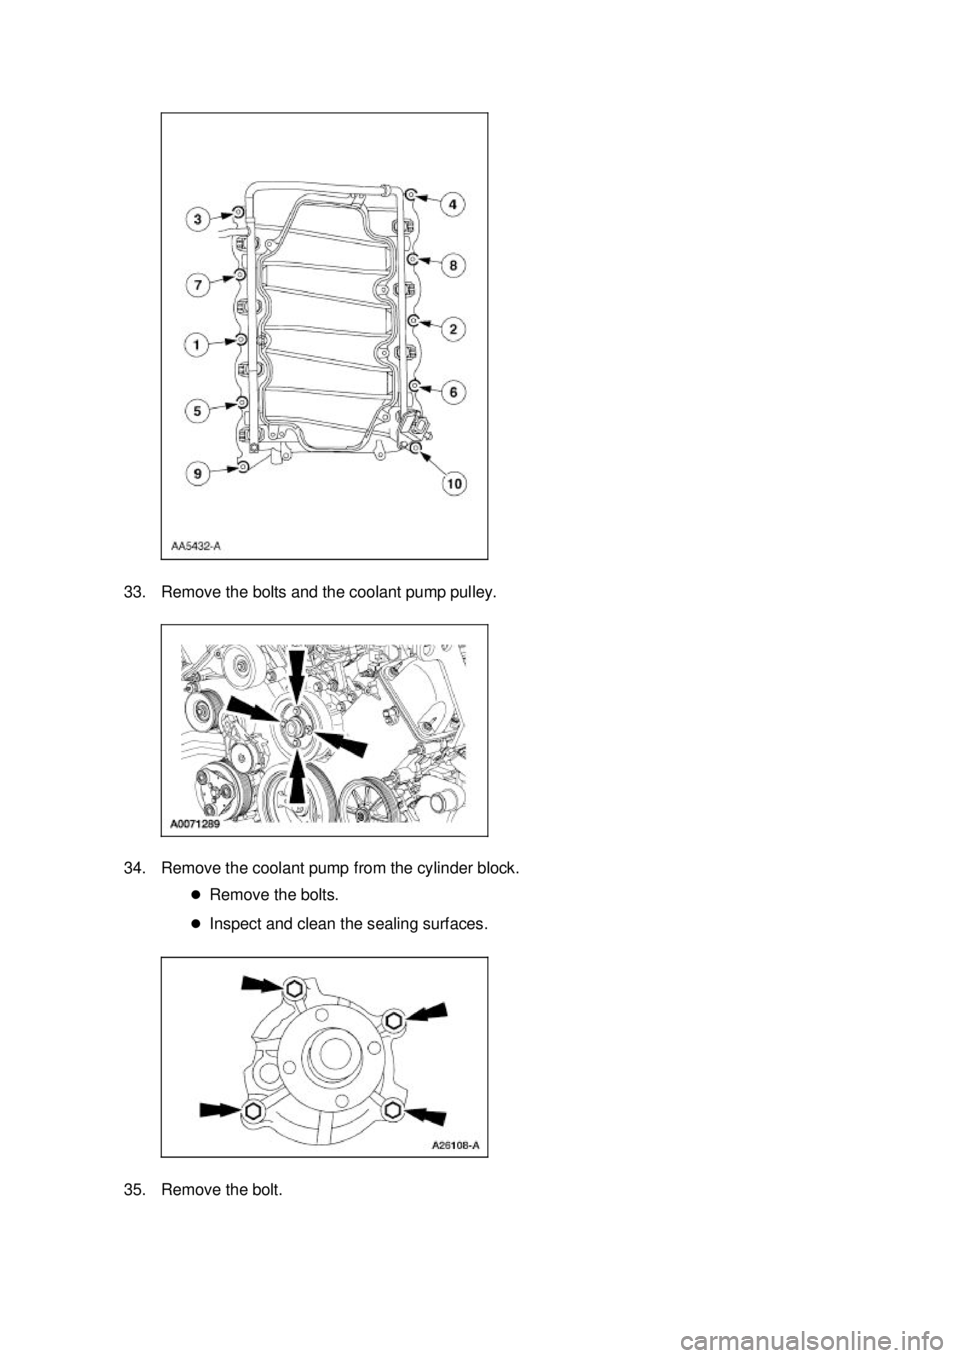
33. Remove the bolts and the coolant pump pulley.
34. Remove the coolant pump from the cylinder block.
�zRemove the bolts.
�z Inspect and clean the sealing surfaces.
35. Remove the bolt. �K�l�j . 10 �b�a
212003 Mustang Workshop Manual
17. 11. 2011file:///C:/Ford/2000 - 2004/tsocache/SHEF_4464/S3B~us~en~ ...
Page 1774 of 4378
63.
CAUTION: Do not scratch the cylinder walls or crankshaft journals with the
connecting rod.
NOTE: Before removing pistons, inspect the top of the cylinder bores. If necessary, remove the
ridge or carbon deposits from each cylinder using a cylinder ridge reamer following
manufacturer's instructions.
Using the special tool, push pistons number 1 and 6 through the top of the cylinder block.
64. To remove pistons 3 and 5, 4 and 7, 2 and 8, turn crankshaft 90 degrees and repeat the previous two steps.
65. Remove the side main bearing cap bolts. �K�l�j . 19 �b�a
212003 Mustang Workshop Manual
17. 11. 2011file:///C:/Ford/2000 - 2004/tsocache/SHEF_4464/S3B~us~en~ ...
Page 1775 of 4378
66. Remove and discard the main bearing cap bolts.
67. Remove the main bearing caps and the crankshaft lower main bearings from the cylinder block.
68. Remove the crankshaft, the crankshaft thrust washer, and the crankshaft upper main bearings
from the cylinder block. �K�l�j . 20 �b�a
212003 Mustang Workshop Manual
17. 11. 2011file:///C:/Ford/2000 - 2004/tsocache/SHEF_4464/S3B~us~en~ ...
Page 1778 of 4378
Install the special tool.
2. Remove the exhaust camshaft sprocket and the intake camshaft bolt, washer and spacer.
3. Compress the tensioner and install a lock pin.
4. Remove the special tool.
5. Remove the timing chain and the camshaft sprocket. �K�l�j . 2 �b�a
112003 Mustang Workshop Manual
17. 11. 2011file:///C:/Ford/2000 - 2004/tsocache/SHEF_4464/S3B~us~en~ ...