Page 2044 of 4378

Component Tests
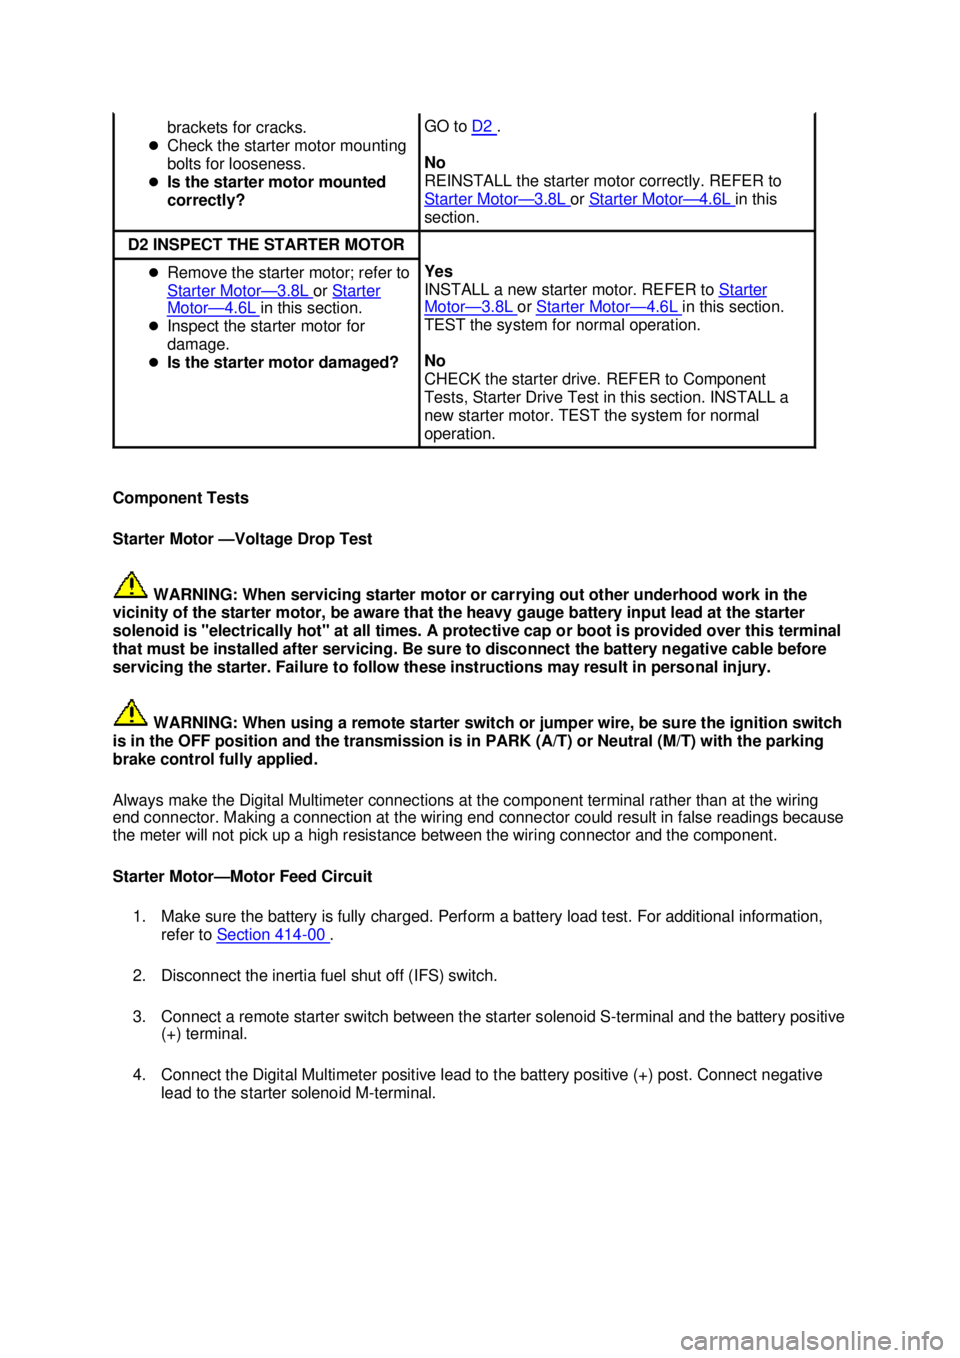
Starter Motor —Voltage Drop Test
WARNING: When servicing starter motor or carrying out other underhood work in the
vicinity of the starter motor, be aware that the heavy gauge battery input lead at the starter
solenoid is "electrically hot" at all times. A protective cap or boot is provided over this terminal
that must be installed after servicing. Be sure to disconnect the battery negative cable before
servicing the starter. Failure to follow these instructions may result in personal injury.
WARNING: When using a remote starter switch or jumper wire, be sure the ignition switch
is in the OFF position and the transmission is in PARK (A/T) or Neutral (M/T) with the parking
brake control fully applied.
Always make the Digital Multimeter connections at the component terminal rather than at the wiring
end connector. Making a connection at the wiring end connector could result in false readings because
the meter will not pick up a high resistance between the wiring connector and the component.
Starter Motor— Motor Feed Circuit
1. Make sure the battery is fully charged. Perform a battery load test. For additional information, refer to Section 414 - 00 .
2. Disconnect the inertia fuel shut off (IFS) switch.
3. Connect a remote starter switch between the starter solenoid S- terminal and the battery positive
(+) terminal.
4. Connect the Digital Multimeter positive lead to the battery positive (+) post. Connect negative lead to the starter solenoid M- terminal. brackets for cracks.
�z Check the starter motor mounting
bolts for looseness.
�z Is the starter motor mounted
correctly? GO to
D2 .
No
REINSTALL the starter motor correctly. REFER to
Starter Motor — 3.8L or
Starter Motor — 4.6L in this
section. D2 INSPECT THE STARTER MOTOR
�z
Remove the starter motor; refer to
Starter Motor — 3.8L or
Starter Motor — 4.6L in this section.
�z Inspect the starter motor for
damage.
�z Is the starter motor damaged? Yes
INSTALL a new starter motor. REFER to
Starter Motor — 3.8L or
Starter Motor — 4.6L in this section.
TEST the system for normal operation.
No
CHECK the starter drive. REFER to Component
Tests, Starter Drive Test in this section. INSTALL a
new starter motor. TEST the system for normal
operation. �K�l�j . 8 �b�a
112003 Mustang Workshop Manual
18. 11. 2011file:///C:/Ford/2000 - 2004/tsocache/SHEF_4464/S3B~us~en~ ...
Page 2057 of 4378
SPECIFICATIONS
SECTION 303-
07A: Engine Ignition — 3.8L 2003 Mustang Workshop Manual General Specifications
Item Specification
Base ignition timing TBD
Firing order 1-4-2-5-3-
6 Spark plug gap mm (in) 1.32-
1.42 (0.052- 0.056) Spark plug type production LH AWSF-
42E Spark plug type production RH AWSF-
42EG Spark plug type service AWSF-
42EE Silicone Brake Caliper Grease and Dielectric Compound D7AZ-19A331-
A ESE-
M1C171- A
Torque Specifications Description Nm lb-
ft lb-
in Spark plugs 15 11 —
Ignition coil bolts 7 — 52 �K�l�j . 1 �b�a
12003 Mustang Workshop Manual
18. 11. 2011file:///C:/Ford/2000 - 2004/tsocache/SHEF_4464/S3B~us~en~ ...
Page 2061 of 4378
REMOVAL AND INSTALLATION
Ignition Coil
Removal and Installation
1. Disconnect the battery ground cable (14301). For additional information, refer to Section 414 -
01 .
2. Disconnect the ignition coil electrical connector.
3. CAUTION: Spark plug wires (12286) must be connected to the correct ignition coil
terminal. Mark spark plug wire locations before removing them.
Twist while pulling upward to disconnect the spark plug wires.
4. Disconnect the accelerator cable retaining clamp from the ignition coil stud bolt.
SECTION 303-
07A: Engine Ignition — 3.8L 2003 Mustang Workshop Manual Material
Item Specification
Silicone Brake Caliper Grease
and Dielectric Compound
D7AZ-
19A331-A or equivalent ESE-
M1C171-
A �K�l�j . 1 �b�a
22003 Mustang Workshop Manual
18. 11. 2011file:///C:/Ford/2000 - 2004/tsocache/SHEF_4464/S3B~us~en~ ...
Page 2062 of 4378
5. Remove the bolts and the ignition coil (12029).
6.
NOTE: Apply silicone brake caliper grease and dielectric compound to the inside of the spark
plug wire coil boot.
NOTE: Be sure to reinstall the radio ignition interference capacitor (18801) under the correct
mounting bolt.
To install, reverse the removal procedure. �K�l�j . 2 �b�a
22003 Mustang Workshop Manual
18. 11. 2011file:///C:/Ford/2000 - 2004/tsocache/SHEF_4464/S3B~us~en~ ...
Page 2063 of 4378
REMOVAL AND INSTALLATION
Spark Plug Wire
Removal and Installation
CAUTION: It is important to twist the spark plug wire boots while pulling upward to avoid
possible damage to the spark plug wire.
CAUTION: Spark plug wires must be connected to the correct ignition coil terminal. Mark
spark plug wire (12286) locations before removing them.
1. Using the special tool, remove the spark plug wire from the spark plug using a twisting motion.
2. Twist while pulling upward to disconnect the spark plug wires from the ignition coil (12029).
SECTION 303-
07A: Engine Ignition — 3.8L 2003 Mustang Workshop Manual Special Tool(s)
Remover, Spark Plug Wire
303-
106 (T74P- 6666A)
Material Item Specification
Silicone Brake Caliper Grease
and Dielectric Compound
D7AZ-
19A331-A or equivalent ESE-
M1C171-
A �K�l�j . 1 �b�a
22003 Mustang Workshop Manual
18. 11. 2011file:///C:/Ford/2000 - 2004/tsocache/SHEF_4464/S3B~us~en~ ...
Page 2064 of 4378
3.
CAUTION: Be sure to orient the spark plug boots so the spark plug wires do not
contact the exhaust manifold.
NOTE: Apply silicone brake caliper grease and dielectric compound to the inside of spark plug
and ignition coil boots of the spark plug wire.
To install, reverse the removal procedure. �K�l�j . 2 �b�a
22003 Mustang Workshop Manual
18. 11. 2011file:///C:/Ford/2000 - 2004/tsocache/SHEF_4464/S3B~us~en~ ...
Page 2065 of 4378

REMOVAL AND INSTALLATION
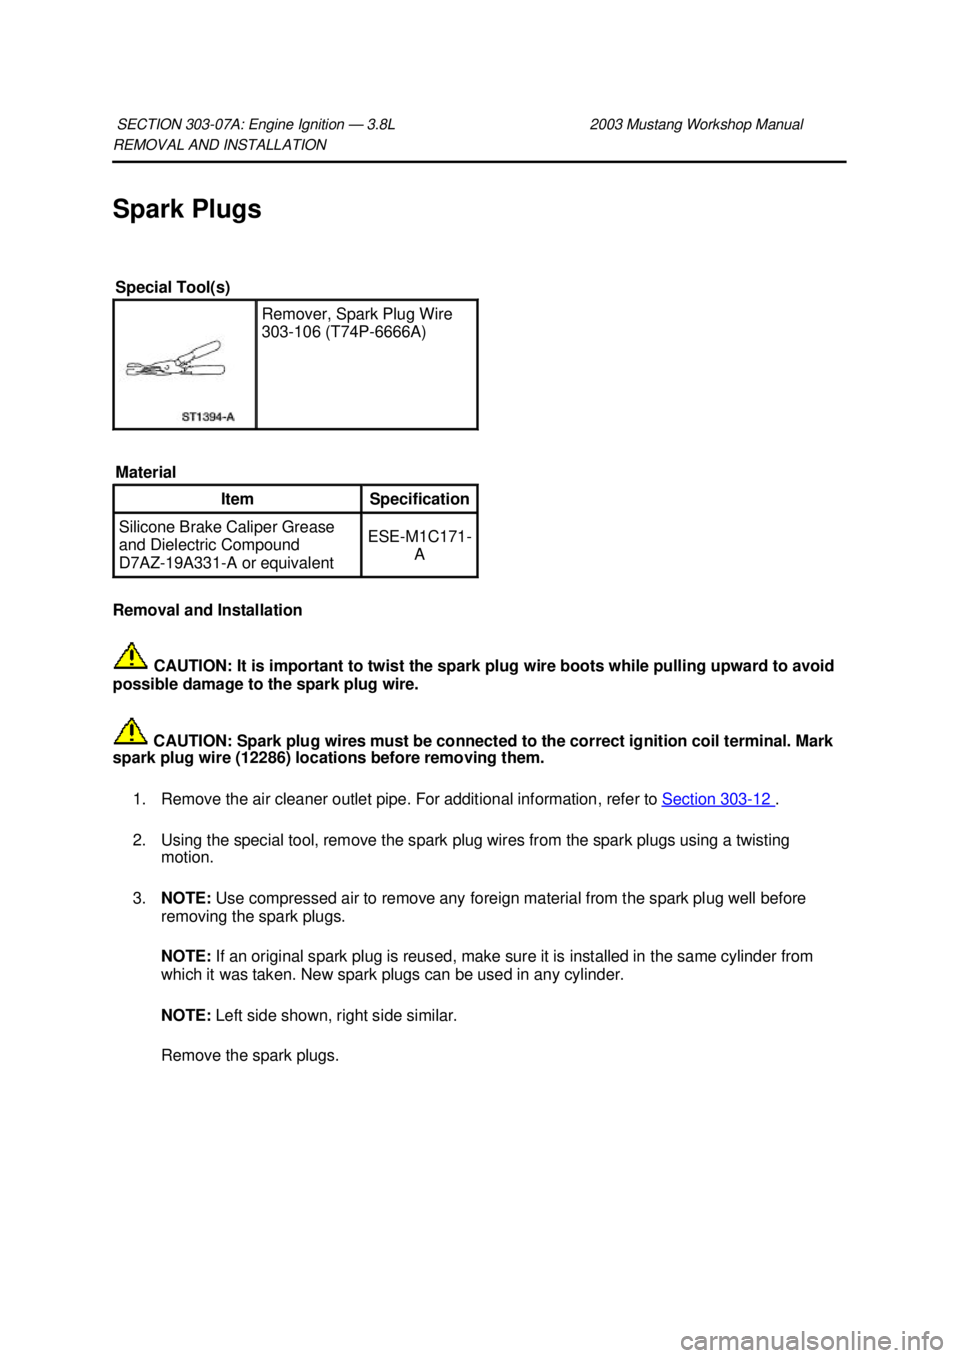
Spark Plugs
Removal and Installation
CAUTION: It is important to twist the spark plug wire boots while pulling upward to avoid
possible damage to the spark plug wire.
CAUTION: Spark plug wires must be connected to the correct ignition coil terminal. Mark
spark plug wire (12286) locations before removing them.
1. Remove the air cleaner outlet pipe. For additional information, refer to Section 303 - 12 .
2. Using the special tool, remove the spark plug wires from the spark plugs using a twisting motion.
3. NOTE: Use compressed air to remove any foreign material from the spark plug well before
removing the spark plugs.
NOTE: If an original spark plug is reused, make sure it is installed in the same cylinder from
which it was taken. New spark plugs can be used in any cylinder.
NOTE: Left side shown, right side similar.
Remove the spark plugs.
SECTION 303-
07A: Engine Ignition — 3.8L 2003 Mustang Workshop Manual Special Tool(s)
Remover, Spark Plug Wire
303-
106 (T74P- 6666A)
Material Item Specification
Silicone Brake Caliper Grease
and Dielectric Compound
D7AZ-
19A331-A or equivalent ESE-
M1C171-
A �K�l�j . 1 �b�a
52003 Mustang Workshop Manual
18. 11. 2011file:///C:/Ford/2000 - 2004/tsocache/SHEF_4464/S3B~us~en~ ...
Page 2068 of 4378
10. Inspect for fused spot deposits.
�zThis can be identified by melted or spotty deposits resembling bubbles or blisters.
�z This can be caused by sudden acceleration.
�z Clean the spark plug.
11. CAUTION: Be sure to orient the spark plug boots so the spark plug wires do not
contact the exhaust manifold.
NOTE: Apply silicone brake caliper grease and dielectric compound to the inside of the spark
plug wire boots.
To install, reverse the removal procedure.
�zAdjust the spark plug gap as necessary. �K�l�j . 4 �b�a
52003 Mustang Workshop Manual
18. 11. 2011file:///C:/Ford/2000 - 2004/tsocache/SHEF_4464/S3B~us~en~ ...