2003 DODGE RAM tow bar
[x] Cancel search: tow barPage 33 of 2895
To adjust the vehicle height turn the torsion bar
adjustment bolt CLOCKWISE to raise the vehicle
and COUNTER CLOCKWISE to lower the vehicle.
CAUTION: ALWAYS raise the vehicle to the correct
suspension height, NEVER lower the vehicle to
obtain the correct suspension height. If the vehicle
suspension height is too high, lower the vehicle
below the height specification. Then raise the vehi-
cle to the correct suspension height specification.
This will insure the vehicle maintains the proper
suspension height.
NOTE: If a height adjustment has been made, per-
form height measurement again on both sides of
the vehicle.
STANDARD PROCEDURE - CAMBER AND
CASTER ADJUSTMENT
NOTE: 4X4 (LD) SUSPENSION HEIGHT MEASURE-
MENT MUST BE PERFORMED BEFORE AN ALIGN-
MENT.
NOTE: When the upper control arm pivot bolts are
loosened the upper control arm will normally go
inwards toward the frame automatically with the
weight of the vehicle.
Camber and caster angle adjustments involve
changing the position of the upper control arm incon-
junction with the slotted holes in the frame brackets,
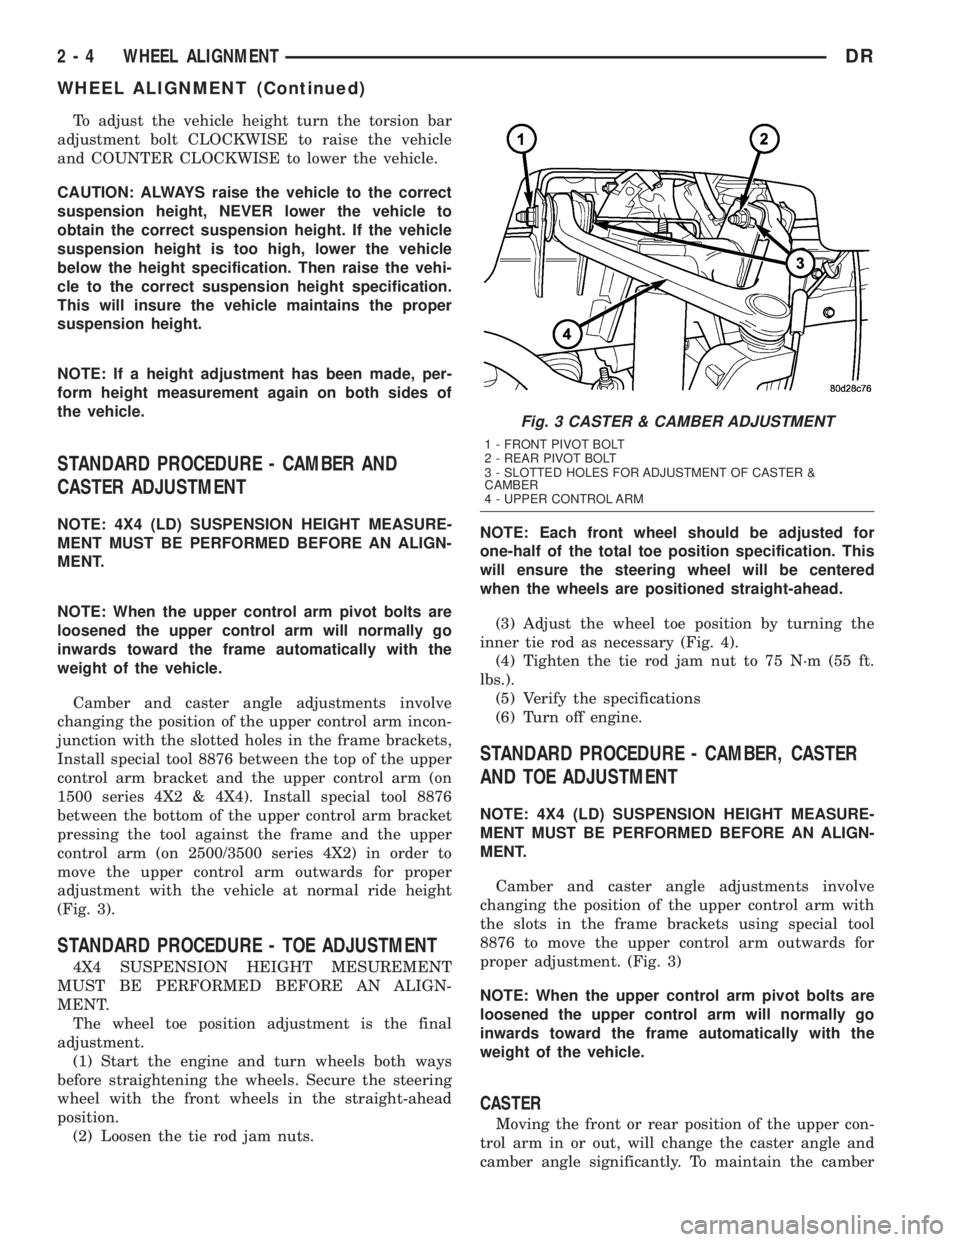
Install special tool 8876 between the top of the upper
control arm bracket and the upper control arm (on
1500 series 4X2 & 4X4). Install special tool 8876
between the bottom of the upper control arm bracket
pressing the tool against the frame and the upper
control arm (on 2500/3500 series 4X2) in order to
move the upper control arm outwards for proper
adjustment with the vehicle at normal ride height
(Fig. 3).
STANDARD PROCEDURE - TOE ADJUSTMENT
4X4 SUSPENSION HEIGHT MESUREMENT
MUST BE PERFORMED BEFORE AN ALIGN-
MENT.
The wheel toe position adjustment is the final
adjustment.
(1) Start the engine and turn wheels both ways
before straightening the wheels. Secure the steering
wheel with the front wheels in the straight-ahead
position.
(2) Loosen the tie rod jam nuts.NOTE: Each front wheel should be adjusted for
one-half of the total toe position specification. This
will ensure the steering wheel will be centered
when the wheels are positioned straight-ahead.
(3) Adjust the wheel toe position by turning the
inner tie rod as necessary (Fig. 4).
(4) Tighten the tie rod jam nut to 75 N´m (55 ft.
lbs.).
(5) Verify the specifications
(6) Turn off engine.
STANDARD PROCEDURE - CAMBER, CASTER
AND TOE ADJUSTMENT
NOTE: 4X4 (LD) SUSPENSION HEIGHT MEASURE-
MENT MUST BE PERFORMED BEFORE AN ALIGN-
MENT.
Camber and caster angle adjustments involve
changing the position of the upper control arm with
the slots in the frame brackets using special tool
8876 to move the upper control arm outwards for
proper adjustment. (Fig. 3)
NOTE: When the upper control arm pivot bolts are
loosened the upper control arm will normally go
inwards toward the frame automatically with the
weight of the vehicle.
CASTER
Moving the front or rear position of the upper con-
trol arm in or out, will change the caster angle and
camber angle significantly. To maintain the camber
Fig. 3 CASTER & CAMBER ADJUSTMENT
1 - FRONT PIVOT BOLT
2 - REAR PIVOT BOLT
3 - SLOTTED HOLES FOR ADJUSTMENT OF CASTER &
CAMBER
4 - UPPER CONTROL ARM
2 - 4 WHEEL ALIGNMENTDR
WHEEL ALIGNMENT (Continued)
Page 42 of 2895

LARGE BUSHING
(1) Install bushing remover tools 8836-2 (receiver),
8836-4 (spacer) and 8836-5 (driver) with the threaded
rod 8839 and the bearing as shown (Fig. 6) for
replacement of the large bushing.
SMALL BUSHING
(1) Install the bushing tool 8836-6 (driver), 8836-3
(spacer) and 8836-2 (receiver) with the threaded rod
8839 and the bearing as shown for the replacement
of the small bushing (Fig. 7)
INSTALLATION
INSTALLATION - LOWER CONTROL ARM
BUSHINGS - 4WD (LD)
NOTE: Be careful to properly orient the bushing
voids in the correct position to within 10É. The
correct position places the long narrow void out-
board of the bushing and the short wide void
inboard of the bushing (Fig. 8).
Fig. 5 TORSION BAR CROSS MEMBER BUSHING -
REMOVAL
1 - 8838
2 - 8835-1
3 - 8835-4
4 - 8835-3
Fig. 6 LARGE LOWER CONTROL ARM BUSHING -
REMOVAL
1 - 8836-4 (SPACER)
2 - 8836-5 (DRIVER)
3 - 8839 (THREADED ROD)
4 - 8836-2 (RECEIVER)
Fig. 7 SMALL LOWER CONTROL ARM BUSHING -
REMOVAL
1 - 8839 (THREADED ROD)
2 - 8836-6 (DRIVER)
3 - 8836-3 (SPACER)
4 - 8836-2 (RECEIVER)
Fig. 8 REAR LOWER CONTROL ARM BUSHING
1 - SHORT - WIDE VOID
2 - INWARD TOWARD VEHICLE
3 - LONG - THIN VOID
DRFRONT - INDEPENDENT FRONT SUSPENSION 2 - 13
BUSHINGS (Continued)
Page 47 of 2895

(8) Remove the hub/bearing from the steering
knuckle (Refer to 2 - SUSPENSION/FRONT/HUB /
BEARING - REMOVAL).
INSTALLATION
CAUTION: The ball joint stud tapers must be
CLEAN and DRY before installing the knuckle.
Clean the stud tapers with mineral spirits to remove
dirt and grease.
NOTE: When installing hub/bearing with ABS
brakes, position the speed sensor opening towards
the front of the vehicle.
(1) Install the hub/bearing to the steering knuckle
and tighten the bolts to 163 N´m (120 ft. lbs.)(LD) or
176 N´m (130 ft. lbs.)(HD 4X2) (Fig. 19).
(2) Install the knuckle onto the upper and lower
ball joints (Fig. 19).
(3) Install the upper and lower ball joint nuts.
Tighten the upper ball joint nut to 54 N´m (40 ft.
lbs.) (on 1500 series only an additional 90É turn is
required) and the lower ball joint nut to 52 N´m (38
ft. lbs.)(on 1500 series only an additional 90É turn is
required)(LD) or 135 N´m (100 ft. lbs.)(HD 4X2).
(4) Remove the hydraulic jack from the lower sus-
pension arm.
(5) Install the tie rod end and tighten the nut to
61 N´m (45 ft. lbs.).
(6) Install the front halfshaft into the hub/bearing
(if equipped).
(7) Install the the halfshaft nut and tighten to 251
N´m (185 ft. lbs.) (if equipped).(8)
Install the ABS wheel speed sensor if equipped
(Refer to 5 - BRAKES/ELECTRICAL/FRONT WHEEL
SPEED SENSOR - INSTALLATION) and brake shield,
rotor and caliper (Refer to 5 - BRAKES/HYDRAULIC/
MECHANICAL/ROTORS - INSTALLATION).
(9) Install the wheel and tire assembly (Refer to 22
- TIRES/WHEELS/WHEELS - STANDARD PROCE-
DURE).
(10) Remove the support and lower the vehicle.
(11) Perform a wheel alignment (Refer to 2 - SUS-
PENSION/WHEEL ALIGNMENT - STANDARD
PROCEDURE).
LOWER BALL JOINT
DIAGNOSIS AND TESTING - LOWER BALL
JOINT
NOTE: If the ball joint is equipped with a lubrication
fitting, grease the joint then road test the vehicle
before performing test.
(1) Raise the front of the vehicle. Place safety floor
stands under both lower control arms as far outboard
as possible. Lower the vehicle to allow the stands to
support some or all of the vehicle weight.
(2)
Mount a dial indicator solidly to the topside of
the lower control arm and then zero the dial indicator.
(3) Position the indicator plunger against the bot-
tom surface of the steering knuckle.
NOTE: The dial indicator plunger must be perpen-
dicular to the machined surface of the steering
knuckle.
(4) Position a pry bar under the tire assembly. Pry
upwards on the tire assembly.
(5) If the travel exceeds 0.5 mm (0.020 in.), replace
the lower ball joint (Refer to 2 - SUSPENSION/
FRONT/LOWER BALL JOINT - REMOVAL).
REMOVAL
(1) Remove the tire and wheel assembly.
(2) Remove the brake caliper and rotor (Refer to 5
- BRAKES/HYDRAULIC/MECHANICAL/ROTORS -
REMOVAL).
(3) Disconnect the tie rod from the steering
knuckle (Refer to 19 - STEERING/LINKAGE/TIE
ROD END - REMOVAL).
(4) Remove the steering knuckle (Fig. 20)(Refer to
2 - SUSPENSION/FRONT/KNUCKLE - REMOVAL).
(5) Move the halfshaft to the side and support the
halfshaft out of the way (If Equipped).
(6) Remove the snap ring, from the lower control
arm (HD 4X2 only)
Fig. 19 STEERING KNUCKLE
1 - STEERING KNUCKLE
2 - LOWER CONTROL ARM
3 - LOWER BALL JOINT NUT
2 - 18 FRONT - INDEPENDENT FRONT SUSPENSIONDR
KNUCKLE (Continued)
Page 71 of 2895
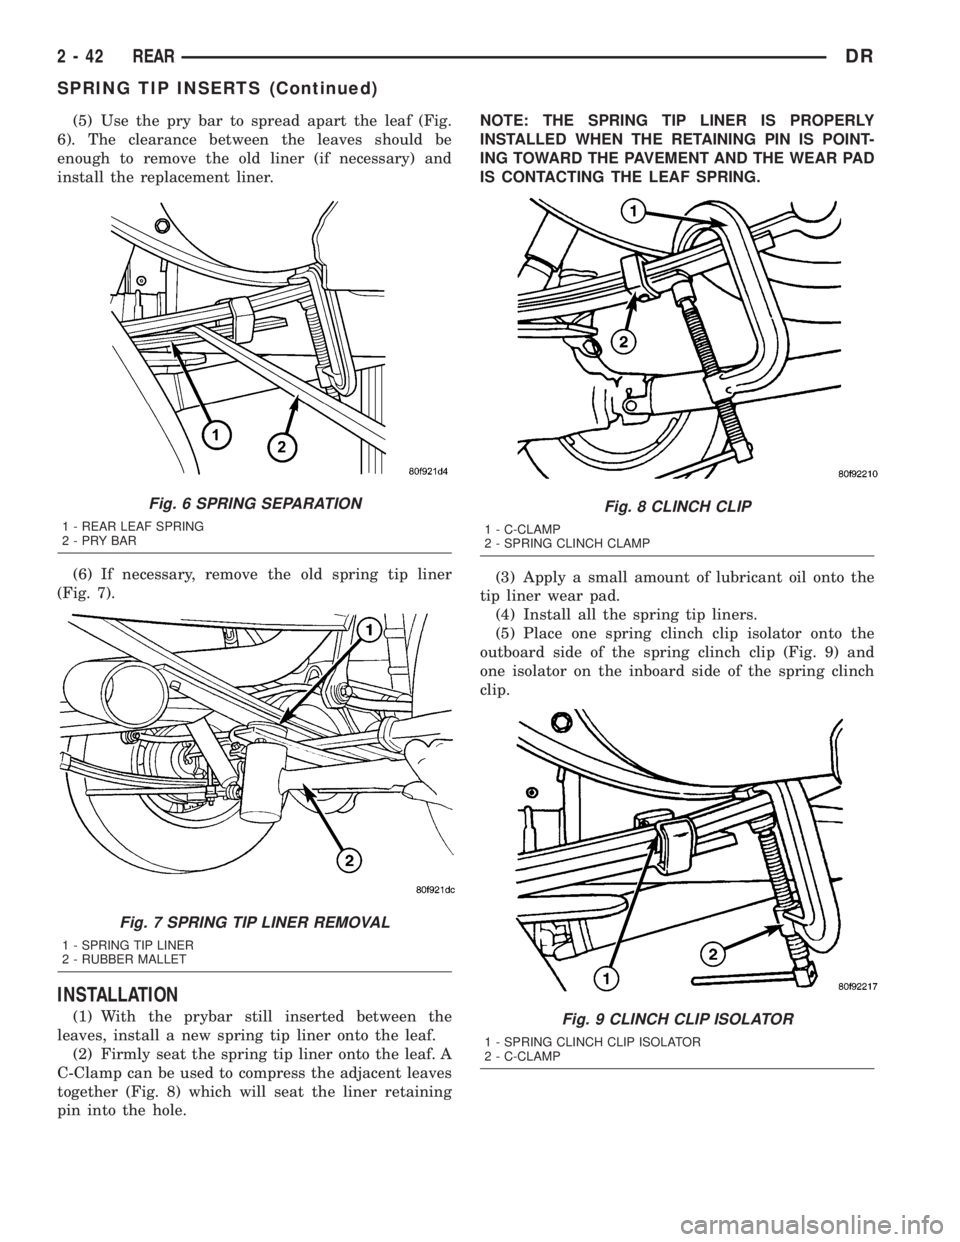
(5) Use the pry bar to spread apart the leaf (Fig.
6). The clearance between the leaves should be
enough to remove the old liner (if necessary) and
install the replacement liner.
(6) If necessary, remove the old spring tip liner
(Fig. 7).
INSTALLATION
(1) With the prybar still inserted between the
leaves, install a new spring tip liner onto the leaf.
(2) Firmly seat the spring tip liner onto the leaf. A
C-Clamp can be used to compress the adjacent leaves
together (Fig. 8) which will seat the liner retaining
pin into the hole.NOTE: THE SPRING TIP LINER IS PROPERLY
INSTALLED WHEN THE RETAINING PIN IS POINT-
ING TOWARD THE PAVEMENT AND THE WEAR PAD
IS CONTACTING THE LEAF SPRING.
(3) Apply a small amount of lubricant oil onto the
tip liner wear pad.
(4) Install all the spring tip liners.
(5) Place one spring clinch clip isolator onto the
outboard side of the spring clinch clip (Fig. 9) and
one isolator on the inboard side of the spring clinch
clip.
Fig. 6 SPRING SEPARATION
1 - REAR LEAF SPRING
2-PRYBAR
Fig. 7 SPRING TIP LINER REMOVAL
1 - SPRING TIP LINER
2 - RUBBER MALLET
Fig. 8 CLINCH CLIP
1 - C-CLAMP
2 - SPRING CLINCH CLAMP
Fig. 9 CLINCH CLIP ISOLATOR
1 - SPRING CLINCH CLIP ISOLATOR
2 - C-CLAMP
2 - 42 REARDR
SPRING TIP INSERTS (Continued)
Page 559 of 2895
TRAILER TOW WIRING
DESCRIPTION
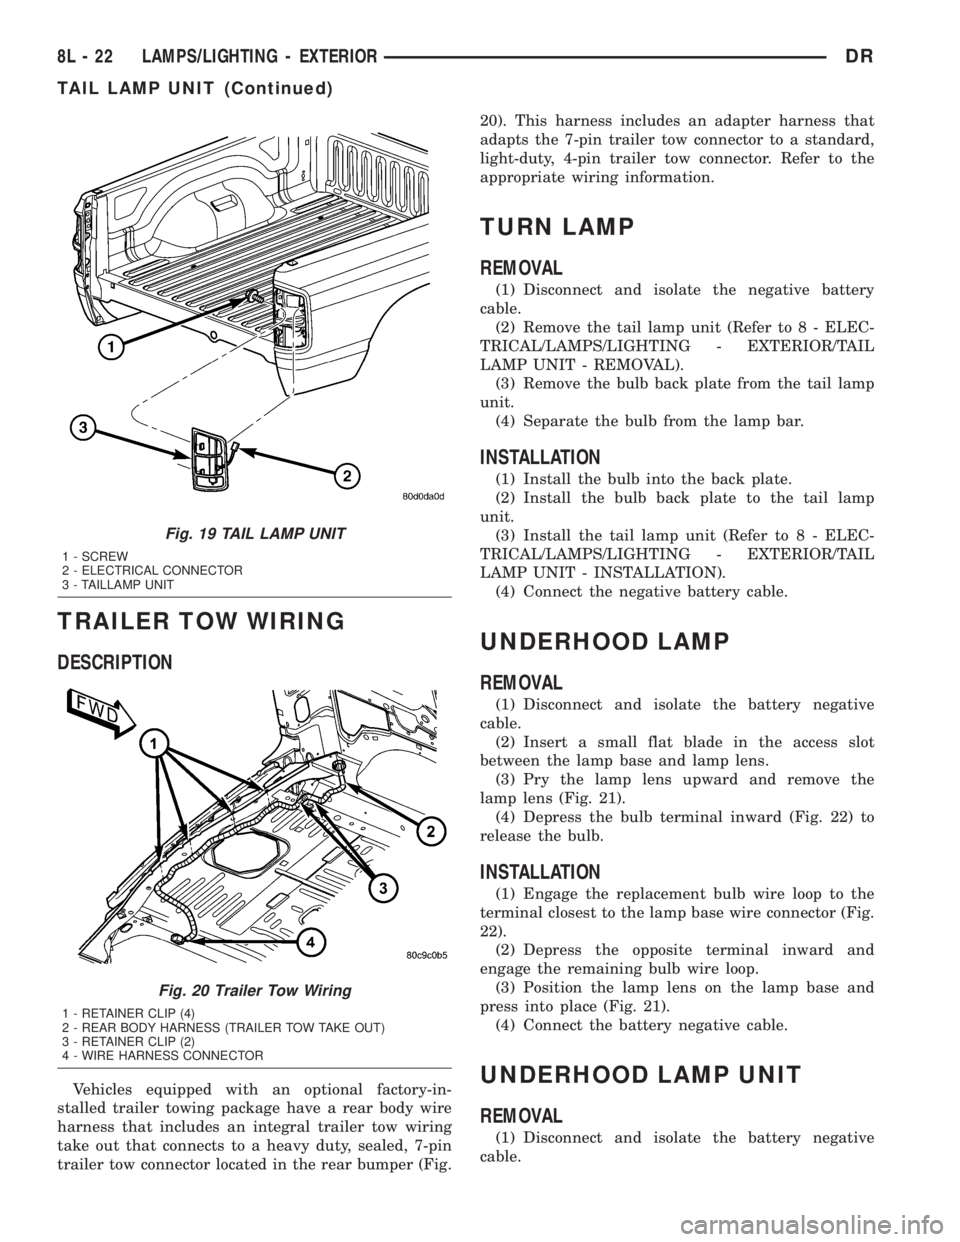
Vehicles equipped with an optional factory-in-
stalled trailer towing package have a rear body wire
harness that includes an integral trailer tow wiring
take out that connects to a heavy duty, sealed, 7-pin
trailer tow connector located in the rear bumper (Fig.20). This harness includes an adapter harness that
adapts the 7-pin trailer tow connector to a standard,
light-duty, 4-pin trailer tow connector. Refer to the
appropriate wiring information.
TURN LAMP
REMOVAL
(1) Disconnect and isolate the negative battery
cable.
(2) Remove the tail lamp unit (Refer to 8 - ELEC-
TRICAL/LAMPS/LIGHTING - EXTERIOR/TAIL
LAMP UNIT - REMOVAL).
(3) Remove the bulb back plate from the tail lamp
unit.
(4) Separate the bulb from the lamp bar.
INSTALLATION
(1) Install the bulb into the back plate.
(2) Install the bulb back plate to the tail lamp
unit.
(3) Install the tail lamp unit (Refer to 8 - ELEC-
TRICAL/LAMPS/LIGHTING - EXTERIOR/TAIL
LAMP UNIT - INSTALLATION).
(4) Connect the negative battery cable.
UNDERHOOD LAMP
REMOVAL
(1) Disconnect and isolate the battery negative
cable.
(2) Insert a small flat blade in the access slot
between the lamp base and lamp lens.
(3) Pry the lamp lens upward and remove the
lamp lens (Fig. 21).
(4) Depress the bulb terminal inward (Fig. 22) to
release the bulb.
INSTALLATION
(1) Engage the replacement bulb wire loop to the
terminal closest to the lamp base wire connector (Fig.
22).
(2) Depress the opposite terminal inward and
engage the remaining bulb wire loop.
(3) Position the lamp lens on the lamp base and
press into place (Fig. 21).
(4) Connect the battery negative cable.
UNDERHOOD LAMP UNIT
REMOVAL
(1) Disconnect and isolate the battery negative
cable.
Fig. 19 TAIL LAMP UNIT
1 - SCREW
2 - ELECTRICAL CONNECTOR
3 - TAILLAMP UNIT
Fig. 20 Trailer Tow Wiring
1 - RETAINER CLIP (4)
2 - REAR BODY HARNESS (TRAILER TOW TAKE OUT)
3 - RETAINER CLIP (2)
4 - WIRE HARNESS CONNECTOR
8L - 22 LAMPS/LIGHTING - EXTERIORDR
TAIL LAMP UNIT (Continued)
Page 597 of 2895
to a molded plastic back panel and to the seat back
frame.
The power lumbar adjuster cannot be repaired, and
is serviced only as a unit with the seat back frame. If
the power lumbar adjuster or the seat back frame
are damaged or faulty, the entire seat back frame
unit must be replaced (Refer to 23 - BODY/SEATS/
SEAT BACK - REMOVAL).
OPERATION
The power lumbar adjuster mechanism includes a
reversible electric motor that is secured to the
inboard side of the seat back panel and is connected
to a worm-drive gearbox. The motor and gearbox
operate the lumbar adjuster mechanism in the center
of the seat back by extending and retracting a cable
that actuates a lever. The action of this lever com-
presses or relaxes a grid of flexible slats. The more
this grid is compressed, the more the slats bow out-
ward against the center of the seat back padding,
providing additional lumbar support.
DIAGNOSIS AND TESTING - LUMBAR MOTOR
Actuate the power lumbar switch to move the
power lumbar adjuster in each direction. The power
lumbar adjuster should move in both directions. It
should be noted that the power lumber adjuster nor-
mally operates very quietly and exhibits little visible
movement. If the power lumbar adjuster fails to oper-
ate in only one direction, move the adjuster a short
distance in the opposite direction and test again to be
certain that the adjuster is not at its travel limit. If
the power lumbar adjuster fails to operate in onlyone direction, Test the appropriate power seat switch
as described in this group. If the power lumbar
adjuster fails to operate in either direction, perform
the following tests. For complete circuit diagrams,
refer toWiring.
(1) Check the power seat circuit breaker. If OK, go
to Step 2. If not OK, replace the faulty power seat
circuit breaker.
(2) Check for battery voltage at the power seat cir-
cuit breaker. If OK, go to Step 3. If not OK, repair
the open fused B(+) circuit to the fuse in the Inte-
grated Power Module as required.
(3) Remove the outboard seat cushion side shield
from the seat. Disconnect the seat wire harness con-
nector from the power lumbar switch connector
receptacle. Check for battery voltage at the fused
B(+) circuit cavity of the power seat wire harness
connector for the power lumbar switch. If OK, go to
Step 4. If not OK, repair the open fused B(+) circuit
to the power seat as required.
(4) Check for continuity between the ground cir-
cuit cavity of the power seat wire harness connector
for the power lumbar switch and a good ground.
There should be continuity. If OK, go to Step 5. If not
OK, repair the open ground circuit to ground as
required.
(5) Test the power lumbar switch. . If the switch
tests OK, test the circuits of the power seat wire har-
ness between the power lumbar adjuster motor and
the power lumbar switch for shorts or opens. If the
circuits check OK, replace the faulty seat back frame
assembly. If the circuits are not OK, repair the power
seat wire harness as required.
8N - 20 POWER SEATSDR
LUMBAR MOTOR (Continued)
Page 683 of 2895
CHECK VALVE
DESCRIPTION
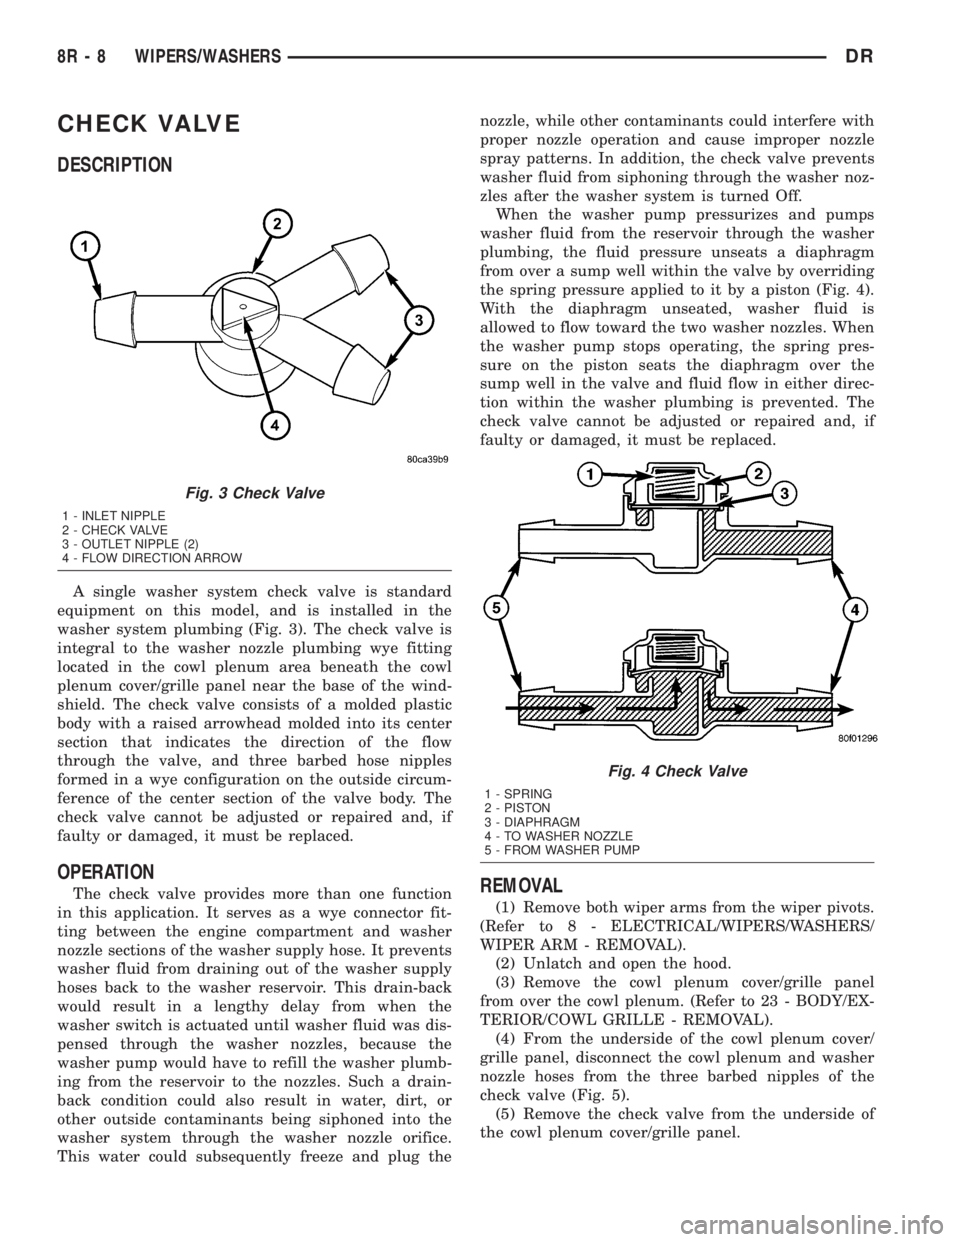
A single washer system check valve is standard
equipment on this model, and is installed in the
washer system plumbing (Fig. 3). The check valve is
integral to the washer nozzle plumbing wye fitting
located in the cowl plenum area beneath the cowl
plenum cover/grille panel near the base of the wind-
shield. The check valve consists of a molded plastic
body with a raised arrowhead molded into its center
section that indicates the direction of the flow
through the valve, and three barbed hose nipples
formed in a wye configuration on the outside circum-
ference of the center section of the valve body. The
check valve cannot be adjusted or repaired and, if
faulty or damaged, it must be replaced.
OPERATION
The check valve provides more than one function
in this application. It serves as a wye connector fit-
ting between the engine compartment and washer
nozzle sections of the washer supply hose. It prevents
washer fluid from draining out of the washer supply
hoses back to the washer reservoir. This drain-back
would result in a lengthy delay from when the
washer switch is actuated until washer fluid was dis-
pensed through the washer nozzles, because the
washer pump would have to refill the washer plumb-
ing from the reservoir to the nozzles. Such a drain-
back condition could also result in water, dirt, or
other outside contaminants being siphoned into the
washer system through the washer nozzle orifice.
This water could subsequently freeze and plug thenozzle, while other contaminants could interfere with
proper nozzle operation and cause improper nozzle
spray patterns. In addition, the check valve prevents
washer fluid from siphoning through the washer noz-
zles after the washer system is turned Off.
When the washer pump pressurizes and pumps
washer fluid from the reservoir through the washer
plumbing, the fluid pressure unseats a diaphragm
from over a sump well within the valve by overriding
the spring pressure applied to it by a piston (Fig. 4).
With the diaphragm unseated, washer fluid is
allowed to flow toward the two washer nozzles. When
the washer pump stops operating, the spring pres-
sure on the piston seats the diaphragm over the
sump well in the valve and fluid flow in either direc-
tion within the washer plumbing is prevented. The
check valve cannot be adjusted or repaired and, if
faulty or damaged, it must be replaced.REMOVAL
(1) Remove both wiper arms from the wiper pivots.
(Refer to 8 - ELECTRICAL/WIPERS/WASHERS/
WIPER ARM - REMOVAL).
(2) Unlatch and open the hood.
(3) Remove the cowl plenum cover/grille panel
from over the cowl plenum. (Refer to 23 - BODY/EX-
TERIOR/COWL GRILLE - REMOVAL).
(4) From the underside of the cowl plenum cover/
grille panel, disconnect the cowl plenum and washer
nozzle hoses from the three barbed nipples of the
check valve (Fig. 5).
(5) Remove the check valve from the underside of
the cowl plenum cover/grille panel.
Fig. 3 Check Valve
1 - INLET NIPPLE
2 - CHECK VALVE
3 - OUTLET NIPPLE (2)
4 - FLOW DIRECTION ARROW
Fig. 4 Check Valve
1 - SPRING
2 - PISTON
3 - DIAPHRAGM
4 - TO WASHER NOZZLE
5 - FROM WASHER PUMP
8R - 8 WIPERS/WASHERSDR
Page 684 of 2895
INSTALLATION
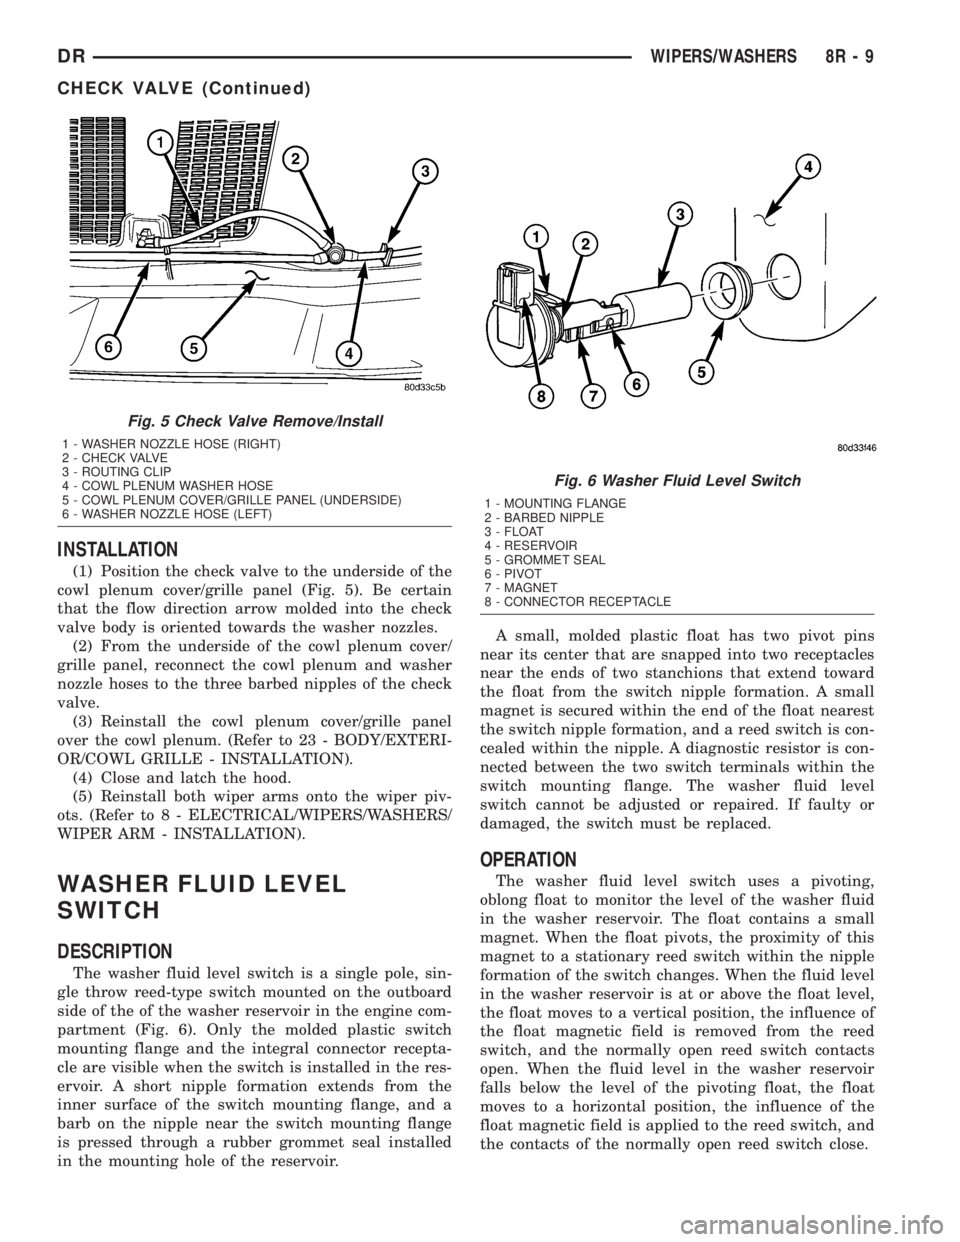
(1) Position the check valve to the underside of the
cowl plenum cover/grille panel (Fig. 5). Be certain
that the flow direction arrow molded into the check
valve body is oriented towards the washer nozzles.
(2) From the underside of the cowl plenum cover/
grille panel, reconnect the cowl plenum and washer
nozzle hoses to the three barbed nipples of the check
valve.
(3) Reinstall the cowl plenum cover/grille panel
over the cowl plenum. (Refer to 23 - BODY/EXTERI-
OR/COWL GRILLE - INSTALLATION).
(4) Close and latch the hood.
(5) Reinstall both wiper arms onto the wiper piv-
ots. (Refer to 8 - ELECTRICAL/WIPERS/WASHERS/
WIPER ARM - INSTALLATION).
WASHER FLUID LEVEL
SWITCH
DESCRIPTION
The washer fluid level switch is a single pole, sin-
gle throw reed-type switch mounted on the outboard
side of the of the washer reservoir in the engine com-
partment (Fig. 6). Only the molded plastic switch
mounting flange and the integral connector recepta-
cle are visible when the switch is installed in the res-
ervoir. A short nipple formation extends from the
inner surface of the switch mounting flange, and a
barb on the nipple near the switch mounting flange
is pressed through a rubber grommet seal installed
in the mounting hole of the reservoir.A small, molded plastic float has two pivot pins
near its center that are snapped into two receptacles
near the ends of two stanchions that extend toward
the float from the switch nipple formation. A small
magnet is secured within the end of the float nearest
the switch nipple formation, and a reed switch is con-
cealed within the nipple. A diagnostic resistor is con-
nected between the two switch terminals within the
switch mounting flange. The washer fluid level
switch cannot be adjusted or repaired. If faulty or
damaged, the switch must be replaced.
OPERATION
The washer fluid level switch uses a pivoting,
oblong float to monitor the level of the washer fluid
in the washer reservoir. The float contains a small
magnet. When the float pivots, the proximity of this
magnet to a stationary reed switch within the nipple
formation of the switch changes. When the fluid level
in the washer reservoir is at or above the float level,
the float moves to a vertical position, the influence of
the float magnetic field is removed from the reed
switch, and the normally open reed switch contacts
open. When the fluid level in the washer reservoir
falls below the level of the pivoting float, the float
moves to a horizontal position, the influence of the
float magnetic field is applied to the reed switch, and
the contacts of the normally open reed switch close.
Fig. 5 Check Valve Remove/Install
1 - WASHER NOZZLE HOSE (RIGHT)
2 - CHECK VALVE
3 - ROUTING CLIP
4 - COWL PLENUM WASHER HOSE
5 - COWL PLENUM COVER/GRILLE PANEL (UNDERSIDE)
6 - WASHER NOZZLE HOSE (LEFT)
Fig. 6 Washer Fluid Level Switch
1 - MOUNTING FLANGE
2 - BARBED NIPPLE
3 - FLOAT
4 - RESERVOIR
5 - GROMMET SEAL
6 - PIVOT
7 - MAGNET
8 - CONNECTOR RECEPTACLE
DRWIPERS/WASHERS 8R - 9
CHECK VALVE (Continued)