2003 DODGE RAM boot
[x] Cancel search: bootPage 2491 of 2895
EXTENSION HOUSING SEAL
AND DUST BOOT
REMOVAL
(1) Raise and support vehicle.
(2) Remove rear propeller shaft. (Refer to 3 - DIF-
FERENTIAL & DRIVELINE/PROPELLER SHAFT/
PROPELLER SHAFT - REMOVAL)
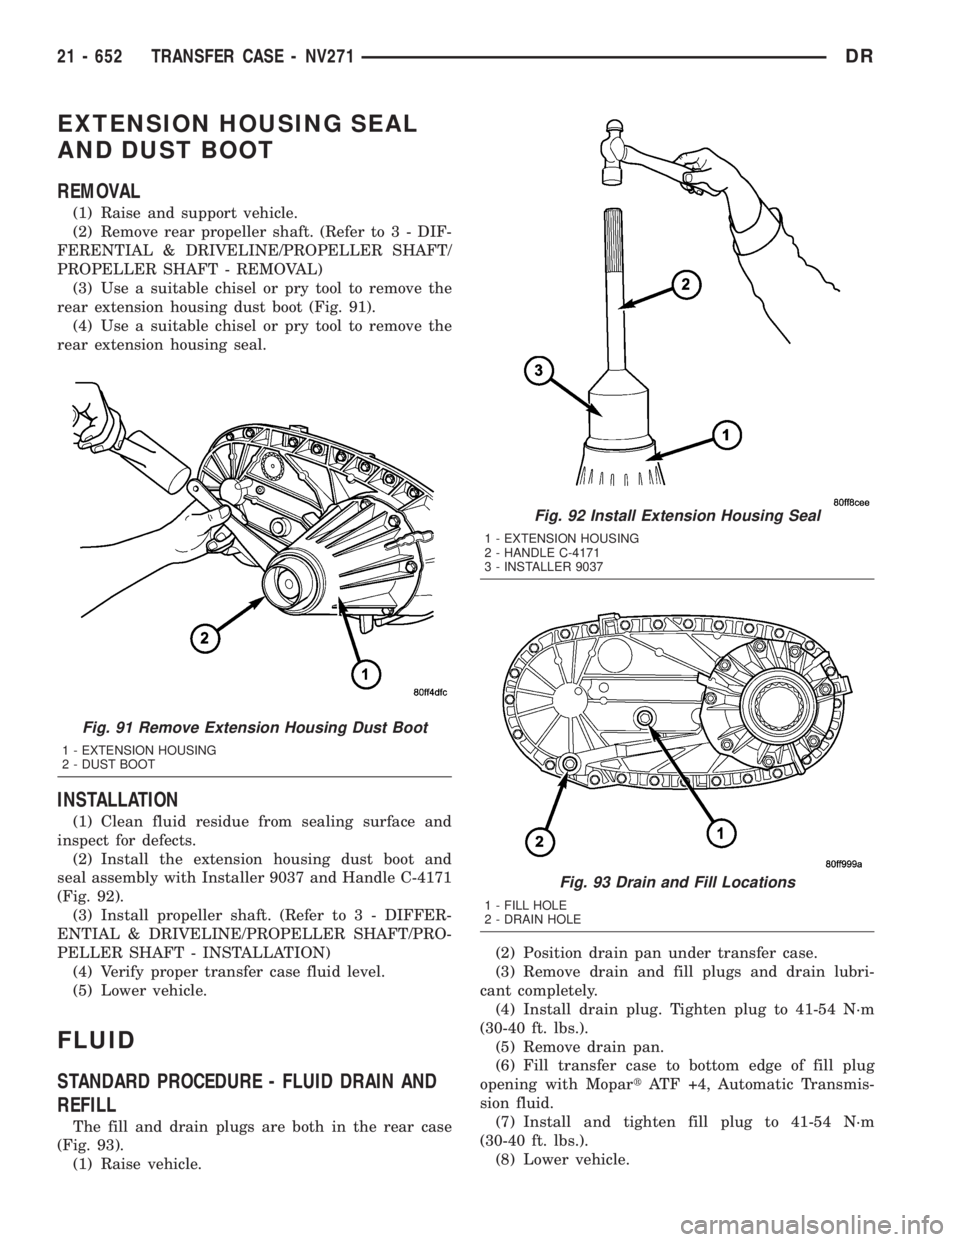
(3) Use a suitable chisel or pry tool to remove the
rear extension housing dust boot (Fig. 91).
(4) Use a suitable chisel or pry tool to remove the
rear extension housing seal.
INSTALLATION
(1) Clean fluid residue from sealing surface and
inspect for defects.
(2) Install the extension housing dust boot and
seal assembly with Installer 9037 and Handle C-4171
(Fig. 92).
(3) Install propeller shaft. (Refer to 3 - DIFFER-
ENTIAL & DRIVELINE/PROPELLER SHAFT/PRO-
PELLER SHAFT - INSTALLATION)
(4) Verify proper transfer case fluid level.
(5) Lower vehicle.
FLUID
STANDARD PROCEDURE - FLUID DRAIN AND
REFILL
The fill and drain plugs are both in the rear case
(Fig. 93).
(1) Raise vehicle.(2) Position drain pan under transfer case.
(3) Remove drain and fill plugs and drain lubri-
cant completely.
(4) Install drain plug. Tighten plug to 41-54 N´m
(30-40 ft. lbs.).
(5) Remove drain pan.
(6) Fill transfer case to bottom edge of fill plug
opening with MopartATF +4, Automatic Transmis-
sion fluid.
(7) Install and tighten fill plug to 41-54 N´m
(30-40 ft. lbs.).
(8) Lower vehicle.
Fig. 91 Remove Extension Housing Dust Boot
1 - EXTENSION HOUSING
2 - DUST BOOT
Fig. 92 Install Extension Housing Seal
1 - EXTENSION HOUSING
2 - HANDLE C-4171
3 - INSTALLER 9037
Fig. 93 Drain and Fill Locations
1 - FILL HOLE
2 - DRAIN HOLE
21 - 652 TRANSFER CASE - NV271DR
Page 2494 of 2895
SHIFT LEVER
REMOVAL
(1) Shift transfer case into 2H.
(2) Raise and support the vehicle.
(3) Loosen adjusting trunnion lock bolt and slide
shift rod out of trunnion. If rod lacks enough travel
to come out of trunnion, push trunnion out of shift
lever.
(4) Lower vehicle.
(5) Remove transfer case shifter knob cap.
(6) Remove nut holding shifter knob to shift lever.
(7) Remove shifter knob.
(8) Remove the shift boot from the shifter console.
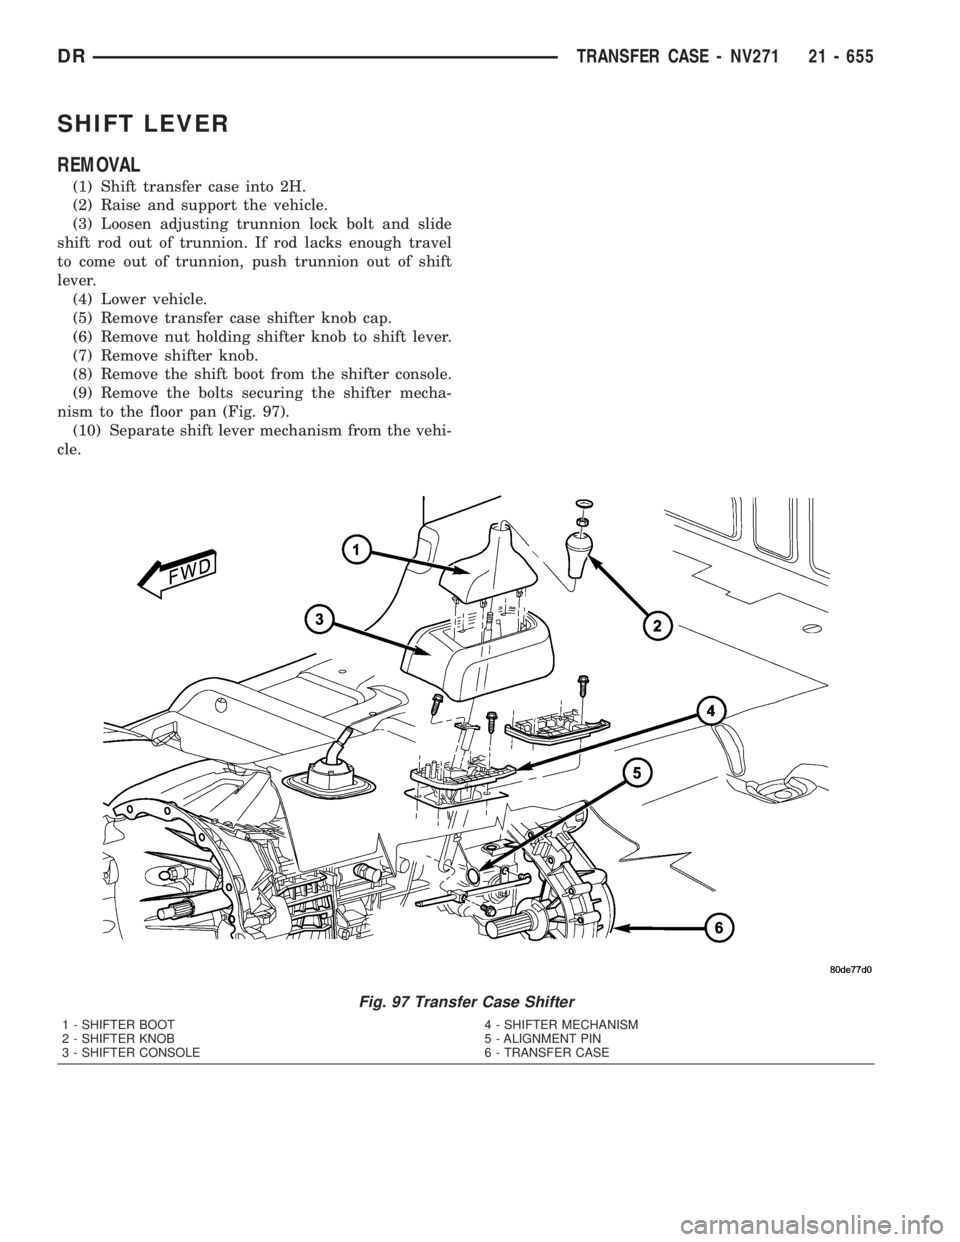
(9) Remove the bolts securing the shifter mecha-
nism to the floor pan (Fig. 97).
(10) Separate shift lever mechanism from the vehi-
cle.
Fig. 97 Transfer Case Shifter
1 - SHIFTER BOOT
2 - SHIFTER KNOB
3 - SHIFTER CONSOLE4 - SHIFTER MECHANISM
5 - ALIGNMENT PIN
6 - TRANSFER CASE
DRTRANSFER CASE - NV271 21 - 655
Page 2495 of 2895
INSTALLATION
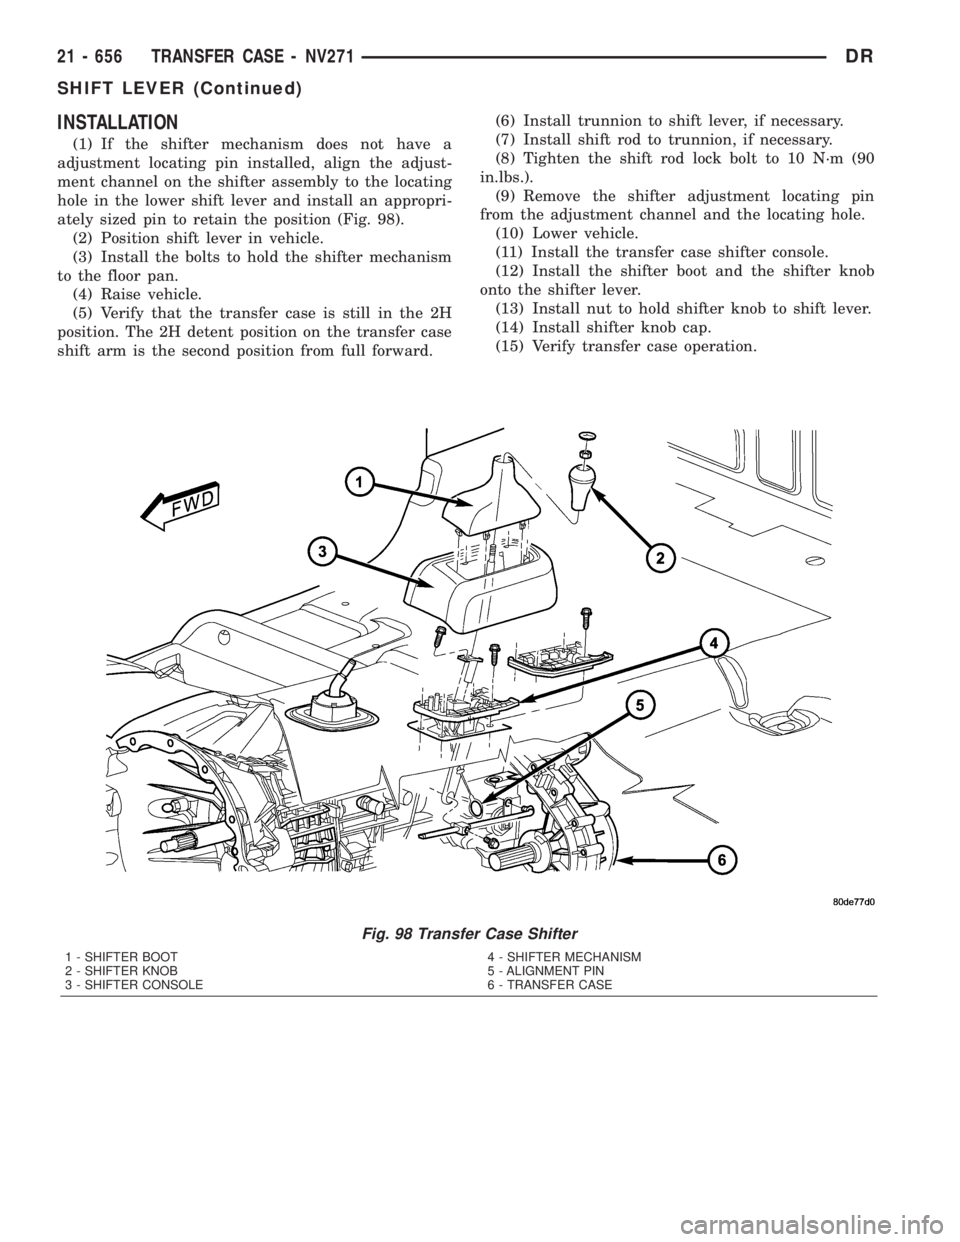
(1) If the shifter mechanism does not have a
adjustment locating pin installed, align the adjust-
ment channel on the shifter assembly to the locating
hole in the lower shift lever and install an appropri-
ately sized pin to retain the position (Fig. 98).
(2) Position shift lever in vehicle.
(3) Install the bolts to hold the shifter mechanism
to the floor pan.
(4) Raise vehicle.
(5) Verify that the transfer case is still in the 2H
position. The 2H detent position on the transfer case
shift arm is the second position from full forward.(6) Install trunnion to shift lever, if necessary.
(7) Install shift rod to trunnion, if necessary.
(8) Tighten the shift rod lock bolt to 10 N´m (90
in.lbs.).
(9) Remove the shifter adjustment locating pin
from the adjustment channel and the locating hole.
(10) Lower vehicle.
(11) Install the transfer case shifter console.
(12) Install the shifter boot and the shifter knob
onto the shifter lever.
(13) Install nut to hold shifter knob to shift lever.
(14) Install shifter knob cap.
(15) Verify transfer case operation.
Fig. 98 Transfer Case Shifter
1 - SHIFTER BOOT
2 - SHIFTER KNOB
3 - SHIFTER CONSOLE4 - SHIFTER MECHANISM
5 - ALIGNMENT PIN
6 - TRANSFER CASE
21 - 656 TRANSFER CASE - NV271DR
SHIFT LEVER (Continued)
Page 2496 of 2895
ADJUSTMENTS
ADJUSTMENT - SHIFT LEVER
(1) Move shift lever into 2H position.
(2) Raise vehicle.
(3) Loosen shift rod lock bolt at trunnion.
(4) Check shift rod fit in trunnion. Be sure rod
does not bind in trunnion. Lubricate the shift rod
and trunnion if necessary.
(5) Verify that transfer case shift lever is in 2H
detent position. The 2H detent position on the trans-
fer case shift arm is the second position from full for-
ward.
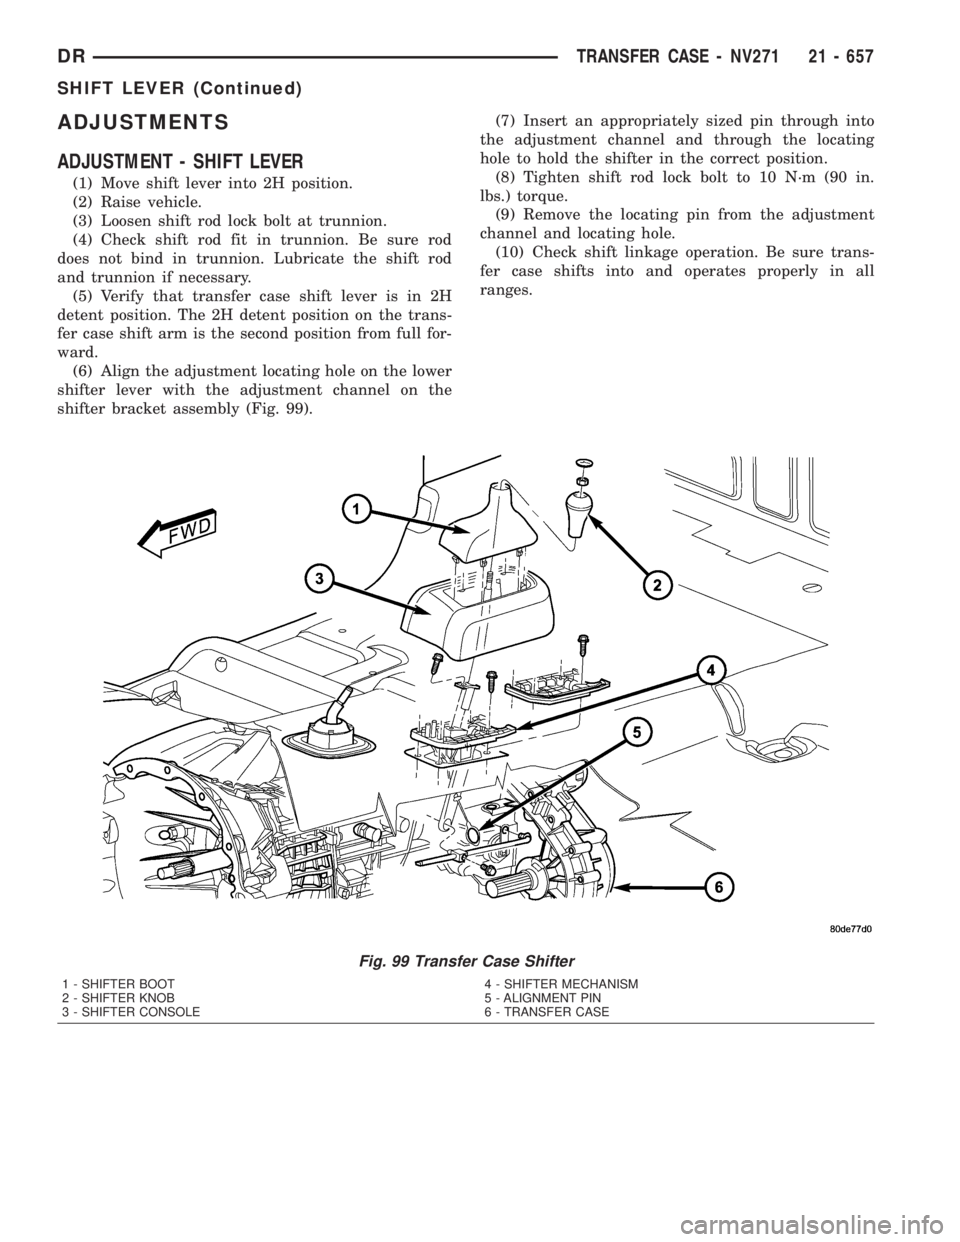
(6) Align the adjustment locating hole on the lower
shifter lever with the adjustment channel on the
shifter bracket assembly (Fig. 99).(7) Insert an appropriately sized pin through into
the adjustment channel and through the locating
hole to hold the shifter in the correct position.
(8) Tighten shift rod lock bolt to 10 N´m (90 in.
lbs.) torque.
(9) Remove the locating pin from the adjustment
channel and locating hole.
(10) Check shift linkage operation. Be sure trans-
fer case shifts into and operates properly in all
ranges.
Fig. 99 Transfer Case Shifter
1 - SHIFTER BOOT
2 - SHIFTER KNOB
3 - SHIFTER CONSOLE4 - SHIFTER MECHANISM
5 - ALIGNMENT PIN
6 - TRANSFER CASE
DRTRANSFER CASE - NV271 21 - 657
SHIFT LEVER (Continued)
Page 2500 of 2895
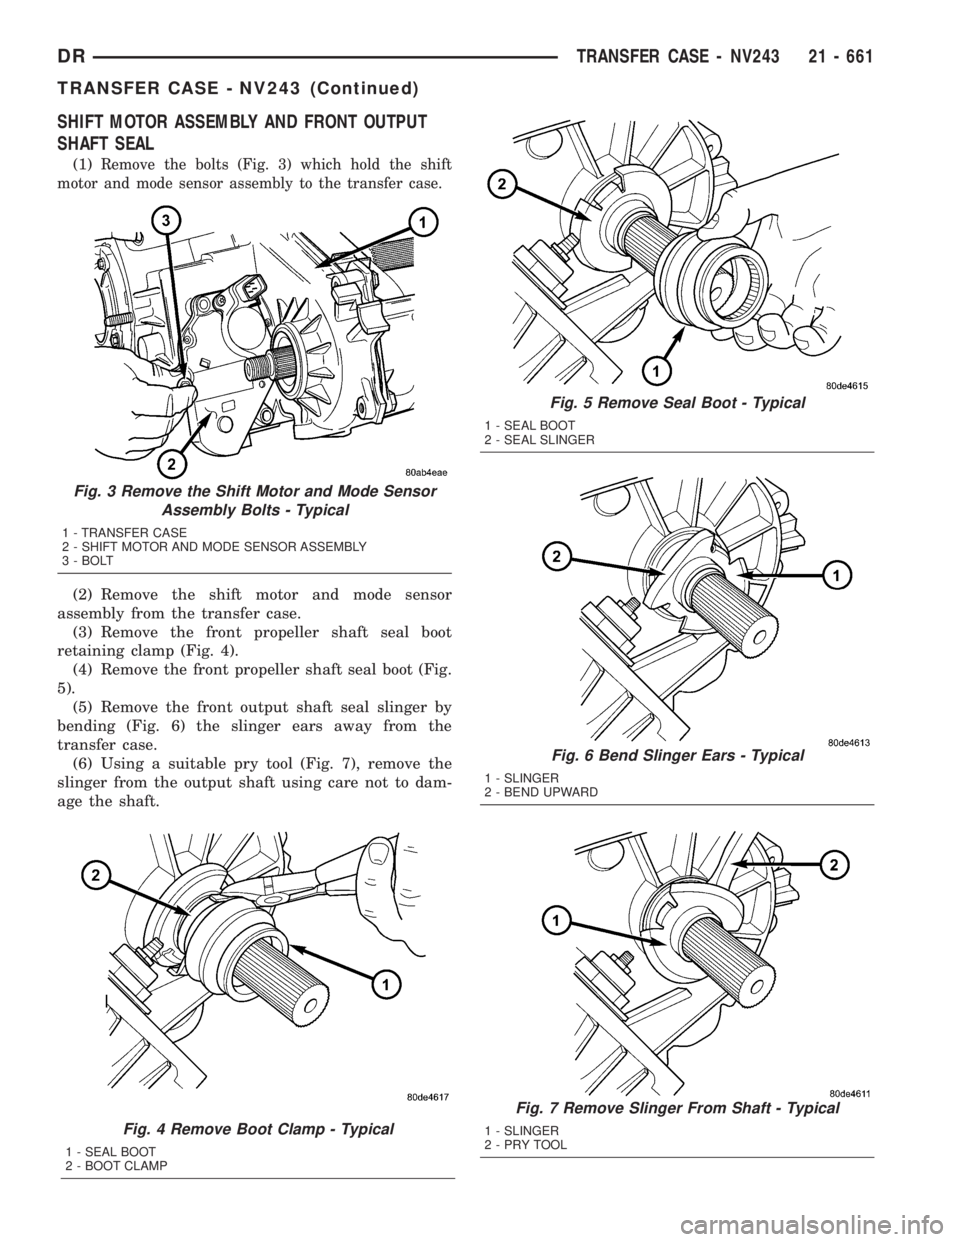
SHIFT MOTOR ASSEMBLY AND FRONT OUTPUT
SHAFT SEAL
(1)Remove the bolts (Fig. 3) which hold the shift
motor and mode sensor assembly to the transfer case.
(2) Remove the shift motor and mode sensor
assembly from the transfer case.
(3) Remove the front propeller shaft seal boot
retaining clamp (Fig. 4).
(4) Remove the front propeller shaft seal boot (Fig.
5).
(5) Remove the front output shaft seal slinger by
bending (Fig. 6) the slinger ears away from the
transfer case.
(6) Using a suitable pry tool (Fig. 7), remove the
slinger from the output shaft using care not to dam-
age the shaft.
Fig. 4 Remove Boot Clamp - Typical
1 - SEAL BOOT
2 - BOOT CLAMP
Fig. 3 Remove the Shift Motor and Mode Sensor
Assembly Bolts - Typical
1 - TRANSFER CASE
2 - SHIFT MOTOR AND MODE SENSOR ASSEMBLY
3 - BOLT
Fig. 5 Remove Seal Boot - Typical
1 - SEAL BOOT
2 - SEAL SLINGER
Fig. 6 Bend Slinger Ears - Typical
1 - SLINGER
2 - BEND UPWARD
Fig. 7 Remove Slinger From Shaft - Typical
1 - SLINGER
2-PRYTOOL
DRTRANSFER CASE - NV243 21 - 661
TRANSFER CASE - NV243 (Continued)
Page 2517 of 2895
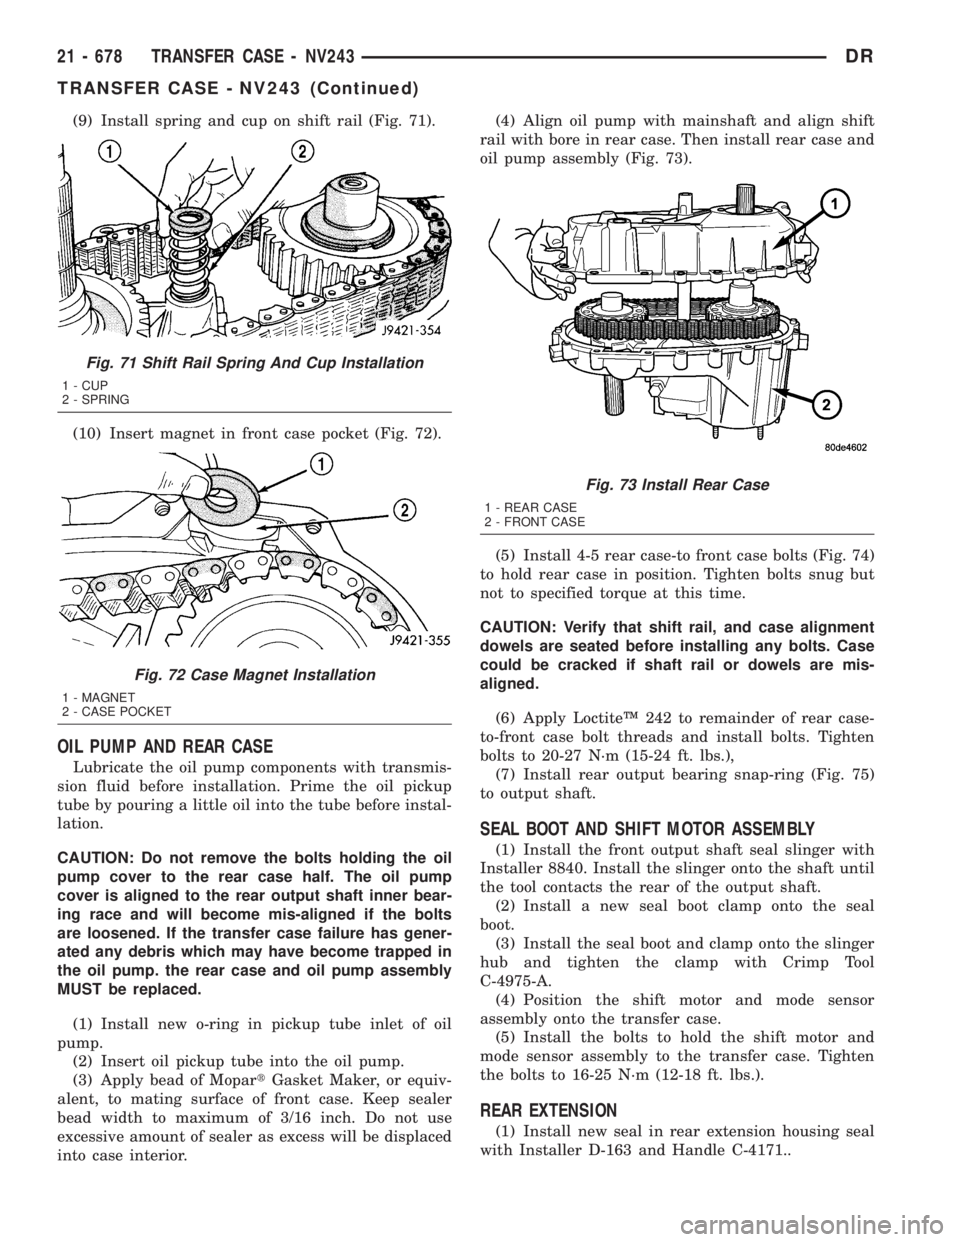
(9) Install spring and cup on shift rail (Fig. 71).
(10) Insert magnet in front case pocket (Fig. 72).
OIL PUMP AND REAR CASE
Lubricate the oil pump components with transmis-
sion fluid before installation. Prime the oil pickup
tube by pouring a little oil into the tube before instal-
lation.
CAUTION: Do not remove the bolts holding the oil
pump cover to the rear case half. The oil pump
cover is aligned to the rear output shaft inner bear-
ing race and will become mis-aligned if the bolts
are loosened. If the transfer case failure has gener-
ated any debris which may have become trapped in
the oil pump. the rear case and oil pump assembly
MUST be replaced.
(1) Install new o-ring in pickup tube inlet of oil
pump.
(2) Insert oil pickup tube into the oil pump.
(3) Apply bead of MopartGasket Maker, or equiv-
alent, to mating surface of front case. Keep sealer
bead width to maximum of 3/16 inch. Do not use
excessive amount of sealer as excess will be displaced
into case interior.(4) Align oil pump with mainshaft and align shift
rail with bore in rear case. Then install rear case and
oil pump assembly (Fig. 73).
(5) Install 4-5 rear case-to front case bolts (Fig. 74)
to hold rear case in position. Tighten bolts snug but
not to specified torque at this time.
CAUTION: Verify that shift rail, and case alignment
dowels are seated before installing any bolts. Case
could be cracked if shaft rail or dowels are mis-
aligned.
(6) Apply LoctiteŸ 242 to remainder of rear case-
to-front case bolt threads and install bolts. Tighten
bolts to 20-27 N´m (15-24 ft. lbs.),
(7) Install rear output bearing snap-ring (Fig. 75)
to output shaft.
SEAL BOOT AND SHIFT MOTOR ASSEMBLY
(1) Install the front output shaft seal slinger with
Installer 8840. Install the slinger onto the shaft until
the tool contacts the rear of the output shaft.
(2) Install a new seal boot clamp onto the seal
boot.
(3) Install the seal boot and clamp onto the slinger
hub and tighten the clamp with Crimp Tool
C-4975-A.
(4) Position the shift motor and mode sensor
assembly onto the transfer case.
(5) Install the bolts to hold the shift motor and
mode sensor assembly to the transfer case. Tighten
the bolts to 16-25 N´m (12-18 ft. lbs.).
REAR EXTENSION
(1) Install new seal in rear extension housing seal
with Installer D-163 and Handle C-4171..
Fig. 71 Shift Rail Spring And Cup Installation
1 - CUP
2 - SPRING
Fig. 72 Case Magnet Installation
1 - MAGNET
2 - CASE POCKET
Fig. 73 Install Rear Case
1 - REAR CASE
2 - FRONT CASE
21 - 678 TRANSFER CASE - NV243DR
TRANSFER CASE - NV243 (Continued)
Page 2522 of 2895
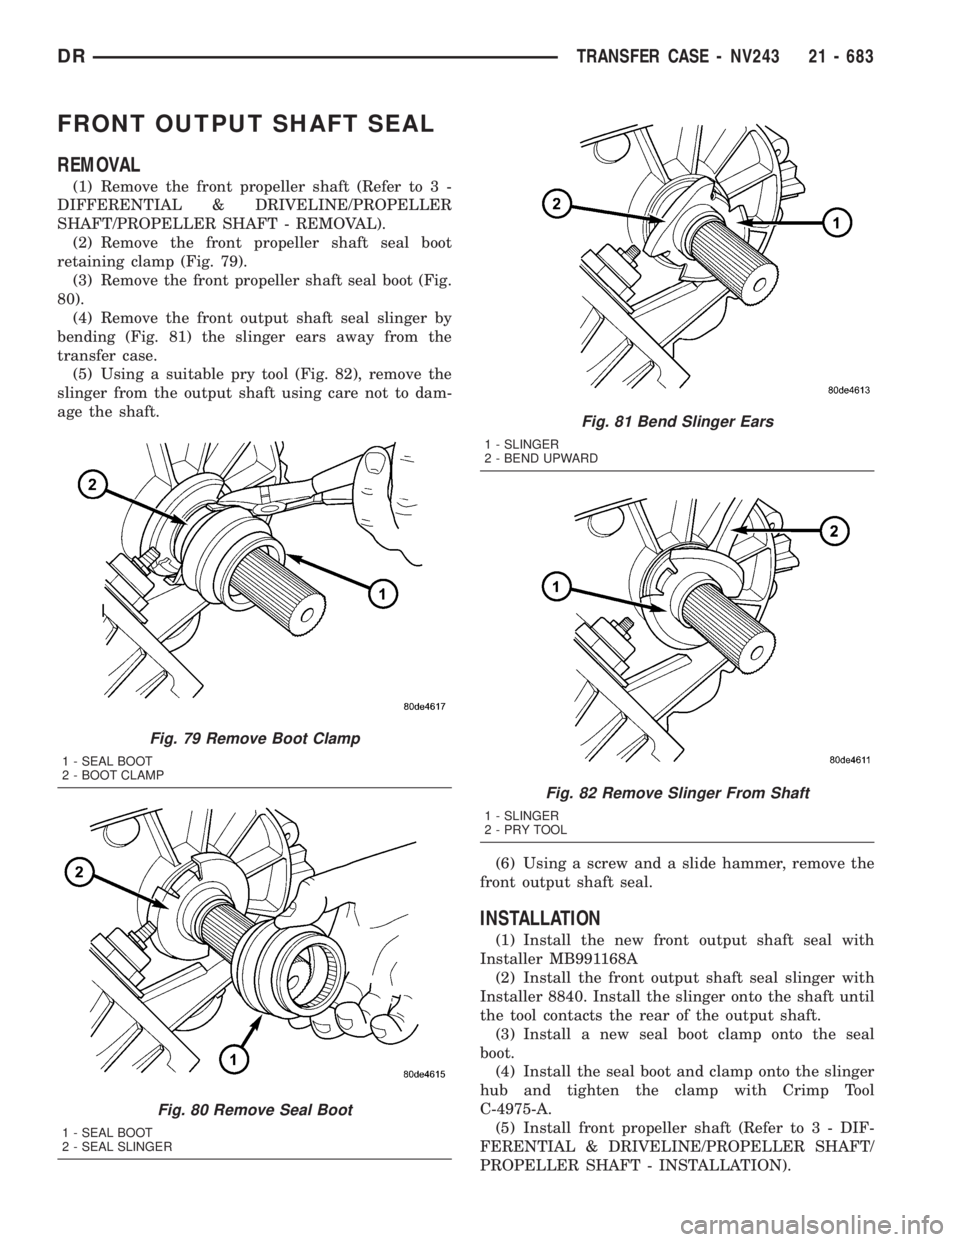
FRONT OUTPUT SHAFT SEAL
REMOVAL
(1) Remove the front propeller shaft (Refer to 3 -
DIFFERENTIAL & DRIVELINE/PROPELLER
SHAFT/PROPELLER SHAFT - REMOVAL).
(2) Remove the front propeller shaft seal boot
retaining clamp (Fig. 79).
(3) Remove the front propeller shaft seal boot (Fig.
80).
(4) Remove the front output shaft seal slinger by
bending (Fig. 81) the slinger ears away from the
transfer case.
(5) Using a suitable pry tool (Fig. 82), remove the
slinger from the output shaft using care not to dam-
age the shaft.
(6) Using a screw and a slide hammer, remove the
front output shaft seal.
INSTALLATION
(1) Install the new front output shaft seal with
Installer MB991168A
(2) Install the front output shaft seal slinger with
Installer 8840. Install the slinger onto the shaft until
the tool contacts the rear of the output shaft.
(3) Install a new seal boot clamp onto the seal
boot.
(4) Install the seal boot and clamp onto the slinger
hub and tighten the clamp with Crimp Tool
C-4975-A.
(5) Install front propeller shaft (Refer to 3 - DIF-
FERENTIAL & DRIVELINE/PROPELLER SHAFT/
PROPELLER SHAFT - INSTALLATION).
Fig. 79 Remove Boot Clamp
1 - SEAL BOOT
2 - BOOT CLAMP
Fig. 80 Remove Seal Boot
1 - SEAL BOOT
2 - SEAL SLINGER
Fig. 81 Bend Slinger Ears
1 - SLINGER
2 - BEND UPWARD
Fig. 82 Remove Slinger From Shaft
1 - SLINGER
2-PRYTOOL
DRTRANSFER CASE - NV243 21 - 683
Page 2526 of 2895
TRANSFER CASE - NV273
TABLE OF CONTENTS
page page
TRANSFER CASE - NV273
DESCRIPTION........................687
OPERATION..........................688
DIAGNOSIS AND TESTING - TRANSFER
CASE - NV273.......................688
REMOVAL............................689
DISASSEMBLY........................689
CLEANING...........................698
INSPECTION.........................699
ASSEMBLY...........................701
INSTALLATION........................713
SPECIFICATIONS
TRANSFER CASE - NV273.............713
SPECIAL TOOLS
TRANSFER CASE NV271/NV273.........714
EXTENSION HOUSING SEAL AND DUST BOOT
REMOVAL............................716
INSTALLATION........................716FLUID
STANDARD PROCEDURE - FLUID DRAIN AND
REFILL............................716
FRONT OUTPUT SHAFT SEAL
REMOVAL............................717
INSTALLATION........................717
MODE SENSOR
DESCRIPTION........................718
OPERATION..........................718
SELECTOR SWITCH
DESCRIPTION........................719
OPERATION..........................719
SHIFT MOTOR
DESCRIPTION........................720
OPERATION..........................720
REMOVAL............................720
INSTALLATION........................720
TRANSFER CASE - NV273
DESCRIPTION
The NV273 is an electronically controlled part-time
transfer case with a low range gear reduction system.
The NV273 has three operating ranges plus a NEU-
TRAL position. The low range system provides a gear
reduction ratio for increased low speed torque capa-
bility.
The geartrain is mounted in two aluminum case
halves attached with bolts. The mainshaft front and
rear bearings are mounted in aluminum case halves.
OPERATING RANGES
Transfer case operating ranges are:
²2WD (2-wheel drive)
²4HI (4-wheel drive)
²4LO (4-wheel drive low range)
²NEUTRAL
The 2WD range is for use on any road surface at
any time.The 4HI and 4LO ranges are for off road use only.
They are not for use on hard surface roads. The only
exception being when the road surface is wet or slip-
pery or covered by ice and snow.
The low range reduction gear system is operative
in 4LO range only. This range is for extra pulling
power in off road situations. Low range reduction
ratio is 2.72:1.
SHIFT MECHANISM
Operating ranges are selected with a dash
mounted shift selector switch. The shift selector
switch provides a input to the Transfer Case Control
Module (TCCM) to indicate the driver's desire to
change operating ranges. The TCCM uses this input,
along with input from the transfer case mounted
mode sensor and information from the vehicle's bus,
to determine if a shift is permitted. If the TCCM
decides the shift is permitted, the TCCM controls the
shift motor, mounted to the exterior of the transfer
case, to perform the shift.
DRTRANSFER CASE - NV273 21 - 687