Page 988 of 1184

9E–14 INSTRUMENTATION/DRIVER INFORMATION
DAEWOO M-150 BL2
7. Install the instrument cluster assembly. Refer to “In-
strument Cluster” in this section.
8. Install the floor console with the screws.
9. Install the passenger’s airbag module to the instru-
ment panel. Refer to Section 8B, Supplemental In-
flatable Restraints (SIR) (For vehicle equipped with
the airbag).
10. Install the glove box assembly to the instrument
panel. Refer to “Glove Box” in this section.
11. Install the hood latch release lever to the instrument
panel. Refer to Section 9R, Body Front End.
12. Install the instrument cluster trim panel to the instru-
ment cluster trim panel with the screws.
13. Install the A–pillar trim panels. Refer to Section 9G,
Interior Trim.
14. Install the signal lamp switch and the wiper switch.
Refer to Section 6E, Steering Wheel and Column.
15. Install the steering column trim cover. Refer to Sec-
tion 6E, Steering Wheel and Column.
16. Install the steering wheel to the steering column.
17. Install the driver’s airbag module to the steering
wheel. Refer to Section 8B, Supplemental Inflatable
Restraints (SIR) (For vehicle equipped with the air-
bag).
18. Connect the negative battery cable.
D109B522
TIE–BAR
(Left–Hand Drive Shown, Right–Hand
Drive Similar)
Removal Procedure
1. Disconnect the negative battery cable.
2. Remove the instrument panel assembly. Refer to “In-
strument Panel” in this section.
3. Remove the defroster duct hose from the tie–bar.
�Remove the screws (1).
�Remove the defroster duct hose (2).
D19B547A
4. Remove the nuts and the steering column. Refer to
Section 6E, Steering Wheel and Column.
5. Disconnect the electrical connectors and electrical
wiring harness after removing the electrical wiring
harness strips.
�Remove the electrical wiring harness strip.
�Disconnect the brake switch connector (1).
�Disconnect the thermostat connector (2).
�Disconnect the blow motor connector (3).
�Disconnect the blow motor resistance connector
(4).
�Disconnect the electrical wiring harness (5).
Page 989 of 1184
INSTRUMENT/DRIVER INFORMATION 9E – 15
DAEWOO M-150 BL2
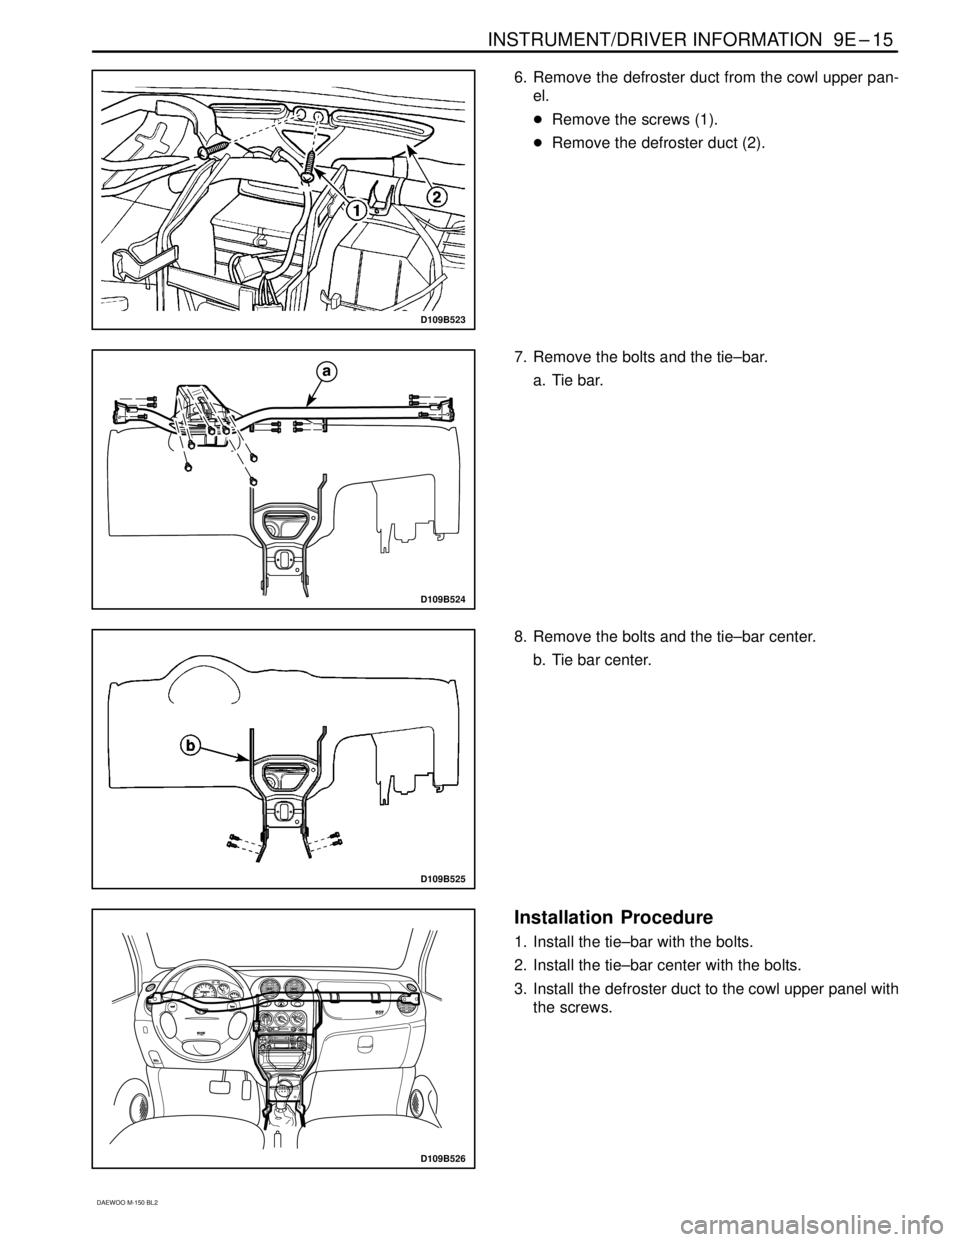
D109B523
6. Remove the defroster duct from the cowl upper pan-
el.
�Remove the screws (1).
�Remove the defroster duct (2).
D109B524
7. Remove the bolts and the tie–bar.
a. Tie bar.
D109B525
8. Remove the bolts and the tie–bar center.
b. Tie bar center.
D109B526
Installation Procedure
1. Install the tie–bar with the bolts.
2. Install the tie–bar center with the bolts.
3. Install the defroster duct to the cowl upper panel with
the screws.
Page 990 of 1184

9E –16 INSTRUMENT/DRIVER INFORMATION
DAEWOO M-150 BL2
4. Connect the electrical wiring harness.
5. Connect the blow motor resistance connector.
6. Connect the blow motor connector.
7. Connect the thermostat connector.
8. Connect the brake switch connector.
9. Bind the electrical wiring harness strip.
10. Install the steering column with the nuts.
11. Install the defroster duct hose with the screws.
12. Install the instrument panel assembly. Refer to “In-
strument Panel” in this section.
13. Connect the negative battery cable.
D109B516
INSTRUMENT CLUSTER TRIM PANEL
(Left–Hand Drive Shown, Right–Hand
Drive Similar)
Removal Procedure
1. Remove the instrument cluster trim panel from the in-
strument panel.
�Remove the screws (1).
�Using a flathead screwdriver, remove the central
console cover (2).
Notice: To prevent the instrument panel damage, cover
the flathead screwdriver with a soft cloth.
D109B527
Installation Procedure
1. Install the instrument cluster trim panel with the
screws.
D109B701
INSTRUMENT TRIM PANEL
ASSEMBLY
(Left–Hand Drive Shown, Right–Hand
Drive Similar)
Removal Procedure
1. Disconnect the negative battery cable.
2. Remove the instrument panel assembly. Refer to “In-
strument Panel” in this section.
3. Remove the instrument cluster brackets from the in-
strument panel.
�Remove the screws.
�Remove the instrument cluster brackets (1).
Page 991 of 1184
INSTRUMENT/DRIVER INFORMATION 9E–17
DAEWOO M-150 BL2
D109B702
4. Remove the passenger’s airbag module blank cover
from the instrument panel.
�Remove the screws.
�Remove the passenger’s airbag module blank cov-
er (1).
D109B703
5. Remove the ventilation duct from the instrument pan-
el.
�Remove the screws.
�Remove the ventilation duct (1).
D109B704
6. Remove the ventilation grilles from the instrument
panel.
�Remove the screws.
�Remove the ventilation grilles (1).
D109B705
7. Remove the cigar lighter housing from the instrument
panel.
�Remove the screws.
�Remove the cigar lighter housing (1).
Page 992 of 1184
.
�Remove the glove box striker and brac")
9E –18 INSTRUMENT/DRIVER INFORMATION
DAEWOO M-150 BL2
D109B706
8. Remove the glove box striker and bracket from the
instrument panel.
�Remove the screws (1).
�Remove the glove box striker and bracket (2).
D109B707
9. Remove the instrument panel guide from the instru-
ment panel.
�Remove the screws (1).
�Remove the instrument panel guide (2).
D109B708
10. Remove the defroster grilles and the demister grilles
from the instrument panel.
a. Defroster grille.
b. Demister grille.
D109B521
Installation Procedure
1. Install the defroster grilles and the demister grilles to
the instrument.
2. Install the instrument panel guide to the instrument
panel with the screws.
3. Install the glove box striker and the bracket to the in-
strument panel with the screws.
4. Install the cigar lighter housing to the instrument pan-
el with the screws.
5. Install the ventilation grilles to the instrument panel
with the screws.
6. Install the ventilation duct to the instrument panel with
the screws.
Page 993 of 1184

INSTRUMENT/DRIVER INFORMATION 9E–19
DAEWOO M-150 BL2
D19B710A
7. Install the passenger’s airbag module blank cover to
the instrument panel with the screws.
Tighten
Tighten the screws to 1.5–2 N.m (13–18 lb-in).
a. Passenger’s airbag module blank cover screw
8. Install the instrument cluster brackets to the instru-
ment panel with the screws.
9. Install the instrument panel assembly. Refer to “In-
strument Panel” in this section.
10. Connect the negative battery cable.
D109B711
INSTRUMENT CLUSTER INDICATOR
LAMPS
Removal Procedure
1. Disconnect the negative battery cable.
2. Remove the instrument cluster from the instrument
panel. Refer to “Instrument Cluster” in this section.
3. Remove the indicator bulbs from the rear of the clus-
ter.
D109B712
Installation Procedure
1. Install the indicator bulb.
2. Install the instrument cluster to the instrument panel.
Refer to “Instrument Cluster” in this section.
3. Connect the negative battery cable.
D109B713
SPEEDOMETER/ODOMETER/TRIP
ODOMETER
Removal Procedure
1. Disconnect the negative battery cable.
2. Remove the instrument cluster from the instrument
panel. Refer to “Instrument Cluster” in this section.
3. Remove the instrument cluster lens and the face
plate.
a. Window plate.
Page 999 of 1184
INSTRUMENT/DRIVER INFORMATION 9E–25
DAEWOO M-150 BL2
INSTRUMENT PANEL ILLUMINATION
D19B202B
Page 1006 of 1184

9F –6 AUDIO SYSTEMS
DAEWOO M-150 BL2
REPAIR INSTRUCTIONS
ON–VEHICLE SERVICE
D109D547
AUDIO SYSTEM
Removal Procedure
1. Disconnect the negative battery cable.
2. Remove the instrument cluster trim panel from the in-
strument panel. Refer to Section 9E, Instrument/Driv-
er Information.
3. Remove the audio system from the instrument panel.
�Remove the screws (1).
�Disconnect the electrical connector and the anten-
na cable (2).
�Remove the audio system (3).
D109D548
Installation Procedure
1. Connect the electrical connector and the antenna
cable.
2. Install the audio system with the screws.
3. Install the instrument cluster trim panel. Refer to Sec-
tion 9E, Instrument/Driver Information.
4. Connect the negative battery cable.
D19D549A
CD CHANGER
Removal Procedure
1. Disconnect the negative battery cable.
2. Remove the audio system from the instrument panel.
Refer to “Audio System” in this section.
3. Remove the floor console. Refer to Section 9G, Inte-
rior Trim.
4. Disconnect the CD changer electrical connector from
the audio system.
a. CD changer electrical connector.