Page 1028 of 1184
9G –16 INTERIOR TRIM
DAEWOO M-150 BL2
D109E578
Installation Procedure
1. Install the parking brake cable cover with the screw.
D109E581
FLOOR CARPET
(Left–Hand Drive Shown, Right–Hand
Drive Similar)
Removal Procedure
1. Disconnect the negative battery cable.
2. Remove the front seats. Refer to Section 9H, Seats.
3. Remove the rear seat cushion. Refer to Section 9H,
Seats.
4. Remove the floor console. Refer to “Floor Console”
in this section.
5. Pry off the front rocker trim panel. Refer to “Front
Rocker Trim Panel” in this section.
6. Pry off the rear rocker trim panel. Refer to “Rear
Rocker Trim Panel” in this section
7. Pry off the lower B–pillar trim panel. Refer to “Lower
B–pillar Trim Panel” in this section.
8. Remove the parking brake cable cover. Refer to
“Parking Brake Cable Cover” in this section.
9. Remove the clips under the front seats.
D109E582
11. Remove the floor carpet.
a. Floor carpet.
Page 1029 of 1184

INTERIOR TRIM 9G–17
DAEWOO M-150 BL2
D109E583
Installation Procedure
1. Install the floor carpet.
2. Install the clips.
3. Install the parking brake cable cover. Refer to “Park-
ing Brake Cable Cover” in this section.
4. Install the lower B–pillar trim panel. Refer to “Lower
B–pillar Trim Panel” in this section.
5. Install the rear rocker trim panel. Refer to “Rear
Rocker Trim Panel” in this section.
6. Install the front rocker trim panel. Refer to “Front
Rocker Trim Panel” in this section.
7. Install the floor console. Refer to “Floor Console” in
this section.
8. Install the rear seat cushion. Refer to Section 9H,
Seats.
9. Install the front seats. Refer to Section 9H, Seats.
10. Connect the negative battery cable.
D109E584
LUGGAGE COMPARTMENT
WHEELHOUSE TRIM PANEL
Removal Procedure
1. Pry off the luggage compartment wheel house trim
panel.
�Remove the screws (1).
�Pry off the trim panel (2).
D109E585
Installation Procedure
1. Install the luggage compartment wheelhouse trim
panel with the plastic screws.
Page 1035 of 1184
SEATS 9H–5
DAEWOO M-150 BL2
REPAIR INSTRUCTIONS
ON–VEHICLE SERVICE
D109B528
FRONT SEATS
Removal Procedure
1. Disconnect the negative battery cable.
2. Remove the front seat.
�Remove the bolts (1).
�Disconnect the seat belt warning lamp connector
(2).
�Remove the seat (3).
23–28 N�m
D19B529A
Installation Procedure
1. Connect the seat belt warning lamp connector.
2. Install the front seat with the bolts.
Tighten
Tighten the seat bolt to 23–28 N�m (17–21 lb-ft).
a. Seat bolt.
3. Connect the negative battery cable.
D109B530
HEAD RESTRAINT
Removal Procedure
1. Pull the head restraint up to the stop position.
2. Insert a small flathead screwdriver in the notch in the
left guide sleeve and pull up the head restraint by
pushing the head restraint left.
Page 1036 of 1184
9H –6 SEATS
DAEWOO M-150 BL2
D109B531
Installation Procedure
1. Install the head restraint into the guide sleeves. Press
down in order to engage the stop pin.
D109B532
FRONT SEATBACK
Removal Procedure
1. Disconnect the negative battery.
2. Remove the front seat assembly. Refer to “Front
Seats” in this section.
3. Remove the recliner knob from the front seat.
�Remove the screw (1).
�Remove the recliner knob (2).
D109B533
4. Remove the recliner cover from the front seat.
�Remove the screws (1).
�Remove the recliner cover (2).
D109B534
5. Remove the recliner from the front seat.
�Remove the bolts on the seat cushion (1).
�Remove the seatback cover hog rings.
�Remove the seatback cover (2).
�Remove the bolts on the seatback (3).
Page 1037 of 1184
SEATS 9H–7
DAEWOO M-150 BL2
D109B535
2
1
6. Remove the seatback bolt from the seat cushion (1).
7. Remove the seatback assembly (2).
D109B536
Installation Procedure
1. Install the seatback assembly with the bolt.
2. Install the recliner with the bolts
3. Install the seatback cover with the hog rings.
D109B537
4. Install the recliner knob and the cover with the
screws.
5. Install the front seat assembly. Refer to “Front Seat”
in this section.
6. Connect the negative battery cable.
D109B532
FRONT SEAT CUSHION
Removal Procedure
1. Disconnect the negative battery cable.
2. Remove the front seat assembly. Refer to “Front
Seat” in this section.
3. Remove the seat belt buckle. Refer to Section 8A,
Seat Belts.
4. Remove the recliner knob.
�Remove the screw (1).
�Remove the recliner knob (2).
Page 1038 of 1184
9H –8 SEATS
DAEWOO M-150 BL2
D109B533
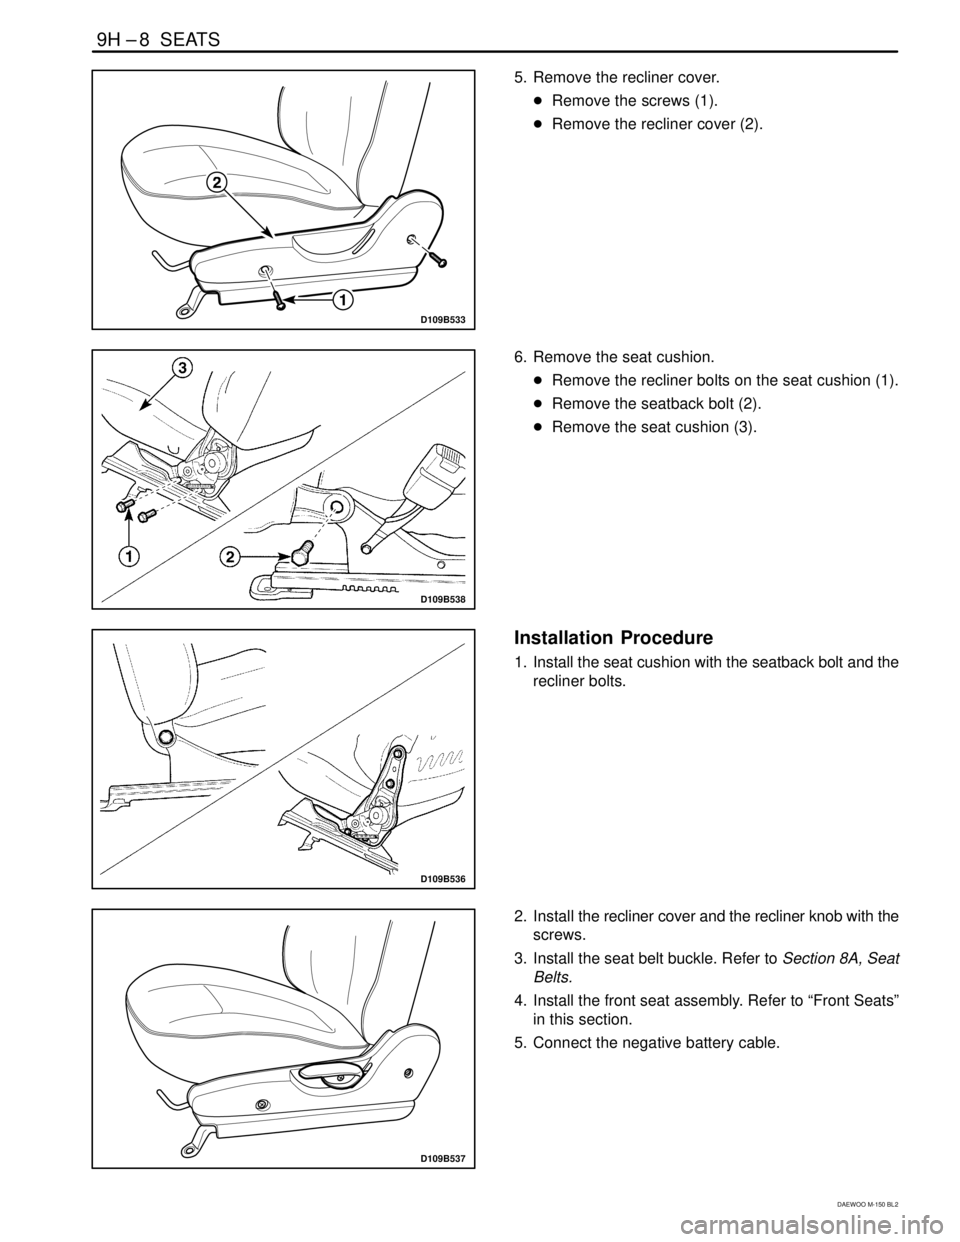
5. Remove the recliner cover.
�Remove the screws (1).
�Remove the recliner cover (2).
D109B538
6. Remove the seat cushion.
�Remove the recliner bolts on the seat cushion (1).
�Remove the seatback bolt (2).
�Remove the seat cushion (3).
D109B536
Installation Procedure
1. Install the seat cushion with the seatback bolt and the
recliner bolts.
D109B537
2. Install the recliner cover and the recliner knob with the
screws.
3. Install the seat belt buckle. Refer to Section 8A, Seat
Belts.
4. Install the front seat assembly. Refer to “Front Seats”
in this section.
5. Connect the negative battery cable.
Page 1039 of 1184
SEATS 9H–9
DAEWOO M-150 BL2
D109B539
FRONT SEATS GUIDE RAIL
Removal Procedure
1. Disconnect the negative battery cable.
2. Remove the front seat assembly. Refer to “Front
Seats” in this section.
3. Remove the guide rail from the seat.
�Remove the bolts (1).
�Remove the guide rail (2).
D109B540
Installation Procedure
1. Install the guide rail to the seat with the bolts.
2. Install the front seat assembly. Refer to “Front Seat”
in this section.
3. Connect the negative battery cable.
D109B539
FRONT SEAT CUSHION FRAME
Removal Procedure
1. Disconnect the negative battery cable.
2. Remove the front seat cushion. Refer to “Front Seat
Cushion” in this section.
3. Remove the guide rail.
�Remove the bolts (1).
�Remove the guide rail (2).
D109B541
4. Remove the seat cushion cover.
�Remove the hog rings.
5. Remove the seat cushion frame.
Page 1040 of 1184
9H –10 SEATS
DAEWOO M-150 BL2
D109B541
Installation Procedure
1. Install the seat cushion cover with the hog rings.
D109B540
2. Install the guide rail with the bolts.
3. Install the front seat cushion. Refer to “Front Seat
Cushion” in this section.
4. Connect the negative battery cable.
D109B542
REAR SEATBACK
Removal Procedure
1. Remove the rear seatback.
�Remove the rear seatback lock by pulling the lock
knob upward (1).
�Remove the seatback hinge bolts (2).
�Remove the rear seatback (3).
D19B543A
23–28 N�m
Installation Procedure
1. Install the rear seatback with the hinge bolts.
Tighten
Tighten the hinge bolts to 23–28 N.m (17–21 lb-ft).
a. Rear seatback hinge bolt.
2. Press the lock knob.


.
7. Remove the seatback assembly (2).
D109B536
Installation Procedure
1. Install the seatback assembl")