Page 707 of 1184

6C –4 POWER STEERING GEAR
DAEWOO M-150 BL2
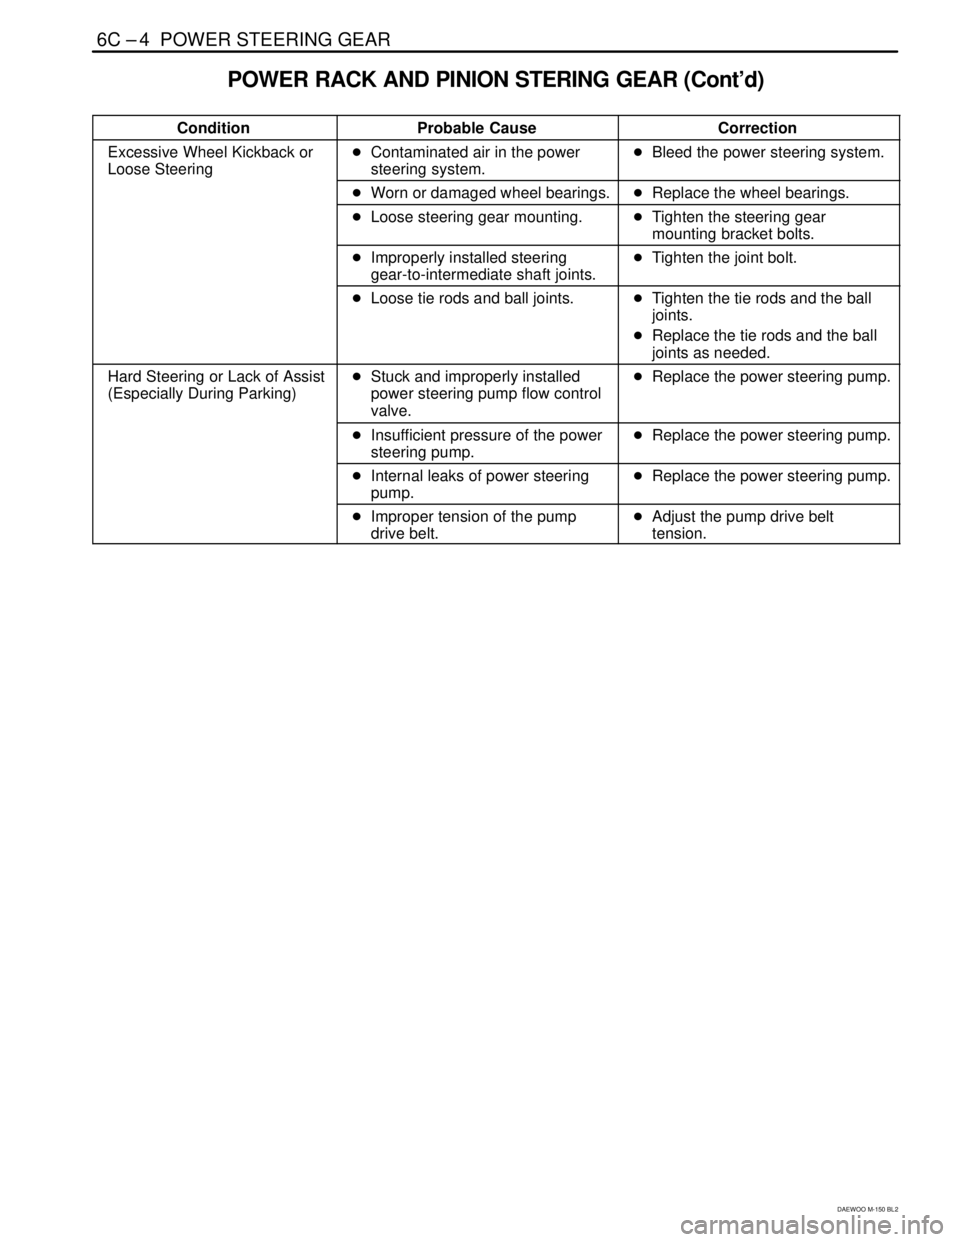
POWER RACK AND PINION STERING GEAR (Cont’d)
ConditionProbable CauseCorrection
Excessive Wheel Kickback or
Loose Steering�Contaminated air in the power
steering system.�Bleed the power steering system.
�Worn or damaged wheel bearings.�Replace the wheel bearings.
�Loose steering gear mounting.�Tighten the steering gear
mounting bracket bolts.
�Improperly installed steering
gear-to-intermediate shaft joints.�Tighten the joint bolt.
�Loose tie rods and ball joints.�Tighten the tie rods and the ball
joints.
�Replace the tie rods and the ball
joints as needed.
Hard Steering or Lack of Assist
(Especially During Parking)�Stuck and improperly installed
power steering pump flow control
valve.�Replace the power steering pump.
�Insufficient pressure of the power
steering pump.�Replace the power steering pump.
�Internal leaks of power steering
pump.�Replace the power steering pump.
�Improper tension of the pump
drive belt.�Adjust the pump drive belt
tension.
Page 708 of 1184
POWER STEERING GEAR 6C–5
DAEWOO M-150 BL2
ADJUST THE FREE LOAD OF THE
STEERING GEAR
1. Place the steering wheel in the straight-ahead posi-
tion.
2. Raise and suitably support the vehicle.
3. Remove the adjust plug locknut.
4. Check the torque of the adjuster plug.
5. Check the torque is below the specification value or
the measured torque is over the specification value,
adjust the tightening torque.
�Place the rack gear in the straight-ahead position.
�Tighten the adjust plug to 10 N�m (89 lb-in).
�Turn the steering wheel all the way to the right and
the left about 5 times repeatedly.
�Place the rack gear in the straight-ahead position.
�Loosen the adjust plug.
D105C302
�Tighten the adjust plug to 4.5–5.5 N�m (40–49 lb-
in).
�Loosen the adjust plug to 67.5�.
6. Tighten the adjust plug locknut.
Page 709 of 1184

6C –6 POWER STEERING GEAR
DAEWOO M-150 BL2
REPAIR INSTRUCTIONS
ON–VEHICLE SERVICE
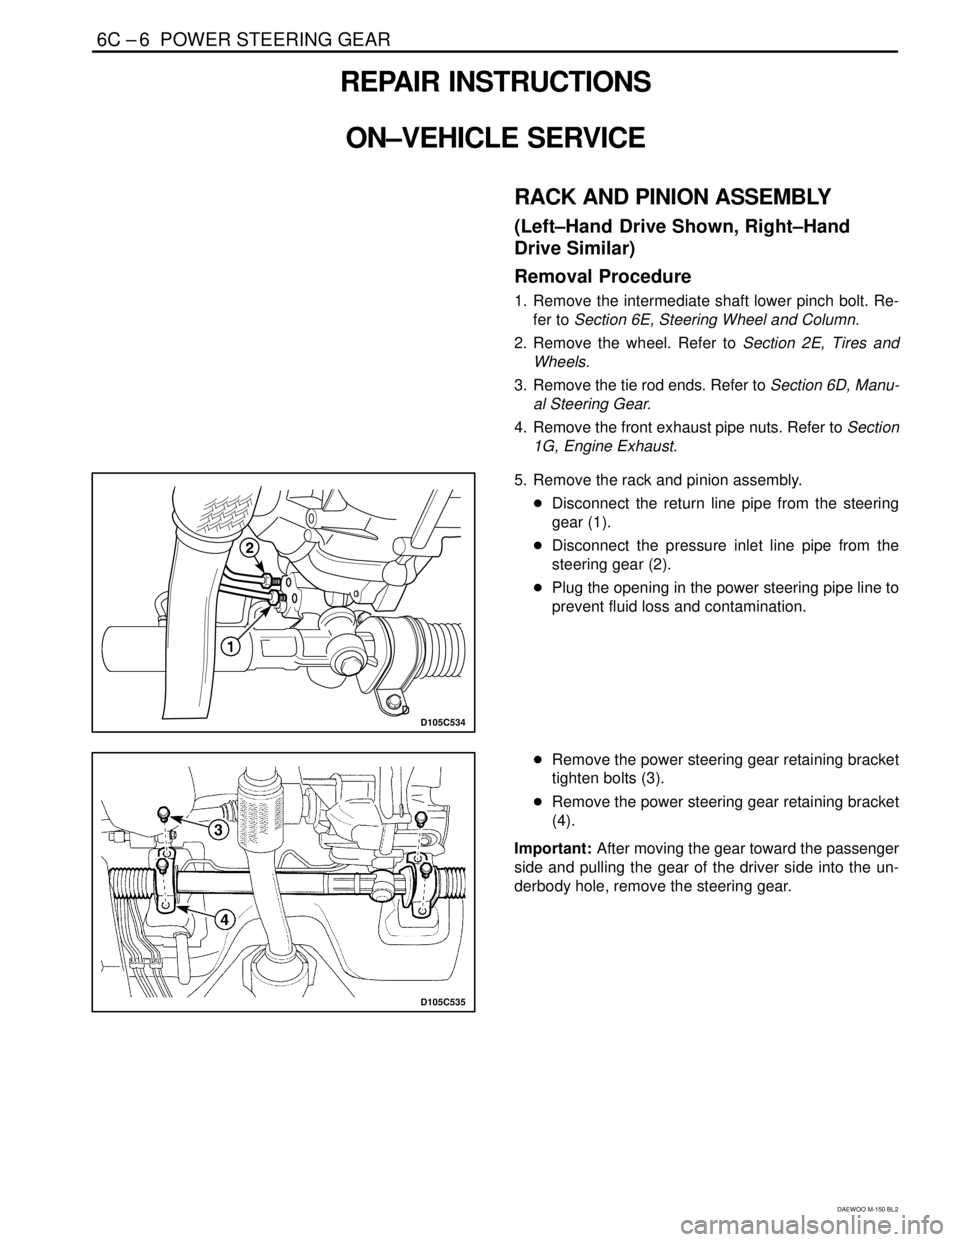
RACK AND PINION ASSEMBLY
(Left–Hand Drive Shown, Right–Hand
Drive Similar)
Removal Procedure
1. Remove the intermediate shaft lower pinch bolt. Re-
fer to Section 6E, Steering Wheel and Column.
2. Remove the wheel. Refer to Section 2E, Tires and
Wheels.
3. Remove the tie rod ends. Refer to Section 6D, Manu-
al Steering Gear.
4. Remove the front exhaust pipe nuts. Refer to Section
1G, Engine Exhaust.
D105C534
5. Remove the rack and pinion assembly.
�Disconnect the return line pipe from the steering
gear (1).
�Disconnect the pressure inlet line pipe from the
steering gear (2).
�Plug the opening in the power steering pipe line to
prevent fluid loss and contamination.
D105C535
�Remove the power steering gear retaining bracket
tighten bolts (3).
�Remove the power steering gear retaining bracket
(4).
Important: After moving the gear toward the passenger
side and pulling the gear of the driver side into the un-
derbody hole, remove the steering gear.
Page 710 of 1184

POWER STEERING GEAR 6C–7
DAEWOO M-150 BL2
D105C536
6. Remove the packing (5).
D15C537A
Installation Procedure
1. Install in the reverse order of removal.
2. Install the power steering gear bracket with the bolt.
Tighten
Tighten the bracket bolts to 50–55 N�m (36–41 lb-ft).
D15C512A
21–35 N�m21–35 N�m3. Connect the steering pipe. Refer to Section 6A, Pow-
er Steering System.
Tighten
Tighten the power steering pressure line fitting (1) to
21–35 N�m (16–25 lb-ft) (1).
Tighten the return line fitting to 21–35 N�m (16–25 lb-
ft) (2).
Important: When adding fluid or making a complete
fluid change, always use DEXRON� II or III power
steering fluid. Failure to use the proper fluid will cause
hose and seal change and fluid leaks.
4. Fill the fluid reservoir with power steering fluid.
5. Inspect for leaks. If there are leaks, correct the cause
of the leaks and bleed the system. Refer to Section
6A, Power Steering System.
POWER STEERING GEAR RACK
AND PINION BOOT
Refer to Section 6D, Manual Steering Gear.
Page 711 of 1184
6C –8 POWER STEERING GEAR
DAEWOO M-150 BL2
UNIT REPAIR
TIE ROD END BOOT
Refer to Section 6D, Manual Steering Gear.
D105C701
HYDRAULIC CYLINDER LINES
(Left–Hand Drive Shown, Right–Hand
Drive Similar)
Disassembly Procedure
1. Remove the rack and pinion steering assembly from
the vehicle. Refer to “Rack and Pinion Assembly” in
this section.
2. Disconnect the cylinder lines from the rack and pinion
housing.
�Remove the fitting (1).
�Remove the fitting (2).
D15C715A
Assembly Procedure
1. Connect the cylinder lines to the rack and pinion
housing.
2. Install the power steering line fittings at the pinion
valve end.
Tighten
Tighten the power steering line fittings to 25–35 N�m
(18–25 lb-ft) (1).
3. Install the power steering line fittings at the cylinder
end.
Tighten
Tighten the power steering line fittings to 25–35 N�m
(18–25 lb-ft) (2).
4. Install the rack and pinion steering assembly to the
vehicle. Refer to “Rack and Pinion Assembly” in this
section.
Page 712 of 1184
POWER STEERING GEAR 6C–9
DAEWOO M-150 BL2
D105C702
RACK AND PINION STEERING GEAR
ASSEMBLY
(Left–Hand Drive Shown, Right–Hand
Drive Similar)
Disassembly Procedure
1. Remove the rack and pinion steering assembly from
the vehicle. Refer to “Rack and Pinion Assembly” in
this section.
2. Remove the rack bearing.
�Remove the adjuster plug locknut (1).
�Remove the adjuster plug (2).
�Remove the adjuster spring (3).
D105C703
3. Remove the steering pinion.
�Remove the dust cap (1).
�Remove the retaining ring (2).
D105C704
�Remove the steering pinion dust cap (3).
�Remove the steering pinion locknut (4).
Notice: If the stub shaft is not held, damage to the pin-
ion teeth will occur. While holding the stub shaft, remove
the locknut from the pinion.
D105C705
�Remove the steering pinion from the pinion bear-
ing by hitting the pinion with the flated drift and
hammer (5).
Page 713 of 1184
6C –10 POWER STEERING GEAR
DAEWOO M-150 BL2
D105C706
Important: Hit the drift using a hammer when the lower
pinion is vertical with the drift.
�Remove the bearing by hitting the bearing with the
flated drift and rubber hammer (6).
D105C707
�Remove the pinion shaft seal (7).
�Remove the needle bearing (8).
�Remove the retaining ring (9).
Important: The power steering gear housing and the
rack gear in this vehicle is not serviceable as unit.
The faulty parts must be replaced as whole units.
D105C708
Inspection Procedure
1. Inspect the tie rod ends and the ball joints for dam-
age. Refer to Section 6D, Manual Steering Gear.
2. Inspect the tie rod ends and the rack/pinion boot for
cracks or abnormal wear. Refer to Section 6D, Manu-
al Steering Gear.
3. Inspect the metal part for damage.
�Inspect the pinion gear for damage or wear (1).
D105C709
�Inspect the rack gear for damage or wear (2).
�Inspect the steering gear housing for damage or
wear(3).
Page 714 of 1184
POWER STEERING GEAR 6C–11
DAEWOO M-150 BL2
D105C710
4. Inspect the bearings and the seal for damage.
�Inspect the pinion shaft seal for leaks and wear (1).
�Inspect the needle bearing for wear (2).
�Inspect the pinion bearing for wear (3).
5. The faulty parts must be replaced.
D105C711
Assembly Procedrue
1. Install the steering pinion gear.
�Install the retaining ring (1).
�Install the needle bearing (2).
�Install the pinion shaft seal using a drift (3).
D105C712
40–50 N�m2. Install the steering pinion locknut (4).
Tighten
Tighten the pinion locknut to 40–50 N�m (30–36 lb-ft).
D15C713A
45–55 N�m3. Install the dust cap (5).
Tighten
Tighten the dust cap to 45–55 N�m (33–41 lb-ft).
4. Install the retaining ring (6).
5. Install the plastic dust cap (7).