Page 57 of 100

6-19
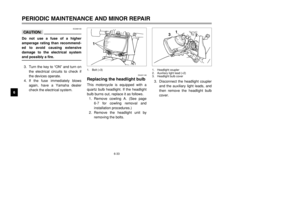
PERIODIC MAINTENANCE AND MINOR REPAIR
6
EAU00681
w8Have a Yamaha dealer replace
excessively worn tires.
Besides being illegal, operat-
ing the motorcycle with exces-
sively worn tires decreases
riding stability and can lead to
loss of control.
8The replacement of all wheel-
and brake-related parts,
including the tires, should be
left to a Yamaha dealer, who
has the necessary profession-
al knowledge and experience.
8It is not recommended to
patch a punctured tube. If
unavoidable, however, patch
the tube very carefully and
replace it as soon as possible
with a high-quality product.
8Ride at moderate speeds after
changing a tire since the tire sur-
face must first be “broken in” for
it to develop its optimal charac-
teristics.
EAU00685
Spoke wheelsWheelsTo maximize the performance, dura-
bility, and safe operation of your
motorcycle, note the following points
regarding the specified wheels.
8The wheel rims should be
checked for cracks, bends or
warpage, and the spokes for
looseness or damage before
each ride. If any damage is
found, have a Yamaha dealer
replace the wheel. Do not
attempt even the smallest repair
to the wheel. A deformed or
cracked wheel must be replaced.
8The wheel should be balanced
whenever either the tire or wheel
has been changed or replaced.
An unbalanced wheel can result
in poor performance, adverse
handling characteristics, and a
shortened tire life.
4PT-E7 (English) 6/29/01 9:13 AM Page 56
Page 58 of 100

6-20
PERIODIC MAINTENANCE AND MINOR REPAIR
6
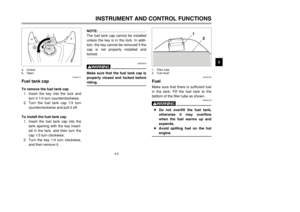
EAU00694
Adjusting the clutch lever
free playClutch lever free play, adjustingThe clutch lever free play should
measure 10–15 mm as shown.
Periodically check the clutch lever
free play and, if necessary, adjust it
as follows.
1. Loosen the locknut at the clutch
lever.
2. To increase the clutch lever free
play, turn the adjusting bolt in
direction a. To decrease the
clutch lever free play, turn the
adjusting bolt in direction b.
a
b 12
c1. Locknut (clutch lever)
2. Adjusting bolt
c. Free play
7. Tighten the locknut at the clutch
lever and the crankcase.
3. If the specified clutch lever free
play could be obtained as
described above, tighten the
locknut and skip the rest of the
procedure, otherwise proceed as
follows.
4. Fully turn the adjusting bolt at the
clutch lever in direction ato
loosen the clutch cable.
5. Loosen the locknut at the
crankcase.
6. To increase the clutch lever free
play, turn the adjusting nut in
direction a. To decrease the
clutch lever free play, turn the
adjusting nut in direction b.
b
a
2
1
1. Locknut (crankcase)
2. Adjusting nut
4PT-E7 (English) 6/29/01 9:13 AM Page 57
Page 59 of 100

6-21
PERIODIC MAINTENANCE AND MINOR REPAIR
6
EAU00696
Adjusting the brake lever
free playBrake lever free play, adjustingThe brake lever free play should
measure 2–5 mm as shown.
Periodically check the brake lever
free play and, if necessary, adjust it
as follows.
1. Loosen the locknut at the brake
lever.
2. To increase the brake lever free
play, turn the adjusting bolt in
direction a. To decrease the
brake lever free play, turn the
adjusting bolt in direction b.
1
2b
a
c
1. Locknut
2. Adjusting bolt
c. Free play
EAU00712
Adjusting the brake pedal
positionBrake pedal position, adjustingThe top of the brake pedal should be
positioned approximately 12 mm
below the top of the footrest as
shown. Periodically check the brake
pedal position and, if necessary,
have a Yamaha dealer adjust it.
a
a. Brake pedal position
3. Tighten the locknut.
EW000099
w8After adjusting the brake lever
free play, check the free play
and make sure that the brake
is working properly.
8A soft or spongy feeling in the
brake lever can indicate the
presence of air in the
hydraulic system. If there is air
in the hydraulic system, have
a Yamaha dealer bleed the
system before operating the
motorcycle. Air in the
hydraulic system will diminish
the braking performance,
which may result in loss of
control and an accident.
4PT-E7 (English) 6/29/01 9:13 AM Page 58
Page 60 of 100

6-22
PERIODIC MAINTENANCE AND MINOR REPAIR
6
EW000109
wA soft or spongy feeling in the
brake pedal can indicate the pres-
ence of air in the hydraulic system.
If there is air in the hydraulic sys-
tem, have a Yamaha dealer bleed
the system before operating the
motorcycle. Air in the hydraulic
system will diminish the braking
performance, which may result in
loss of control and an accident.
EAU00721
Checking the front and rear
brake padsFront and rear brake pads, checkingThe front and rear brake pads must
be checked for wear at the intervals
specified in the periodic maintenance
and lubrication chart.
EAU00713
Adjusting the rear brake light
switchRear brake light switch, adjustingThe rear brake light switch, which is
activated by the brake pedal, is prop-
erly adjusted when the brake light
comes on just before braking takes
effect. If necessary, adjust the brake
light switch as follows.
Turn the adjusting nut while holding
the rear brake light switch in place.
To make the brake light come on ear-
lier, turn the adjusting nut in direction
a. To make the brake light come on
later, turn the adjusting nut in direc-
tion b.
21
a
b
1. Rear brake light switch
2. Adjusting nut
4PT-E7 (English) 6/29/01 9:13 AM Page 59
Page 61 of 100

6-23
PERIODIC MAINTENANCE AND MINOR REPAIR
6
EAU03938
Front brake pads
Each front brake pad is provided with
wear indicator grooves, which allow
you to check the brake pad wear
without having to disassemble the
brake. To check the brake pad wear,
check the wear indicator grooves. If a
brake pad has worn to the point that
the wear indicator grooves have
almost disappeared, have a Yamaha
dealer replace the brake pads as a
set.
1
1
1. Wear indicator groove (×3)
EAU03774
Checking the brake fluid
levelBrake fluid level, checkingInsufficient brake fluid may allow air
to enter the brake system, possibly
causing it to become ineffective.
Before riding, check that the brake
fluid is above the minimum level mark
and replenish if necessary. A low
brake fluid level may indicate worn
brake pads and/or brake system
leakage. If the brake level is low, be
sure to check the brake pads for
wear and the brake system for leak-
age.
1
1. Minimum level mark
EAU04288
Rear brake pads
The rear brake is provided with a
check plug, which, if it is removed,
allows you to check the brake pad
wear without having to disassemble
the brake. To check the brake pad
wear, check the position of the wear
indicator while applying the brake. If
a brake pad has worn to the point
that the wear indicator almost touch-
es the brake disc, have a Yamaha
dealer replace the brake pads as a
set.
1
2
1. Check plug
2. Wear indicator
FRONT
4PT-E7 (English) 6/29/01 9:13 AM Page 60
Page 62 of 100

6-24
PERIODIC MAINTENANCE AND MINOR REPAIR
6 Observe these precautions:
8When checking the fluid level,
make sure that the top of the
brake fluid reservoir is level.
8Use only the recommended qual-
ity brake fluid, otherwise the rub-
ber seals may deteriorate, caus-
ing leakage and poor braking
performance.8Refill with the same type of brake
fluid. Mixing fluids may result in a
harmful chemical reaction and
lead to poor braking perfor-
mance.
8Be careful that water does not
enter the brake fluid reservoir
when refilling. Water will signifi-
cantly lower the boiling point of
the fluid and may result in vapor
lock.
8Brake fluid may deteriorate paint-
ed surfaces or plastic parts.
Always clean up spilled fluid
immediately.
8As the brake pads wear, it is nor-
mal for the brake fluid level to
gradually go down. However, if
the brake fluid level goes down
suddenly, have a Yamaha dealer
check the cause.
EAU03976
Changing the brake fluidBrake fluid, changingHave a Yamaha dealer change the
brake fluid at the intervals specified in
the NOTE after the periodic mainte-
nance and lubrication chart. In addi-
tion, have the oil seals of the master
cylinders and calipers as well as the
brake hoses replaced at the intervals
listed below or whenever they are
damaged or leaking.
8Oil seals: Replace every two
years.
8Brake hoses: Replace every four
years.
1
1. Minimum level markREARRecommended brake fluid:
DOT 4
4PT-E7 (English) 6/29/01 9:13 AM Page 61
Page 63 of 100

6-25
PERIODIC MAINTENANCE AND MINOR REPAIR
6
EAU00744
Drive chain slackDrive chain slackThe drive chain slack should be
checked before each ride and adjust-
ed if necessary.
To check the drive chain slackChecking1. Place the motorcycle on a level
surface and hold it in an upright
position.NOTE:
When checking and adjusting the
drive chain slack, the motorcycle
should be positioned straight up and
there should be no weight on it.2. Shift the transmission into the
neutral position.
EAU01134
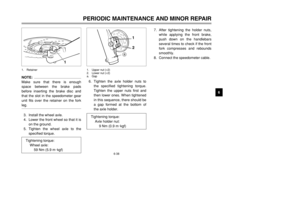
To adjust the drive chain slackadjusting1. Loosen the axle nut and the
brake caliper bracket bolt.
2. To tighten the drive chain, turn
the adjusting plate on each side
of the swingarm in direction a.
To loosen the drive chain, turn
the adjusting plate on each side
of the swingarm in direction b,
and then push the rear wheel for-
ward.
a
b2 1
3
1. Adjusting plate
2. Axle nut
3. Brake caliper bracket bolt
3. Move the rear wheel by pushing
the motorcycle to locate the tight-
est portion of the drive chain,
and then measure the drive
chain slack as shown.
4. If the drive chain slack is incor-
rect, adjust it as follows.
a
a. Drive chain slack
Drive chain slack:
30–40 mm
4PT-E7 (English) 6/29/01 9:13 AM Page 62
Page 64 of 100

6-26
PERIODIC MAINTENANCE AND MINOR REPAIR
6
NOTE:
Make sure that both adjusting plates
are in the same position for proper
wheel alignment.
EC000096
cCImproper drive chain slack will
overload the engine as well as
other vital parts of the motorcycle
and can lead to chain slippage or
breakage. To prevent this from
occurring, keep the drive chain
slack within the specified limits.3. Tighten the axle nut and the
brake caliper bracket bolt to the
specified torques.2. Wipe the drive chain dry.
3. Thoroughly lubricate the drive
chain with a special O-ring chain
lubricant.
ECA00052
cCDo not use engine oil or any other
lubricants for the drive chain, as
they may contain substances that
could damage the O-rings.
EAU03006
Lubricating the drive chainDrive chain, lubricatingThe drive chain must be cleaned and
lubricated at the intervals specified in
the periodic maintenance and lubrica-
tion chart, otherwise it will quickly
wear out, especially when riding in
dusty or wet areas. Service the drive
chain as follows.
EC000097
cCThe drive chain must be lubricated
after washing the motorcycle or
riding in the rain.1. Clean the drive chain with
kerosene and a small soft brush.
ECA00053
cCTo prevent damaging the O-rings,
do not clean the drive chain with
steam cleaners, high-pressure
washers or inappropriate solvents.
Tightening torques:
Axle nut:
105 Nm (10.5 m0kgf)
Brake caliper bracket bolt:
48 Nm (4.8 m0kgf)
4PT-E7 (English) 6/29/01 9:13 AM Page 63