Page 65 of 100
6-27
PERIODIC MAINTENANCE AND MINOR REPAIR
6
EAU02962
Checking and lubricating the
cablesCables, checking and lubricatingThe operation of all control cables
and the condition of the cables
should be checked before each ride,
and the cables and cable ends
should be lubricated if necessary. If a
cable is damaged or does not move
smoothly, have a Yamaha dealer
check or replace it.
EAU04034
Checking and lubricating the
throttle grip and cableThrottle grip and cable, checking and lubricatingThe operation of the throttle grip
should be checked before each ride.
In addition, the cable should be lubri-
cated or replaced at the intervals
specified in the periodic maintenance
chart.
EW000112
wDamage to the outer sheath may
interfere with proper cable opera-
tion and will cause the inner cable
to rust. Replace a damaged cable
as soon as possible to prevent
unsafe conditions.
Recommended lubricant:
Engine oil
4PT-E7 (English) 6/29/01 9:13 AM Page 64
Page 66 of 100

6-28
PERIODIC MAINTENANCE AND MINOR REPAIR
6
EAU03370
Checking and lubricating the
brake and shift pedalsBrake and shift pedals, checking and lubricatingThe operation of the brake and shift
pedals should be checked before
each ride, and the pedal pivots
should be lubricated if necessary.
EAU03164
Checking and lubricating the
brake and clutch leversBrake and clutch levers, checking and lubricatingThe operation of the brake and clutch
levers should be checked before
each ride, and the lever pivots should
be lubricated if necessary.
EAU03165
Checking and lubricating the
sidestandSidestand, checking and lubricatingThe operation of the sidestand
should be checked before each ride,
and the sidestand pivot and metal-to-
metal contact surfaces should be
lubricated if necessary.
EW000113
wIf the sidestand does not move up
and down smoothly, have a
Yamaha dealer check or repair it.
Recommended lubricant:
Lithium-soap-based grease
(all-purpose grease)
Recommended lubricant:
Lithium-soap-based grease
(all-purpose grease)
Recommended lubricant:
Lithium-soap-based grease
(all-purpose grease)
4PT-E7 (English) 6/29/01 9:13 AM Page 65
Page 67 of 100

6-29
PERIODIC MAINTENANCE AND MINOR REPAIR
6
EAU00790
Lubricating the rear
suspensionRear suspension, lubricatingThe pivoting points of the rear sus-
pension must be lubricated at the
intervals specified in the periodic
maintenance and lubrication chart.
1
1
1. Grease nipple (×2)
To check the operation
1. Place the motorcycle on a level
surface and hold it in an upright
position.
2. While applying the front brake,
push down hard on the handle-
bars several times to check if the
front fork compresses and
rebounds smoothly.
EC000098
cCIf any damage is found or the front
fork does not operate smoothly,
have a Yamaha dealer check or
repair it.
EAU02939
Checking the front forkFront fork, checkingThe condition and operation of the
front fork must be checked as follows
at the intervals specified in the peri-
odic maintenance and lubrication
chart.
To check the condition
EW000115
wSecurely support the motorcycle
so that there is no danger of it
falling over.Check the inner tubes for scratches,
damage and excessive oil leakage.
Recommended lubricant:
Molybdenum disulfide grease
4PT-E7 (English) 6/29/01 9:13 AM Page 66
Page 68 of 100
6-30
PERIODIC MAINTENANCE AND MINOR REPAIR
6
EAU00794
Checking the steeringSteering, checkingWorn or loose steering bearings may
cause danger. Therefore, the opera-
tion of the steering must be checked
as follows at the intervals specified in
the periodic maintenance and lubrica-
tion chart.
1. Place a stand under the engine
to raise the front wheel off the
ground.
EW000115
wSecurely support the motorcycle
so that there is no danger of it
falling over.
EAU01144
Checking the wheel bearingsWheel bearings, checkingThe front and rear wheel bearings
must be checked at the intervals
specified in the periodic maintenance
and lubrication chart. If there is play
in the wheel hub or if the wheel does
not turn smoothly, have a Yamaha
dealer check the wheel bearings.
2. Hold the lower ends of the front
fork legs and try to move them
forward and backward. If any
free play can be felt, have a
Yamaha dealer check or repair
the steering.
4PT-E7 (English) 6/29/01 9:13 AM Page 67
Page 69 of 100
 battery, which does
not require any maintenance. There
is no need to check the e")
6-31
PERIODIC MAINTENANCE AND MINOR REPAIR
6
EAU00800
BatteryBatteryThis motorcycle is equipped with a
sealed-type (MF) battery, which does
not require any maintenance. There
is no need to check the electrolyte or
to add distilled water.
EC000101
cCNever attempt to remove the bat-
tery cell seals, as this would per-
manently damage the battery.
8 8
KEEP THIS AND ALL BATTER-
IES OUT OF THE REACH OF
CHILDREN.
EW000116
w8 8
Electrolyte is poisonous and
dangerous since it contains
sulfuric acid, which causes
severe burns. Avoid any con-
tact with skin, eyes or clothing
and always shield your eyes
when working near batteries.
In case of contact, administer
the following FIRST AID.
9 9
EXTERNAL: Flush with plen-
ty of water.
9 9
INTERNAL: Drink large quan-
tities of water or milk and
immediately call a physician.
9 9
EYES: Flush with water for
15 minutes and seek prompt
medical attention.
8 8
Batteries produce explosive
hydrogen gas. Therefore, keep
sparks, flames, cigarettes,
etc., away from the battery and
provide sufficient ventilation
when charging it in an
enclosed space.
4PT-E7 (English) 6/29/01 9:13 AM Page 68
Page 70 of 100

6-32
PERIODIC MAINTENANCE AND MINOR REPAIR
6 To charge the battery
Have a Yamaha dealer charge the
battery as soon as possible if it
seems to have discharged. Keep in
mind that the battery tends to dis-
charge more quickly if the motorcycle
is equipped with optional electrical
accessories.
To store the battery
1. If the motorcycle will not be used
for more than one month,
remove the battery, fully charge
it, and then place it in a cool, dry
place.
2. If the battery will be stored for
more than two months, check it
at least once a month and fully
charge it if necessary.
3. Fully charge the battery before
installation.
4. After installation, make sure that
the battery leads are properly
connected to the battery termi-
nals.
EAU01307
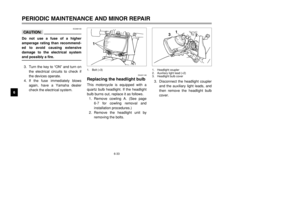
Replacing the fuseFuse, replacingThe fuse holder is located behind
panel A. (See page 6-7 for panel
removal and installation procedures.)
If the fuse is blown, replace it as fol-
lows.
1. Turn the key to “OFF” and turn
off all electrical circuits.
2. Remove the blown fuse, and
then install a new fuse of the
specified amperage.
1
2
1. Fuse
2. Spare fuse
EC000102
cC8
8
Always keep the battery
charged. Storing a discharged
battery can cause permanent
battery damage.
8 8
To charge a sealed-type (MF)
battery, a special (constant-
voltage) battery charger is
required. Using a conventional
battery charger will damage
the battery. If you do not have
access to a sealed-type (MF)
battery charger, have a
Yamaha dealer charge your
battery.
Specified fuse:
20 A
4PT-E7 (English) 6/29/01 9:13 AM Page 69
Page 71 of 100
6-33
PERIODIC MAINTENANCE AND MINOR REPAIR
6
EC000103
cCDo not use a fuse of a higher
amperage rating than recommend-
ed to avoid causing extensive
damage to the electrical system
and possibly a fire.3. Turn the key to “ON” and turn on
the electrical circuits to check if
the devices operate.
4. If the fuse immediately blows
again, have a Yamaha dealer
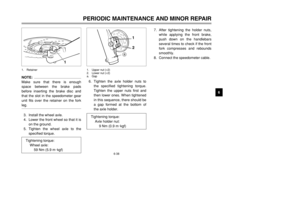
check the electrical system.3. Disconnect the headlight coupler
and the auxiliary light leads, and
then remove the headlight bulb
cover.
3
1
2
1. Headlight coupler
2. Auxiliary light lead (×2)
3. Headlight bulb cover
EAU01146
Replacing the headlight bulbHeadlight bulb, replacingThis motorcycle is equipped with a
quartz bulb headlight. If the headlight
bulb burns out, replace it as follows.
1. Remove cowling A. (See page
6-7 for cowling removal and
installation procedures.)
2. Remove the headlight unit by
removing the bolts.
1
1. Bolt (×3)
4PT-E7 (English) 6/29/01 9:13 AM Page 70
Page 72 of 100

6-34
PERIODIC MAINTENANCE AND MINOR REPAIR
6 4. Remove the headlight bulb hold-
er by turning it counterclockwise,
and then remove the defective
bulb.
EW000119
wHeadlight bulbs get very hot.
Therefore, keep flammable prod-
ucts away from a lit headlight bulb,
and do not touch the bulb until it
has cooled down.
1
1. Headlight bulb holder
6. Install the bulb cover, and then
connect the coupler and leads.
7. Install the headlight unit by
installing the bolts.
8. Install the cowling.
9. Have a Yamaha dealer adjust
the headlight beam if necessary.
5. Place a new bulb into position,
and then secure it with the bulb
holder.
EC000105
cCDo not touch the glass part of the
headlight bulb to keep it free from
oil, otherwise the transparency of
the glass, the luminosity of the
bulb, and the bulb life will be
adversely affected. Thoroughly
clean off any dirt and fingerprints
on the headlight bulb using a cloth
moistened with alcohol or thinner.
a
a. Do not touch this area.
4PT-E7 (English) 6/29/01 9:13 AM Page 71