Page 44 of 122

50
UN081
When you finish registration of the
marked point, the ºEdit Marked Pointº
screen appears. The information shown
depends on the method used to enter the
marked point.
If you want to change the icon or name or en-
ter a telephone number, touch the item to be
edited (on the left side of the screen).
3. Touch the
ºOKº switch.
INFORMATION
Up to 100 marked points can be regis-tered.
Once a marked point is registered, you
can edit the icon, name or telephone
number.
1. Push the
ºMENUº button on the bez-
el to display the menu screen and touch
the
ºMarked Pointº switch.
UN082
2. Touch the ºEditº switch.
UN083
The screen lists the marked points.
Sort by Mark: Touch this switch to list the
marked points in order of the type of symbol.
Sort by Date: Touch this switch to list the
marked points in order of the registered date.
Sort by Name: Touch this switch to list the
marked points in alphabetical order.
Sort by Dist: Touch this switch to list the
marked points in order of nearest place from
your current location.
Touch
of the desired marked point to
display the edit marked point screen.
(b) Editing marked points
Page 45 of 122
51
UN084
Touch the item to edit (on the left side of
the screen).
�Editing an ºIconº
UN085
Touch your desired icon.
Special Purpose Icon: During driving, only
special purpose icons can be selected in the
marked point list. You can register up to 5. Sound Icon:
When you set on these icons,
the buzzer sounds as your vehicle ap-
proaches them.
When you touch the desired symbol or
ºBackº, the previous screen is displayed.
� Editing a ºNameº
UN086
Touch alphabet or numeral keys directly
to input the name.
After you finish your entry, touch the
ºEn-
terº
switch at the bottom right of the screen.
The previous screen will be displayed. �
Editing a ºPhoneº (telephone number)
UN087
Touch numeral keys directly.
After you finish your entry, touch the
ºEn-
terº
switch at the bottom of the screen.
The previous screen will be displayed.
Page 46 of 122
52�
Editing a ºPositionº (position/map
location).
UN088
Touch the arrows to scroll to your desired
point on the map screen.
Touch the
ºEnterº switch when the cursor
moves to your desired point.
The previous screen will return.
After you finish any editing, touch the
ºOKº switch. 1. Push
the
ºMENUº button on the bez-
el to display the menu screen and touch
the
ºMarked Pointº switch.
UN089
2. Touch the ºDeleteº switch of the
marked point.
delete-mark
3. Touch of the marked point to de-
lete. If you want to delete all of the
marked points, touch the
ºDelete Allºswitch. To delete only specified marked points, use
the
ºMarkº, ºDateº,
ºNameº or
ºDistº switch to display the screen, so that
you can easily find the marked points.
UN090
UN091
Either of the above messages appears de-
pending on the type of deletion. If you want
to delete, touch the
ºYESº switch. To can-
cel the deletion, touch the
ºNOº switch.
(c) Deleting marked points
Page 48 of 122
54
UN096
You can set way points during route guid-
ance. Touch the
ºChg. Routeº switch
to display the following screen.
chg-r oute
1. Touch the ºSetº switch.
UN098
2. Enter your way point in the same way
as you input any destination. (See page
6 through 19.)
The set way point is indicated by
1 through
5.
INFORMATION
If some way points are already regis- tered on the route, ºAddº instead ofºSetº is displayed.
After entering a way point, the screen
changes and displays the map location of
the way point and route preference. (See
ºEntering Destinationº on page 19.) 1. Touch the
ºAddº switch to display
the Add Way Point screen.
UN099
2. Select the section of your route where
you want to add a way point and touch the
ºADDº switch.
MAP: If you touch this switch, you can con-
firm the set way points already registered on
the map screen.
Way Points (a) Setting a way point (b) Adding a way point
Page 49 of 122
55
UN100
3. Add a way point in the same way as
you input the destination.
You can set up to 5 way points.
After adding a way point, the screen
changes and displays the map location of
the way point and route preference. (See
ºEntering Destinationº on page 19.) 1. Touch the
ºDeleteº switch to display
the Delete Way Point screen.
UN101
2. Select the way point you want to delete
and touch the
ºDeleteº switch.
UN102
3. A selected point and above message
appear. To delete the point, touch the
ºYESº switch. If you want to try again or
cancel the deletion, touch the
ºNOº
switch. The previous screen will return.
INFORMATION
When the vehicle is in motion, ºDelete
Nextº instead of ºDeleteº is dis-
played.
(c) Deleting a way point
Page 50 of 122
56
UN103
When the vehicle is in motion, only the
next way point can be deleted. Touch the
ºDelete Nextº switch. Any points you want to avoid due to traf-
fic jams, construction work or other rea-
sons can be registered as avoid points.
Push the
ºMENUº button on the bezel
to display the menu screen and then
touch the
ºAvoid Point/Areaº switch
to display the following screen.
un137
INFORMATION
�Some areas and freeways may not be able to be set as an avoid point.
�If a destination is input in the avoidarea or the route calculation cannotbe made without running throughthe avoid area, a route passingthrough the avoid area may beshown.
(d) Deleting the next way
point
Avoid Point/Area
Page 51 of 122
57
1. Touch the
ºRegister Avoid Point/
Areaº switch.
UN104
2. Enter the avoid point location in the
same way as you input any destination or
display the map of the area you want to
avoid. (See page 6 through 19.)
UN105
3. Depending on the contents to be
edited, touch either the ºReduceº orºEnlargeº switch or one of the arrows.
When you touch the
ºEnterº switch, the
following message appears.
UN106
After a few seconds, the avoid point/area
screen returns. 1. Touch the
ºEdit Avoid Point/
Areaº switch to display the Edit Avoid
Point/Area screen.
UN107
2. Touch the point you want to edit from
the list.
(a) Registering avoid point/area (b) Editing avoid points
Page 52 of 122
58
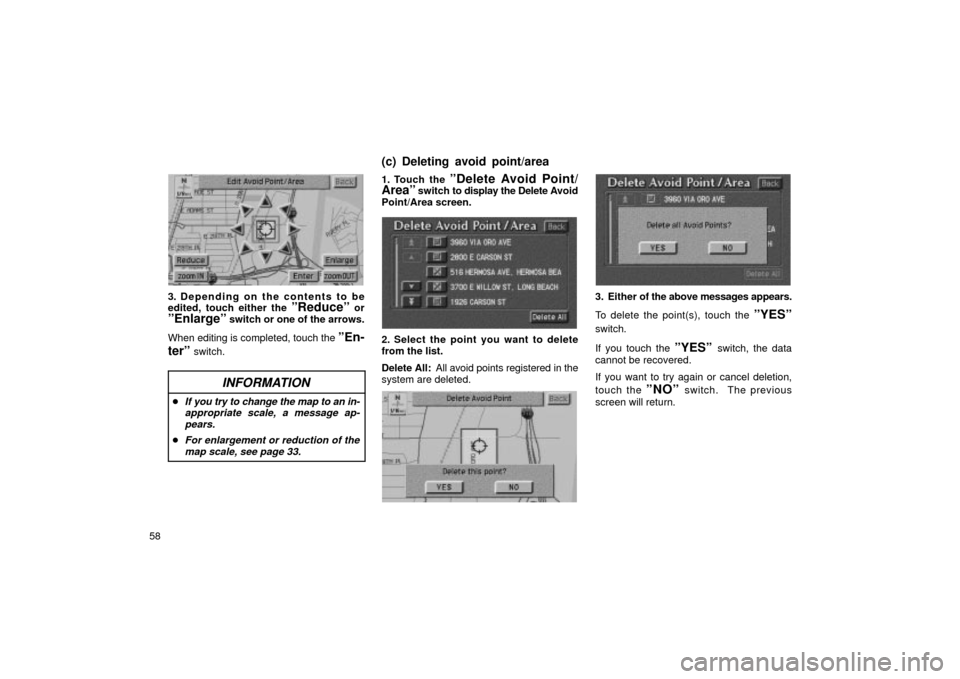
UN108
3. Depending on the contents to be
edited, touch either the ºReduceº orºEnlargeº switch or one of the arrows.
When editing is completed, touch the
ºEn-
terº
switch.
INFORMATION
�If you try to change the map to an in-
appropriate scale, a message ap-pears.
�For enlargement or reduction of themap scale, see page 33.
1. Touch the ºDelete Avoid Point/
Areaº switch to display the Delete A void
Point/Area screen.
UN109
2. Select the point you want to delete
from the list.
Delete All: All avoid points registered in the
system are deleted.
UN110
UN111
3. Either of the above messages appears.
To delete the point(s), touch the
ºYESº
switch.
If you touch the
ºYESº switch, the data
cannot be recovered.
If you want to try again or cancel deletion,
touch the
ºNOº switch. The previous
screen will return.
(c) Deleting avoid point/area