Page 1010 of 1690
01±18
± INTRODUCTIONREPAIR INSTRUCTION
AVENSIS REPAIR MANUAL (RM1018E)
NOTICE:
�Confirm that the VSC warning light blinks.
�VSC system will be reset when the engine is re-
started.
�Fasten the vehicle with lock chains.
(b) NOTICES OF RELATED OPERATIONS TO VSC
(1) Do not carry out unnecessary installation and re-
moval as it might disorder the adjustment of related
parts to VSC.
(2) Be sure to carry out the preparation for operation
and the confirmation of operation completion in ac-
cordance with the instruction of the text and when
the related operations to VSC are performed.
10. FOR VEHICLES EQUIPPED WITH CATALYTIC CONVERTER
CAUTION:
If a large amount of unburned gasoline flows into the converter, it may cause overheating and is a
fire hazard. To prevent this, observe the following precautions.
(a) Use only unleaded gasoline.
(b) Avoid prolonged idling.
Avoid idling the engine for more than 20 minutes.
(c) Avoid a spark jump test.
(1) Perform a spark jump test only when absolutely necessary. Perform this test as rapidly as pos-
sible.
(2) While testing, never race the engine.
(d) Avoid a prolonged engine compression measurement.
Engine compression measurements must be performed as rapidly as possible.
(e) Do not run the engine when the fuel tank is nearly empty. This may cause the engine to misfire and
create an extra load on the converter.
Page 1051 of 1690
1700F±09
A56466
Recommended Viscosity (SAE)
BEFORE NEXT OIL CHANGE TEMPERATURE RANGE ANTICiPATED416 2738
0 20 40 60 80 100 ±29
±20±18 ±7 �C
�F20 W ± 50
15 W ± 40
10 W ± 30
5 W ± 30 PREFERRED
Oil Pressure Switch
B11410
Oil Pressure Switch
Oil Pressure Gauge
B11411
Oil Pressure Gauge 17±6
± LUBRICATIONLUBRICATION SYSTEM (1AZ±FE)
AVENSIS REPAIR MANUAL (RM1018E)
LUBRICATION SYSTEM (1AZ±FE)
ON±VEHICLE INSPECTION
1. CHECK ENGINE OIL LEVEL
(a) After warm up the engine and then 5 minutes after the engine stop, oil level should be between the
low level and full level marks of the dipstick.
If low, check for leakage and add oil up to the full level mark.
NOTICE:
Do not fill with engine oil above the full level mark.
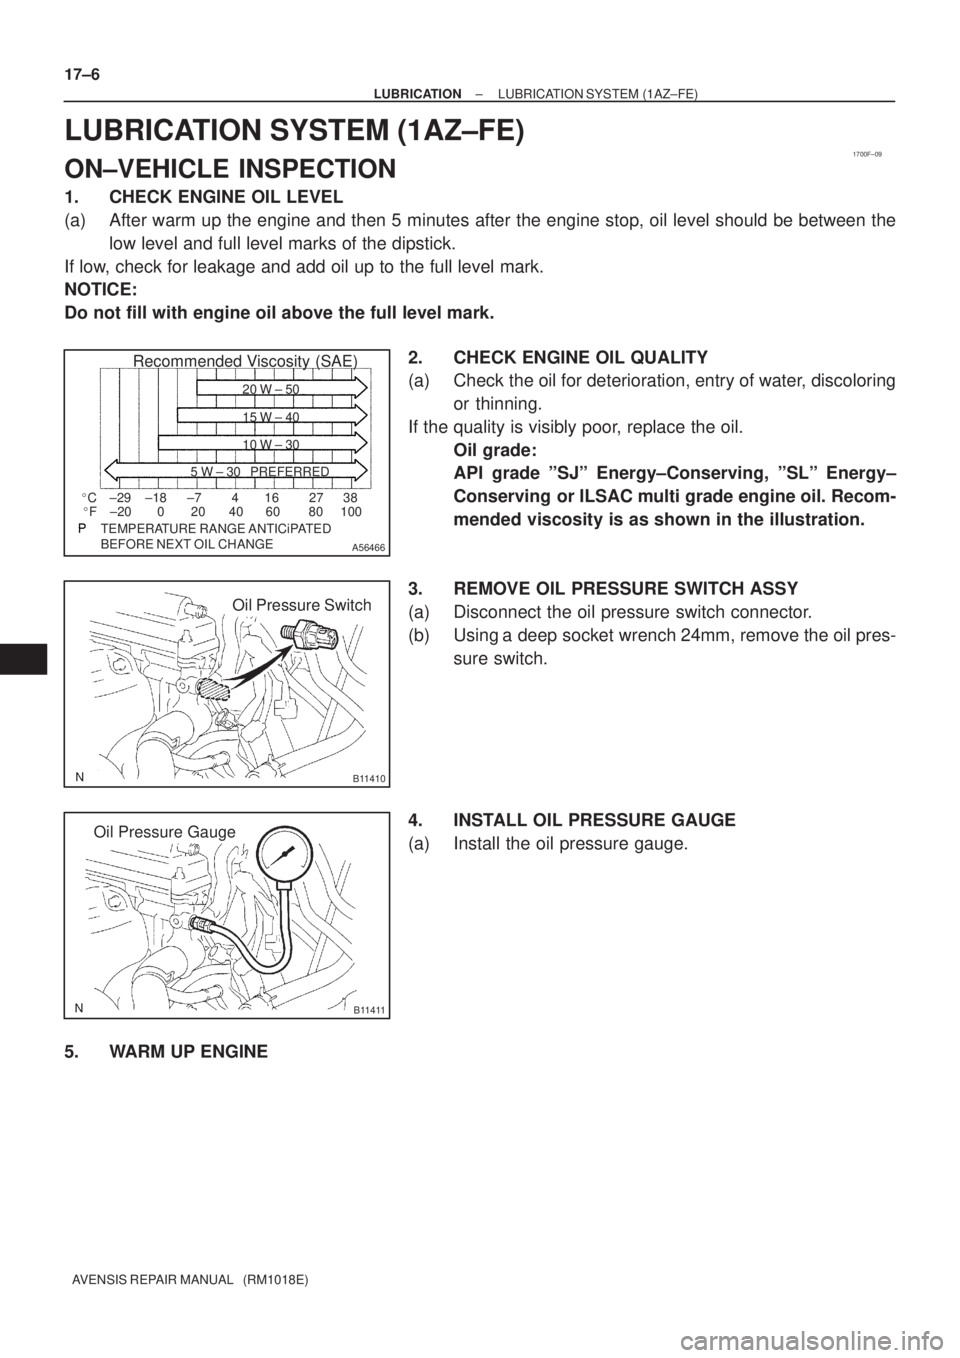
2. CHECK ENGINE OIL QUALITY
(a) Check the oil for deterioration, entry of water, discoloring
or thinning.
If the quality is visibly poor, replace the oil.
Oil grade:
API grade ºSJº Energy±Conserving, ºSLº Energy±
Conserving or ILSAC multi grade engine oil. Recom-
mended viscosity is as shown in the illustration.
3. REMOVE OIL PRESSURE SWITCH ASSY
(a) Disconnect the oil pressure switch connector.
(b) Using a deep socket wrench 24mm, remove the oil pres-
sure switch.
4. INSTALL OIL PRESSURE GAUGE
(a) Install the oil pressure gauge.
5. WARM UP ENGINE
Page 1053 of 1690
1700E±07
A56466
Recommended Viscosity (SAE)
BEFORE NEXT OIL CHANGE TEMPERATURE RANGE ANTICiPATED416 2738
0 20 40 60 80 100 ±29
±20±18 ±7 �C
�F20 W ± 50
15 W ± 40
10 W ± 30
5 W ± 30 PREFERRED
B67536
B67537Oil Pressure Gauge
± LUBRICATIONLUBRICATION SYSTEM (1AZ±FSE)
17±13
AVENSIS REPAIR MANUAL (RM1018E)
LUBRICATION SYSTEM (1AZ±FSE)
ON±VEHICLE INSPECTION
1. CHECK ENGINE OIL LEVEL
(a) After warm up the engine and then 5 minutes after the engine stop, oil level should be between the
low level and full level marks of the dipstick.
If low, check for leakage and add oil up to the full level mark.
NOTICE:
Do not fill with engine oil above the full level mark.
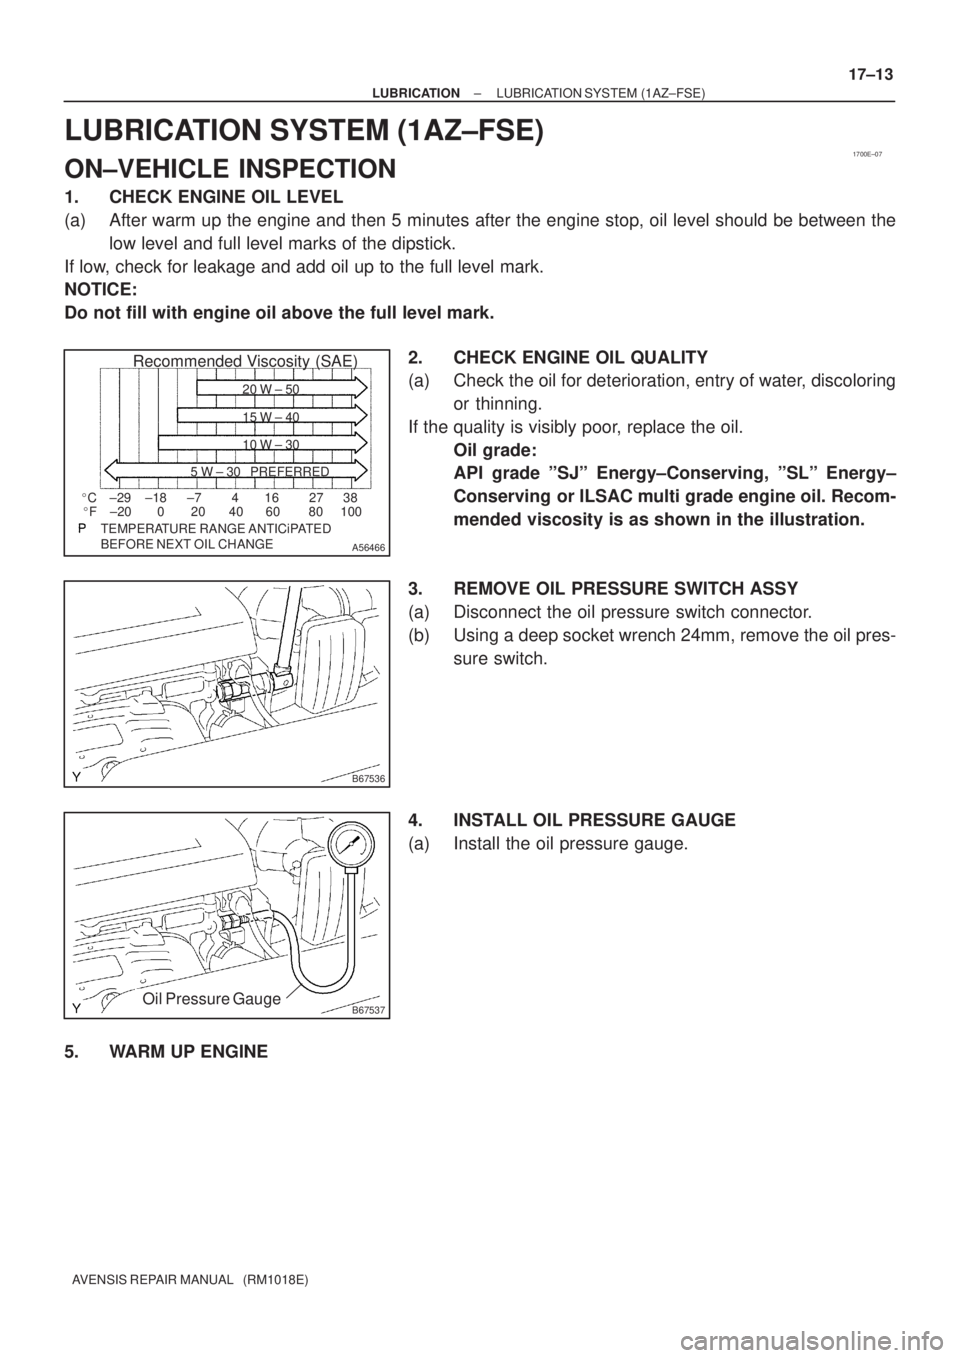
2. CHECK ENGINE OIL QUALITY
(a) Check the oil for deterioration, entry of water, discoloring
or thinning.
If the quality is visibly poor, replace the oil.
Oil grade:
API grade ºSJº Energy±Conserving, ºSLº Energy±
Conserving or ILSAC multi grade engine oil. Recom-
mended viscosity is as shown in the illustration.
3. REMOVE OIL PRESSURE SWITCH ASSY
(a) Disconnect the oil pressure switch connector.
(b) Using a deep socket wrench 24mm, remove the oil pres-
sure switch.
4. INSTALL OIL PRESSURE GAUGE
(a) Install the oil pressure gauge.
5. WARM UP ENGINE
Page 1055 of 1690
17045±03
A56466
Recommended Viscosity (SAE)
BEFORE NEXT OIL CHANGE TEMPERATURE RANGE ANTICiPATED416 2738
0 20 40 60 80 100 ±29
±20±18 ±7 �C
�F20 W ± 50
15 W ± 40
10 W ± 30
5 W ± 30 PREFERRED
B14332
Oil Pressure Switch
B14333
Oil Pressure Gauge 17±20
± LUBRICATIONLUBRICATION SYSTEM (1CD±FTV)
AVENSIS REPAIR MANUAL (RM1018E)
LUBRICATION SYSTEM (1CD±FTV)
ON±VEHICLE INSPECTION
1. CHECK ENGINE OIL LEVEL
(a) After warm up the engine and then 5 minutes after the engine stop, oil level should be between the
low level and full level marks of the dipstick.
If low, check for leakage and add oil up to the full level mark.
NOTICE:
Do not fill with engine oil above the full level mark.
2. CHECK ENGINE OIL QUALITY
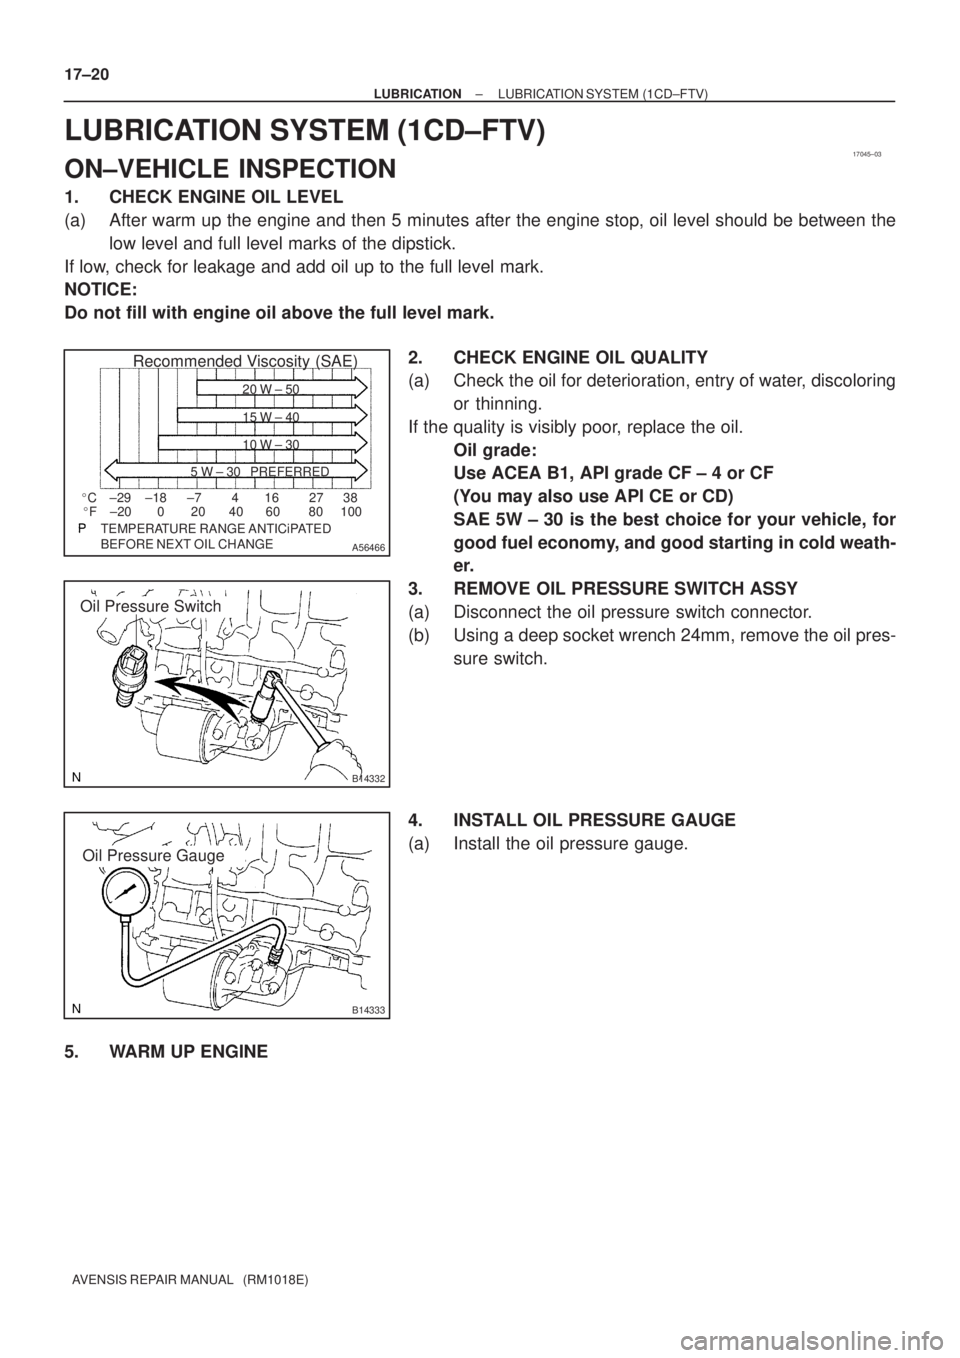
(a) Check the oil for deterioration, entry of water, discoloring
or thinning.
If the quality is visibly poor, replace the oil.
Oil grade:
Use ACEA B1, API grade CF ± 4 or CF
(You may also use API CE or CD)
SAE 5W ± 30 is the best choice for your vehicle, for
good fuel economy, and good starting in cold weath-
er.
3. REMOVE OIL PRESSURE SWITCH ASSY
(a) Disconnect the oil pressure switch connector.
(b) Using a deep socket wrench 24mm, remove the oil pres-
sure switch.
4. INSTALL OIL PRESSURE GAUGE
(a) Install the oil pressure gauge.
5. WARM UP ENGINE
Page 1057 of 1690
1700F±10
A56466
Recommended Viscosity (SAE)
BEFORE NEXT OIL CHANGE TEMPERATURE RANGE ANTICiPATED416 2738
0 20 40 60 80 100 ±29
±20±18 ±7 �C
�F20 W ± 50
15 W ± 40
10 W ± 30
5 W ± 30 PREFERRED
Oil Pressure
Switch
A80004
Oil Pressure GaugeOil Pressure Gauge
A50711
± LUBRICATIONLUBRICATION SYSTEM (1ZZ±FE/3ZZ±FE)
17±1
AVENSIS REPAIR MANUAL (RM1018E)
LUBRICATION SYSTEM (1ZZ±FE/3ZZ±FE)
ON±VEHICLE INSPECTION
1. CHECK ENGINE OIL LEVEL
(a) After warm up the engine and then 5 minutes after the engine stop, oil level should be between the
low level and full level marks of the dipstick.
If low, check for leakage and add oil up to the full level mark.
NOTICE:
Do not fill with engine oil above the full level mark.
2. CHECK ENGINE OIL QUALITY
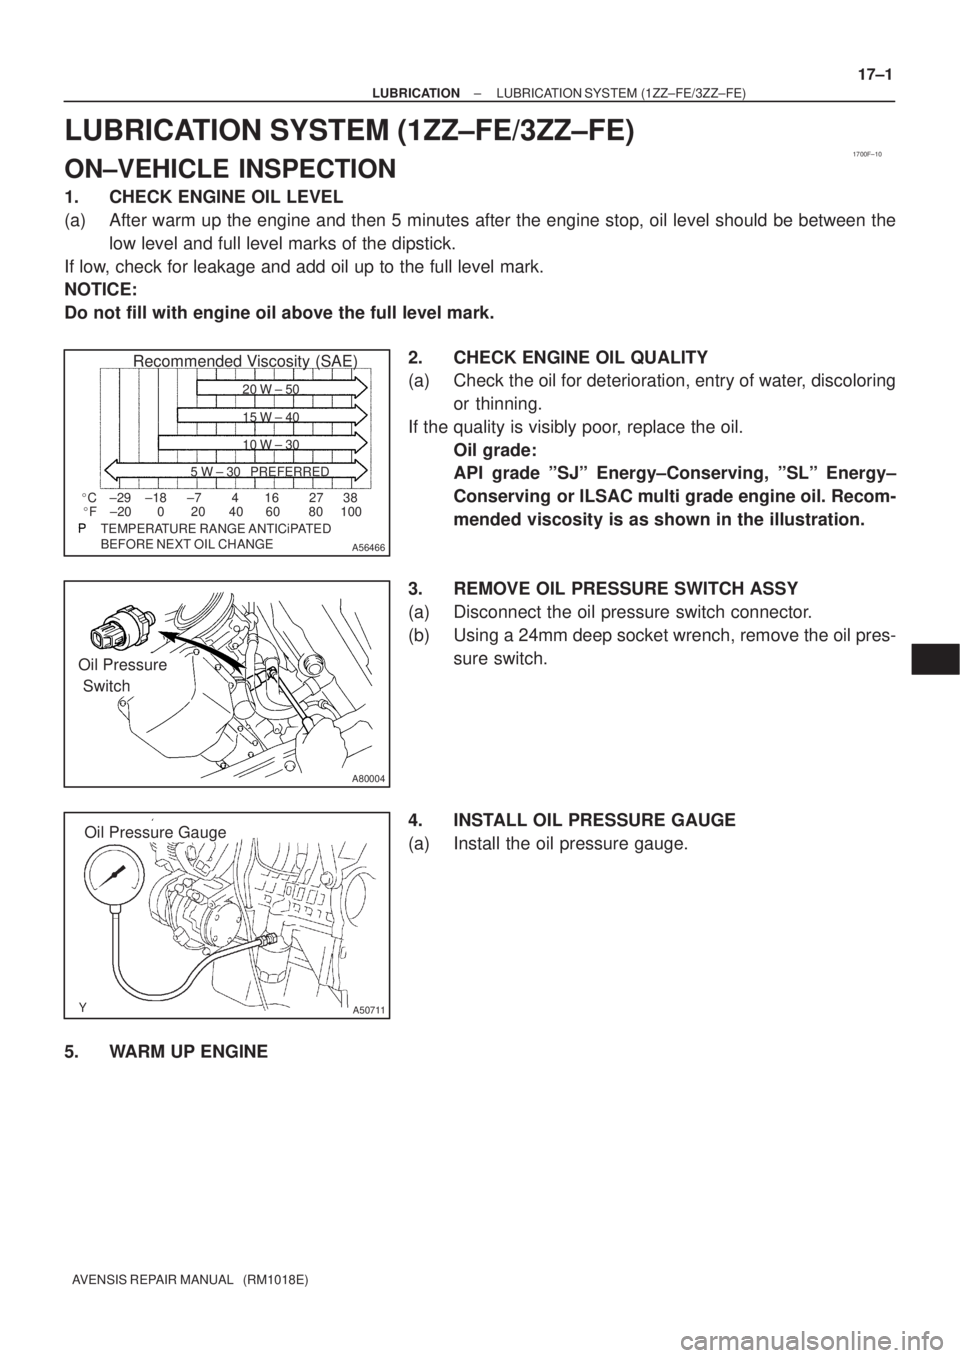
(a) Check the oil for deterioration, entry of water, discoloring
or thinning.
If the quality is visibly poor, replace the oil.
Oil grade:
API grade ºSJº Energy±Conserving, ºSLº Energy±
Conserving or ILSAC multi grade engine oil. Recom-
mended viscosity is as shown in the illustration.
3. REMOVE OIL PRESSURE SWITCH ASSY
(a) Disconnect the oil pressure switch connector.
(b) Using a 24mm deep socket wrench, remove the oil pres-
sure switch.
4. INSTALL OIL PRESSURE GAUGE
(a) Install the oil pressure gauge.
5. WARM UP ENGINE
Page 1087 of 1690
D26133
SST(s)
D25304
0 to 5 mm
(0 to 0.20 in.)
41±4
±
MANUAL TRANSMISSION/TRANSAXLE FRONT DIFFERENTIAL OIL SEAL (C50/C250)
AVENSIS REPAIR MANUAL (RM1018E)
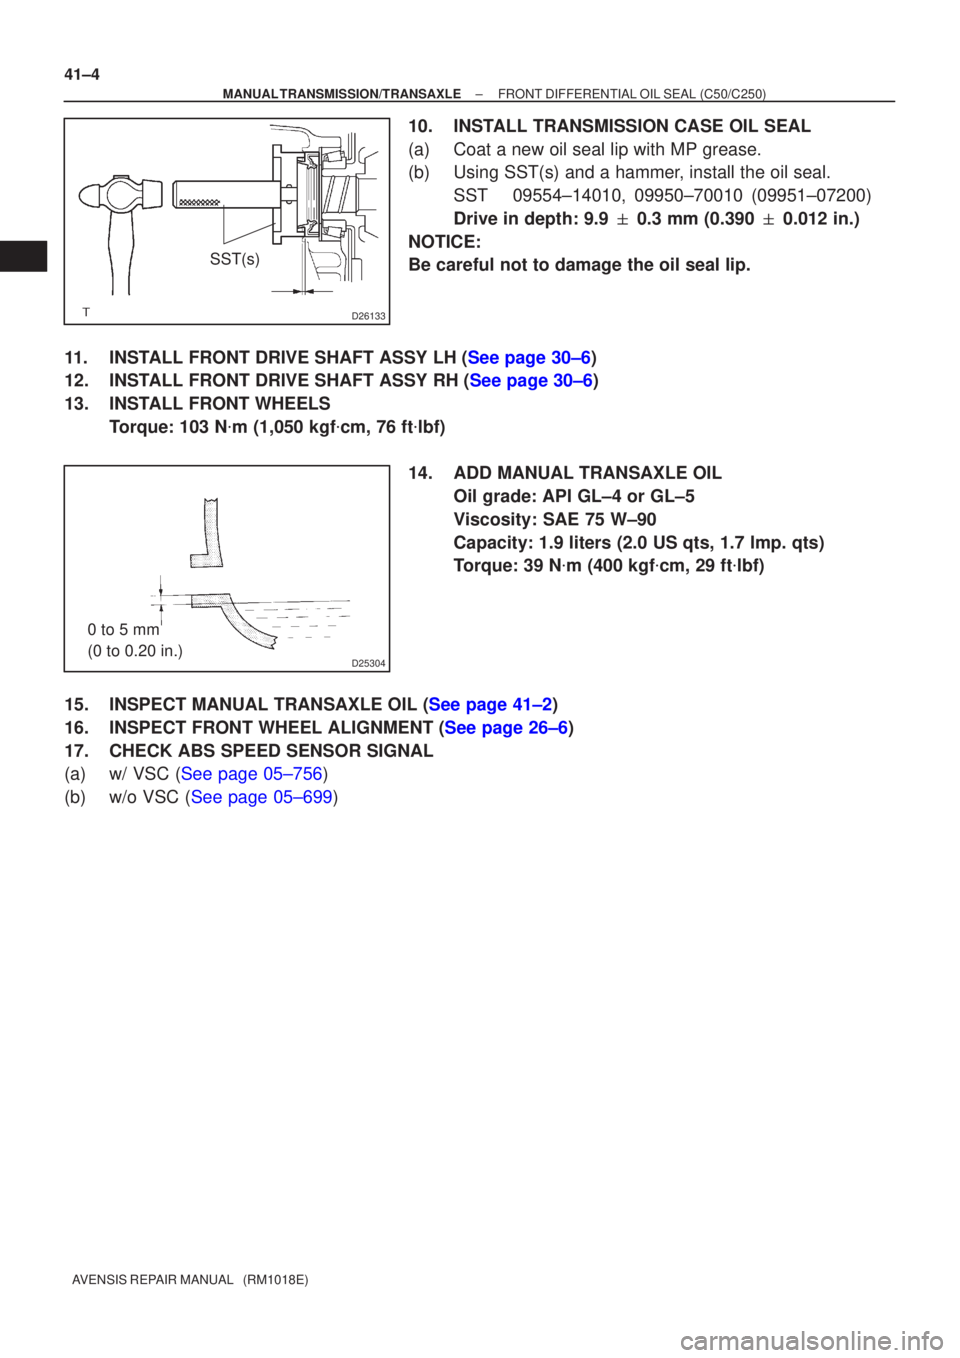
10. INSTALL TRANSMISSION CASE OIL SEAL
(a) Coat a new oil seal lip with MP grease.
(b) Using SST(s) and a hammer, install the oil seal. SST 09554±14010, 09950±70010 (09951±07200)
Drive in depth: 9.9 � 0.3 mm (0.390 � 0.012 in.)
NOTICE:
Be careful not to damage the oil seal lip.
11.INSTALL FRONT DRIVE SHAFT ASSY LH (See page 30±6)
12.INSTALL FRONT DRIVE SHAFT ASSY RH (See page 30±6)
13. INSTALL FRONT WHEELS Torque: 103 N �m (1,050 kgf �cm, 76 ft �lbf)
14. ADD MANUAL TRANSAXLE OIL Oil grade: API GL±4 or GL±5
Viscosity: SAE 75 W±90
Capacity: 1.9 liters (2.0 US qts, 1.7 lmp. qts)
Torque: 39 N �m (400 kgf �cm, 29 ft �lbf)
15.INSPECT MANUAL TRANSAXLE OIL (See page 41±2)
16.INSPECT FRONT WHEEL ALIGNMENT (See page 26±6)
17. CHECK ABS SPEED SENSOR SIGNAL
(a)w/ VSC (See page 05±756)
(b)w/o VSC (See page 05±699)
Page 1089 of 1690
D26133
SST(s)
D25304
0 to 5 mm
(0 to 0.20 in.)
41±6
±
MANUAL TRANSMISSION/TRANSAXLE FRONT DIFFERENTIAL OIL SEAL (E354/E357)
AVENSIS REPAIR MANUAL (RM1018E)
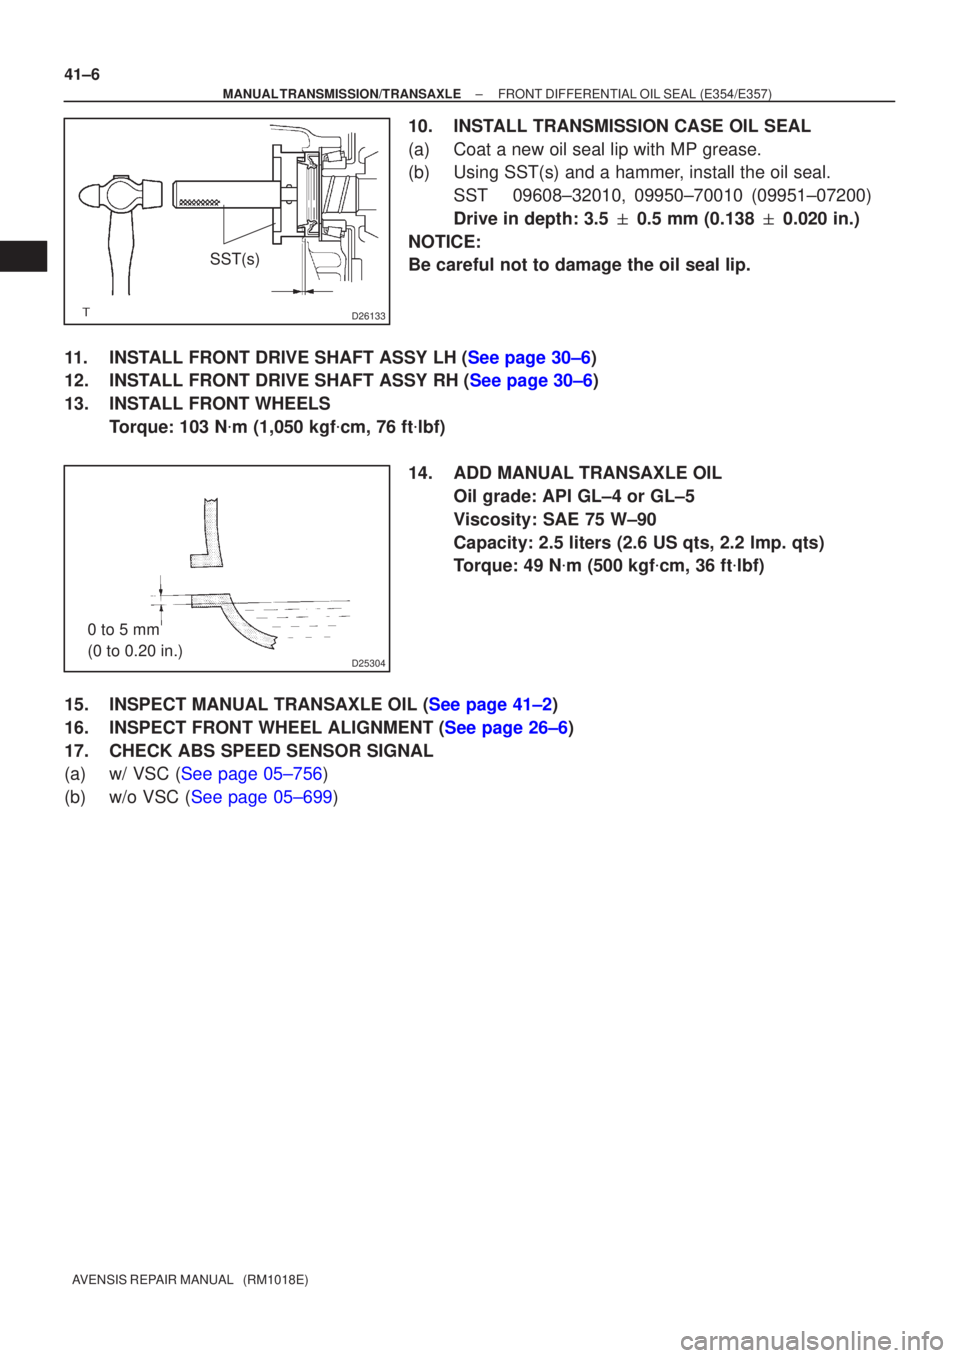
10. INSTALL TRANSMISSION CASE OIL SEAL
(a) Coat a new oil seal lip with MP grease.
(b) Using SST(s) and a hammer, install the oil seal. SST 09608±32010, 09950±70010 (09951±07200)
Drive in depth: 3.5 � 0.5 mm (0.138 � 0.020 in.)
NOTICE:
Be careful not to damage the oil seal lip.
11.INSTALL FRONT DRIVE SHAFT ASSY LH (See page 30±6)
12.INSTALL FRONT DRIVE SHAFT ASSY RH (See page 30±6)
13. INSTALL FRONT WHEELS Torque: 103 N �m (1,050 kgf �cm, 76 ft �lbf)
14. ADD MANUAL TRANSAXLE OIL Oil grade: API GL±4 or GL±5
Viscosity: SAE 75 W±90
Capacity: 2.5 liters (2.6 US qts, 2.2 lmp. qts)
Torque: 49 N �m (500 kgf �cm, 36 ft �lbf)
15.INSPECT MANUAL TRANSAXLE OIL (See page 41±2)
16.INSPECT FRONT WHEEL ALIGNMENT (See page 26±6)
17. CHECK ABS SPEED SENSOR SIGNAL
(a)w/ VSC (See page 05±756)
(b)w/o VSC (See page 05±699)
Page 1224 of 1690
02±22
± PREPARATIONLUBRICATION
AVENSIS REPAIR MANUAL (RM1018E)
SSM
08826±00080Seal Packing Black or equivalent
(FIPG)OIL PUMP ASSY(1CD±FTV)
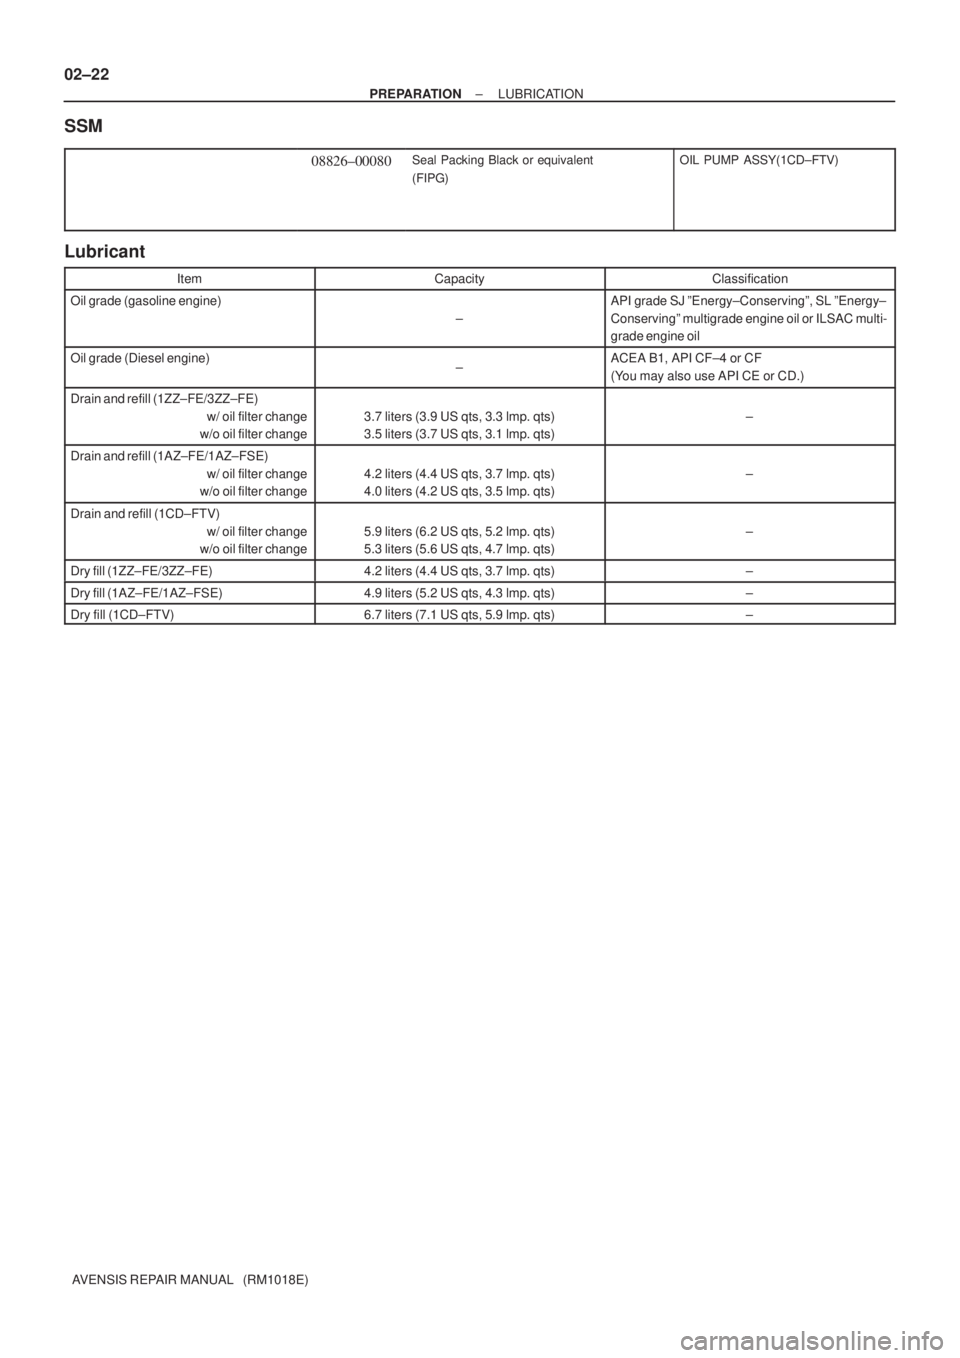
Lubricant
ItemCapacityClassification
Oil grade (gasoline engine)
±
API grade SJ ºEnergy±Conservingº, SL ºEnergy±
Conservingº multigrade engine oil or ILSAC multi-
grade engine oil
Oil grade (Diesel engine)±ACEA B1, API CF±4 or CF
(You may also use API CE or CD.)
Drain and refill (1ZZ±FE/3ZZ±FE)
w/ oil filter change
w/o oil filter change
3.7 liters (3.9 US qts, 3.3 lmp. qts)
3.5 liters (3.7 US qts, 3.1 lmp. qts)±
Drain and refill (1AZ±FE/1AZ±FSE)
w/ oil filter change
w/o oil filter change
4.2 liters (4.4 US qts, 3.7 lmp. qts)
4.0 liters (4.2 US qts, 3.5 lmp. qts)±
Drain and refill (1CD±FTV)
w/ oil filter change
w/o oil filter change
5.9 liters (6.2 US qts, 5.2 lmp. qts)
5.3 liters (5.6 US qts, 4.7 lmp. qts)±
Dry fill (1ZZ±FE/3ZZ±FE)4.2 liters (4.4 US qts, 3.7 lmp. qts)±
Dry fill (1AZ±FE/1AZ±FSE)4.9 liters (5.2 US qts, 4.3 lmp. qts)±
Dry fill (1CD±FTV)6.7 liters (7.1 US qts, 5.9 lmp. qts)±