Page 1059 of 1690
170FQ±01
B14352
B14354
New O±RingNew O±Ring
B14355
17±32
±
LUBRICATION OIL COOLER ASSY(1CD±FTV)
AVENSIS REPAIR MANUAL (RM1018E)
OIL COOLER ASSY(1CD±FTV)
REPLACEMENT
1.DRAIN ENGINE COOLANT(See page 16±44)
2.DRAIN ENGINE OIL(See page 17±30)
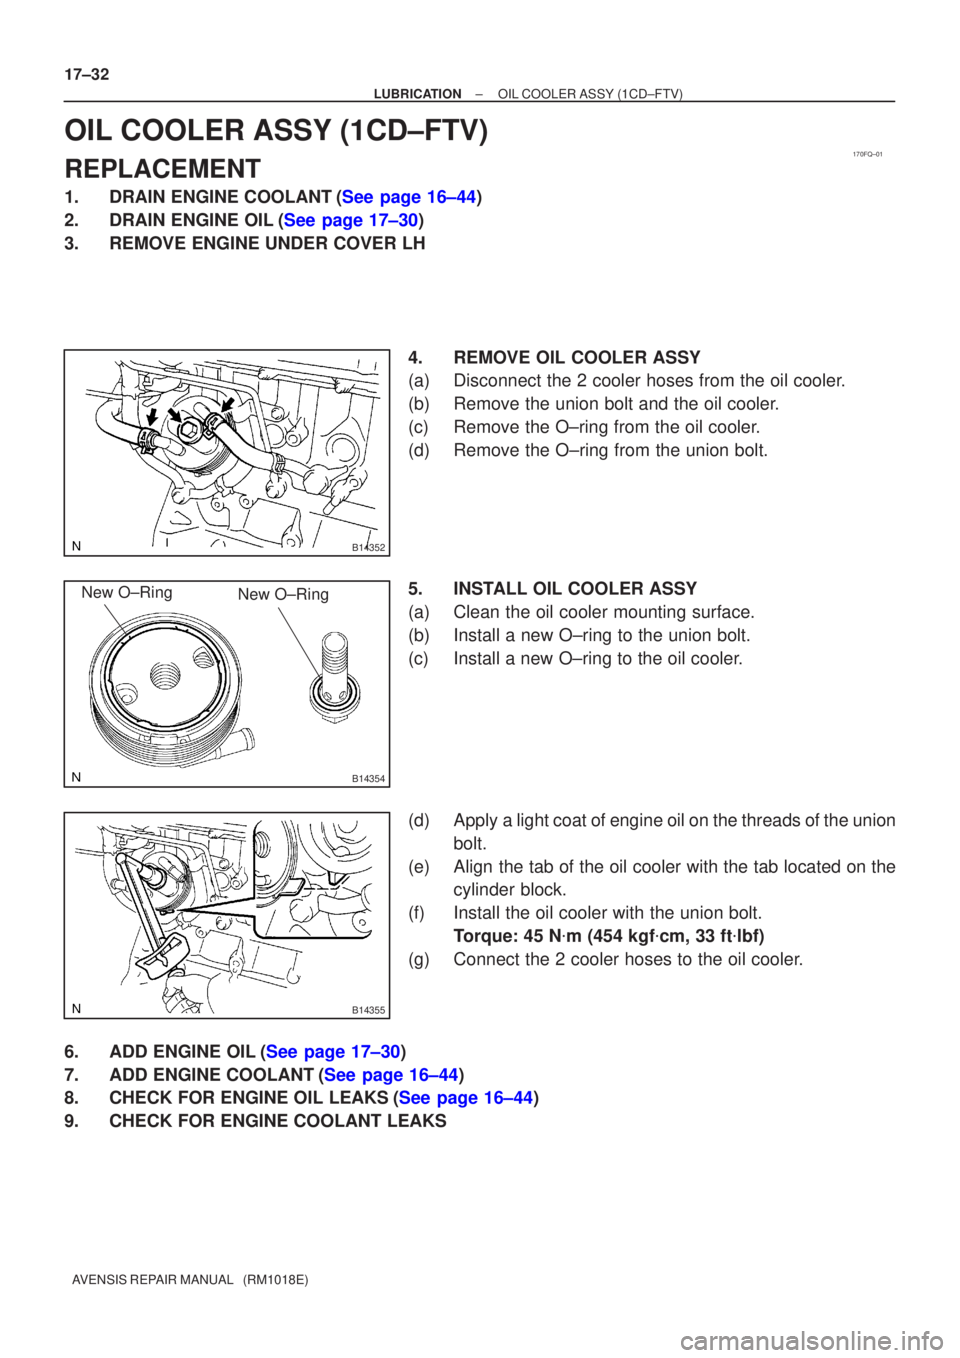
3.REMOVE ENGINE UNDER COVER LH 4.REMOVE OIL COOLER ASSY
(a)Disconnect the 2 cooler hoses from the oil cooler.
(b)Remove the union bolt and the oil cooler.
(c)Remove the O±ring from the oil cooler.
(d)Remove the O±ring from the union bolt.
5.INSTALL OIL COOLER ASSY
(a)Clean the oil cooler mounting surface.
(b)Install a new O±ring to the union bolt.
(c)Install a new O±ring to the oil cooler.
(d)Apply a light coat of engine oil on the threads of the unionbolt.
(e)Align the tab of the oil cooler with the tab located on the cylinder block.
(f)Install the oil cooler with the union bolt. Torque: 45 N �m (454 kgf �cm, 33 ft �lbf)
(g)Connect the 2 cooler hoses to the oil cooler.
6.ADD ENGINE OIL(See page 17±30)
7.ADD ENGINE COOLANT(See page 16±44)
8.CHECK FOR ENGINE OIL LEAKS(See page 16±44)
9. CHECK FOR ENGINE COOLANT LEAKS
Page 1060 of 1690
170FW±01
A56222
A56223
17±12
± LUBRICATIONOIL FILTER SUB±ASSY (1AZ±FE)
AVENSIS REPAIR MANUAL (RM1018E)
OIL FILTER SUB±ASSY (1AZ±FE)
REPLACEMENT
CAUTION:
�Prolonged and repeated contact with mineral oil will result in the removal of natural fats from
the skin, leading to dryness, irritation and dermatitis. In addition, used engine oil contains po-
tentially harmful contaminants which may cause skin cancer.
�Exercise caution in order to minimize the length and frequency of contact of your skin to used
oil. Wear protective clothing and gloves. Wash your skin thoroughly with soap and water, or use
water±less hand cleaner to remove any used engine oil. Do not use gasoline, thinners, or sol-
vents.
�In order to preserve the environment, used oil and used oil filter must be disposed of only at
designated disposal sites.
1. REMOVE ENGINE UNDER COVER RH
2. DRAIN ENGINE OIL
(a) Install a new gasket and drain plug after draining engine oil.
Torque: 25 N�m (250 kgf�cm, 18 ft�lbf)
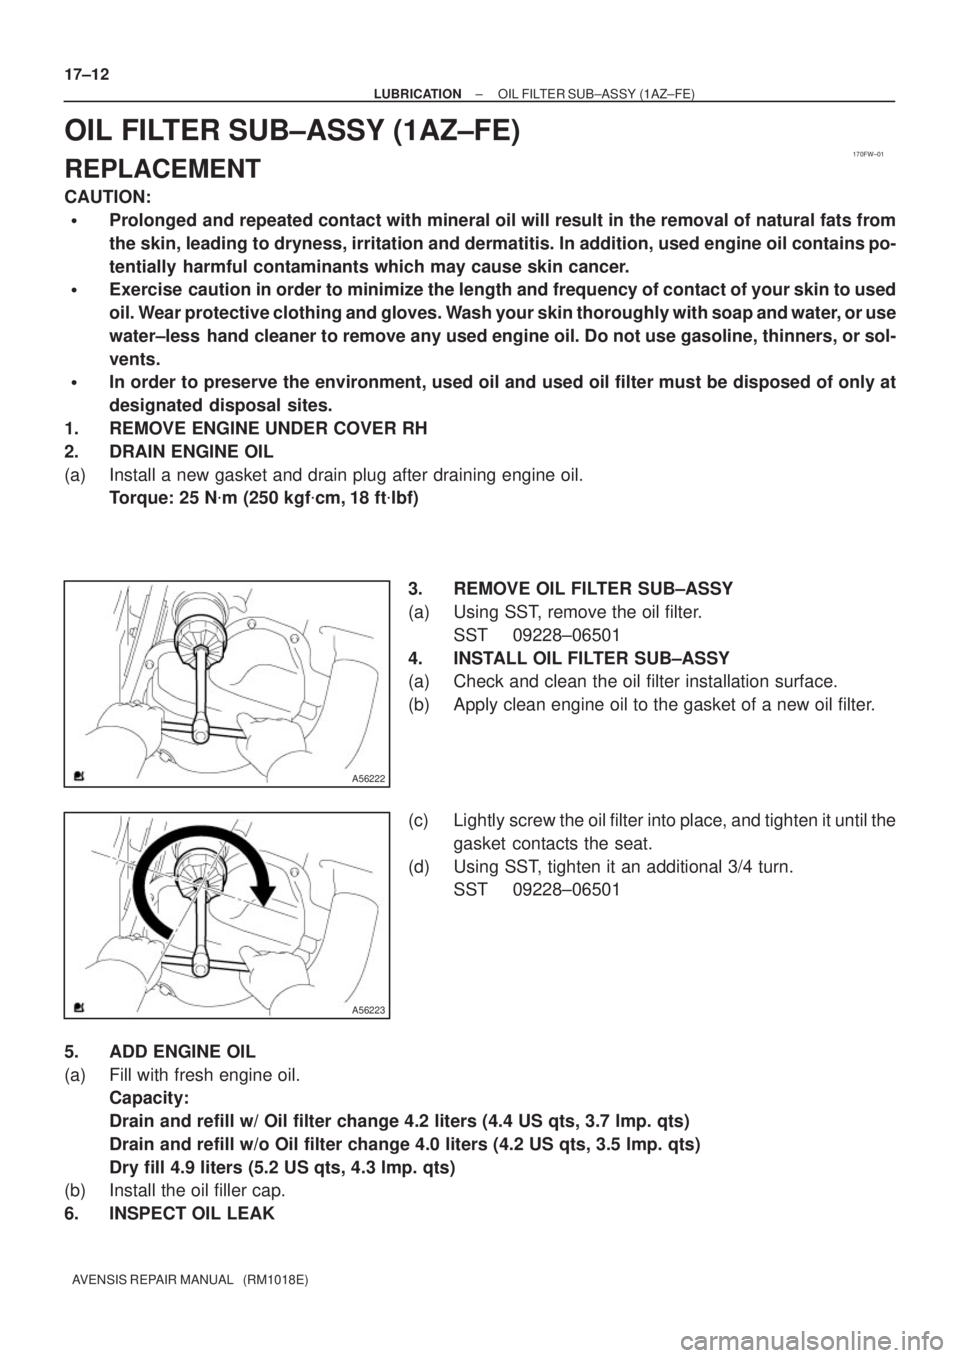
3. REMOVE OIL FILTER SUB±ASSY
(a) Using SST, remove the oil filter.
SST 09228±06501
4. INSTALL OIL FILTER SUB±ASSY
(a) Check and clean the oil filter installation surface.
(b) Apply clean engine oil to the gasket of a new oil filter.
(c) Lightly screw the oil filter into place, and tighten it until the
gasket contacts the seat.
(d) Using SST, tighten it an additional 3/4 turn.
SST 09228±06501
5. ADD ENGINE OIL
(a) Fill with fresh engine oil.
Capacity:
Drain and refill w/ Oil filter change 4.2 liters (4.4 US qts, 3.7 lmp. qts)
Drain and refill w/o Oil filter change 4.0 liters (4.2 US qts, 3.5 lmp. qts)
Dry fill 4.9 liters (5.2 US qts, 4.3 lmp. qts)
(b) Install the oil filler cap.
6. INSPECT OIL LEAK
Page 1061 of 1690
170FV±01
A56222
A56223
± LUBRICATIONOIL FILTER SUB±ASSY (1AZ±FSE)
17±19
AVENSIS REPAIR MANUAL (RM1018E)
OIL FILTER SUB±ASSY (1AZ±FSE)
REPLACEMENT
CAUTION:
�Prolonged and repeated contact with mineral oil will result in the removal of natural fats from
the skin, leading to dryness, irritation and dermatitis. In addition, used engine oil contains po-
tentially harmful contaminants which may cause skin cancer.
�Exercise caution in order to minimize the length and frequency of contact of your skin to used
oil. Wear protective clothing and gloves. Wash your skin thoroughly with soap and water, or use
water±less hand cleaner to remove any used engine oil. Do not use gasoline, thinners, or sol-
vents.
�In order to preserve the environment, used oil and used oil filter must be disposed of only at
designated disposal sites.
1. REMOVE ENGINE UNDER COVER RH
2. DRAIN ENGINE OIL
(a) Install a new gasket and drain plug after draining engine oil.
Torque: 25 N�m (250 kgf�cm, 18 ft�lbf)
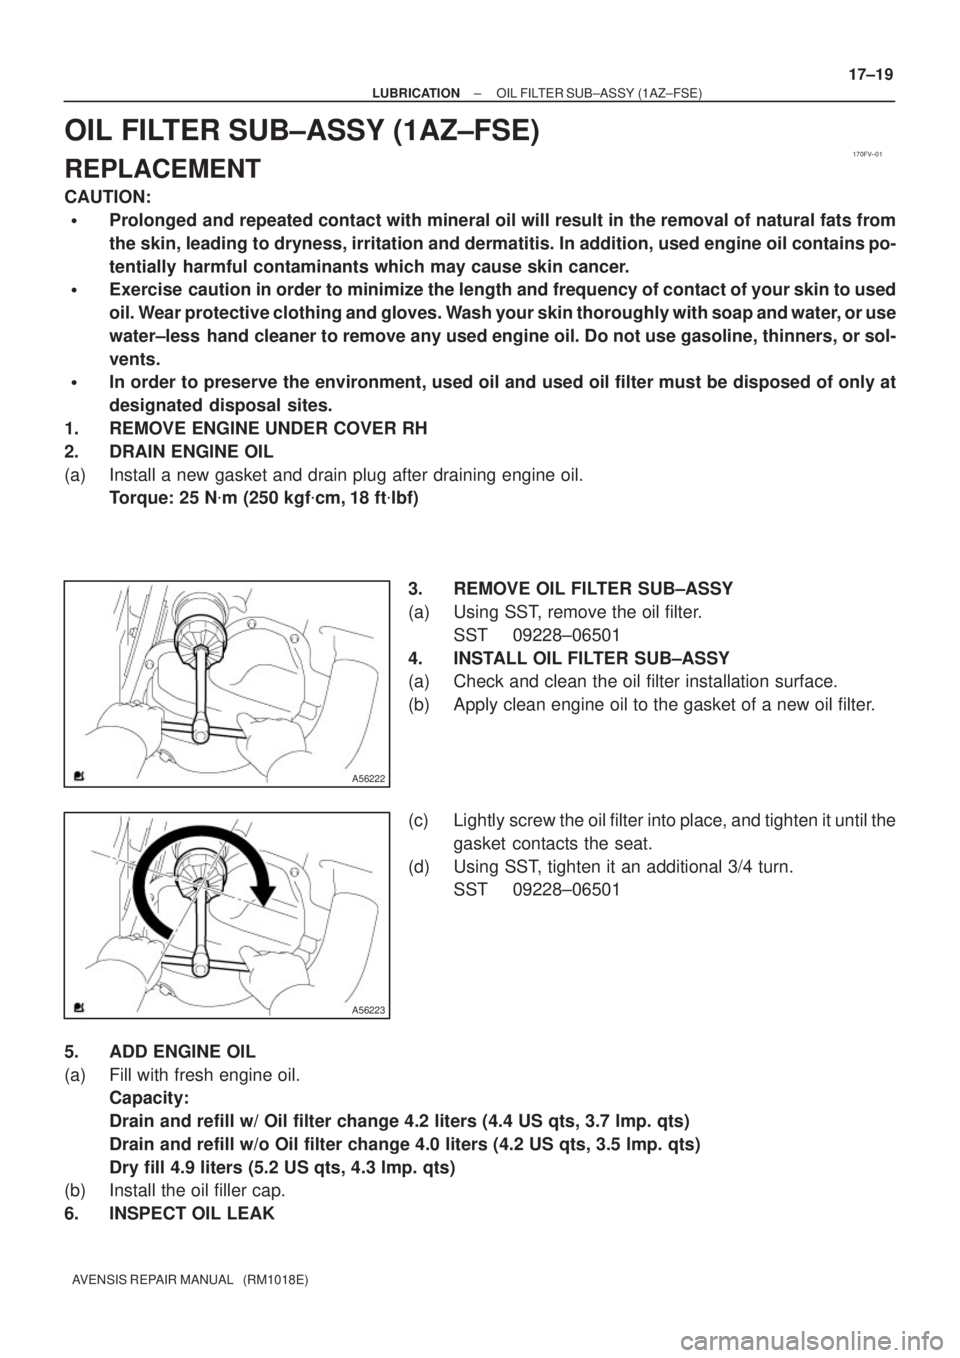
3. REMOVE OIL FILTER SUB±ASSY
(a) Using SST, remove the oil filter.
SST 09228±06501
4. INSTALL OIL FILTER SUB±ASSY
(a) Check and clean the oil filter installation surface.
(b) Apply clean engine oil to the gasket of a new oil filter.
(c) Lightly screw the oil filter into place, and tighten it until the
gasket contacts the seat.
(d) Using SST, tighten it an additional 3/4 turn.
SST 09228±06501
5. ADD ENGINE OIL
(a) Fill with fresh engine oil.
Capacity:
Drain and refill w/ Oil filter change 4.2 liters (4.4 US qts, 3.7 lmp. qts)
Drain and refill w/o Oil filter change 4.0 liters (4.2 US qts, 3.5 lmp. qts)
Dry fill 4.9 liters (5.2 US qts, 4.3 lmp. qts)
(b) Install the oil filler cap.
6. INSPECT OIL LEAK
Page 1062 of 1690
170FO±01
A79191
A79192
17±30
± LUBRICATIONOIL FILTER SUB±ASSY (1CD±FTV)
AVENSIS REPAIR MANUAL (RM1018E)
OIL FILTER SUB±ASSY (1CD±FTV)
REPLACEMENT
NOTICE:
�Prolonged and repeated contact with engine oil will result in the removal of natural oils from
the skin, leading to dryness, irritation and dermatitis. In addition, used engine oil contains po-
tentially harmful contaminants which may cause skin cancer.
�Precautions should be taken when replacing engine oil to minimize the risk of your skin making
contact with used engine oil. Wear protective clothing and gloves. Wash your skin thoroughly
with soap and water, or use water±less hand cleaner to remove any used engine oil. Do not use
gasoline, thinners, or solvents.
�In order to preserve the environment, used oil and oil filter must be disposed of at designated
disposal sites.
1. DRAIN ENGINE OIL
(a) Remove the oil filler cap.
(b) Remove the oil drain plug and drain the oil into a container.
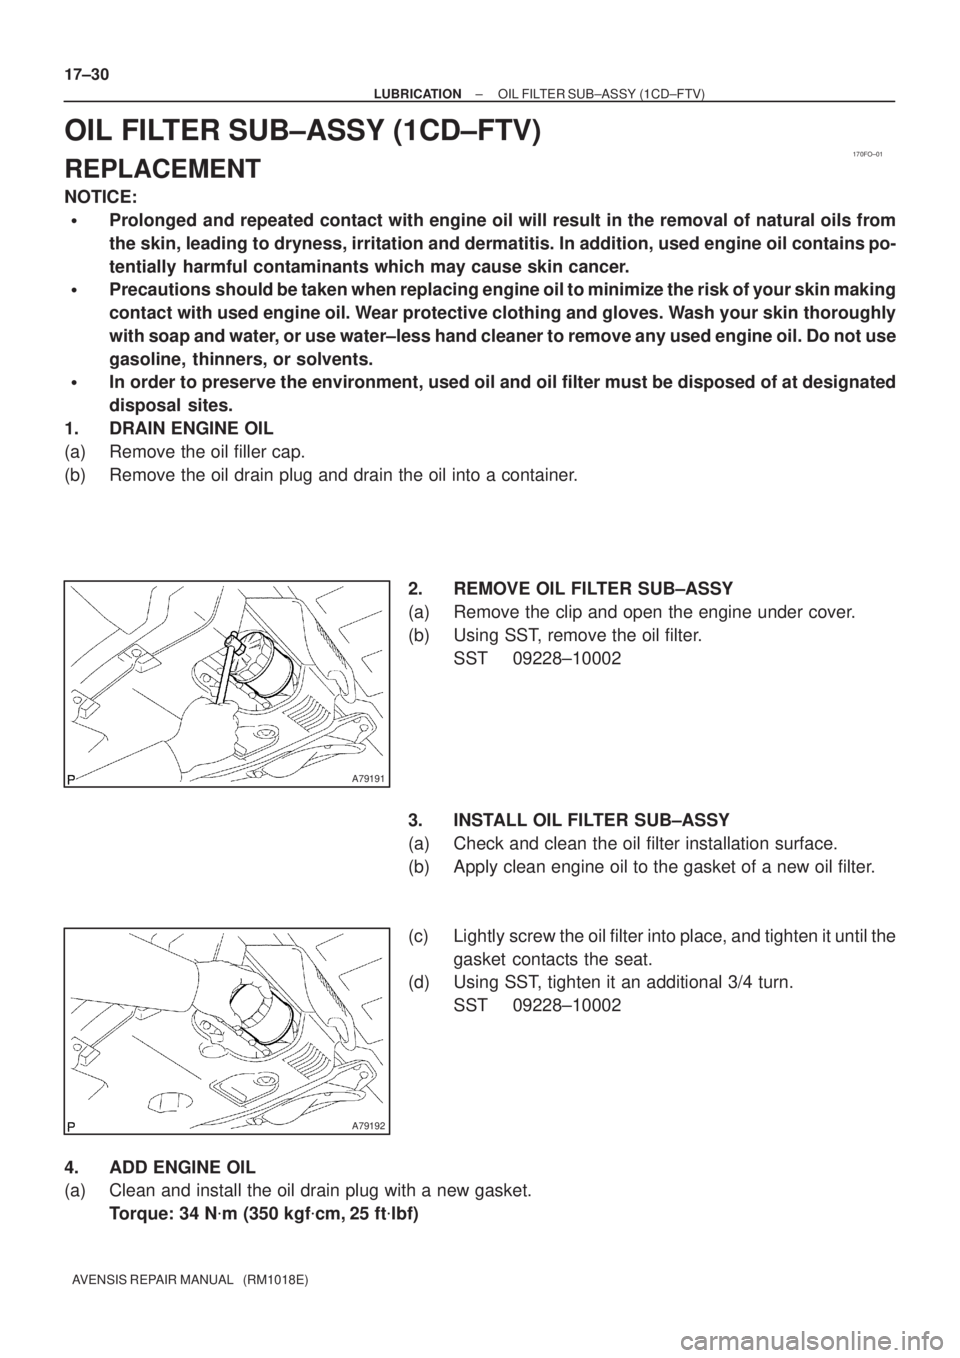
2. REMOVE OIL FILTER SUB±ASSY
(a) Remove the clip and open the engine under cover.
(b) Using SST, remove the oil filter.
SST 09228±10002
3. INSTALL OIL FILTER SUB±ASSY
(a) Check and clean the oil filter installation surface.
(b) Apply clean engine oil to the gasket of a new oil filter.
(c) Lightly screw the oil filter into place, and tighten it until the
gasket contacts the seat.
(d) Using SST, tighten it an additional 3/4 turn.
SST 09228±10002
4. ADD ENGINE OIL
(a) Clean and install the oil drain plug with a new gasket.
Torque: 34 N�m (350 kgf�cm, 25 ft�lbf)
Page 1064 of 1690
170FS±01
A79297
A79298
SST
A79299
3/4 turn
SST 17±4
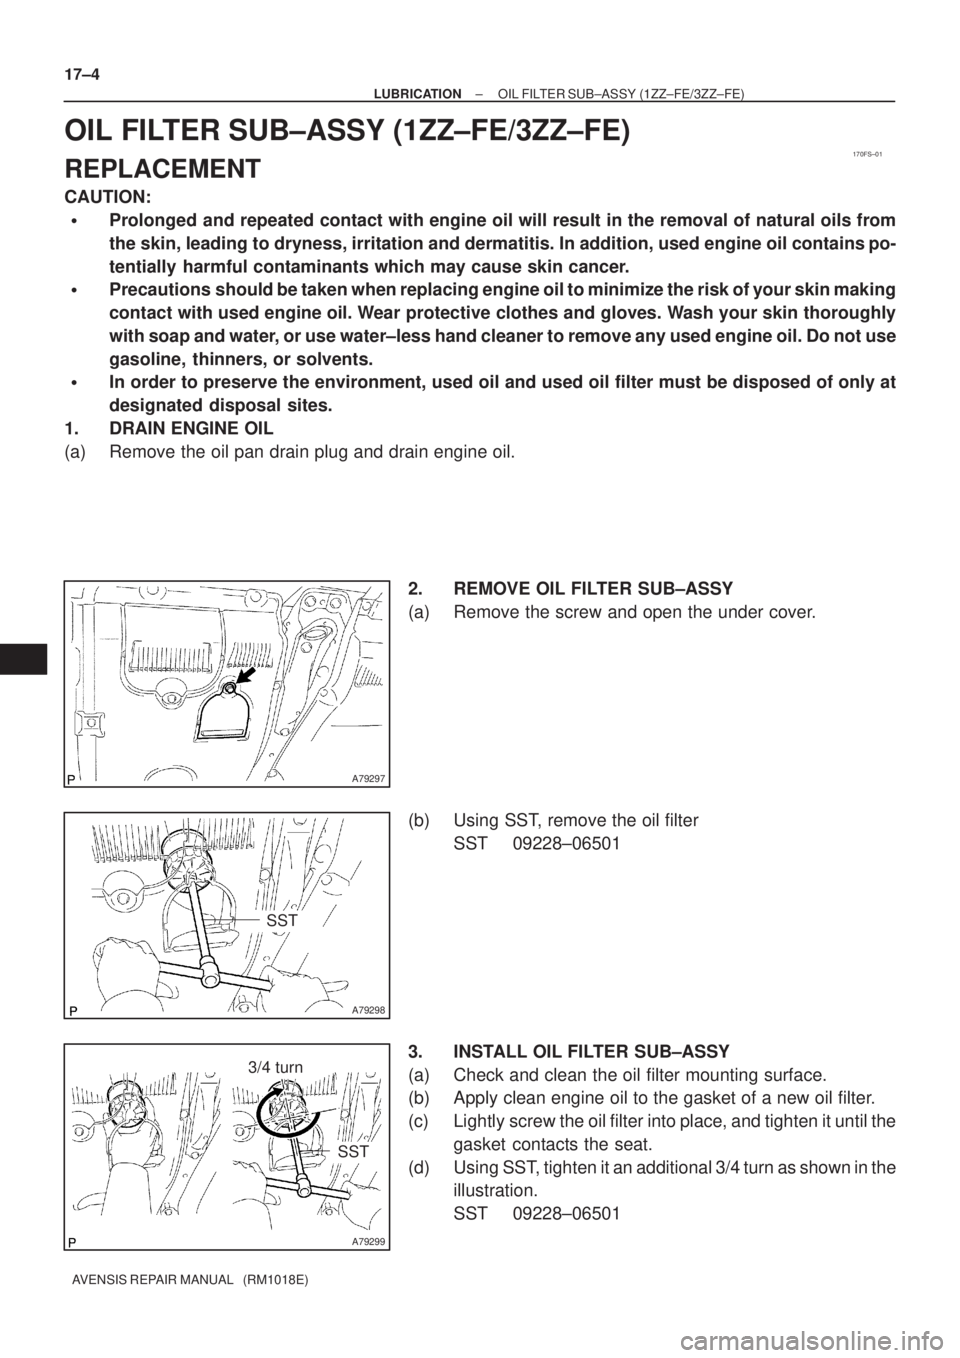
± LUBRICATIONOIL FILTER SUB±ASSY (1ZZ±FE/3ZZ±FE)
AVENSIS REPAIR MANUAL (RM1018E)
OIL FILTER SUB±ASSY (1ZZ±FE/3ZZ±FE)
REPLACEMENT
CAUTION:
�Prolonged and repeated contact with engine oil will result in the removal of natural oils from
the skin, leading to dryness, irritation and dermatitis. In addition, used engine oil contains po-
tentially harmful contaminants which may cause skin cancer.
�Precautions should be taken when replacing engine oil to minimize the risk of your skin making
contact with used engine oil. Wear protective clothes and gloves. Wash your skin thoroughly
with soap and water, or use water±less hand cleaner to remove any used engine oil. Do not use
gasoline, thinners, or solvents.
�In order to preserve the environment, used oil and used oil filter must be disposed of only at
designated disposal sites.
1. DRAIN ENGINE OIL
(a) Remove the oil pan drain plug and drain engine oil.
2. REMOVE OIL FILTER SUB±ASSY
(a) Remove the screw and open the under cover.
(b) Using SST, remove the oil filter
SST 09228±06501
3. INSTALL OIL FILTER SUB±ASSY
(a) Check and clean the oil filter mounting surface.
(b) Apply clean engine oil to the gasket of a new oil filter.
(c) Lightly screw the oil filter into place, and tighten it until the
gasket contacts the seat.
(d) Using SST, tighten it an additional 3/4 turn as shown in the
illustration.
SST 09228±06501
Page 1098 of 1690
D30080
41±30
±
MANUAL TRANSMISSION/TRANSAXLE MANUAL TRANSAXLE ASSY (1AZ±FE/1AZ±FSE)
AVENSIS REPAIR MANUAL (RM1018E)
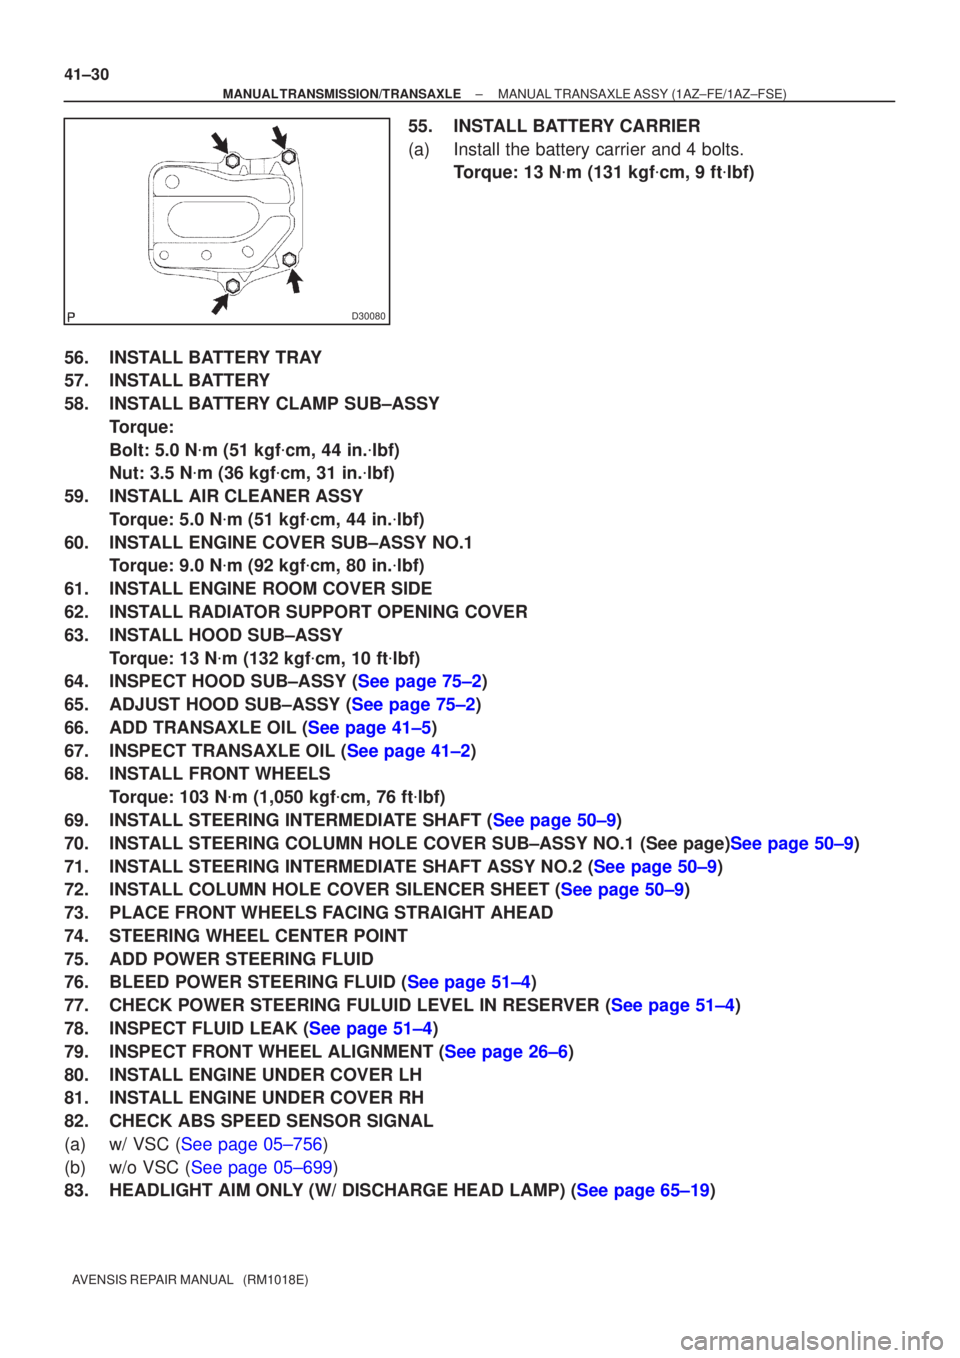
55. INSTALL BATTERY CARRIER
(a) Install the battery carrier and 4 bolts. Torque: 13 N �m (131 kgf �cm, 9 ft �lbf)
56. INSTALL BATTERY TRAY
57. INSTALL BATTERY
58. INSTALL BATTERY CLAMP SUB±ASSY Torque:
Bolt: 5.0 N �m (51 kgf �cm, 44 in. �lbf)
Nut: 3.5 N �m (36 kgf �cm, 31 in. �lbf)
59. INSTALL AIR CLEANER ASSY Torque: 5.0 N �m (51 kgf �cm, 44 in. �lbf)
60. INSTALL ENGINE COVER SUB±ASSY NO.1 Torque: 9.0 N �m (92 kgf �cm, 80 in. �lbf)
61. INSTALL ENGINE ROOM COVER SIDE
62. INSTALL RADIATOR SUPPORT OPENING COVER
63. INSTALL HOOD SUB±ASSY Torque: 13 N �m (132 kgf �cm, 10 ft �lbf)
64.INSPECT HOOD SUB±ASSY (See page 75±2)
65.ADJUST HOOD SUB±ASSY (See page 75±2)
66.ADD TRANSAXLE OIL (See page 41±5)
67.INSPECT TRANSAXLE OIL (See page 41±2)
68. INSTALL FRONT WHEELS
Torque: 103 N �m (1,050 kgf �cm, 76 ft �lbf)
69.INSTALL STEERING INTERMEDIATE SHAFT (See page 50±9)
70.INSTALL STEERING COLUMN HOLE COVER SUB±ASSY NO.1 (See page)See page 50±9)
71.INSTALL STEERING INTERMEDIATE SHAFT ASSY NO.2 (See page 50±9)
72.INSTALL COLUMN HOLE COVER SILENCER SHEET (See page 50±9)
73. PLACE FRONT WHEELS FACING STRAIGHT AHEAD
74. STEERING WHEEL CENTER POINT
75. ADD POWER STEERING FLUID
76.BLEED POWER STEERING FLUID (See page 51±4)
77.CHECK POWER STEERING FULUID LEVEL IN RESERVER (See page 51±4)
78.INSPECT FLUID LEAK (See page 51±4)
79.INSPECT FRONT WHEEL ALIGNMENT (See page 26±6)
80. INSTALL ENGINE UNDER COVER LH
81. INSTALL ENGINE UNDER COVER RH
82. CHECK ABS SPEED SENSOR SIGNAL
(a)w/ VSC (See page 05±756)
(b)w/o VSC (See page 05±699)
83.HEADLIGHT AIM ONLY (W/ DISCHARGE HEAD LAMP) (See page 65±19)
Page 1108 of 1690
41±40
±
MANUAL TRANSMISSION/TRANSAXLE MANUAL TRANSAXLE ASSY (1CD±FTV)
AVENSIS REPAIR MANUAL (RM1018E)
75. INSTALL HOOD SUB±ASSY Torque: 13 N �m (133 kgf �cm, 10 ft �lbf)
76.INSPECT HOOD SUB±ASSY (See page 75±2)
77.ADJUST HOOD SUB±ASSY (See page 75±2)
78.ADD TRANSAXLE OIL (See page 41±5)
79.INSPECT TRANSAXLE OIL (See page 41±2)
80. ADD POWER STEERING FLUID
81.BLEED POWER STEERING FLUID (See page 51±4)
82.CHECK POWER STEERING FULUID LEVEL IN RESERVER (See page 51±4)
83.INSPECT FLUID LEAK (See page 51±4)
84. INSTALL FRONT WHEELS Torque: 103 N �m (1,050 kgf �cm, 76 ft �lbf)
85.INSPECT FRONT WHEEL ALIGNMENT (See page 26±6)
86. INSTALL ENGINE UNDER COVER RH
87. INSTALL ENGINE UNDER COVER LH
88. CHECK ABS SPEED SENSOR SIGNAL
(a)w/ VSC (See page 05±756)
(b)w/o VSC (See page 05±699)
89.HEADLIGHT AIM ONLY (W/ DISCHARGE HEAD LAMP) (See page 65±19)
Page 1153 of 1690
������
������D30705
LHD:
A
B
RHD:
Matchmarks
Matchmarks
A
B
±
POWER STEERING RACK & PINION POWER STEERING GEAR ASSY
51±45
AVENSIS REPAIR MANUAL (RM1018E)
50. INSTALL HEIGHT CONTROL SENSOR SUB±ASSY FR RH (W/ DISCHARGE HEAD LAMP)
(See page 65±28)
51.INSTALL TIE ROD END SUB±ASSY LH (See page 30±6)
52. INSTALL TIE ROD END SUB±ASSY RH
HINT:
Perform the same procedure on the other side.
53. INSTALL FRONT WHEELS
Torque: 103 N �m (1,050 kgf �cm, 76 ft �lbf)
54. INSTALL STEERING COLUMN HOLE COVER SUB±ASSY NO.1
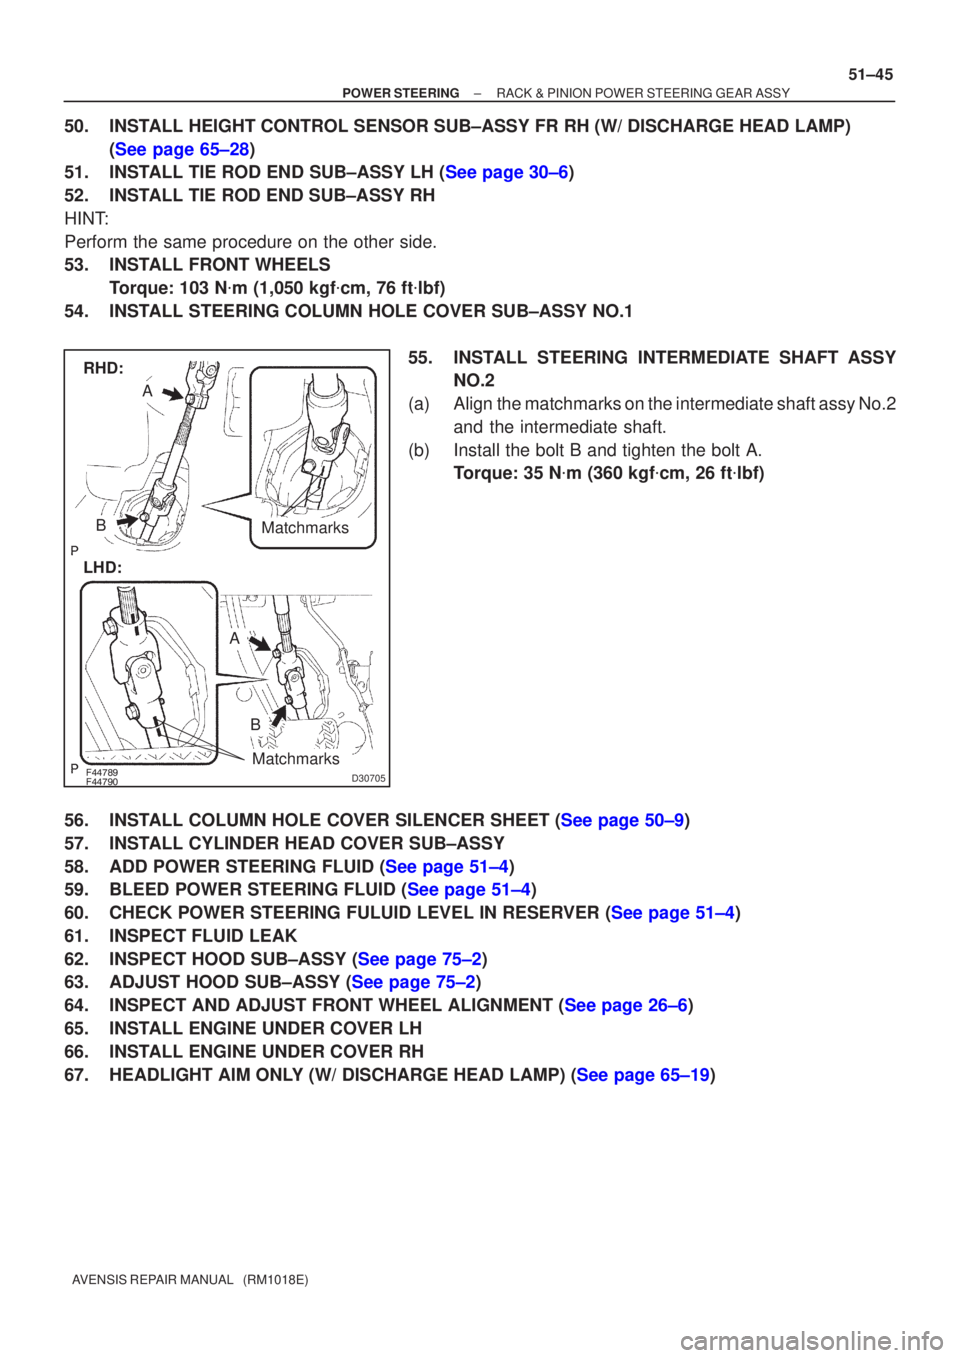
55. INSTALL STEERING INTERMEDIATE SHAFT ASSYNO.2
(a) Align the matchmarks on the intermediate shaft assy No.2 and the intermediate shaft.
(b) Install the bolt B and tighten the bolt A. Torque: 35 N �m (360 kgf �cm, 26 ft �lbf)
56.INSTALL COLUMN HOLE COVER SILENCER SHEET (See page 50±9)
57. INSTALL CYLINDER HEAD COVER SUB±ASSY
58.ADD POWER STEERING FLUID (See page 51±4)
59.BLEED POWER STEERING FLUID (See page 51±4)
60.CHECK POWER STEERING FULUID LEVEL IN RESERVER (See page 51±4)
61. INSPECT FLUID LEAK
62.INSPECT HOOD SUB±ASSY (See page 75±2)
63.ADJUST HOOD SUB±ASSY (See page 75±2)
64.INSPECT AND ADJUST FRONT WHEEL ALIGNMENT (See page 26±6)
65. INSTALL ENGINE UNDER COVER LH
66. INSTALL ENGINE UNDER COVER RH
67.HEADLIGHT AIM ONLY (W/ DISCHARGE HEAD LAMP) (See page 65±19)