2002 TOYOTA AVENSIS brake light
[x] Cancel search: brake lightPage 38 of 1690
3201G±07
BR2238
GOOD NO GOOD
2nd3rd
1st
BR2237
G24221
Ventilation No Ventilation
± BRAKEBRAKE BOOSTER ASSY (LHD)
32±17
AVENSIS REPAIR MANUAL (RM1018E)
BRAKE BOOSTER ASSY (LHD)
ON±VEHICLE INSPECTION
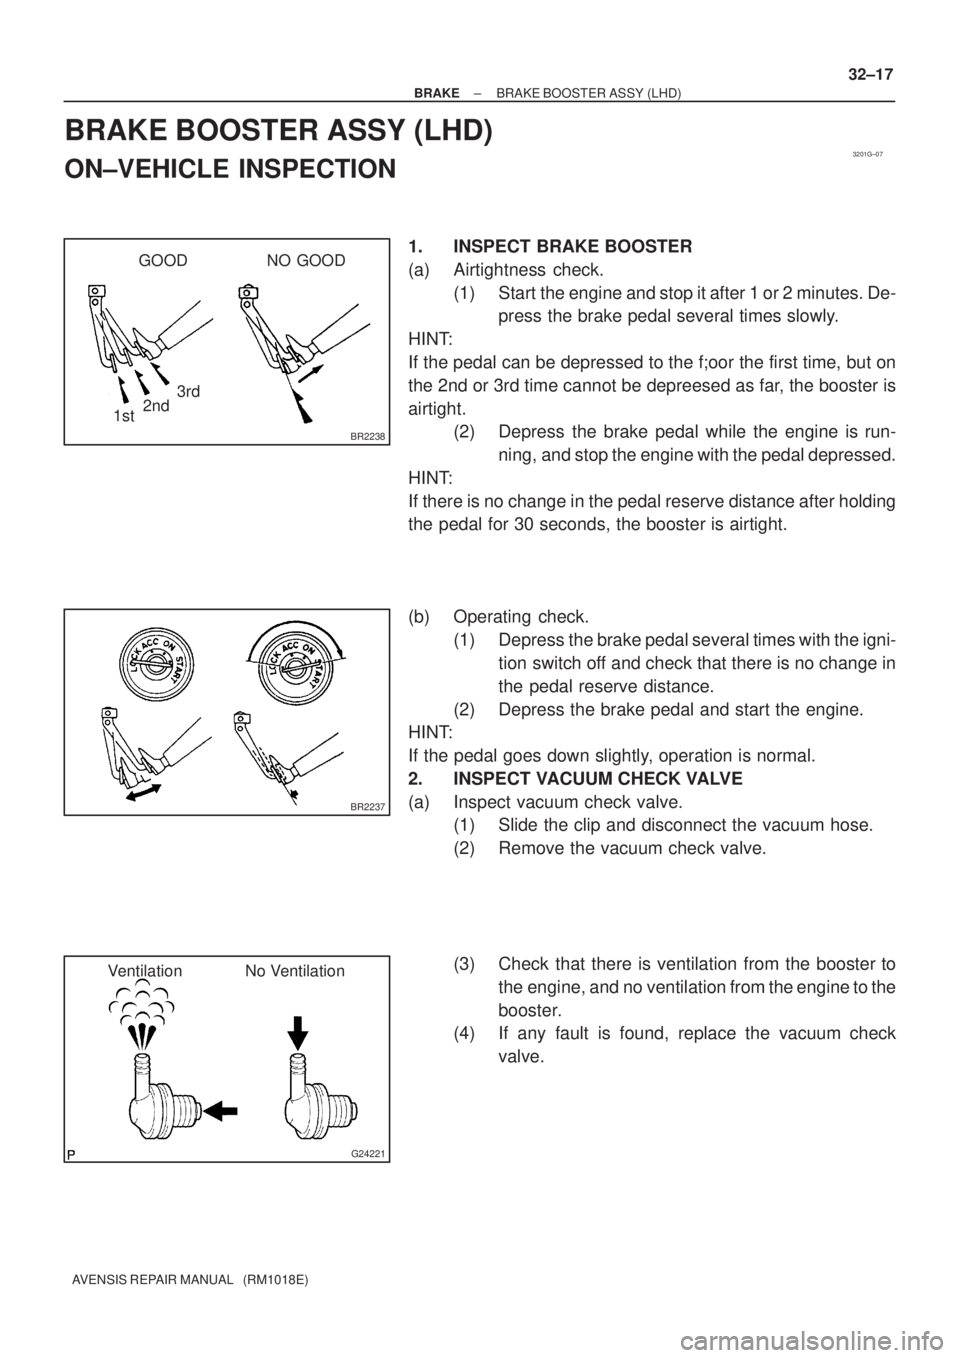
1. INSPECT BRAKE BOOSTER
(a) Airtightness check.
(1) Start the engine and stop it after 1 or 2 minutes. De-
press the brake pedal several times slowly.
HINT:
If the pedal can be depressed to the f;oor the first time, but on
the 2nd or 3rd time cannot be depreesed as far, the booster is
airtight.
(2) Depress the brake pedal while the engine is run-
ning, and stop the engine with the pedal depressed.
HINT:
If there is no change in the pedal reserve distance after holding
the pedal for 30 seconds, the booster is airtight.
(b) Operating check.
(1) Depress the brake pedal several times with the igni-
tion switch off and check that there is no change in
the pedal reserve distance.
(2) Depress the brake pedal and start the engine.
HINT:
If the pedal goes down slightly, operation is normal.
2. INSPECT VACUUM CHECK VALVE
(a) Inspect vacuum check valve.
(1) Slide the clip and disconnect the vacuum hose.
(2) Remove the vacuum check valve.
(3) Check that there is ventilation from the booster to
the engine, and no ventilation from the engine to the
booster.
(4) If any fault is found, replace the vacuum check
valve.
Page 42 of 1690
320GN±02
BR2238
GOOD NO GOOD
2nd3rd
1st
BR2237
G24221
Ventilation No Ventilation
± BRAKEBRAKE BOOSTER ASSY (RHD)
32±21
AVENSIS REPAIR MANUAL (RM1018E)
BRAKE BOOSTER ASSY (RHD)
ON±VEHICLE INSPECTION
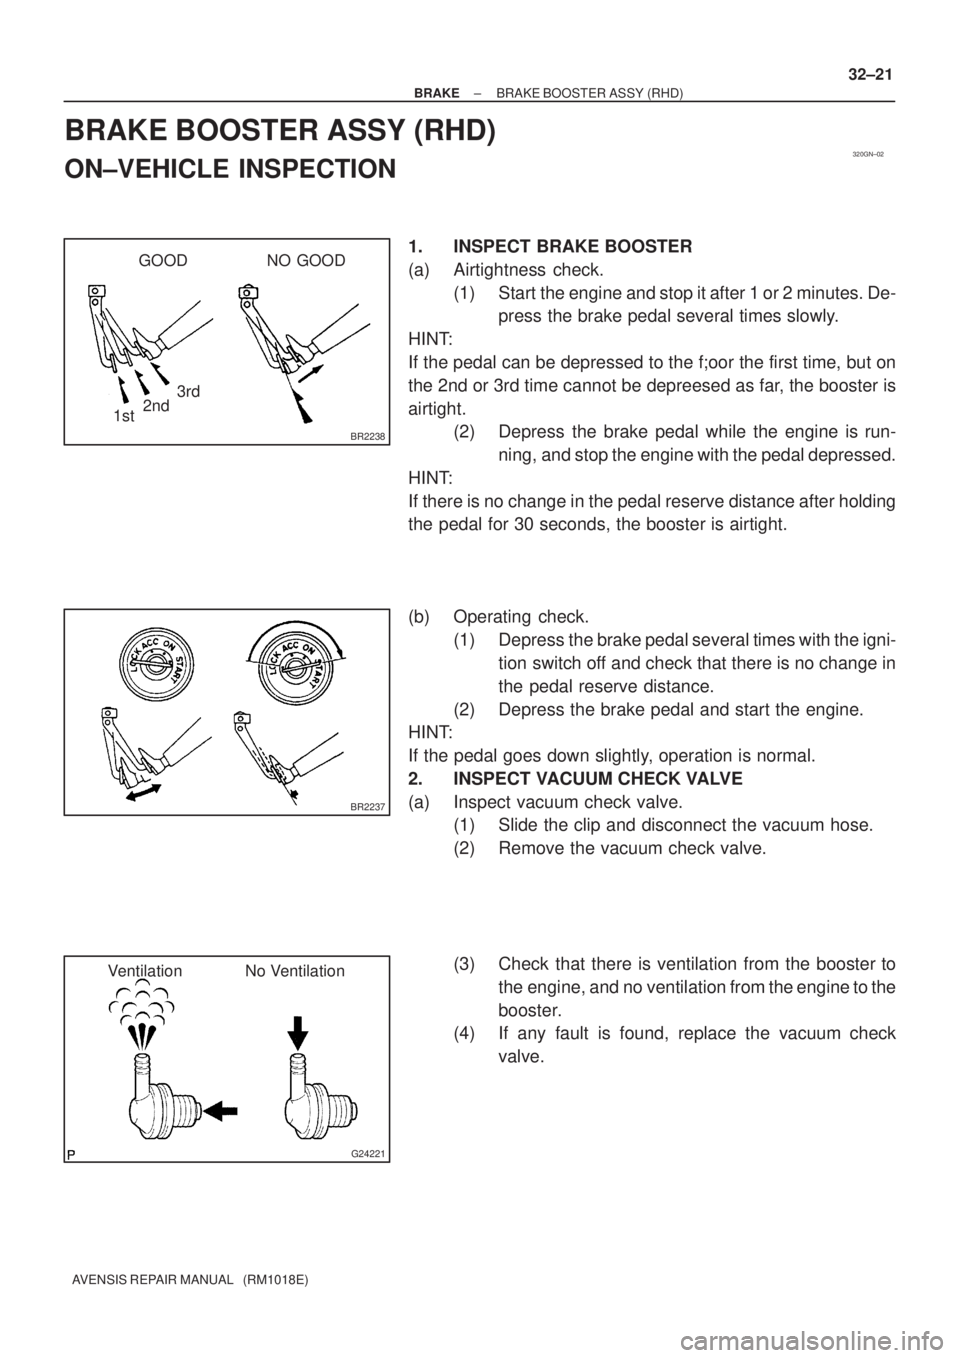
1. INSPECT BRAKE BOOSTER
(a) Airtightness check.
(1) Start the engine and stop it after 1 or 2 minutes. De-
press the brake pedal several times slowly.
HINT:
If the pedal can be depressed to the f;oor the first time, but on
the 2nd or 3rd time cannot be depreesed as far, the booster is
airtight.
(2) Depress the brake pedal while the engine is run-
ning, and stop the engine with the pedal depressed.
HINT:
If there is no change in the pedal reserve distance after holding
the pedal for 30 seconds, the booster is airtight.
(b) Operating check.
(1) Depress the brake pedal several times with the igni-
tion switch off and check that there is no change in
the pedal reserve distance.
(2) Depress the brake pedal and start the engine.
HINT:
If the pedal goes down slightly, operation is normal.
2. INSPECT VACUUM CHECK VALVE
(a) Inspect vacuum check valve.
(1) Slide the clip and disconnect the vacuum hose.
(2) Remove the vacuum check valve.
(3) Check that there is ventilation from the booster to
the engine, and no ventilation from the engine to the
booster.
(4) If any fault is found, replace the vacuum check
valve.
Page 89 of 1690

±
BRAKE STEERING SENSOR
32±67
AVENSIS REPAIR MANUAL (RM1018E)
20.CONNECT BATTERY NEGATIVE TERMINAL (See page 60±1)
21.INSPECT SRS WARNING LIGHT (See page 05±1184)
22.INSPECT ABS WARNING LIGHT AND VSC WARNING LIGHT (See page 05±756)
Page 946 of 1690
710CM±02
±
INSTRUMENT PANEL/METER COMBINATION METER
71±1
AVENSIS REPAIR MANUAL (RM1018E)
COMBINATION METER
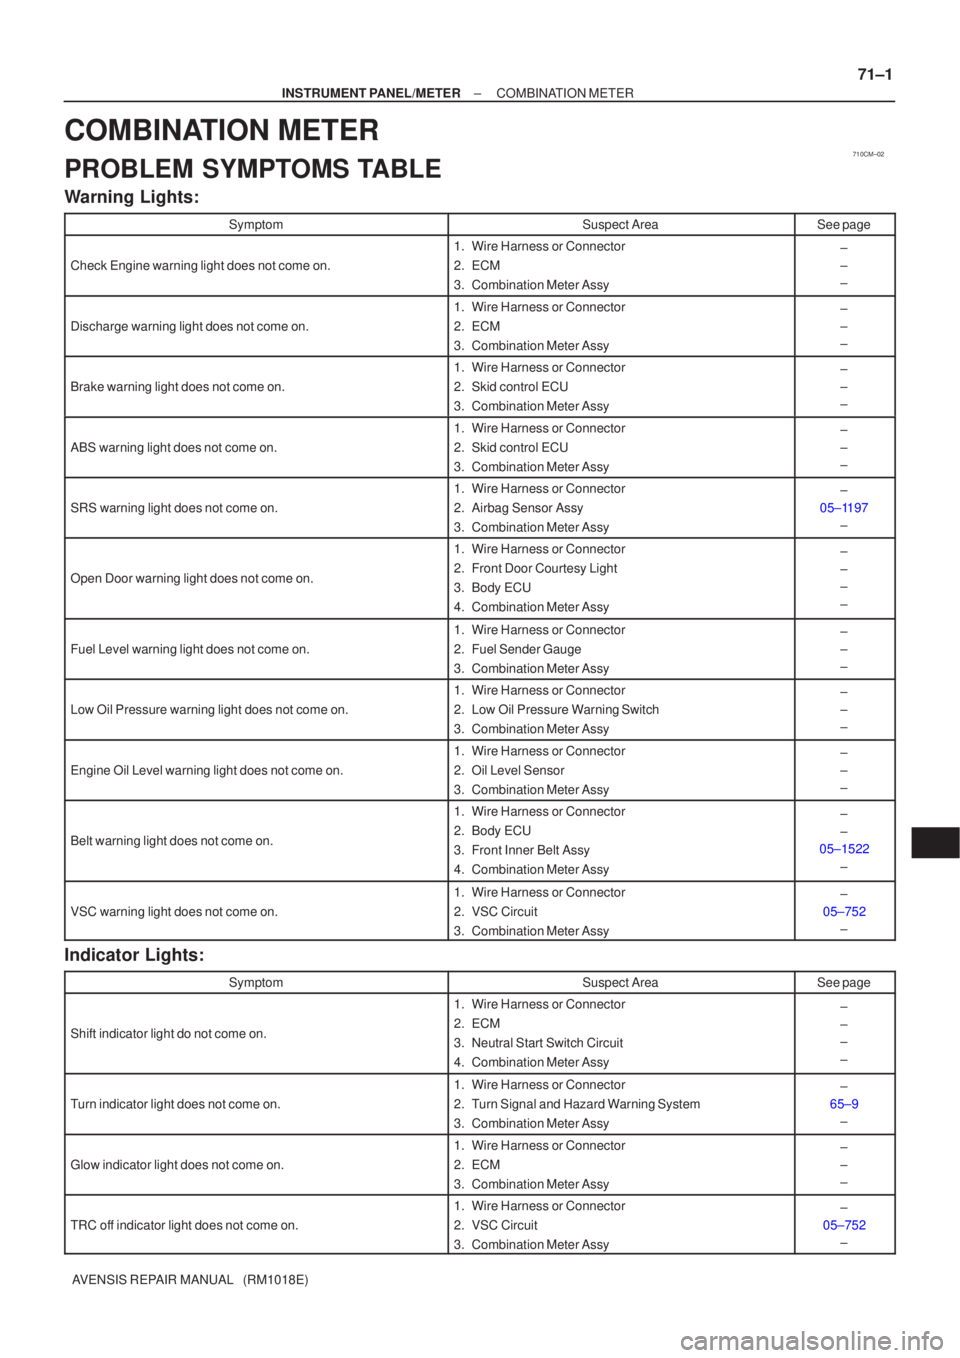
PROBLEM SYMPTOMS TABLE
Warning Lights:
SymptomSuspect AreaSee page
Check Engine warning light does not come on.
1.Wire Harness or Connector
2.ECM
3.Combination Meter Assy±
±
±
Discharge warning light does not come on.
1.Wire Harness or Connector
2.ECM
3.Combination Meter Assy±
±
±
Brake warning light does not come on.
1.Wire Harness or Connector
2.Skid control ECU
3.Combination Meter Assy±
±
±
ABS warning light does not come on.
1.Wire Harness or Connector
2.Skid control ECU
3.Combination Meter Assy±
±
±
SRS warning light does not come on.
1.Wire Harness or Connector
2.Airbag Sensor Assy
3.Combination Meter Assy±
05±1197 ±
Open Door warning light does not come on.
1.Wire Harness or Connector
2.Front Door Courtesy Light
3.Body ECU
4.Combination Meter Assy±
±
±
±
Fuel Level warning light does not come on.
1.Wire Harness or Connector
2.Fuel Sender Gauge
3.Combination Meter Assy±
±
±
Low Oil Pressure warning light does not come on.
1.Wire Harness or Connector
2.Low Oil Pressure Warning Switch
3.Combination Meter Assy±
±
±
Engine Oil Level warning light does not come on.
1.Wire Harness or Connector
2.Oil Level Sensor
3.Combination Meter Assy±
±
±
Belt warning light does not come on.
1.Wire Harness or Connector
2.Body ECU
3.Front Inner Belt Assy
4.Combination Meter Assy±
±
05±1522
±
VSC warning light does not come on.
1.Wire Harness or Connector
2.VSC Circuit
3.Combination Meter Assy±
05±752 ±
Indicator Lights:
SymptomSuspect AreaSee page
Shift indicator light do not come on.
1. Wire Harness or Connector
2. ECM
3. Neutral Start Switch Circuit
4. Combination Meter Assy±
±
±
±
Turn indicator light does not come on.
1. Wire Harness or Connector
2. Turn Signal and Hazard Warning System
3. Combination Meter Assy±
65±9 ±
Glow indicator light does not come on.
1. Wire Harness or Connector
2. ECM
3. Combination Meter Assy±
±
±
TRC off indicator light does not come on.
1. Wire Harness or Connector
2. VSC Circuit
3. Combination Meter Assy±
05±752 ±
Page 950 of 1690
IG
SPEED
BKL SW
(D±seat)
BKL SW
(P seat)
WRN LAMP
BUZZERON
OFF
15km/h
0
BELT ON
BELT OFF
LVL1
LVL2 BELT ON
BELT OFF
ON
OFF OFF
30s
90s30s
90s
± INSTRUMENT PANEL/METERCOMBINATION METER
71±5
AVENSIS REPAIR MANUAL (RM1018E)
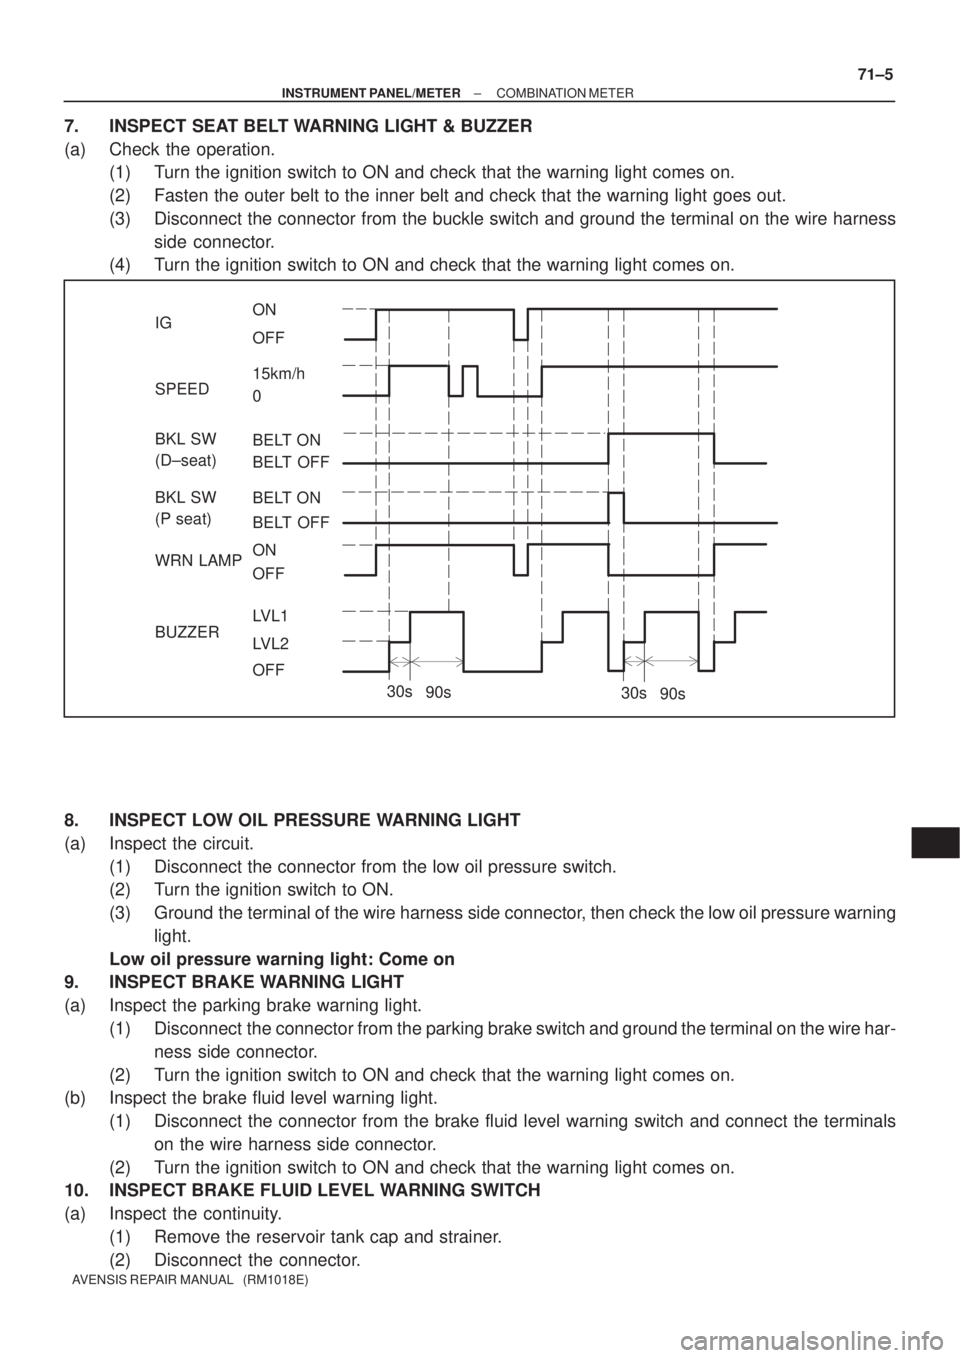
7. INSPECT SEAT BELT WARNING LIGHT & BUZZER
(a) Check the operation.
(1) Turn the ignition switch to ON and check that the warning light comes on.
(2) Fasten the outer belt to the inner belt and check that the warning light goes out.
(3) Disconnect the connector from the buckle switch and ground the terminal on the wire harness
side connector.
(4) Turn the ignition switch to ON and check that the warning light comes on.
8. INSPECT LOW OIL PRESSURE WARNING LIGHT
(a) Inspect the circuit.
(1) Disconnect the connector from the low oil pressure switch.
(2) Turn the ignition switch to ON.
(3) Ground the terminal of the wire harness side connector, then check the low oil pressure warning
light.
Low oil pressure warning light: Come on
9. INSPECT BRAKE WARNING LIGHT
(a) Inspect the parking brake warning light.
(1) Disconnect the connector from the parking brake switch and ground the terminal on the wire har-
ness side connector.
(2) Turn the ignition switch to ON and check that the warning light comes on.
(b) Inspect the brake fluid level warning light.
(1) Disconnect the connector from the brake fluid level warning switch and connect the terminals
on the wire harness side connector.
(2) Turn the ignition switch to ON and check that the warning light comes on.
10. INSPECT BRAKE FLUID LEVEL WARNING SWITCH
(a) Inspect the continuity.
(1) Remove the reservoir tank cap and strainer.
(2) Disconnect the connector.
Page 1009 of 1690
D25081
Spring Type Clamp
Clamp Track
D20025
CG
DLC3
TS
D30964
± INTRODUCTIONREPAIR INSTRUCTION
01±17
AVENSIS REPAIR MANUAL (RM1018E)
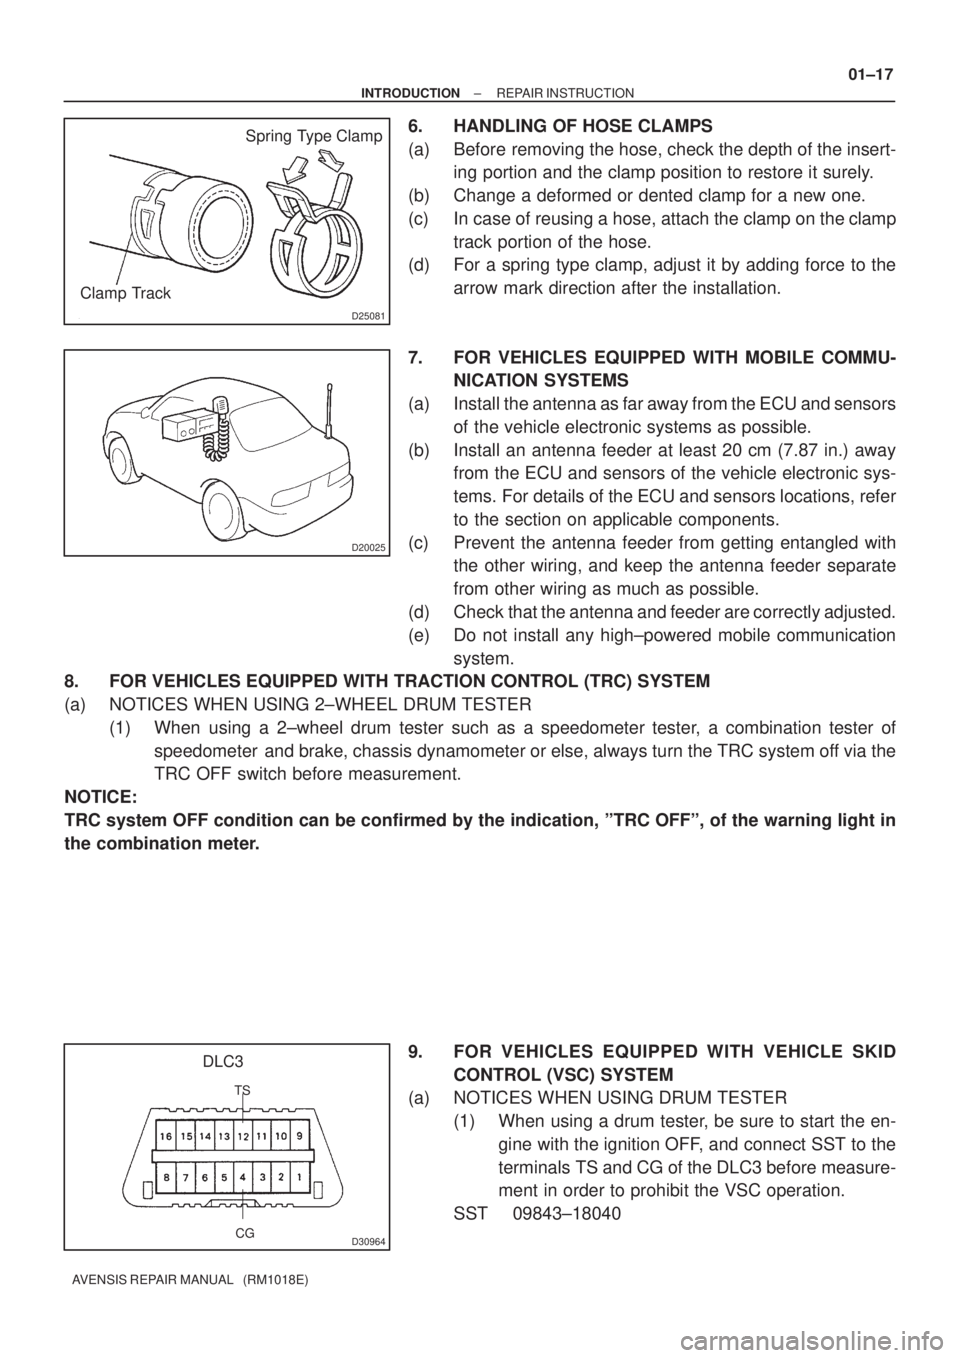
6. HANDLING OF HOSE CLAMPS
(a) Before removing the hose, check the depth of the insert-
ing portion and the clamp position to restore it surely.
(b) Change a deformed or dented clamp for a new one.
(c) In case of reusing a hose, attach the clamp on the clamp
track portion of the hose.
(d) For a spring type clamp, adjust it by adding force to the
arrow mark direction after the installation.
7. FOR VEHICLES EQUIPPED WITH MOBILE COMMU-
NICATION SYSTEMS
(a) Install the antenna as far away from the ECU and sensors
of the vehicle electronic systems as possible.
(b) Install an antenna feeder at least 20 cm (7.87 in.) away
from the ECU and sensors of the vehicle electronic sys-
tems. For details of the ECU and sensors locations, refer
to the section on applicable components.
(c) Prevent the antenna feeder from getting entangled with
the other wiring, and keep the antenna feeder separate
from other wiring as much as possible.
(d) Check that the antenna and feeder are correctly adjusted.
(e) Do not install any high±powered mobile communication
system.
8. FOR VEHICLES EQUIPPED WITH TRACTION CONTROL (TRC) SYSTEM
(a) NOTICES WHEN USING 2±WHEEL DRUM TESTER
(1) When using a 2±wheel drum tester such as a speedometer tester, a combination tester of
speedometer and brake, chassis dynamometer or else, always turn the TRC system off via the
TRC OFF switch before measurement.
NOTICE:
TRC system OFF condition can be confirmed by the indication, ºTRC OFFº, of the warning light in
the combination meter.
9. FOR VEHICLES EQUIPPED WITH VEHICLE SKID
CONTROL (VSC) SYSTEM
(a) NOTICES WHEN USING DRUM TESTER
(1) When using a drum tester, be sure to start the en-
gine with the ignition OFF, and connect SST to the
terminals TS and CG of the DLC3 before measure-
ment in order to prohibit the VSC operation.
SST 09843±18040
Page 1346 of 1690
030MU±02
± SERVICE SPECIFICATIONSBRAKE
03±41
AVENSIS REPAIR MANUAL (RM1018E)
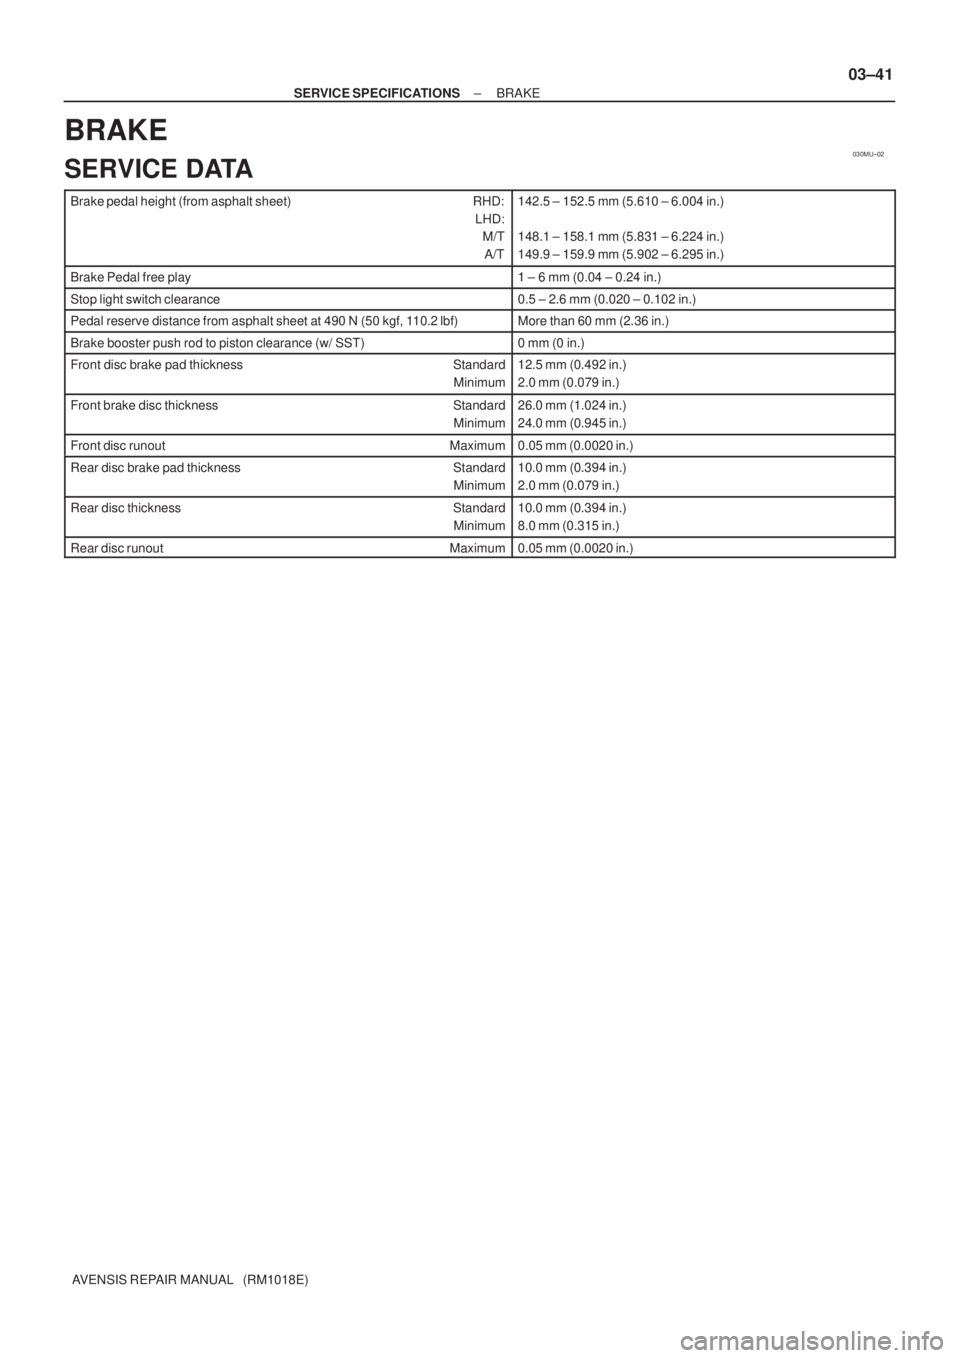
BRAKE
SERVICE DATA
Brake pedal height (from asphalt sheet) RHD:
LHD:
M/T
A/T142.5 ± 152.5 mm (5.610 ± 6.004 in.)
148.1 ± 158.1 mm (5.831 ± 6.224 in.)
149.9 ± 159.9 mm (5.902 ± 6.295 in.)
Brake Pedal free play1 ± 6 mm (0.04 ± 0.24 in.)
Stop light switch clearance0.5 ± 2.6 mm (0.020 ± 0.102 in.)
Pedal reserve distance from asphalt sheet at 490 N (50 kgf, 110.2 lbf)More than 60 mm (2.36 in.)
Brake booster push rod to piston clearance (w/ SST)0 mm (0 in.)
Front disc brake pad thickness Standard
Minimum12.5 mm (0.492 in.)
2.0 mm (0.079 in.)
Front brake disc thickness Standard
Minimum26.0 mm (1.024 in.)
24.0 mm (0.945 in.)
Front disc runout Maximum0.05 mm (0.0020 in.)
Rear disc brake pad thickness Standard
Minimum10.0 mm (0.394 in.)
2.0 mm (0.079 in.)
Rear disc thickness Standard
Minimum10.0 mm (0.394 in.)
8.0 mm (0.315 in.)
Rear disc runout Maximum0.05 mm (0.0020 in.)