2002 NISSAN TERRANO torque
[x] Cancel search: torquePage 1424 of 1767
TAIL/L - Wiring diagram ..................................EL-45
TCM circuit diagram ..........................................AT-7
TCM inspection table ......................................AT-46
TDC Pulse Signal .........................................EC-168
Temperature control cable and linkage
adjustment ..................................................HA-63
THEFT - Wiring diagram...............................EL-214
Theft warning system ...........EL-209, 210, 213, 230
Thermo control amp .................................HA-51, 61
Thermostat................................................LC-12, 31
Third (3rd) seat ...............................................BT-39
THLCNT - Wiring diagram ...........................EC-435
Three way catalyst precautions.........................GI-5
Throttle control solenoid valve .....................EC-435
Throttle position switch ...................................AT-60
Tie-rod .......................................................ST-19, 21
Tie-rod ball joints.............................................ST-20
Tightening torque of standard bolts.................GI-38
Time control system .....................EL-180, 182, 184
Timing chain ...................................................EM-26
Timing gear ....................................................EM-38
Tire rotation ....................................................MA-43
Tooth contact diff. .....................................PD-27, 52
Torque convertor clutch solenoid valve ..AT-72, 141
Torsion bar spring .......................................FA-4, 30
Tow truck towing ..............................................GI-33
Towing point.....................................................GI-34
Transaxle fluid replacement.....................MA-36, 37
Transfer case ..............................................TF-9, 12
Transfer fluid replacement (Part time
4WD model) .........................................MA-36, 37
Transfer oil replacement ..........................MA-36, 38
Transmission case (M/T)..........................MT-10, 14
TRANSMT - Wiring diagram ...........................EL-80
Tread-FR&RR (Dimensions)............................GI-25
Trim...............................................BT-18, 19, 20, 21
Trunk room trim...............................................BT-47
Turbocharger ..................................................EM-14
Turbocharger charge air cooler......................EM-11
Turbocharger precautions..................................GI-5
TURN - Wiring diagram ..................................EL-56
Turn signal lamp .......................................EL-55, 56
U
Under body .....................................................BT-53
Upper link (front susp.) ...................................FA-33
V
Vacuum hose (brake system) ........................BR-19Vacuum hose drawing (Engine
control)................................................EC-18, 304
Vacuum pump .............................EM-24, BR-23, 25
Valve clearance..............................................EM-35
Valve clearance adjustment.....................MA-20, 28
Valve guide ....................................................EM-59
Valve lifter ......................................................EM-32
Valve seat ......................................................EM-60
Valve spring ...................................................EM-61
Variable nozzle turbocharger control
solenoid valve ...........................................EC-281
Vehicle identification number...........................GI-29
Vehicle speed sensor (VSS) ..................EC-99, 397
Ventilator door control rod adjustment ...........HA-61
Viscosity number (SAE)...........................MA-17, 18
VNT - Wiring diagram ..................................EC-283
VSS - Wiring diagram ..................................EC-101
W
WARN - Wiring diagram ...........................EL-82, 93
Warning chime ..........................................EL-81, 93
Warning lamps ..........................................EL-81, 82
Washer, front ...................................................EL-94
Washer, rear....................................................EL-96
Water cock control rod adjustment ................HA-63
Water pump ..............................................LC-11, 29
Water temperature gauge ...............................EL-72
Weatherstrip - See Exterior ............................BT-21
Wheel alignment (front) ....................................FA-8
Wheel balance ...............................................MA-43
Wheel bearing (front axle) ................................FA-6
Wheel bearing (rear) ..................................RA-5, 16
Wheel hub (front) ........................................FA-4, 18
Wheel sensors (ABS)...............................BR-38, 42
Wheel size .......................................................GI-31
WINDOW - Wiring diagram ..........................EL-134
Window, back door .........................................BT-47
Window, door ..................................................BT-42
Window, rear side .....................................BT-42, 43
Window, side - See Rear side window ...........BT-43
Windshield.......................................................BT-42
WIP/R - Wiring diagram ..................................EL-96
WIPER - Wiring diagram ........................EL-94, 100
Wiper and washer.....................................EL-94, 98
Wiper, front......................................................EL-94
Wiper, rear ......................................................EL-96
Wiring Diagram (Cell code) list .....................EL-291
ALPHABETICAL INDEX
IDX-7
Page 1460 of 1767
MAINTENANCE
SECTION
MA
CONTENTS
PRE-DELIVERY INSPECTION ITEMS............................3
GENERAL MAINTENANCE............................................4
PERIODIC MAINTENANCE............................................5
Maintenance Schedule for Diesel Engine Models
(annual mileage < 30,000 km/year) ............................5
Maintenance Schedule for Diesel Engine Models
(annual mileage > 30,000 km/year) ............................8
Maintenance Under Severe Driving Conditions
(annual mileage < 30,000 km/year) .......................... 11
Maintenance Under Severe Driving Conditions
(annual mileage > 30,000 km/year) ..........................14
RECOMMENDED FLUIDS AND LUBRICANTS...........17
Fluids and Lubricants ................................................17
SAE Viscosity Number ..............................................18
Engine Coolant Mixture Ratio....................................19
TD
ENGINE MAINTENANCE..............................................20
Retightening Manifold Bolts and Nuts .......................20
Adjusting Intake and Exhaust Valve Clearance ........20
Drive Belt Inspection..................................................20
Changing Engine Oil..................................................21
Changing Oil Filter .....................................................21
Changing Engine Coolant..........................................22
Checking Cooling System .........................................23
Checking and Replacing fuel filter and Draining
Water .........................................................................23
Cleaning and Replacing Air Cleaner Filter (Dry
paper type).................................................................24
Checking Injection Nozzle .........................................25
Checking Idle Speed .................................................26
ZD
ENGINE MAINTENANCE..............................................28
Checking Tightening Torque ......................................28
Adjusting Intake and Exhaust Valve Clearance ........28
Checking Drive Belt ...................................................28
Removal .....................................................................29Installation ..................................................................29
Changing Engine Oil..................................................29
Changing Engine Oil Filter ........................................30
Changing Engine Coolant..........................................31
Checking Cooling System .........................................32
Checking and Replacing Fuel Filter and Draining
Water .........................................................................33
Checking Fuel Lines ..................................................34
Cleaning and Replacing Air Cleaner Filter ................35
CHASSIS AND BODY MAINTENANCE.......................36
Checking Exhaust System.........................................36
Checking Clutch Operation........................................36
Checking Clutch Fluid Level and Leaks ....................36
Checking Clutch System ...........................................36
Checking M/T Oil .......................................................36
Changing M/T Oil.......................................................37
Checking Water Entry ................................................37
Checking Transfer Oil ................................................37
Changing Transfer Oil................................................38
Checking Propeller Shaft ...........................................38
Checking Differential Gear Oil ...................................38
Changing Differential Gear Oil ..................................39
Checking Front Wheel Bearing Grease ....................39
Repacking Front Wheel Bearing Grease ..................39
Checking Free-running Hub Grease .........................40
Checking Brake Fluid Level and Leaks.....................40
Checking Brake System ............................................40
Checking Brake Booster, Vacuum Hoses,
Connections and Check Valve ..................................40
Checking Disc Brake .................................................40
Checking Drum Brake ...............................................41
Checking Foot Brake Pedal Operation......................42
Checking Parking Brake ............................................42
Changing Brake Fluid ................................................43
Balancing Wheels ......................................................43
Tire Rotation ..............................................................43
Checking Steering Gear and Linkage .......................43
Checking Fluid Level and Leaks (Power steering) ...44
Page 1487 of 1767
Checking Tightening Torque
Checking should be performed while engine is cold.
MANIFOLD BOLTS AND NUTS
Intake and exhaust manifolds:
Intake
:25-28N×m (2.5 - 2.9 kg-m, 18 - 20 ft-lb)
Exhaust
:40-49N×m (4.0 - 4.5 kg-m, 29 - 36 ft-lb)
Adjusting Intake and Exhaust Valve Clearance
Refer to EM section.
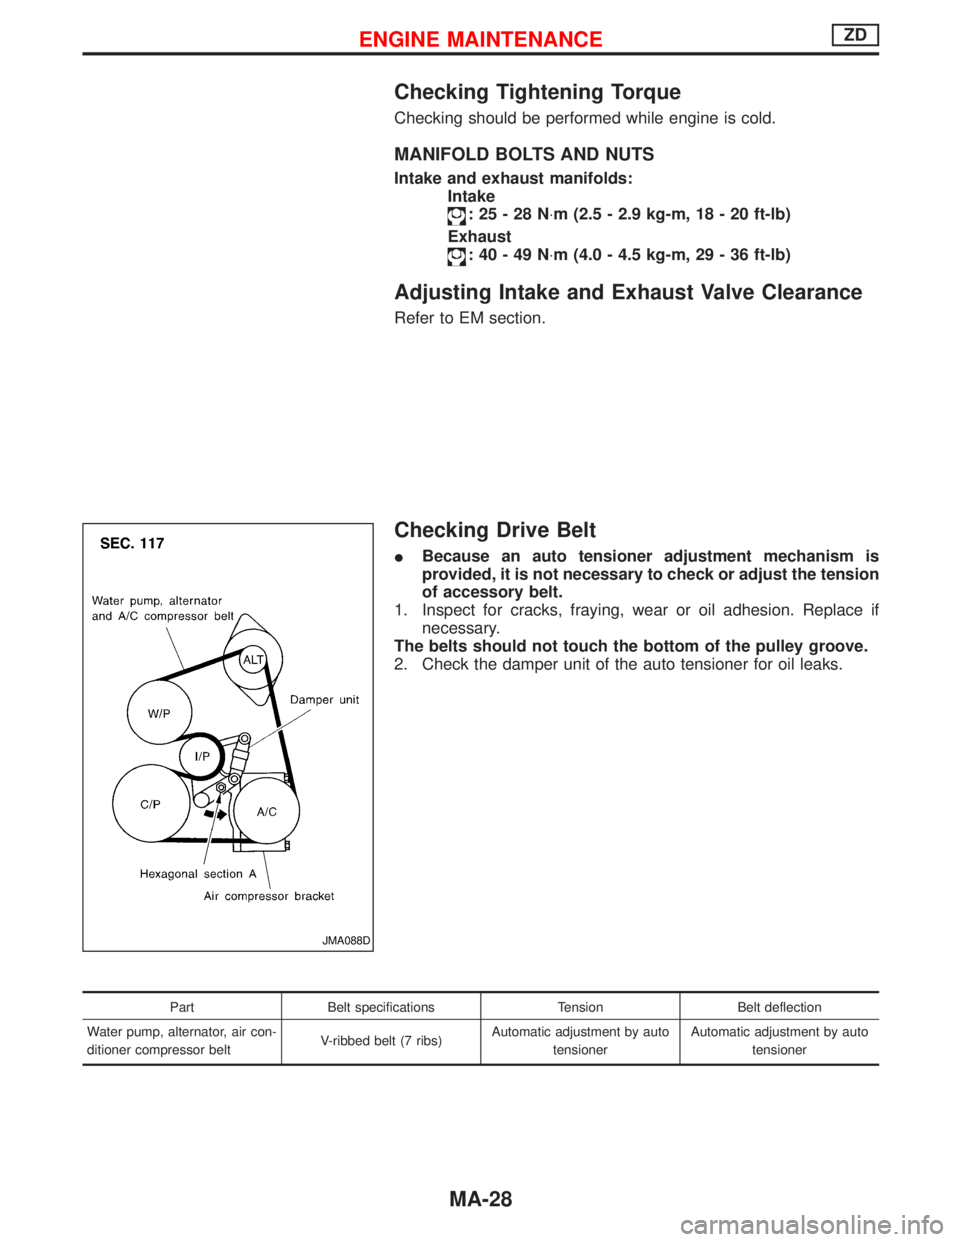
Checking Drive Belt
IBecause an auto tensioner adjustment mechanism is
provided, it is not necessary to check or adjust the tension
of accessory belt.
1. Inspect for cracks, fraying, wear or oil adhesion. Replace if
necessary.
The belts should not touch the bottom of the pulley groove.
2. Check the damper unit of the auto tensioner for oil leaks.
Part Belt specifications Tension Belt deflection
Water pump, alternator, air con-
ditioner compressor beltV-ribbed belt (7 ribs)Automatic adjustment by auto
tensionerAutomatic adjustment by auto
tensioner
JMA088D
ENGINE MAINTENANCEZD
MA-28
Page 1509 of 1767
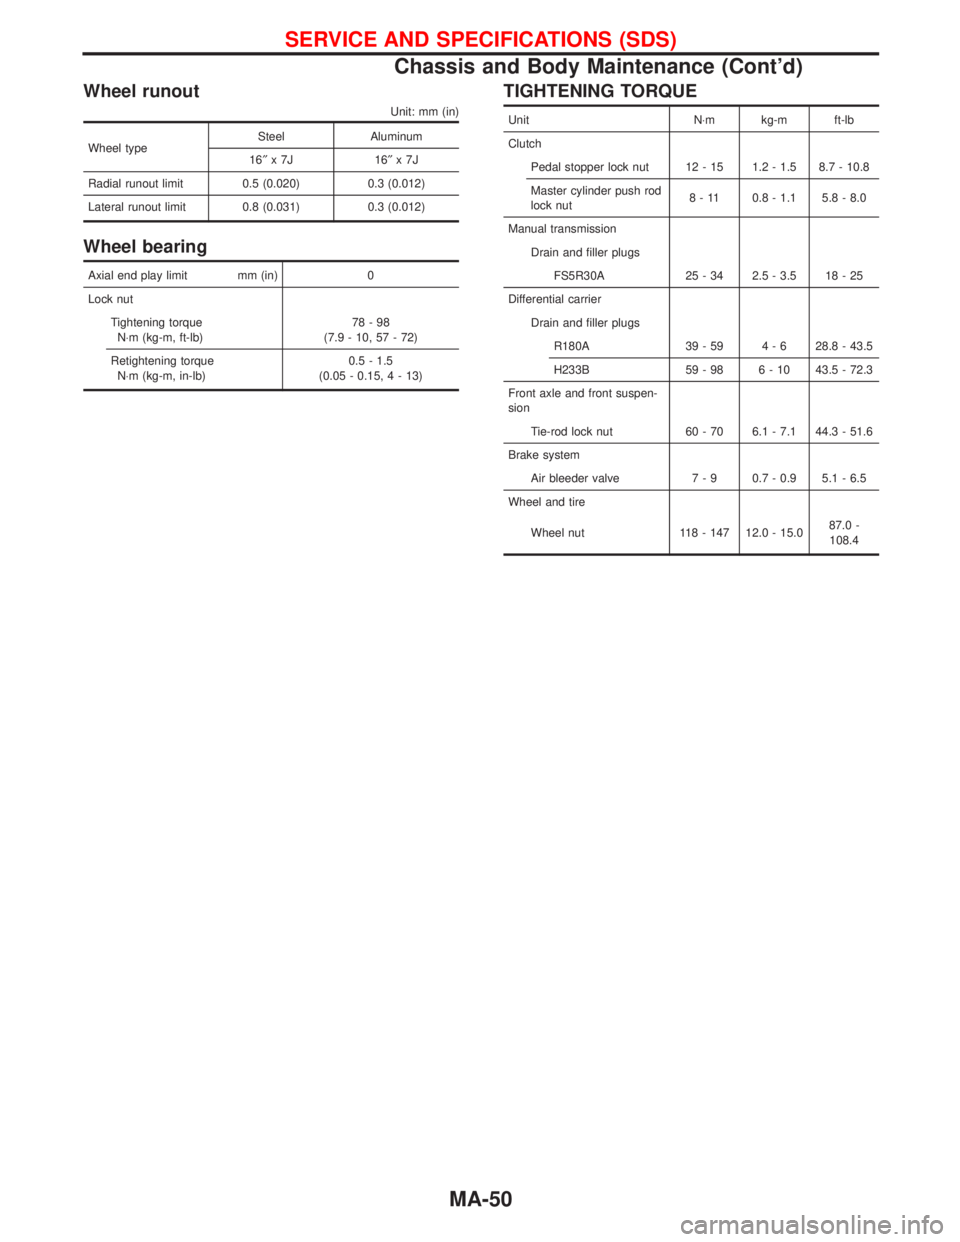
Wheel runout
Unit: mm (in)
Wheel typeSteel Aluminum
16²x7J 16²x7J
Radial runout limit 0.5 (0.020) 0.3 (0.012)
Lateral runout limit 0.8 (0.031) 0.3 (0.012)
Wheel bearing
Axial end play limit mm (in) 0
Lock nut
Tightening torque
N×m (kg-m, ft-lb)78-98
(7.9 - 10, 57 - 72)
Retightening torque
N×m (kg-m, in-lb)0.5 - 1.5
(0.05 - 0.15,4-13)
TIGHTENING TORQUE
Unit N×m kg-m ft-lb
Clutch
Pedal stopper lock nut 12 - 15 1.2 - 1.5 8.7 - 10.8
Master cylinder push rod
lock nut8 - 11 0.8 - 1.1 5.8 - 8.0
Manual transmission
Drain and filler plugs
FS5R30A 25 - 34 2.5 - 3.5 18 - 25
Differential carrier
Drain and filler plugs
R180A 39 - 59 4 - 6 28.8 - 43.5
H233B 59 - 98 6 - 10 43.5 - 72.3
Front axle and front suspen-
sion
Tie-rod lock nut 60 - 70 6.1 - 7.1 44.3 - 51.6
Brake system
Air bleeder valve 7 - 9 0.7 - 0.9 5.1 - 6.5
Wheel and tire
Wheel nut 118 - 147 12.0 - 15.087.0 -
108.4
SERVICE AND SPECIFICATIONS (SDS)
Chassis and Body Maintenance (Cont'd)
MA-50
Page 1517 of 1767
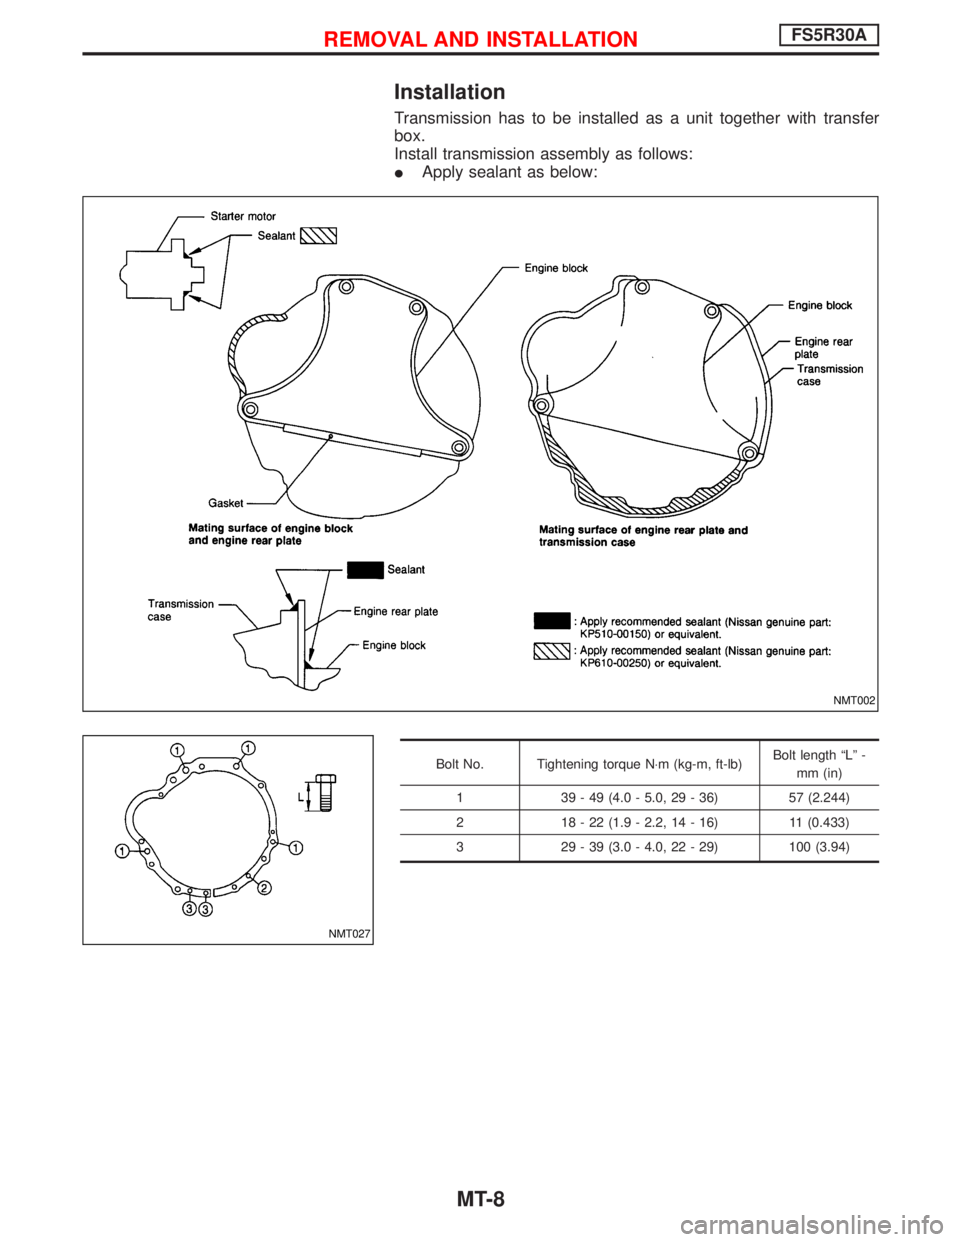
Installation
Transmission has to be installed as a unit together with transfer
box.
Install transmission assembly as follows:
IApply sealant as below:
Bolt No. Tightening torque N×m (kg-m, ft-lb)Bolt length ªLº -
mm (in)
1 39 - 49 (4.0 - 5.0, 29 - 36) 57 (2.244)
2 18 - 22 (1.9 - 2.2, 14 - 16) 11 (0.433)
3 29 - 39 (3.0 - 4.0, 22 - 29) 100 (3.94)
NMT002
NMT027
REMOVAL AND INSTALLATIONFS5R30A
MT-8
Page 1548 of 1767
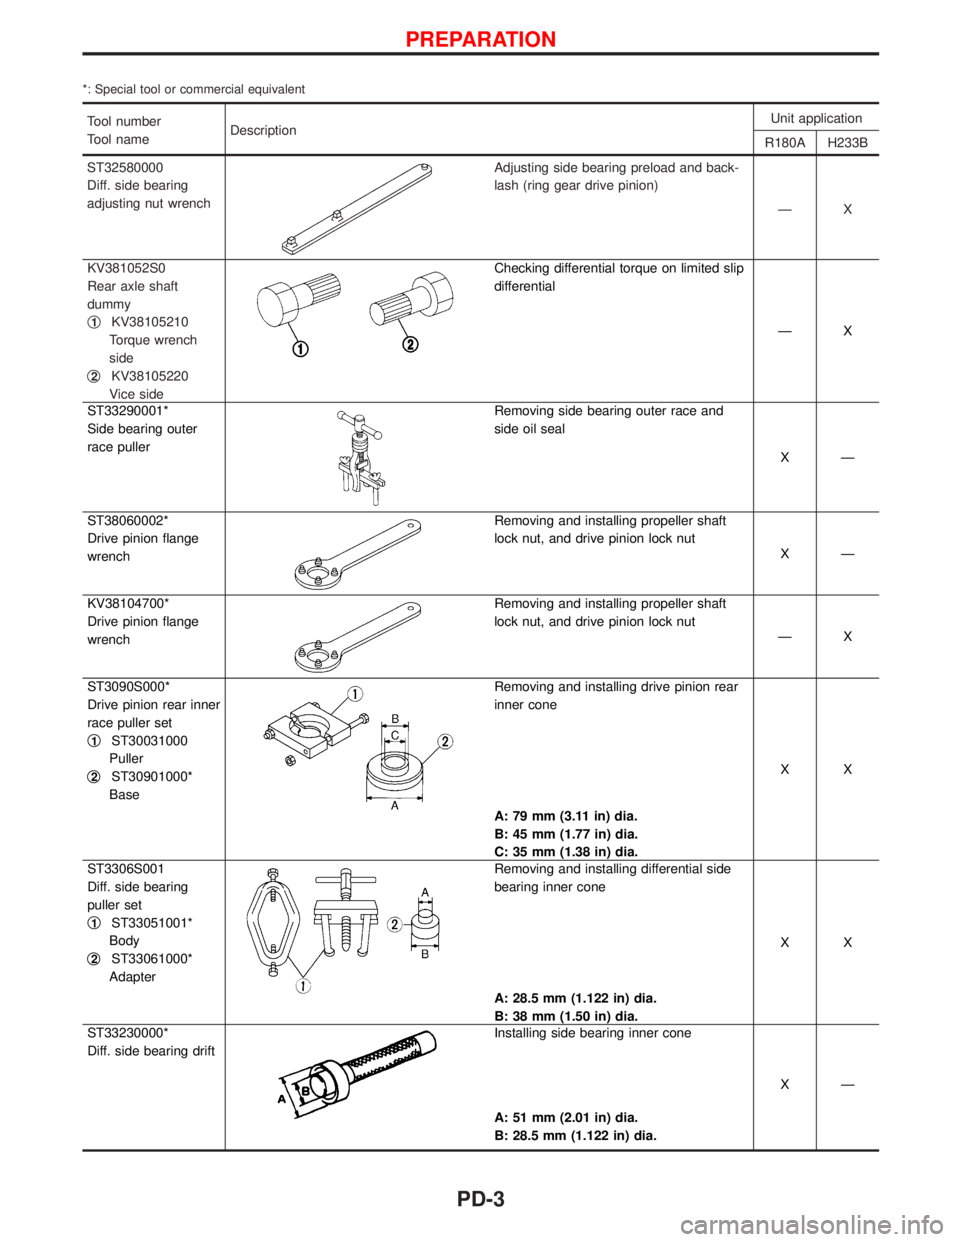
*: Special tool or commercial equivalent
Tool number
Tool nameDescriptionUnit application
R180A H233B
ST32580000
Diff. side bearing
adjusting nut wrench
Adjusting side bearing preload and back-
lash (ring gear drive pinion)
ÐX
KV381052S0
Rear axle shaft
dummy
q
1KV38105210
Torque wrench
side
q
2KV38105220
Vice side
Checking differential torque on limited slip
differential
ÐX
ST33290001*
Side bearing outer
race puller
Removing side bearing outer race and
side oil seal
XÐ
ST38060002*
Drive pinion flange
wrench
Removing and installing propeller shaft
lock nut, and drive pinion lock nut
XÐ
KV38104700*
Drive pinion flange
wrench
Removing and installing propeller shaft
lock nut, and drive pinion lock nut
ÐX
ST3090S000*
Drive pinion rear inner
race puller set
q
1ST30031000
Puller
q
2ST30901000*
Base
Removing and installing drive pinion rear
inner cone
A: 79 mm (3.11 in) dia.
B: 45 mm (1.77 in) dia.
C: 35 mm (1.38 in) dia.XX
ST3306S001
Diff. side bearing
puller set
q
1ST33051001*
Body
q
2ST33061000*
Adapter
Removing and installing differential side
bearing inner cone
A: 28.5 mm (1.122 in) dia.
B: 38 mm (1.50 in) dia.XX
ST33230000*
Diff. side bearing drift
Installing side bearing inner cone
A: 51 mm (2.01 in) dia.
B: 28.5 mm (1.122 in) dia.XÐ
PREPARATION
PD-3
Page 1557 of 1767
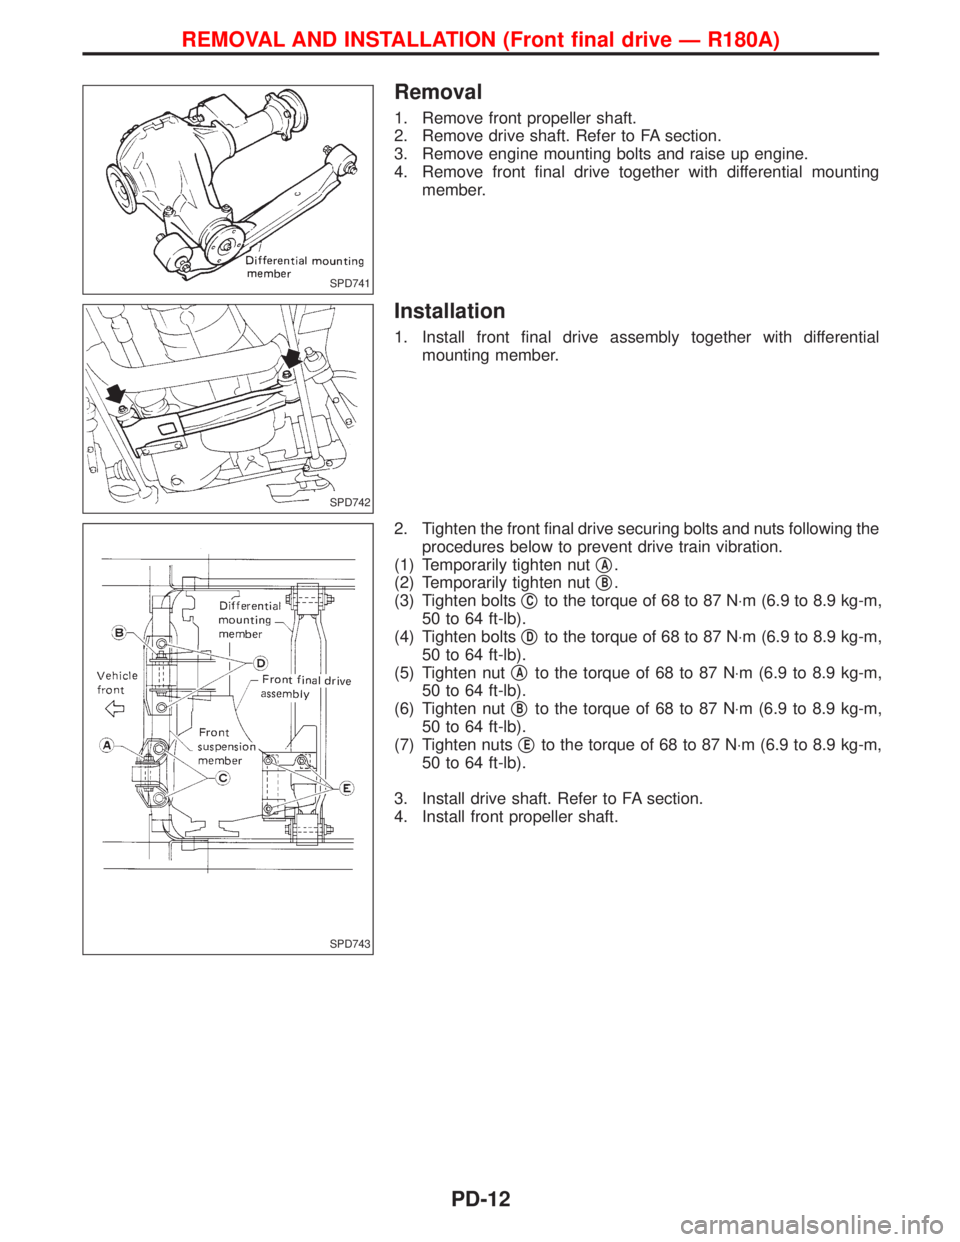
Removal
1. Remove front propeller shaft.
2. Remove drive shaft. Refer to FA section.
3. Remove engine mounting bolts and raise up engine.
4. Remove front final drive together with differential mounting
member.
Installation
1. Install front final drive assembly together with differential
mounting member.
2. Tighten the front final drive securing bolts and nuts following the
procedures below to prevent drive train vibration.
(1) Temporarily tighten nutq
A.
(2) Temporarily tighten nutq
B.
(3) Tighten boltsq
Cto the torque of 68 to 87 N×m (6.9 to 8.9 kg-m,
50 to 64 ft-lb).
(4) Tighten boltsq
Dto the torque of 68 to 87 N×m (6.9 to 8.9 kg-m,
50 to 64 ft-lb).
(5) Tighten nutq
Ato the torque of 68 to 87 N×m (6.9 to 8.9 kg-m,
50 to 64 ft-lb).
(6) Tighten nutq
Bto the torque of 68 to 87 N×m (6.9 to 8.9 kg-m,
50 to 64 ft-lb).
(7) Tighten nutsq
Eto the torque of 68 to 87 N×m (6.9 to 8.9 kg-m,
50 to 64 ft-lb).
3. Install drive shaft. Refer to FA section.
4. Install front propeller shaft.
SPD741
SPD742
SPD743
REMOVAL AND INSTALLATION (Front final drive Ð R180A)
PD-12
Page 1576 of 1767
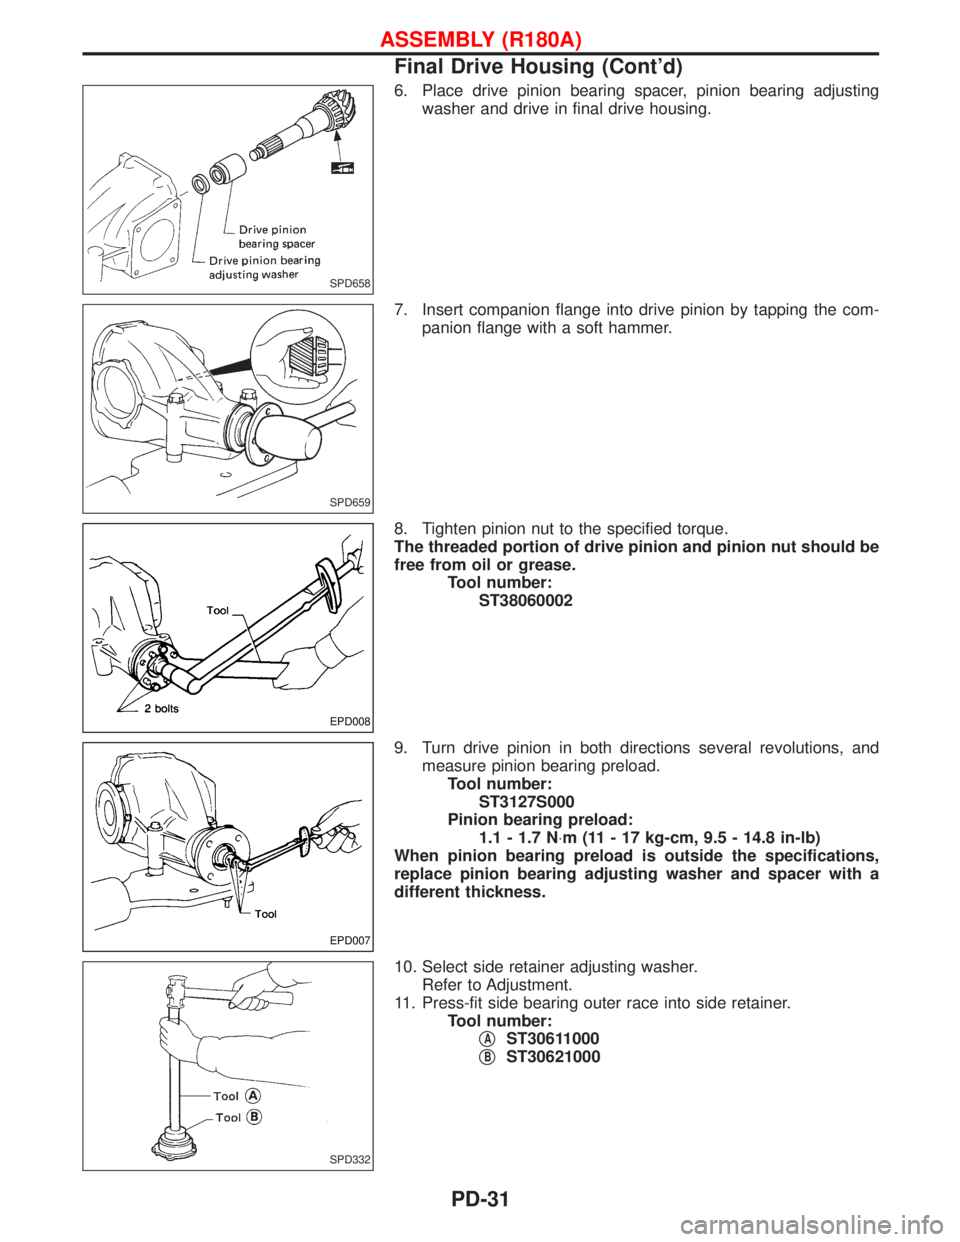
6. Place drive pinion bearing spacer, pinion bearing adjusting
washer and drive in final drive housing.
7. Insert companion flange into drive pinion by tapping the com-
panion flange with a soft hammer.
8. Tighten pinion nut to the specified torque.
The threaded portion of drive pinion and pinion nut should be
free from oil or grease.
Tool number:
ST38060002
9. Turn drive pinion in both directions several revolutions, and
measure pinion bearing preload.
Tool number:
ST3127S000
Pinion bearing preload:
1.1 - 1.7 N×m (11 - 17 kg-cm, 9.5 - 14.8 in-lb)
When pinion bearing preload is outside the specifications,
replace pinion bearing adjusting washer and spacer with a
different thickness.
10. Select side retainer adjusting washer.
Refer to Adjustment.
11. Press-fit side bearing outer race into side retainer.
Tool number:
q
AST30611000
q
BST30621000
SPD658
SPD659
EPD008
EPD007
SPD332
ASSEMBLY (R180A)
Final Drive Housing (Cont'd)
PD-31