2002 NISSAN QUEST ECO mode
[x] Cancel search: ECO modePage 146 of 294
WARNING
cThe air conditioner cooling function
operates only when the engine is
running.
cDo not leave children, impaired
adults, or pets alone in your vehicle.
On hot, sunny days, temperatures in
a closed vehicle could quickly be-
come high enough to cause severe
or possibly fatal injuries to people or
animals.
cDo not use the recirculation mode
for long periods as it may cause the
interior air to become stale and the
windows to fog up.
cPositioning of the heater and air con-
ditioner controls should not be done
while driving, so full attention may
be given to vehicle operation.
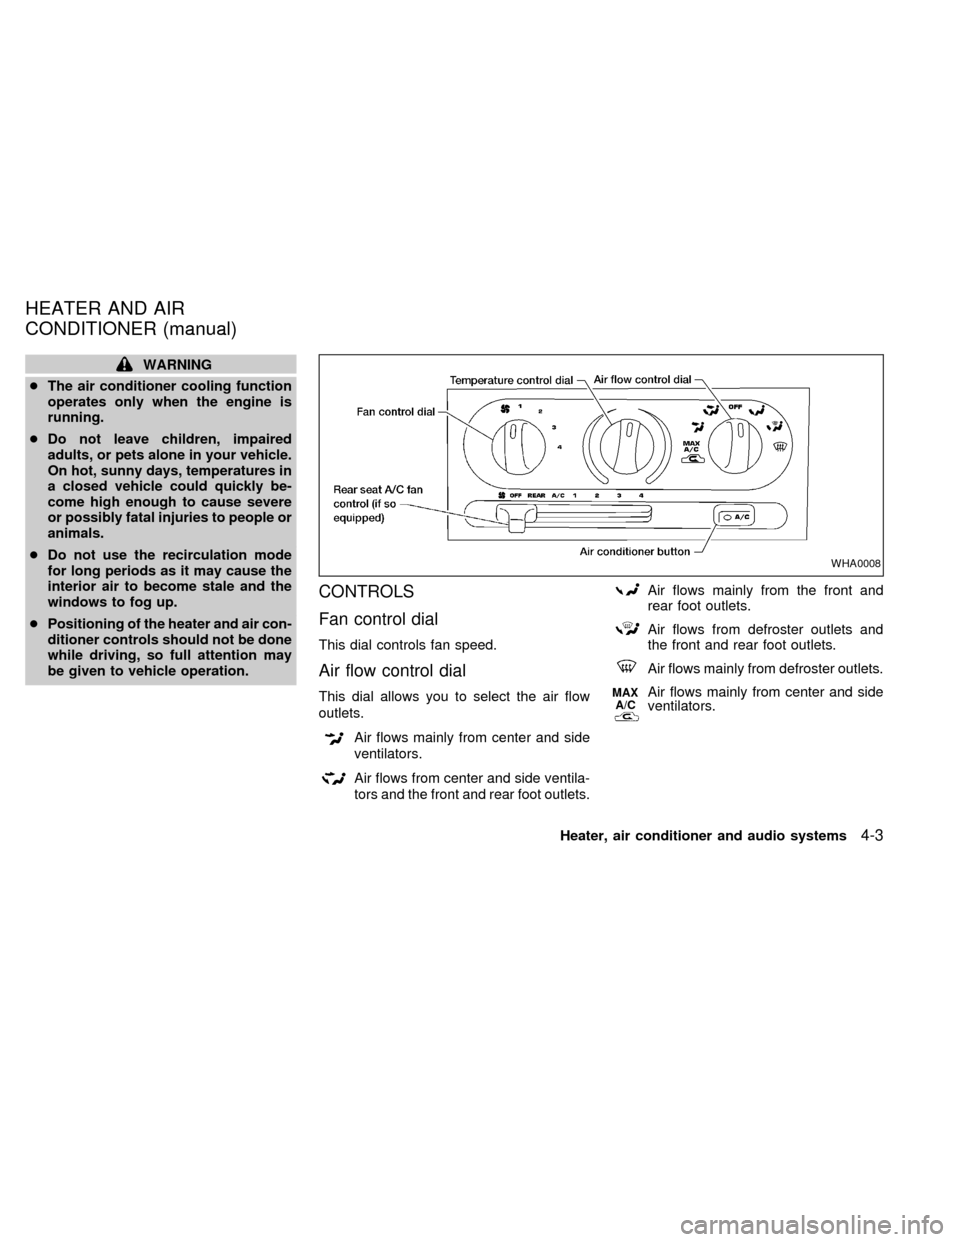
CONTROLS
Fan control dial
This dial controls fan speed.
Air flow control dial
This dial allows you to select the air flow
outlets.
Air flows mainly from center and side
ventilators.
Air flows from center and side ventila-
tors and the front and rear foot outlets.
Air flows mainly from the front and
rear foot outlets.
Air flows from defroster outlets and
the front and rear foot outlets.
Air flows mainly from defroster outlets.
MAX
A/CAir flows mainly from center and side
ventilators.
WHA0008
HEATER AND AIR
CONDITIONER (manual)
Heater, air conditioner and audio systems4-3
ZX
Page 147 of 294
OFF position
The OFF position shuts off the air supply to
all outlets and stops all fan operations. Use
the OFF position to prevent cold air from
entering the passenger compartment under
cold outside conditions before the engine is
warmed up.
MAX A/C Position
Interior air is recirculated inside the vehicle.
Turn the air control dial to the MAX A/C
position when driving on a dusty road or
to help keep out traffic fumes.
Turn the air control dial to the MAX A/C
position for improved air conditioner perfor-
mance under high temperature and high hu-
midity conditions.
CAUTION
Do not use the recirculation mode for
long periods as it may cause the inte-
rior air to become stale and the win-
dows to fog up.
Temperature control dial
This dial allows you to adjust the tempera-
ture of the outlet air.
Air conditioning button
Start the engine, turn the fan control dial to
the desired (one to four) position, select an
air control position and push the air condi-
tioner button to turn on the air conditioner.
The indicator light comes on when the air
conditioner is operating. To stop the air con-
ditioner, push the button again; the indicator
light goes off.
The air conditioner cooling function op-
erates only when the engine is running.
HEATER OPERATION
Heating
This mode is used to direct most of the hot
air to the front and rear floor outlets. Rear
passenger heat is provided by the front
system through floor outlets located under
both front seats.
1. Move the air control dial to the
po-
sition.
2. Turn the fan control dial to select speed.
3. Move the temperature control dial to the
desired position.
Ventilation
This mode directs air to the side and center
vents.
1. Move the air control dial to the
po-
sition.
2. Turn the fan control dial to select speed.
3. Move the temperature control dial to the
desired position.
Defrosting or defogging
This mode is used to defrost/defog the
windows.
1. Move the air control dial to the
po-
sition.
2. Turn the fan control dial to select speed.
3. Move the temperature control dial to the
desired position.
When the
position is selected, the
air conditioner automatically turns on
(however, the indicator light will not illu-
minate) if the outside temperature is
more than 45ÉF (7ÉC). This dehumidifies
the air which helps defog the windshield.
The air recirculation mode automatically
turns off, allowing outside air to be drawn
4-4Heater, air conditioner and audio systems
ZX
Page 154 of 294
WARNING
cThe air conditioner cooling function
operates only when the engine is
running.
cDo not leave children, impaired
adults, or pets alone in your vehicle.
On hot, sunny days, temperatures in
a closed vehicle could quickly be-
come high enough to cause severe
or possibly fatal injuries to people or
animals.
cDo not use the recirculation mode
for long periods as it may cause theinterior air to become stale and the
windows to fog up.
cPositioning of the heater and air con-
ditioner controls should not be done
while driving, so full attention may
be given to vehicle operation.
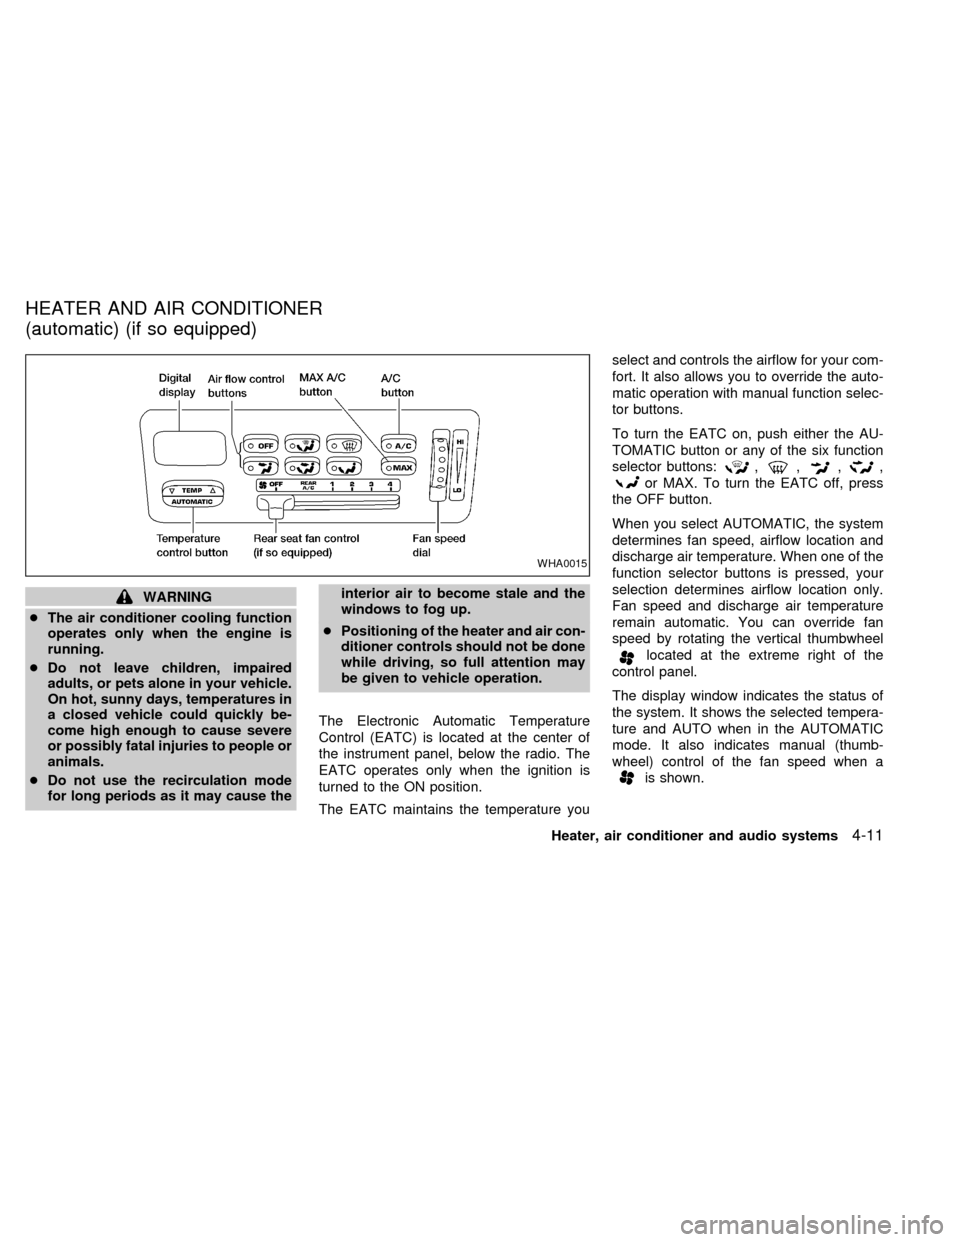
The Electronic Automatic Temperature
Control (EATC) is located at the center of
the instrument panel, below the radio. The
EATC operates only when the ignition is
turned to the ON position.
The EATC maintains the temperature youselect and controls the airflow for your com-
fort. It also allows you to override the auto-
matic operation with manual function selec-
tor buttons.
To turn the EATC on, push either the AU-
TOMATIC button or any of the six function
selector buttons:
,,,,
or MAX. To turn the EATC off, press
the OFF button.
When you select AUTOMATIC, the system
determines fan speed, airflow location and
discharge air temperature. When one of the
function selector buttons is pressed, your
selection determines airflow location only.
Fan speed and discharge air temperature
remain automatic. You can override fan
speed by rotating the vertical thumbwheel
located at the extreme right of the
control panel.
The display window indicates the status of
the system. It shows the selected tempera-
ture and AUTO when in the AUTOMATIC
mode. It also indicates manual (thumb-
wheel) control of the fan speed when a
is shown.
WHA0015
HEATER AND AIR CONDITIONER
(automatic) (if so equipped)
Heater, air conditioner and audio systems4-11
ZX
Page 156 of 294
the instrument panel registers. The
indicator light comes on, and the
display window shows the set temperature.
The EATC heats the air if the selected
temperature is warmer than the outside air
coming into the vehicle. However, the air is
not cooled regardless of the temperature
setting, unless the A/C button is selected.
Push this button to get air from the front and
rear floor outlets and instrument panel ven-
tilators at the same time. The
indicator
light comes on and the display window
shows the set temperature. The EATC
heats the air if the selected temperature is
warmer than the outside air coming into the
vehicle. However, the air is not cooled re-
gardless of the temperature setting, unless
the A/C button is selected.
Push this button to direct airflow to the front
and rear floor outlets. Theindicator
light comes on, and the display window
shows the set temperature. The EATC
heats the air if the selected temperature is
warmer than the outside air coming into the
vehicle. However, the air is not cooled re-gardless of the temperature setting, unless
the A/C button is selected.
Push the MAX button to choose air recircu-
lation. In this mode the EATC system recir-
culates the air inside the vehicle rather than
drawing air from outside. Air is distributed
through the instrument panel ventilators
similar to
mode. Use this mode to rap-
idly cool the inside of the vehicle, or to
dehumidify the air inside the vehicle.
Activate the air conditioner in any of the
override modes listed above by pressing the
A/C button. The A/C indicator light comes
on to verify activation, and cooled air flows
from the vents. Fan speed continues to be
controlled by the EATC unless the fan
speed thumbwheel is used to override.English/metric mode
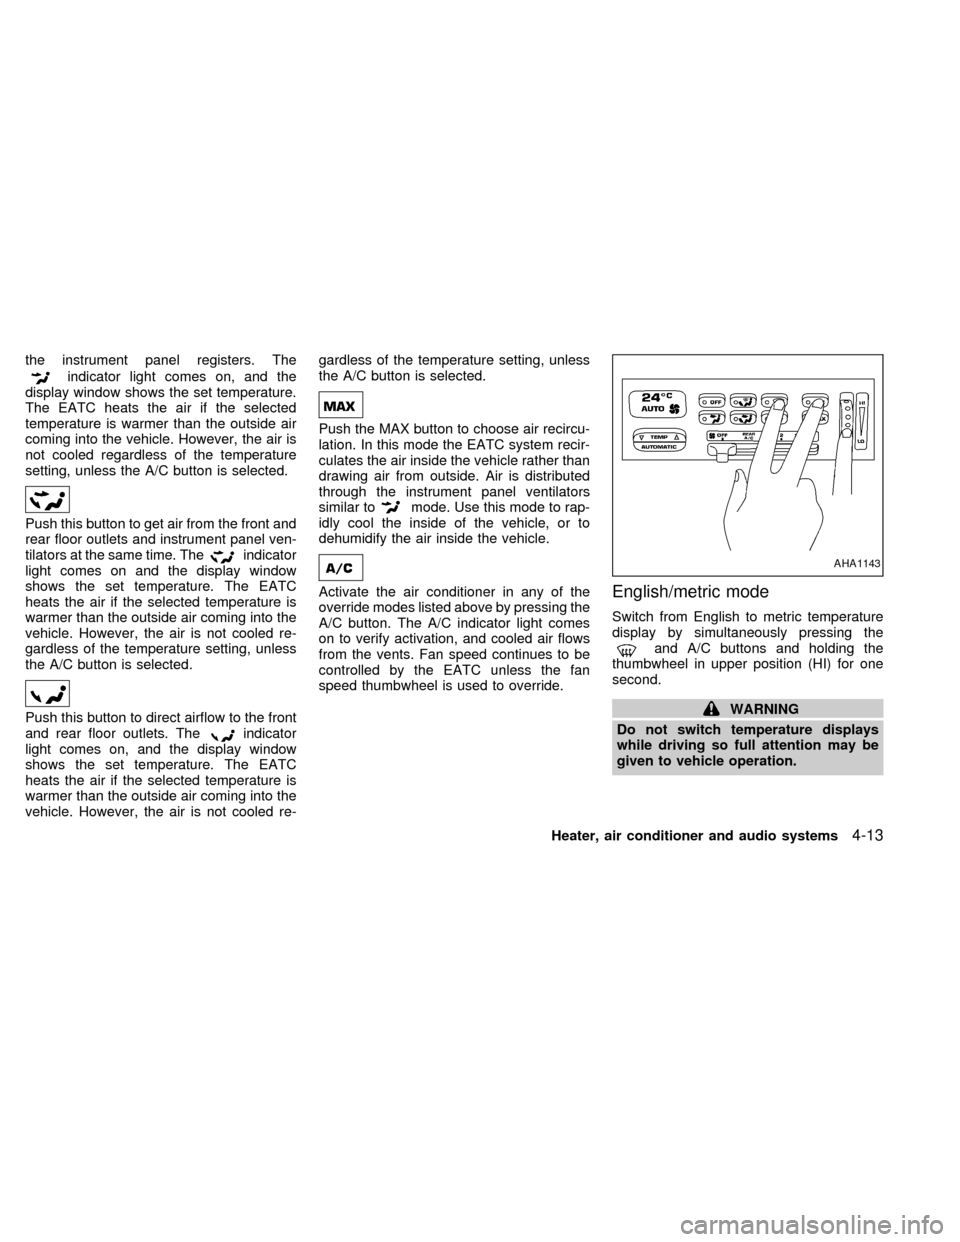
Switch from English to metric temperature
display by simultaneously pressing the
and A/C buttons and holding the
thumbwheel in upper position (HI) for one
second.
WARNING
Do not switch temperature displays
while driving so full attention may be
given to vehicle operation.
AHA1143
Heater, air conditioner and audio systems4-13
ZX
Page 164 of 294
window. When the indicator bar is in the
center position the sound is equally distrib-
uted between the right and left speakers.
Following balance adjustment, the display
window shows the current setting for three
seconds, then returns to the display prior to
adjustment.
Fader
Fader control allows you to adjust sound
distribution between the front and rear
speakers.
Push the FADE button and the setting indi-
cator bar appears in the display window.
Press the SELECT button
to shift the
sound to the front speakers. The single
indicator bar moves to the right of the dis-
play window. Press the SELECT button
to shift the sound to the rear speakers.
The single indicator bar moves to the left of
the display window. When the indicator bar
is in the center position the sound is equally
distributed between the front and rear
speakers.
Following fader adjustment, the display win-
dow shows the current setting for three
seconds, then returns to the display prior to
adjustment.COMP button
Press this button to activate the compres-
sion function. This reduces the dynamic
range, which provides the listener with a
more consistent level of volume. The dis-
play window shows a C when the COMP
button is pushed.
Clock operation
The clock is on in the display regardless of
what mode, media, or function the radio is in
as long as the ignition is in ACC or ON.
Clock set
Press the RDS/CLK button until SELECT
HOURS is displayed then use the SEL
buttons to change the hour, press
the RDS/CLK button again until SELECT
MINS is displayed then use the SEL
buttons to change the minutes.
The display will return to clock priority mode
in 10 seconds or press the RDS/CLK button
to return to the clock display.
Selecting the desired band
Push the AM or FM buttons to change to AM
or FM band reception.
The FM stereo indicator, ST illuminates during
FM stereo reception. When the stereo broad-
cast signal is weak, the radio automaticallychanges from stereo to monaural reception.
FM-AM radio operation
MUTE button
Push the MUTE button to mute out the
radio.
TUNE buttons
WARNING
The radio should not be tuned while
driving so full attention may be given to
vehicle operation.
Use the
orbuttons for manual
tuning. To move quickly through the chan-
nels, hold either of the tune buttons down
for more than 0.5 seconds.
AUTO SET
Press the AUTO button while listening to the
radio to activate the auto set feature. When
AUTO is depressed for less than 5 seconds,
the display window momentarily indicates
AUTO ON, and the radio seeks the first six
strong stations for the respective band. The
first six strong stations are then stored in
order in memory buttons one through six.
Heater, air conditioner and audio systems
4-21
ZX
Page 165 of 294

Only stations in the selected band are set,
and the station seek begins from the last
frequency stored in memory button six. If
AM, FM, SCAN, TUNE, SEEK, AUTO or a
memory button is pushed while auto set is
operating, auto set is canceled and AUTO
OFF shows in the display window.
AUTO LOAD
Press the AUTO button for longer than 5
seconds while listening to the radio to acti-
vate the auto load feature. When AUTO is
depressed for longer than 5 seconds, the
display window momentarily indicates
AUTO LOAD, and the radio seeks the first
six strong stations for every band. The first
six strong stations are then stored in order
in memory buttons one through six for each
band (AM, FM1, and FM2).
SEEK tuning
Push the SEEKorbuttons to find the
next broadcast station. Pushing the
SEEKS up andbutton SEEKS down.
Pushing the button again continues the SEEK
function. Once the highest broadcast station
is reached, the radio continues in the SEEK
mode at the lowest station. Once the lowest
broadcast station is reached, the radio con-tinues in the SEEK mode at the highest
station.
SCAN tuning
Push the SCAN tuning button, SCAN illumi-
nates in the display. SCAN tuning begins
from low to high frequencies and stops at
each broadcasting station for 5 seconds.
Pushing the button again during this 5 sec-
ond period stops SCAN tuning and remains
tuned to that station.
Station memory operations
Six stations can be set for the AM band.
Twelve stations can be set for the FM band
(six for FM1, six for FM2).
1. Push the FM or AM buttons to select AM,
AHA1107
4-22Heater, air conditioner and audio systems
ZX
Page 166 of 294

FM1, or FM2. The selected band illumi-
nates in the display.
2. Tune to the desired station.
3. Push the desired station select button for
more than 1.5 seconds. The radio mutes
when the select button is pushed.
4. When the sound resumes, memorizing is
complete.
5. Other station select buttons can be set in
the same manner.
If the battery is disconnected, or if the radio
fuse opens, the radio memory is canceled.
In that case, reset the desired stations.
RDS (Radio Data System)
RDS stands for Radio Data System, and is
a data information service transmitted by
some radio stations on the FM band (not
AM band) encoded within a regular radio
broadcast. Most RDS stations are currently
in large cities, but many stations are now
considering broadcasting RDS data.
RDS can display:
cStation name or call-sign, such as
``WHFR 98.3''.cMusic or programming type such as
``Classical'', ``Country'', or ``Rock''.
cTraffic reports about delays or construc-
tion.
Using RDS
To turn RDS on push the RDS/CLK button
until RDS OFF is displayed, then press the
SEL button until RDS ON is displayed.
To change display type turn RDS ON then
use the SEL button to choose between:
cSHOW TYPE - Music or program type.
cSHOW NAME - Station name or call-
sign.
cSHOW NONE - No text display.
To choose traffic reports press the
RDS/CLK button until TRAFFIC OFF is dis-
played, the use then SEL button to choose
TRAFFIC ON, then use the seek or scan
control to look for a station that may transmit
traffic reports, the radio will display a
``TRAF'' icon to show it is in traffic mode and
tuned to a station that may transmit traffic
reports. If the radio searches through the
whole band and then returns to the previous
station it was originally playing there are nostations in the area that are transmitting
traffic reports.
If a cassette or compact disc is being played
while the traffic option is on and the station
previously tuned into displays a traffic bul-
letin the radio will pause the cassette or
compact disc and broadcast the bulletin,
then resume playing the cassette or com-
pact disc.
Using RDS to search for programming type
Certain areas have a limited number of
stations that transmit RDS. Many stations
transmit call letters and frequencies only.
Searching or scanning by program type
may yield a limited number of selections.
Press the RDS/CLK button until FIND
CLASSIC is displayed, then use the SEL
button to choose between CLASSIC,
COUNTRY, INFO, JAZZ, OLDIES, R&B,
RELIGUS (Religious), ROCK, SOFT and
TOP40. When you have chosen a program
type, use the SEEK, SCAN, or AUTOSET
controls to look for a station transmitting that
kind of program. If the radio searches
through the whole band and then returns to
the previous station it was originally playing
there are no stations in the area that are
Heater, air conditioner and audio systems
4-23
ZX
Page 170 of 294
uted between the right and left speakers.
Following balance adjustment, the display
window shows the current setting for three
seconds, then returns to the display prior to
adjustment.
Fader
Fader control allows you to adjust sound
distribution between the front and rear
speakers.
Push the FADE button and the setting indi-
cator bar appears in the display window.
Press the SELECT button
to shift the
sound to the front speakers. The single
indicator bar moves to the right of the dis-
play window. Press the SELECT button
to shift the sound to the rear speakers.
The single indicator bar moves to the left of
the display window. When the indicator bar
is in the center position the sound is equally
distributed between the front and rear
speakers.
Following fader adjustment, the display win-
dow shows the current setting for three
seconds, then returns to the display prior to
adjustment.COMP button
Press this button to activate the compres-
sion function. This reduces the dynamic
range, which provides the listener with a
more consistent level of volume. The dis-
play window shows COMP when the COMP
button is pushed.
Clock operation
The clock is on in the display regardless of
what mode, media, or function the radio is in
as long as the ignition is in ACC or ON.
Clock set
Press the RDS/CLK button until SELECT
HOURS is displayed then use the SELbuttons to change the hour, press
the RDS/CLK button again until SELECT
MINS is displayed then use the SEL
buttons to change the minutes.
The display will return to the previous radio
station, tape or CD that was being played
previous to setting the clock in 7 seconds or
you may press the RDS/CLK button until the
previous display appears.Selecting the desired band
Push the AM buttons to change to AM band
or push the FM button to change to FM1 or
FM2 band reception.
The FM stereo indicator, ST illuminates
during FM stereo reception. When the ste-
reo broadcast signal is weak, the radio
automatically changes from stereo to mon-
aural reception.
FM-AM Radio operation
MUTE button
Push the MUTE button to mute out the
radio.
TUNE buttons
WARNING
The radio should not be tuned while
driving so full attention may be given to
vehicle operation.
Use the
orbuttons for manual
tuning. To move quickly through the chan-
nels, hold either of the tune buttons down
for more than 0.5 seconds.
Heater, air conditioner and audio systems
4-27
ZX