Page 97 of 312
Heated outside mirrorsR(if equipped)
Both mirrors are heated
automatically to remove ice, mist
and fog when the rear window
defrost is activated.
Do not remove ice from the
mirrors with a scraper or
attempt to readjust the mirror
glass if it is frozen in place.
These actions could cause damage to the glass and mirrors.
Fold-away mirrors
Pull the side mirrors in carefully
when driving through a narrow
space, like an automatic car wash.
CENTER CONSOLE
Your vehicle may be equipped with a
variety of console features. These
include:
•Utility compartment with
cassette/compact disc storage
•Auxiliary power point
•Cupholders
•Tissue box holder
Use only soft cups in the cupholder. Hard objects can injure you
in a collision.
Controls and features
97
Page 98 of 312
Auxiliarypower point
Power outlets are designed for
accessory plugs only. Do not
hang any type of accessory or
accessory bracket from the plug.
Improper use of the power
outlet can cause damage not
covered by your warranty.
The power point is an additional
power source for electrical accessories.
Rear auxiliary power point (if equipped)
A second auxiliary power point is
located on the rear side of the
console. It is accessible from the
rear seats.
Rear console features
The rear console may incorporate
the following features:
•air vents
•cupholders (will pull up with
break away feature)
•rear power point
Controls and features
98
Page 99 of 312

POSITIVERETENTION FLOOR MAT
Position the driver floor mat so that
the eyelet is over the pointed end of
the retention post and rotate
forward to lock in. Make sure that
the mat does not interfere with the
operation of the accelerator or the
brake pedal. To remove the floor
mat, reverse the installation
procedure.
REAR LIFTGATE
The liftgate area is only intended for cargo, not passengers. You can open
and close the liftgate from outside the vehicle. It cannot be opened from
inside the cargo area.
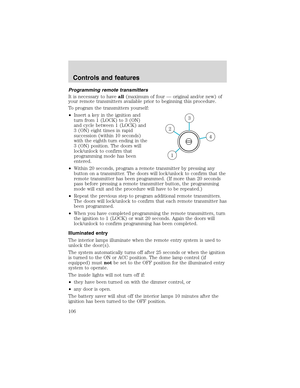
•To open the liftgate window,
press the control on the remote
entry key fob or, with the liftgate
unlocked, push the control button
on theright sideunder the
license plate lamp shield.
•To open the liftgate, unlock the
liftgate (with the power door
locks, the remote entry or the
keyless entry pad) and pull the
middlelever under the license
plate lamp shield.
To lock the liftgate and the liftgate window, use the power door locks or
press the door lock switch on the left side of the cargo area. To manually
lock or unlock the liftgate, move the button located below the window
down or up.
The liftgate door and window should be closed before driving. If not,
possible damage may occur to your vehicle.
Always close liftgate window before opening liftgate. Liftgate
glass and liftgate should never be open at the same time. Failure
to observe this warning may result in personal injury or damage
to your vehicle.
Controls and features
99
Page 100 of 312
Make sure the liftgate door and/or window are closed to prevent
exhaust fumes from being drawn into the vehicle. This will also
prevent passengers and cargo from falling out.
CARGO COVER (IF EQUIPPED)
Your vehicle may be equipped with a cargo area cover that covers the
luggage compartment of your vehicle.
To install the cover:
Push both ends of the cover into the
depressions (right side first) in the
trim panels behind the second row
seat.
To reduce the risk of
injuries, the cargo area
cover must be properly installed
on the rear trim panels.
Do not place any objects on the cargo area cover. They may
obstruct your vision or strike occupants of the vehicle in the
case of a sudden stop or collision.
The cover may cause injury in a sudden stop or accident if it is
not securely installed.
Cargo management system
The cargo management system consists of storage compartments located
in the floor of the rear cargo area.
Controls and features
100
Page 101 of 312

7passenger stowage:
1. To open, lift the release handle
and the lid.
2. To close, lower the lid, lift the
release handle and press down on
the lid.
5 passenger stowage:
When the lid is open, it will stand
up on its own. The lid can be
detached from the vehicle and used
as a knee pad (carpet side up) for
changing a tire.
1. To open, lift the release handle
and the lid.
2. To close, lower the lid, lift the
release handle and press down on the lid.
REMOTE ENTRY SYSTEM
This device complies with part 15 of the FCC rules and with RS-210 of
Industry Canada. Operation is subject to the following two conditions:
(1) This device may not cause harmful interference, and (2) This device
must accept any interference received, including interference that may
cause undesired operation.
Changes or modifications not expressly approved by the party
responsible for compliance could void the user’s authority to
operate the equipment.
The remote entry system allows you to lock or unlock all vehicle doors
and liftgate and open the liftgate window without a key.
The remote entry lock/unlock feature operates in any ignition position.
The liftgate glass features operate as long as the vehicle’s speed is less
than 5 km/h (3 mph). The panic feature operates with the key in the
OFF or ACC position.
If there is any potential remote keyless entry problem with your vehicle,
ensureALLremote entry transmitters are brought to the dealership, to
aid in troubleshooting.
Controls and features
101
Page 102 of 312
Unlockingthedoors/liftgate
Pressthiscontroltounlockthe
driver’sdoor.Theinteriorlamps will
illuminate with the ignition OFF.
Press the control a second time
within three seconds to unlock all
doors and liftgate.
Locking the doors/liftgate
Press this control to lock all doors
and liftgate. The doors and liftgate
will lock and the lamps will flash
once as long as all doors, liftgate,
liftgate glass are closed (also
includes hood on vehicles equipped
with perimeter anti-theft). If any of
these are ajar, the lamps will not
flash.
To confirm all doors are closed and
locked, press the control a second
time within three seconds. The doors will lock again, the lamps will flash
once and the horn will chirp.
If any of the doors or liftgate are ajar, the horn will make two quick
chirps, reminding you to properly close all doors.
Controls and features
102
Page 103 of 312
Openingtheliftgate window
Press the control to unlatch the
liftgate window.
Sounding a panic alarm
Press this control to activate the
alarm.
The personal panic alarm will cycle
the horn and turn signals on/off,
plus illuminate the interior lights.
To deactivate the alarm, press the
control again or turn the ignition to
ACC or ON.
Memory seat feature (if equipped)
The remote entry system can also
control the memory seat feature.
Press the control once to unlock the
driver’s door. Pressing the control
will automatically move the seat to
the desired memory position (the
seat position corresponds to the
transmitter being used).
Controls and features
103
Page 104 of 312

Activating the memory seat feature
To activate this feature:
1. Position the seat to the position you desire.
2. Press the SET control on the
driver’s door panel.
3. Within 5 five seconds, press one
control on the remote transmitter
and then press the 1 or 2 control on
the driver’s door panel to which you
would like to associate with the seat
and Driver 1 or Driver 2 positions.
4. Repeat this procedure for another
remote transmitter if desired.
Deactivating the memory seat feature
To deactivate this feature:
1. Press the SET control on the driver’s door panel.
2. Within 5 five seconds, press any control on the remote transmitter
which you would like to deactivate and then press the SET control on
the driver’s door panel.
3. Repeat this procedure for another remote transmitter if desired.
Replacing the battery
The remote transmitter is powered by one coin type three-volt lithium
battery CR2032 or equivalent. Typical operating range will allow you to
be up to 10 meters (33 feet) away from your vehicle. A decrease in
operating range can be caused by the following factors:
•Weather conditions
•Nearby radio towers
•Structures around the vehicle
•Other vehicles parked next to the vehicle
SE T
12
Controls and features
104