Page 1462 of 1672
LIGHTING
REPAIRS 86-2-7
4.Remove 4 screws and remove lamp.
Refit
1.Fit new lamp and secure with screws.
2. For LH lamp:Fit front bumper assembly.
+ EXTERIOR FITTINGS, REPAIRS,
Bumper assembly - front.
3. For RH lamp: Connect multiplug to harness.
Fit wheel arch liner extension, secure to
bumper valance and liner with screws.
4.Lower vehicle.
Lamp - front fog from 03MY
$% 86.40.96
Remove
1.Remove the front bumper finisher.
+ EXTERIOR FITTINGS, REPAIRS,
Trim finisher - bumper - front - from 03MY.
2.Remove 3 screws securing the fog lamp to the
bumper.
3.Disconnect the fog lamp multiplug and remove
the fog lamp.
Refit
1.Position the fog lamp to the bumper, connect
the multiplug and secure with screws.
2.Fit the front bumper finisher.
+ EXTERIOR FITTINGS, REPAIRS,
Trim finisher - bumper - front - from 03MY.
Page 1463 of 1672

LIGHTING
86-2-8 REPAIRS
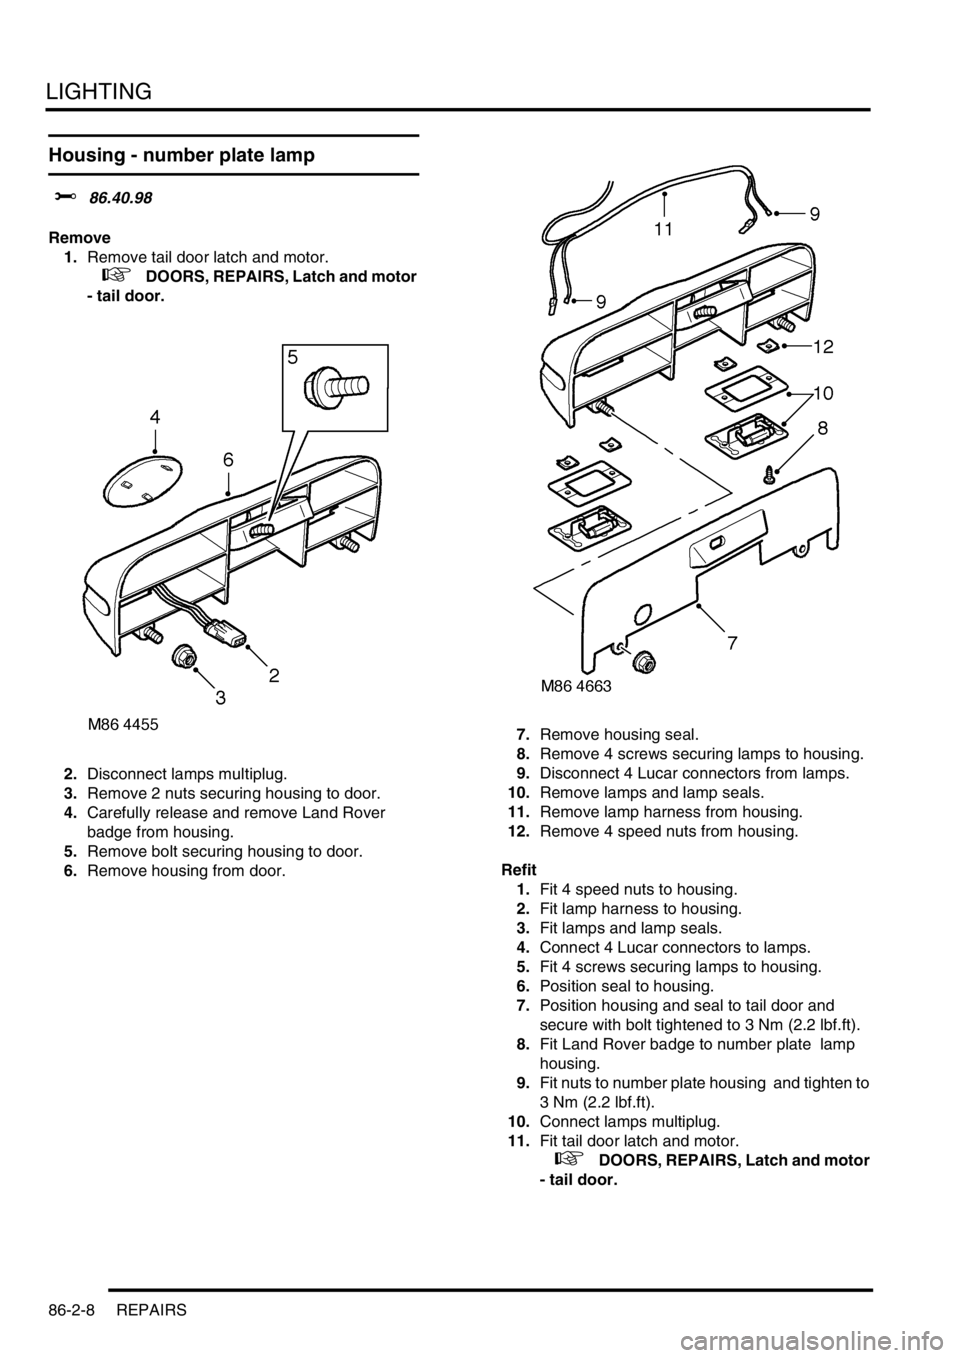
Housing - number plate lamp
$% 86.40.98
Remove
1.Remove tail door latch and motor.
+ DOORS, REPAIRS, Latch and motor
- tail door.
2.Disconnect lamps multiplug.
3.Remove 2 nuts securing housing to door.
4.Carefully release and remove Land Rover
badge from housing.
5.Remove bolt securing housing to door.
6.Remove housing from door. 7.Remove housing seal.
8.Remove 4 screws securing lamps to housing.
9.Disconnect 4 Lucar connectors from lamps.
10.Remove lamps and lamp seals.
11.Remove lamp harness from housing.
12.Remove 4 speed nuts from housing.
Refit
1.Fit 4 speed nuts to housing.
2.Fit lamp harness to housing.
3.Fit lamps and lamp seals.
4.Connect 4 Lucar connectors to lamps.
5.Fit 4 screws securing lamps to housing.
6.Position seal to housing.
7.Position housing and seal to tail door and
secure with bolt tightened to 3 Nm (2.2 lbf.ft).
8.Fit Land Rover badge to number plate lamp
housing.
9.Fit nuts to number plate housing and tighten to
3 Nm (2.2 lbf.ft).
10.Connect lamps multiplug.
11.Fit tail door latch and motor.
+ DOORS, REPAIRS, Latch and motor
- tail door.
Page 1464 of 1672
LIGHTING
REPAIRS 86-2-9
Motor - headlamp levelling
$% 86.41.16
Remove
1. For RH headlamp levelling motor: Release
fixings and remove battery cover.
2.Remove headlamp access cover.
3.Release headlamp from adjuster pin sockets. 4.Rotate and remove motor from body panel.
5.Disconnect multiplug from motor.
6.Remove headlamp levelling motor.
Refit
1.Position new headlamp levelling motor and
connect multiplug.
2.Fit motor to body panel.
3.Fit headlamp to adjuster pins.
4.Check headlamp beam alignment.
+ LIGHTING, ADJUSTMENTS,
Headlamps beam alignment - up to 03MY.
5.Fit headlamp access cover.
6. For RH headlamp levelling motor: Fit and
secure battery cover with fixings.
Page 1465 of 1672
LIGHTING
86-2-10 REPAIRS
Lamp - stop - centre high mounted
(CHMSL)
$% 86.41.32
Remove
1.Remove 2 screws securing lamp cover and
remove cover.
2.Disconnect Lucar connectors from lamp bulb
holder.
3.Remove 2 nuts securing lamp to rear screen
and remove lamp.
Refit
1.Fit new lamp to screen and secure with nuts.
2.Connect Lucar connectors to lamp bulb holder.
3.Fit lamp cover to lamp and secure with screws.
Lamp - tail/flasher - bumper
$% 86.41.42
Remove
1.Release tail lamp from bumper.
2.Disconnect multiplug and remove lamp.
Refit
1.Position tail lamp, connect multiplug and
secure lamp to bumper.
Page 1466 of 1672
LIGHTING
REPAIRS 86-2-11
Lamp - interior - front
$% 86.45.09
Introduction
This procedure is also applicable for removal and
fitting of the loadspace lamp.
Remove
1.Remove interior lamp lens.
2.Remove two nuts securing lamp.
3.Release lamp and disconnect multiplug.
4.Remove lamp.
Refit
1.Position new lamp and connect multiplug.
2.Fit lamp and secure with nuts.
3.Fit interior lamp lens.
Lamp - interior - rear
$% 86.45.18
Remove
1.Release lamp from headlining.
2.Disconnect multiplug and remove lamp.
Refit
1.Position interior lamp and connect multiplug.
2.Fit lamp to headlining.
Page 1467 of 1672
LIGHTING
86-2-12 REPAIRS
Rheostat - panel lights dimmer
$% 86.65.37
Remove
1.Remove 2 screws securing instrument cowl to
fascia and release the cowl from the retaining
clips.
2.Disconnect 8 multiplugs from the instrument
cowl switches.
3.Remove the instrument cowl.4.Remove 2 screws securing the dimmer switch
to the instrument cowl and remove the dimmer
switch.
Refit
1.Fit the dimmer switch to the instrument cowl
and secure with screws.
2.Position the instrument cowl to the fascia and
connect the multiplugs.
3.Fit the instrument cowl to the fascia and secure
with screws.
Page 1468 of 1672
LIGHTING
REPAIRS 86-2-13
Switch - hazard warning
$% 86.65.50
Remove
1.Carefully remove switch.
2.Disconnect multiplug from switch.
3.Remove switch.
Refit
1.Connect multiplug switch.
2.Position switch and push to secure.
Switch - indicator and exterior lighting -
combined
$% 86.65.55
WARNING: Always remove the key from the
starter switch, disconnect the vehicle battery and
wait 10 minutes before commencing work on the
SRS system.
Remove
1.Remove rotary coupler.
+ RESTRAINT SYSTEMS, REPAIRS,
Rotary coupler.
2.Remove 2 screws securing switch.
3.Carefully raise edge of switch bracket to clear
location peg and release switch from bracket.
4.Disconnect 2 multiplugs and remove switch.
Refit
1.Position switch and connect multiplugs.
2.Fit switch to bracket and secure with screws.
3.Fit rotary coupler.
+ RESTRAINT SYSTEMS, REPAIRS,
Rotary coupler.
Page 1469 of 1672
LIGHTING
86-2-14 REPAIRS
Socket - accessory
$% 86.65.62
Remove
1.Remove screw securing accessory socket
escutcheon to loadspace side trim casing.
2.Release accessory socket assembly from trim
casing.
3.Disconnect multiplug and bulb from accessory
socket.
4.Remove accessory socket.
5.Release bulb holder from accessory socket.
Release accessory socket from escutcheon.
Refit
1.Fit accessory socket to escutcheon.
2.Fit bulb holder to accessory socket.
3.Position accessory socket to trim casing and
connect multiplug and bulb.
4.Fit accessory socket to trim casing and secure
with screw.
Switch - front/rear fog lamps
$% 86.65.65
Remove
1.Carefully remove switch from instrument cowl.
2.Disconnect multiplug and remove switch.
Refit
1.Position switch and connect multiplug.
2.Carefully push switch into instrument cowl.