Page 1411 of 1672
AIR CONDITIONING
82-38REPAIRS
Sensor - ambient air temperature
$% 82.20.91
Remove
1.Remove front grille.
+ EXTERIOR FITTINGS, REPAIRS,
Grille - front - up to 03MY.
2.Release ambient air temperature sensor from
support bracket, disconnect multiplug and
remove sensor.
Refit
1.Position sensor, connect multiplug and secure
sensor to support bracket
2.Fit front grille.
+ EXTERIOR FITTINGS, REPAIRS,
Grille - front - up to 03MY.
Sensor - solar light
$% 82.20.92
Remove
1.Carefully remove solar light sensor from fascia.
2.Disconnect multiplug from solar light sensor.
3.Remove solar light sensor.
Refit
1.Connect multiplug to solar light sensor.
2.Position solar light sensor to fascia and push to
secure.
Page 1438 of 1672

WIPERS AND WASHERS
DESCRIPTION AND OPERATION 84-17
Front flick wipe
Flick wipe operation will only activate when the following conditions are met:
lIgnition switch is in position I or II.
lFront flick switch is operated.
Pressing the flick wipe switch operates the front wiper motor at high speed. The front wiper motor operates as long
as the flick switch is activated. Releasing the flick switch causes the front wiper motor to run through the park switch
circuitry. The park switch only permits low speed operation. Thus if the flick switch is pressed and immediately
released, the wipers operate at low speed.
Rear intermittent wipe variable delay
The rear intermittent wipe variable delay operation allows the driver to adjust the interval between wipes to suit local
conditions. Rear variable delay operation only activates if the following conditions are met:
lIgnition switch in position I or II.
lFront wash/ wipe switch on intermittent.
lRear wipe switch is operated.
The BCU determines the desired delay interval based on the setting of the variable delay switch. The rear wash/ wipe
delay is nominally twice as long as that of the front. This information passes from the IDM to the rear wiper relay and
activates the rear wiper motor.
If the delay duration is decreased during operation of the rear wiper, the wipers immediately operate once and the
delay cycle is reset.
If the delay duration is increased during operation of the rear wiper, the delay cycle is automatically increased by the
BCU.
Reverse wiping
Reverse wiping operates the rear wiper motor when reverse gear is selected. The transmission must be in reverse
for longer then 0.5 seconds before reversing wipe activates. Reversing wipe activates if the following conditions are
met:
lIgnition switch is in position II.
lReverse gear is selected.
lRear wiper or front wipers operating.
If the rear wiper is active in any mode when reverse gear is selected, the rear wiper activates for 4 second. After 4
seconds the rear wiper operates in a delay operation at the same delay interval set by the variable delay switch until
reverse gear is deselected.
If the front wipers are operating on either low or high speed when reverse gear is selected, the rear wiper activates
continuously until reverse gear is deselected.
In order to enable reversing wipe functions, the BCU utilises the reversing light switch located within the transmission
to determine when reverse gear has been selected.
If the front intermittent wipe is active when reverse gear is selected, the rear wiper completes 2 cycles before operating
at the same intermittent delay as the front wipers.
Page 1456 of 1672

LIGHTING
ADJUSTMENTS 86-2-1
LIGHTING ADJUST ME NTS
Headlamps beam alignment - up to 03MY
$% 86.40.17
Check
1.Ensure vehicle is unladen and tyres are at
correct pressures.
2. Models with SLS: Ensure vehicle is at
standard ride height.
3. Models with headlamp levelling: Ensure
headlamp levelling switch is set to '0'.
4.Align suitable beam setting equipment to
headlamp.
5.Switch headlamps on and measure main beam
settings. Beam must be 1.4% below the
horizontal and parallel to the vehicle centre line.
If necessary, adjust headlamp to get correct
beam settings.
6.Align beam setting equipment to 2nd headlamp
and repeat check.
7.Switch off headlamps and remove beam setting
equipment.
Adjust
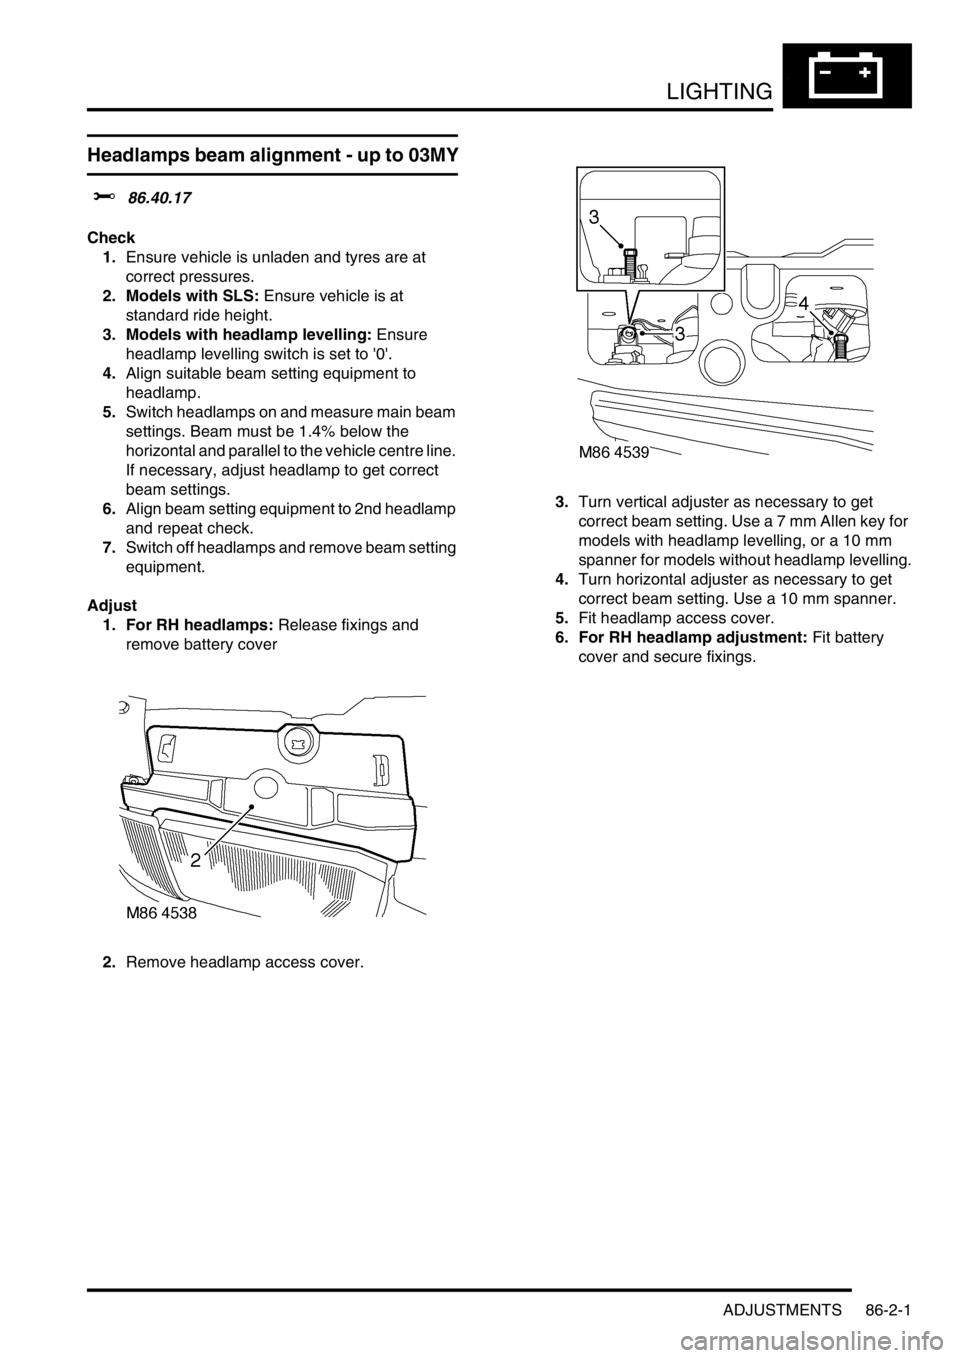
1. For RH headlamps: Release fixings and
remove battery cover
2.Remove headlamp access cover.3.Turn vertical adjuster as necessary to get
correct beam setting. Use a 7 mm Allen key for
models with headlamp levelling, or a 10 mm
spanner for models without headlamp levelling.
4.Turn horizontal adjuster as necessary to get
correct beam setting. Use a 10 mm spanner.
5.Fit headlamp access cover.
6. For RH headlamp adjustment: Fit battery
cover and secure fixings.
Page 1457 of 1672
LIGHTING
86-2-2 ADJUSTMENTS
Headlamps beam alignment - from 03MY
$% 86.40.17
Check
1.Ensure vehicle is unladen and tyres are set at
the correct pressures.
2. Models with SLS: Ensure vehicle is at the
standard ride height.
3. Models without SLS: Set headlamp leveling
switch to zero.
4.Align beam setting equipment to headlamp.
5.Switch on headlamps. Headlamp setting 1.2%
below horizontal and parallel.
6.Align beam setting equipment to second
headlamp and repeat the check.
Adjust
1.Using a flat blade screwdriver rotate the
headlamp adjusters until correct alignment is
achieved
2.Rotate inboard adjuster for verticle alignment.
3.Rotate outboard adjuster for horizontal
alignment.
4.Adjust 2nd headlamp as detailed above.
5.Switch off headlamps and remove beam setting
equipment.
Page 1458 of 1672
LIGHTING
REPAIRS 86-2-3
REPAIRS
Lamp - front repeater
$% 86.40.42
Remove
1. For RH repeater lamp: Release fixings and
remove battery cover.
2.Remove headlamp access cover from body.
3.Remove screw securing repeater lamp to body
and release lamp from 2 locating peg sockets in
wing.
4.Disconnect 2 multiplugs from repeater lamp
and remove lamp. Refit
1.Position new repeater lamp and connect
multiplugs.
2.Fit repeater lamp to body and tighten screw.
3.Fit headlamp access cover.
4. For RH repeater lamp: Fit battery cover and
secure fixings.
Page 1459 of 1672

LIGHTING
86-2-4 REPAIRS
Headlamp - up to 03MY
$% 86.40.49
Remove
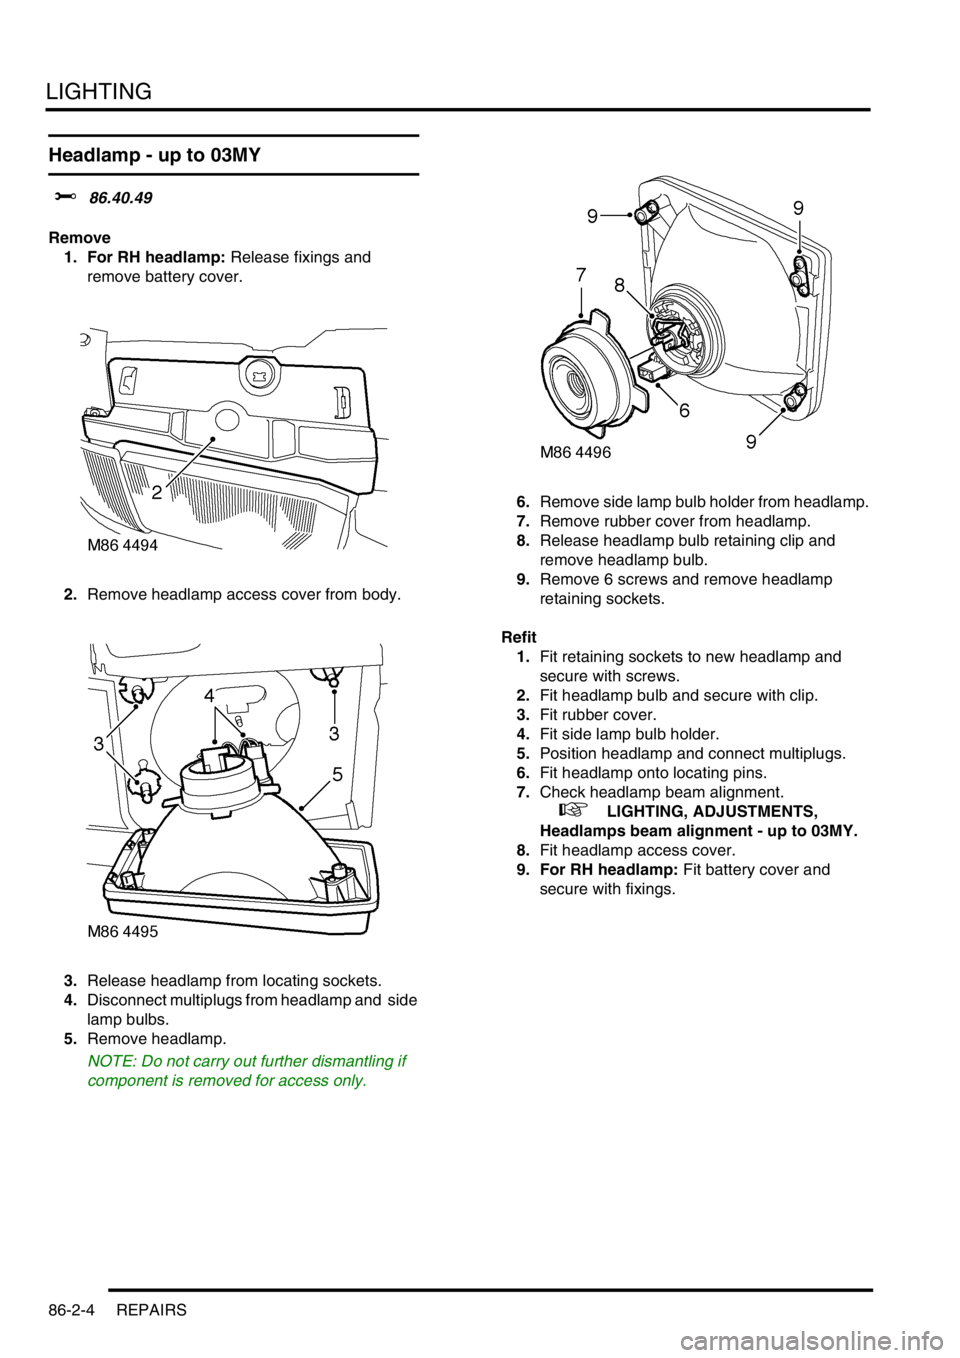
1. For RH headlamp: Release fixings and
remove battery cover.
2.Remove headlamp access cover from body.
3.Release headlamp from locating sockets.
4.Disconnect multiplugs from headlamp and side
lamp bulbs.
5.Remove headlamp.
NOTE: Do not carry out further dismantling if
component is removed for access only.6.Remove side lamp bulb holder from headlamp.
7.Remove rubber cover from headlamp.
8.Release headlamp bulb retaining clip and
remove headlamp bulb.
9.Remove 6 screws and remove headlamp
retaining sockets.
Refit
1.Fit retaining sockets to new headlamp and
secure with screws.
2.Fit headlamp bulb and secure with clip.
3.Fit rubber cover.
4.Fit side lamp bulb holder.
5.Position headlamp and connect multiplugs.
6.Fit headlamp onto locating pins.
7.Check headlamp beam alignment.
+ LIGHTING, ADJUSTMENTS,
Headlamps beam alignment - up to 03MY.
8.Fit headlamp access cover.
9. For RH headlamp: Fit battery cover and
secure with fixings.
Page 1460 of 1672

LIGHTING
REPAIRS 86-2-5
Headlamp - from 03MY
$% 86.40.49
Remove
1.Remove front grille.
+ EXTERIOR FITTINGS, REPAIRS,
Grille - front - from 03MY.
2.Protect bumper.
CAUTION: Always protect paintwork when
removing or refitting any body trims or
bumpers.
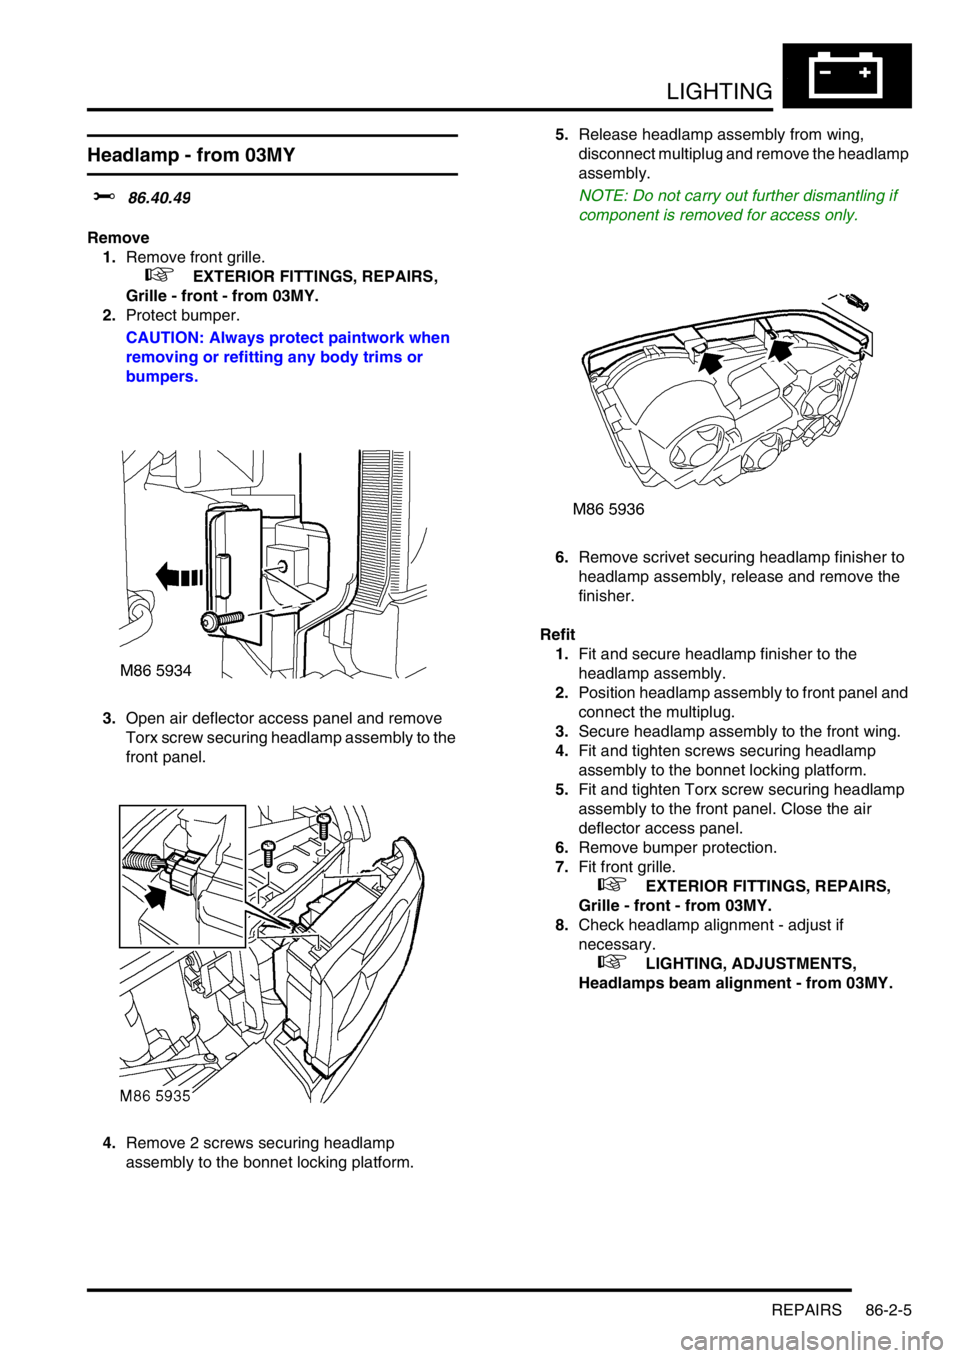
3.Open air deflector access panel and remove
Torx screw securing headlamp assembly to the
front panel.
4.Remove 2 screws securing headlamp
assembly to the bonnet locking platform.5.Release headlamp assembly from wing,
disconnect multiplug and remove the headlamp
assembly.
NOTE: Do not carry out further dismantling if
component is removed for access only.
6.Remove scrivet securing headlamp finisher to
headlamp assembly, release and remove the
finisher.
Refit
1.Fit and secure headlamp finisher to the
headlamp assembly.
2.Position headlamp assembly to front panel and
connect the multiplug.
3.Secure headlamp assembly to the front wing.
4.Fit and tighten screws securing headlamp
assembly to the bonnet locking platform.
5.Fit and tighten Torx screw securing headlamp
assembly to the front panel. Close the air
deflector access panel.
6.Remove bumper protection.
7.Fit front grille.
+ EXTERIOR FITTINGS, REPAIRS,
Grille - front - from 03MY.
8.Check headlamp alignment - adjust if
necessary.
+ LIGHTING, ADJUSTMENTS,
Headlamps beam alignment - from 03MY.
Page 1461 of 1672
LIGHTING
86-2-6 REPAIRS
Lamp - tail
$% 86.40.70
Remove
1.Remove 4 screws securing tail lamp to body.
2.Disconnect multiplug from tail lamp.
3.Remove tail lamp.
Refit
1.Position tail lamp to body and connect
multiplug.
2.Secure tail lamp to body with screws.
Lamp - front fog up to 03MY
$% 86.40.95
Remove
1.Raise front of vehicle, one side.
2. For RH lamp: Remove 7 screws securing
wheel arch liner extension to liner and bumper
valance and remove liner extension.
Disconnect lamp multiplug from harness.
3. For LH lamp:Remove front bumper assembly.
+ EXTERIOR FITTINGS, REPAIRS,
Bumper assembly - front.