2002 LAND ROVER DISCOVERY low beam
[x] Cancel search: low beamPage 25 of 1672

CONTENTS
22 CONTENTS
Condenser .................................................................................................................................... 82-33
Receiver drier and dual pressure switch......................................................................................... 82-36
ECU - air temperature control ......................................................................................................... 82-37
Sensor - ambient air temperature ................................................................................................ 82-38
Sensor - solar light ........................................................................................................................ 82-38
Sensor - air temperature ............................................................................................................. 82-39
Evaporator, evaporator thermistor and thermal expansion valve (TXV) ........................................ 82-40
Expansion valve - (TXV) - rear ....................................................................................................... 82-42
Evaporator - rear............................................................................................................................. 82-43
Evaporator and motor assembly - rear ........................................................................................... 82-44
Blower motor assembly - rear ......................................................................................................... 82-46
Resistor - blower motor ................................................................................................................. 82-46
Duct - centre - rear.......................................................................................................................... 82-47
WIPERS AND WASHERS ........................................................................ 84-1
DESCRIPTION AND OPERATION
Wipers and washers component layout .......................................................................................... 84-1
Front wiper components ................................................................................................................. 84-2
Rear wiper components .................................................................................................................. 84-3
Washer components ....................................................................................................................... 84-4
Wipers and washers block diagram ................................................................................................ 84-6
Description ...................................................................................................................................... 84-8
Operation ........................................................................................................................................ 84-16
REPAIRS
Reservoir - washer - up to 03MY .................................................................................................... 84-19
Reservoir - washer - from 03MY ..................................................................................................... 84-20
Jet - washer - windscreen ............................................................................................................... 84-21
Pump - washer - screen and headlamp ....................................................................................... 84-21
Motor and linkage - wiper - windscreen .......................................................................................... 84-22
Switch - wiper and washer - windscreen ........................................................................................ 84-23
Jet - washer - headlamp ................................................................................................................ 84-24
Jet - washer - rear screen ............................................................................................................ 84-25
Switch - rear wash .......................................................................................................................... 84-25
Motor - wiper - rear screen ............................................................................................................ 84-26
Switch - wiper - rear - up to 03MY .................................................................................................. 84-27
Switch - wiper - rear - from 03MY ................................................................................................... 84-27
CHARGING AND STARTING ................................................................... 86-1-1
REPAIRS
Alternator - diesel .......................................................................................................................... 86-1-1
Alternator - V8................................................................................................................................. 86-1-2
Belt - auxiliary drive ........................................................................................................................ 86-1-3
Battery ........................................................................................................................................... 86-1-4
Battery carrier ................................................................................................................................ 86-1-4
Starter motor - diesel ...................................................................................................................... 86-1-5
Starter motor - V8 ........................................................................................................................... 86-1-6
LIGHTING.................................................................................................. 86-2-1
ADJUSTMENTS
Headlamps beam alignment - up to 03MY ..................................................................................... 86-2-1
Page 1456 of 1672

LIGHTING
ADJUSTMENTS 86-2-1
LIGHTING ADJUST ME NTS
Headlamps beam alignment - up to 03MY
$% 86.40.17
Check
1.Ensure vehicle is unladen and tyres are at
correct pressures.
2. Models with SLS: Ensure vehicle is at
standard ride height.
3. Models with headlamp levelling: Ensure
headlamp levelling switch is set to '0'.
4.Align suitable beam setting equipment to
headlamp.
5.Switch headlamps on and measure main beam
settings. Beam must be 1.4% below the
horizontal and parallel to the vehicle centre line.
If necessary, adjust headlamp to get correct
beam settings.
6.Align beam setting equipment to 2nd headlamp
and repeat check.
7.Switch off headlamps and remove beam setting
equipment.
Adjust
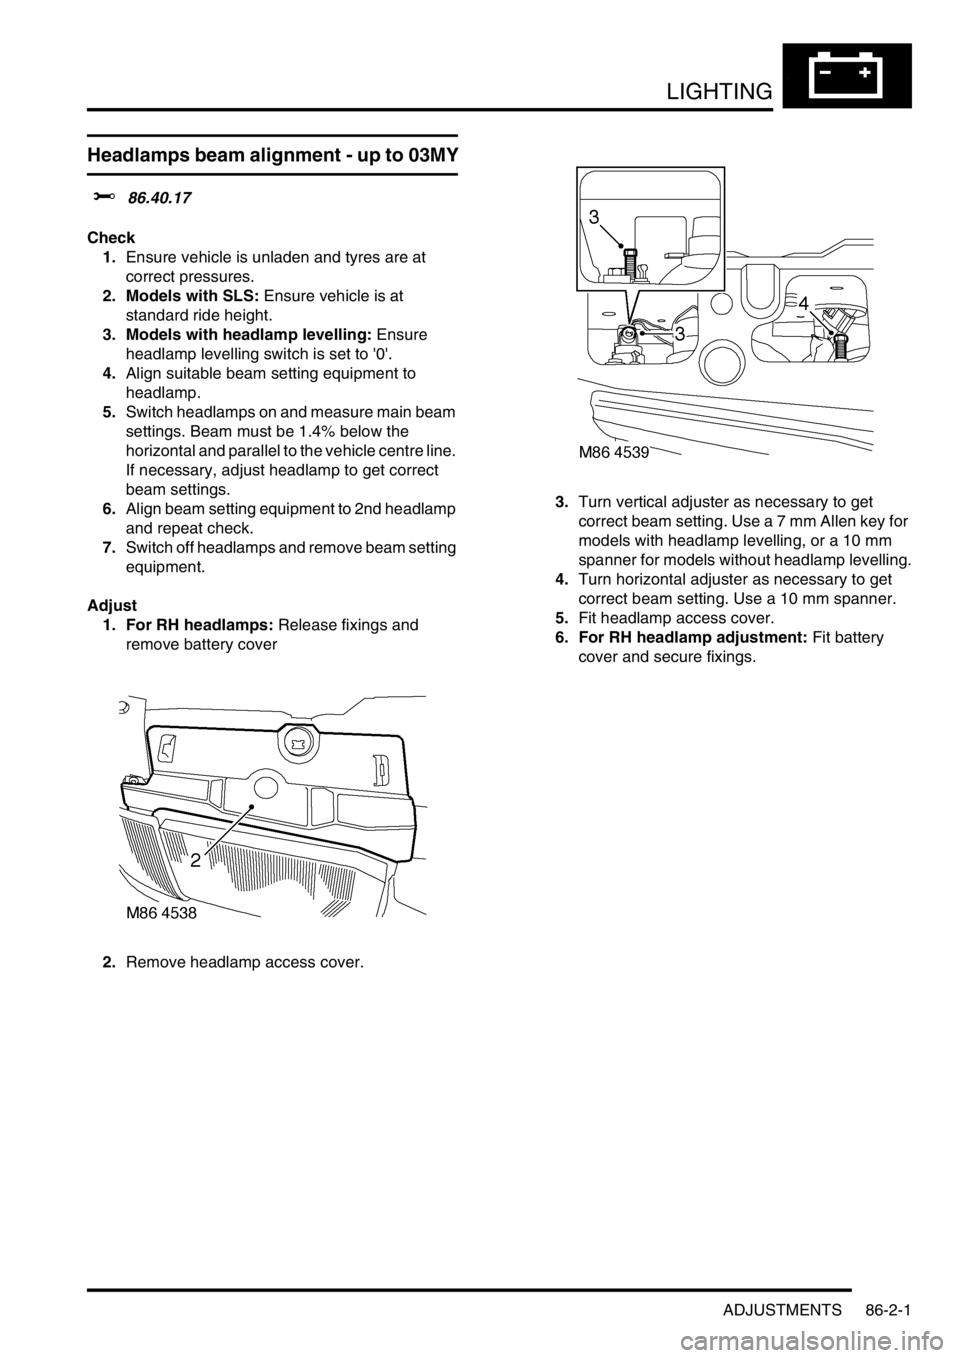
1. For RH headlamps: Release fixings and
remove battery cover
2.Remove headlamp access cover.3.Turn vertical adjuster as necessary to get
correct beam setting. Use a 7 mm Allen key for
models with headlamp levelling, or a 10 mm
spanner for models without headlamp levelling.
4.Turn horizontal adjuster as necessary to get
correct beam setting. Use a 10 mm spanner.
5.Fit headlamp access cover.
6. For RH headlamp adjustment: Fit battery
cover and secure fixings.
Page 1457 of 1672

LIGHTING
86-2-2 ADJUSTMENTS
Headlamps beam alignment - from 03MY
$% 86.40.17
Check
1.Ensure vehicle is unladen and tyres are set at
the correct pressures.
2. Models with SLS: Ensure vehicle is at the
standard ride height.
3. Models without SLS: Set headlamp leveling
switch to zero.
4.Align beam setting equipment to headlamp.
5.Switch on headlamps. Headlamp setting 1.2%
below horizontal and parallel.
6.Align beam setting equipment to second
headlamp and repeat the check.
Adjust
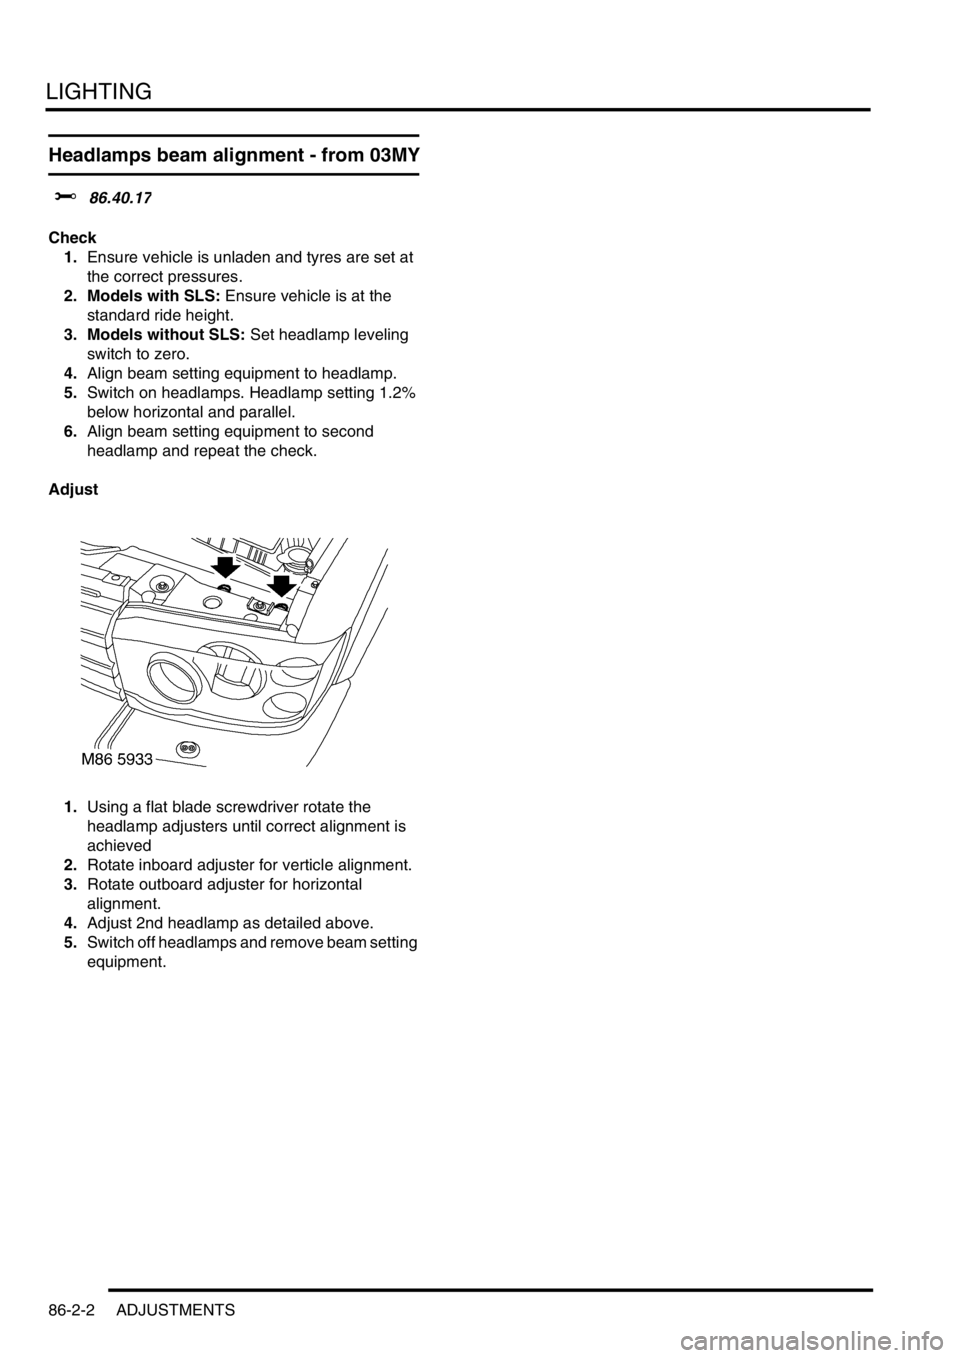
1.Using a flat blade screwdriver rotate the
headlamp adjusters until correct alignment is
achieved
2.Rotate inboard adjuster for verticle alignment.
3.Rotate outboard adjuster for horizontal
alignment.
4.Adjust 2nd headlamp as detailed above.
5.Switch off headlamps and remove beam setting
equipment.
Page 1477 of 1672

BODY CONTROL UNIT
86-3-8 DESCRIPTION AND OPERATION
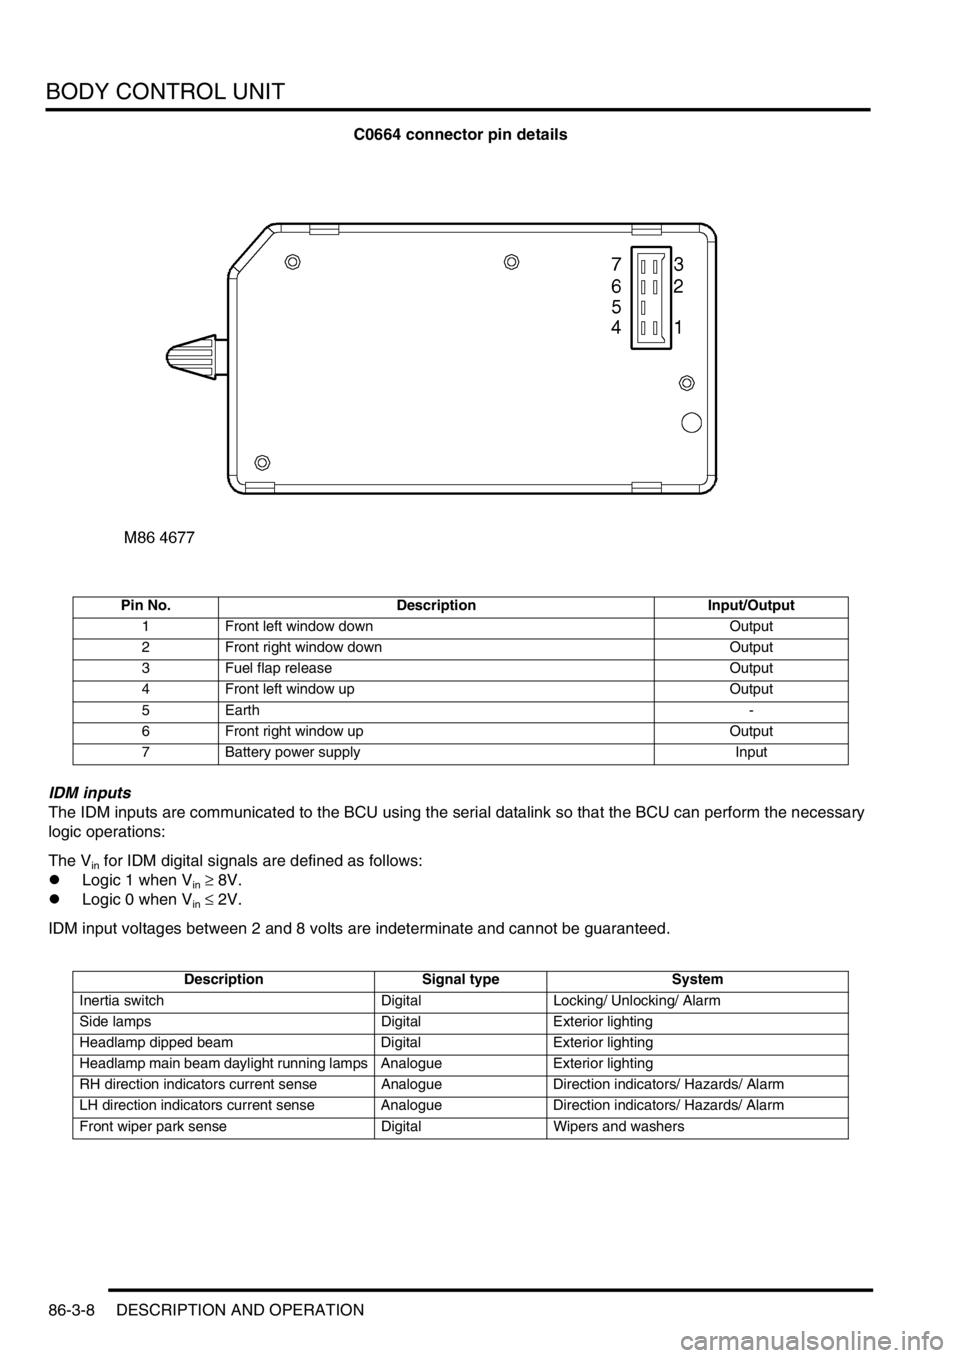
C0664 connector pin details
IDM inputs
The IDM inputs are communicated to the BCU using the serial datalink so that the BCU can perform the necessary
logic operations:
The V
in for IDM digital signals are defined as follows:
lLogic 1 when V
in ≥ 8V.
lLogic 0 when V
in ≤ 2V.
IDM input voltages between 2 and 8 volts are indeterminate and cannot be guaranteed.
Pin No. Description Input/Output
1 Front left window down Output
2 Front right window down Output
3 Fuel flap release Output
4 Front left window up Output
5Earth-
6 Front right window up Output
7 Battery power supply Input
Description Signal type System
Inertia switch Digital Locking/ Unlocking/ Alarm
Side lamps Digital Exterior lighting
Headlamp dipped beam Digital Exterior lighting
Headlamp main beam daylight running lamps Analogue Exterior lighting
RH direction indicators current sense Analogue Direction indicators/ Hazards/ Alarm
LH direction indicators current sense Analogue Direction indicators/ Hazards/ Alarm
Front wiper park sense Digital Wipers and washers
Page 1478 of 1672

BODY CONTROL UNIT
DESCRIPTION AND OPERATION 86-3-9
IDM outputs
The IDM receives the following signals from the BCU using the serial datalink to provide power outputs:
Description Signal type System
Unlock all doors enable Digital Locking/ Unlocking/ Alarm
Lock passenger and rear doors enable Digital Locking/ Unlocking/ Alarm
Superlock all doors enable Digital Locking/ Unlocking/ Alarm
Lock driver's door Digital Locking/ Unlocking/ Alarm
Rear fog lamps enable Digital Exterior lighting
Daylight running lamps enable Digital Exterior lighting
LH direction indicators enable Digital Direction indicators/ Hazard warning/ Alarm
RH direction indicators enable Digital Direction indicators/ Hazard warning/ Alarm
Gear position indicator illumination Digital Illumination
Headlamp main beam indicator disable Digital Illumination
Front wiper enable Digital Wipers and washers
Rear wiper enable Digital Wipers and washers
Rear window enable Digital Power windows
Shift lever solenoid enable Digital Automatic gearbox
Transfer box solenoid enable/ Alarm sounder
relayDigital Gearbox
Heated rear window enable Digital Heated screens
Page 1485 of 1672

BODY CONTROL UNIT
86-3-16 DESCRIPTION AND OPERATION
Headlamps
The BCU contains a feature which allow the vehicle headlamps to be turned on when the remote transmitter is
pressed (courtesy headlamps).
For markets with daylight running lamps, the BCU controls the logical operation of the daylight running lamps. Options
are daylight running lamps are on if the main beam headlamps are off, or the daylight running lamps are on with main
and dipped beam off and the gearbox not in Park.
Front fog lamps
For markets with front fog lamps fitted, the BCU controls the operation of the front fog lamps. Options can be selected
so that the fog lamps will operate with or without the headlamps on main beam.
Instrument pack
The BCU communicates with the instrument pack via a serial data bus.
+ INSTRUMENTS, DESCRIPTION AND OPERATION, Description.
lThe instrument pack provides the BCU and IDM with details of vehicle speed.
lSignals are provided from the IDM to the instrument pack and BCU when the direction indicator lamps are active.
lFor certain markets, the BCU provides a signal to the instrument pack for indicating when the transfer box is in
neutral.
lThe IDM can signal the instrument pack to illuminate a trailer warning lamp. This operates when the IDM senses
that the current drawn by the indicator circuit exceeds a preset threshold.
lThe odometer reading displayed on the instrument pack LCD screen is also stored in non volatile memory in the
BCU. Whenever the ignition is turned from position I to position II, the instrument pack and the BCU compare
their stored values.
lThe gear selector position is displayed on the instrument pack LCD screen under the direction of the BCU.
Starting
The starting system comprises a starter motor and solenoid located at the rear right hand side of the engine. A starter
relay controlled by the BCU is used to supply battery power for starter solenoid operation. The starter motor receives
its feed directly from the battery.
Cruise control
The BCU processes several signals used for cruise control:
lWhen the brake pedal is pressed, a low voltage brake lamp signal is sent via the BCU to the cruise control ECU.
lThe gear position switch sends an input via the BCU to the cruise control ECU if the selector lever is in Park,
Neutral or Reverse.
lA voltage supply is fed from the BCU to the cruise control SET+ switch.
lA voltage supply is fed from the BCU to the cruise control RES switch.
On vehicles with automatic transmission, if the BCU receives an input from the gear position switch or the brake pedal
switch, the BCU sends a signal to the cruise control ECU to cancel or inhibit cruise control operation.
+ ENGINE MANAGEMENT SYSTEM - Td5, DESCRIPTION AND OPERATION, Description.
+ ENGINE MANAGEMENT SYSTEM - V8, DESCRIPTION AND OPERATION, Description - cruise control.
Shift interlock (where fitted)
On automatic gearbox models, the BCU and IDM combine with an interlock relay located in the passenger
compartment fuse box to operate a shift interlock solenoid, so that the gear selector lever cannot be moved out of
Park until certain logical conditions have been satisfied. Operation of the interlock may be affected, if the battery
becomes discharged.
+ AUTOMATIC GEARBOX - ZF4HP22 - 24, DESCRIPTION AND OPERATION, Description.
Page 1495 of 1672

BODY CONTROL UNIT
86-3-26 DESCRIPTION AND OPERATION
If the ignition switch is in the off or crank position, the rear wipers are not active and the rear wiper enable output is
switched off.
In the event of a communications link failure occurring while the rear intermittent wipe programme is in operation, the
rear wiper enable output is switched off.
Reverse gear wipe
The BCU changes the operation of the rear wiper when the front wiper is active and reverse gear is selected. The rear
wiper operation rate used when the preconditions have been satisfied depend on the prevailing front wiper operating
mode and the position of the rear wiper switch. If the rear wiper is on or the front wiper is operating at an intermittent
rate when reverse gear is selected, the BCU will operate the rear wiper continuously for 4 seconds via the IDM. After
the initial period, the rear wiper will operate at the same rate as the front wiper.
The BCU checks for the following inputs to determine when to provide the rear wiper enable signal if the vehicle is in
reverse gear:
lIgnition state.
lRear wiper switch.
lFront intermittent wiper rate.
lReverse gear selected.
lFront intermittent wiper switch.
lFront wiper switch state.
lFront wash/ wipe in progress flag.
In the event of a communications link failure occurring while the reversing wipe is in operation, the rear wiper enable
output is switched off.
Headlamp wash
The headlamp wash will only operate when the headlamps are on, and then only every third time the front windscreen
wash button is pressed. When the BCU operates the headlamp washers, it activates the washer pump relay for a
period of 500 ms. The BCU supplies an earth path for the coil of the power wash relay located in the engine
compartment fuse box when the washer function is selected.
The BCU checks for the following inputs to determine when to provide power to the headlamp power wash relay:
lIgnition state.
lFront washer pump switch.
lDipped beam.
lMain beam state.
If the ignition switch is in the off position, the headlamp power wash relay is also held off. if the ignition state is crank,
the headlamp power wash relay is switched off and the headlamp power wash counter is reset to 0.
In the event of a communications link failure occurring while the headlamp power wash relay in on , the relay remains
on until the 500 ms timer has completed, then the relay is switched off.
Electric seats
The BCU can be programmed to operate the electric seats according to one of three options:
lOption 1 – no electric seats.
lOption 2 – normal.
lOption 3 – operates with ignition only.
To determine when to provide an output to the passenger and drivers seat enable relay, the BCU checks the condition
of the following inputs:
lIgnition state.
lTransit mode.
lDriver's door open.
Page 1498 of 1672

BODY CONTROL UNIT
DESCRIPTION AND OPERATION 86-3-29
Courtesy headlamps
This feature activates the headlamps for 30 seconds when the lock button on the remote transmitter is held down for
longer than 1 second. The headlamps will extinguish if the BCU receives either a lock or an unlock signal from the
remote transmitter.
The BCU checks the status of the following inputs to determine the correct qualifying conditions for requesting
courtesy headlamps:
lIgnition state.
lRemote locking request.
lRemote unlocking request.
lLazy locking request.
If the ignition is off and a lazy locking request is received, the courtesy headlamps are switched on and an internal
timer is turned on in the BCU which operates for 30 seconds. If the 30 second timer expires or a request for remote
locking or remote unlocking is received, the courtesy headlamps will be turned off.
When main beam is selected, the IDM also provides a signal to the instrument pack to switch on the main beam
warning lamp. An additional signal 'main beam indicator disable' is used to prevent the daylight running lamps
illuminating the main beam indicator when the main beam is in the daylight running lamp state and the main beam
indicator disable signal is on.
Lights on alarm
The lights on alarm in the instrument pack operates when the driver's door is open and the side lamps or headlamps
are on. The system uses inputs from the driver's door switch and the lighting switch to determine the logical conditions
that need to occur for switching on the alarm. The BCU carries out the logic operation and communicates with the
instrument pack using the serial data bus; the instrument pack will be requested to sound the alarm if the logic inputs
indicate that the driver's door is open with the lights still on.
Supply voltage is provided through the lighting switch to the IDM which acts as the signal line to indicate that the lights
are on for the logic circuits in the IDM and BCU. When the driver's door is opened, a second feed is supplied to the
BCU through the driver's door switch to indicate the condition. In this logic condition (lights on and driver's door open)
the BCU signals the instrument pack to operate the audible warning. If the lights are switched off or the driver's door
is closed the logic condition will be changed and the audible warning will be switched off.
Daylight running lamps
The BCU operates the daylight running lamps (where fitted) via the IDM. The daylight running lamps option can be
programmed in one of three states dependent on market/ customer requirements, these are:
lOption 1– no daylight running lamps.
lOption 2 – on with main beam off.
lOption 3 – on with main and dipped beam off and gearbox not in Park.
The BCU will ensure the logical conditions are satisfied for the lamps to operate under the set conditions. The BCU
checks the status of the following inputs to determine the logic action for providing an output to the daylight running
lamp relay:
lMain beam state.
lEngine running (link from instrument pack).
lDipped beam.
lGearbox state.
A voltage supply is fed to the coil of the daylight running lamp relay and the IDM. When the preconditions are satisfied
for daylight running lamp operation, the BCU sends a signal for the IDM to complete the circuit to earth to switch on
the daylight running lamps. The logical inputs are checked to ensure that the engine is running before switching the
relay to turn on the daylight running lamps. The engine running signal has to be present for at least 2 seconds before
the daylight running lamp relay can be switched on.