2002 LAND ROVER DISCOVERY Phone
[x] Cancel search: PhonePage 56 of 1672

GENERAL INFORMATION
03-21
WARNING: Do not use a multimeter or other
general purpose test equipment on SRS system
components or accidental deployment may
occur. Use only Testbook to diagnose system
faults.
SRS harnesses and connectors
Always observe the following precautions with
regard to SRS systems:
lNever attempt to modify, splice or repair SRS
wiring. SRS wiring can be identified by a special
yellow outer protective covering (black with
yellow stripe protective coverings are
sometimes used).
lNever install electronic equipment (such as a
mobile telephone, two way radio or in-car
entertainment system) in such a way that it
could generate electrical interference in the
airbag harness. Seek specialist advice when
installing such equipment.CAUTION: Always ensure the SRS harness is
routed correctly. Avoid trapping or pinching the
SRS harness. Look out for possible chafing
points.
CAUTION: Ensure all SRS harness connectors
are mated correctly and securely fastened. Do
not leave the connectors hanging loose.
CAUTION: Do not allow the airbag module to
hang by the airbag harness.
Page 1154 of 1672
INTERIOR TRIM COMPONENTS
REPAIRS 76-3-1
INTERIOR TRIM COMPONENTS REPAIRS
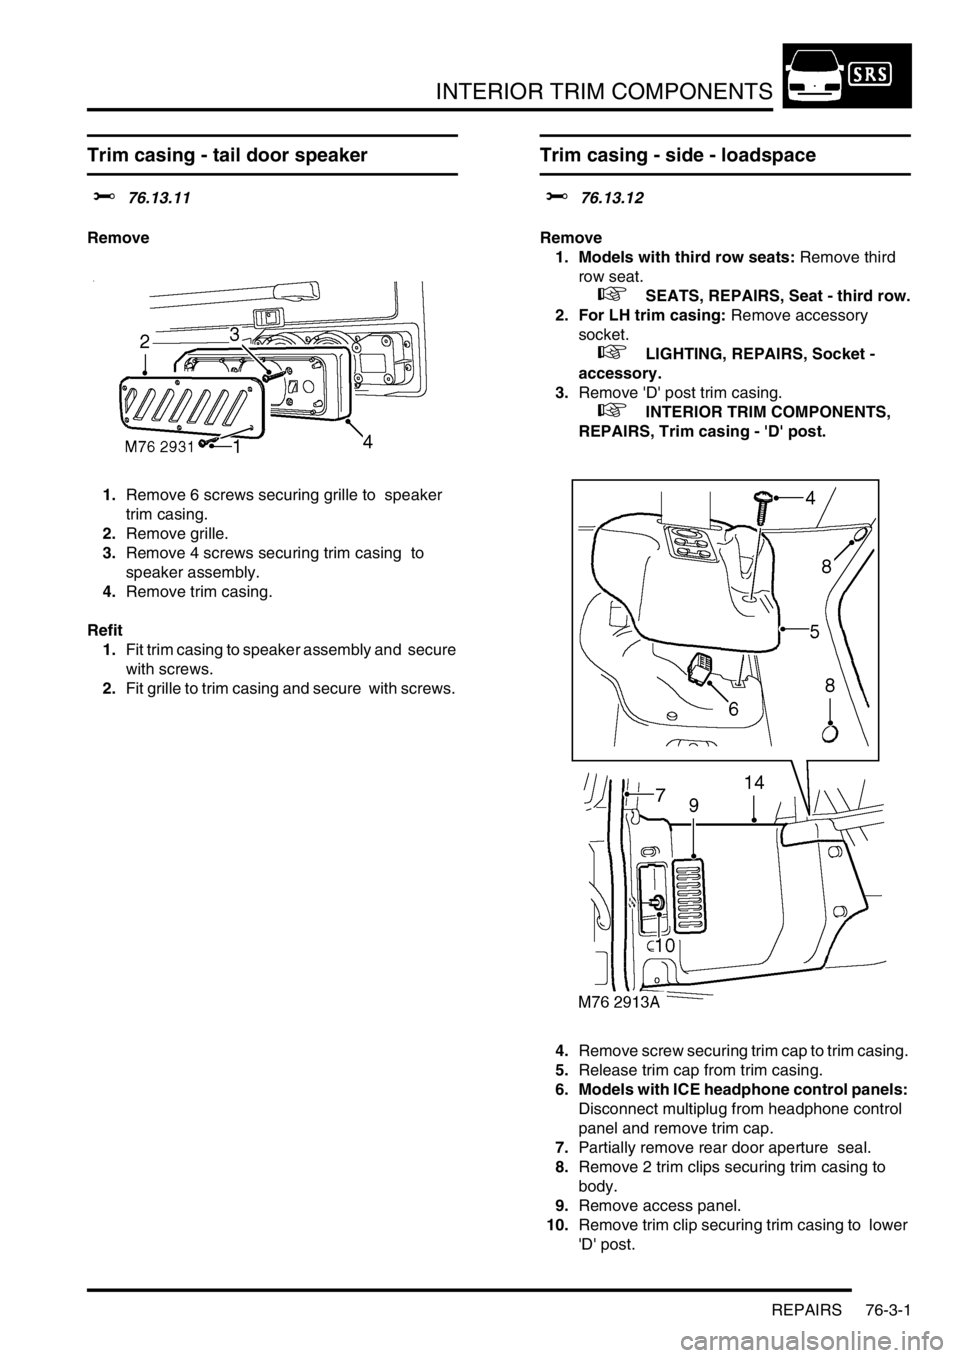
Trim casing - tail door speaker
$% 76.13.11
Remove
1.Remove 6 screws securing grille to speaker
trim casing.
2.Remove grille.
3.Remove 4 screws securing trim casing to
speaker assembly.
4.Remove trim casing.
Refit
1.Fit trim casing to speaker assembly and secure
with screws.
2.Fit grille to trim casing and secure with screws.
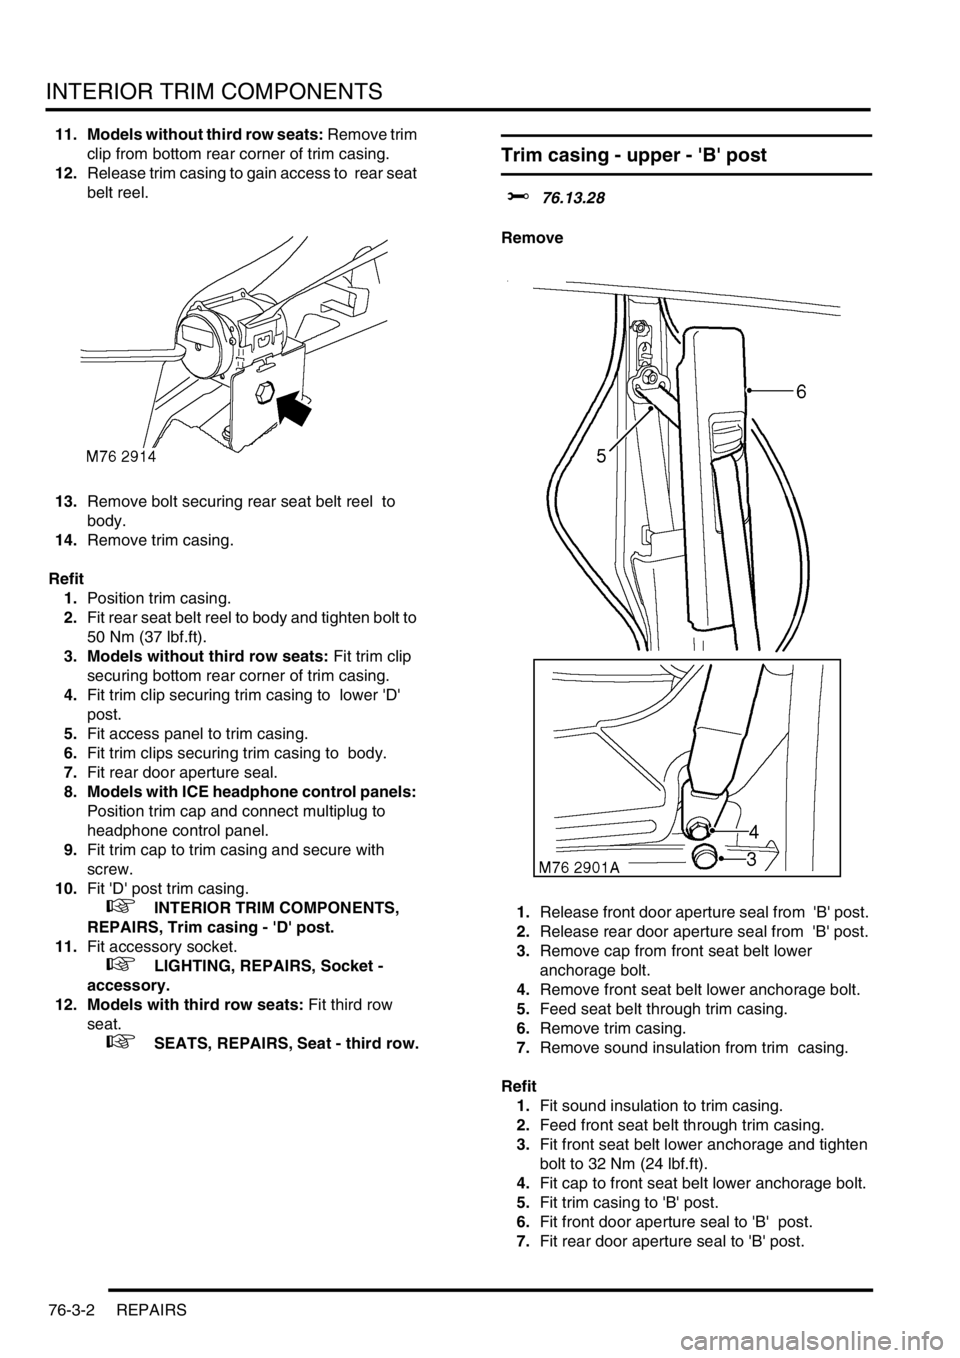
Trim casing - side - loadspace
$% 76.13.12
Remove
1. Models with third row seats: Remove third
row seat.
+ SEATS, REPAIRS, Seat - third row.
2. For LH trim casing: Remove accessory
socket.
+ LIGHTING, REPAIRS, Socket -
accessory.
3.Remove 'D' post trim casing.
+ INTERIOR TRIM COMPONENTS,
REPAIRS, Trim casing - 'D' post.
4.Remove screw securing trim cap to trim casing.
5.Release trim cap from trim casing.
6. Models with ICE headphone control panels:
Disconnect multiplug from headphone control
panel and remove trim cap.
7.Partially remove rear door aperture seal.
8.Remove 2 trim clips securing trim casing to
body.
9.Remove access panel.
10.Remove trim clip securing trim casing to lower
'D' post.
Page 1155 of 1672
INTERIOR TRIM COMPONENTS
76-3-2 REPAIRS
11. Models without third row seats: Remove trim
clip from bottom rear corner of trim casing.
12.Release trim casing to gain access to rear seat
belt reel.
13.Remove bolt securing rear seat belt reel to
body.
14.Remove trim casing.
Refit
1.Position trim casing.
2.Fit rear seat belt reel to body and tighten bolt to
50 Nm (37 lbf.ft).
3. Models without third row seats: Fit trim clip
securing bottom rear corner of trim casing.
4.Fit trim clip securing trim casing to lower 'D'
post.
5.Fit access panel to trim casing.
6.Fit trim clips securing trim casing to body.
7.Fit rear door aperture seal.
8. Models with ICE headphone control panels:
Position trim cap and connect multiplug to
headphone control panel.
9.Fit trim cap to trim casing and secure with
screw.
10.Fit 'D' post trim casing.
+ INTERIOR TRIM COMPONENTS,
REPAIRS, Trim casing - 'D' post.
11.Fit accessory socket.
+ LIGHTING, REPAIRS, Socket -
accessory.
12. Models with third row seats: Fit third row
seat.
+ SEATS, REPAIRS, Seat - third row.
Trim casing - upper - 'B' post
$% 76.13.28
Remove
1.Release front door aperture seal from 'B' post.
2.Release rear door aperture seal from 'B' post.
3.Remove cap from front seat belt lower
anchorage bolt.
4.Remove front seat belt lower anchorage bolt.
5.Feed seat belt through trim casing.
6.Remove trim casing.
7.Remove sound insulation from trim casing.
Refit
1.Fit sound insulation to trim casing.
2.Feed front seat belt through trim casing.
3.Fit front seat belt lower anchorage and tighten
bolt to 32 Nm (24 lbf.ft).
4.Fit cap to front seat belt lower anchorage bolt.
5.Fit trim casing to 'B' post.
6.Fit front door aperture seal to 'B' post.
7.Fit rear door aperture seal to 'B' post.
Page 1554 of 1672
IN CAR ENTERTAINMENT
DESCRIPTION AND OPERATION 86-6-1
IN CAR ENTERTA INMENT DESCRIPTION AND OPERAT ION
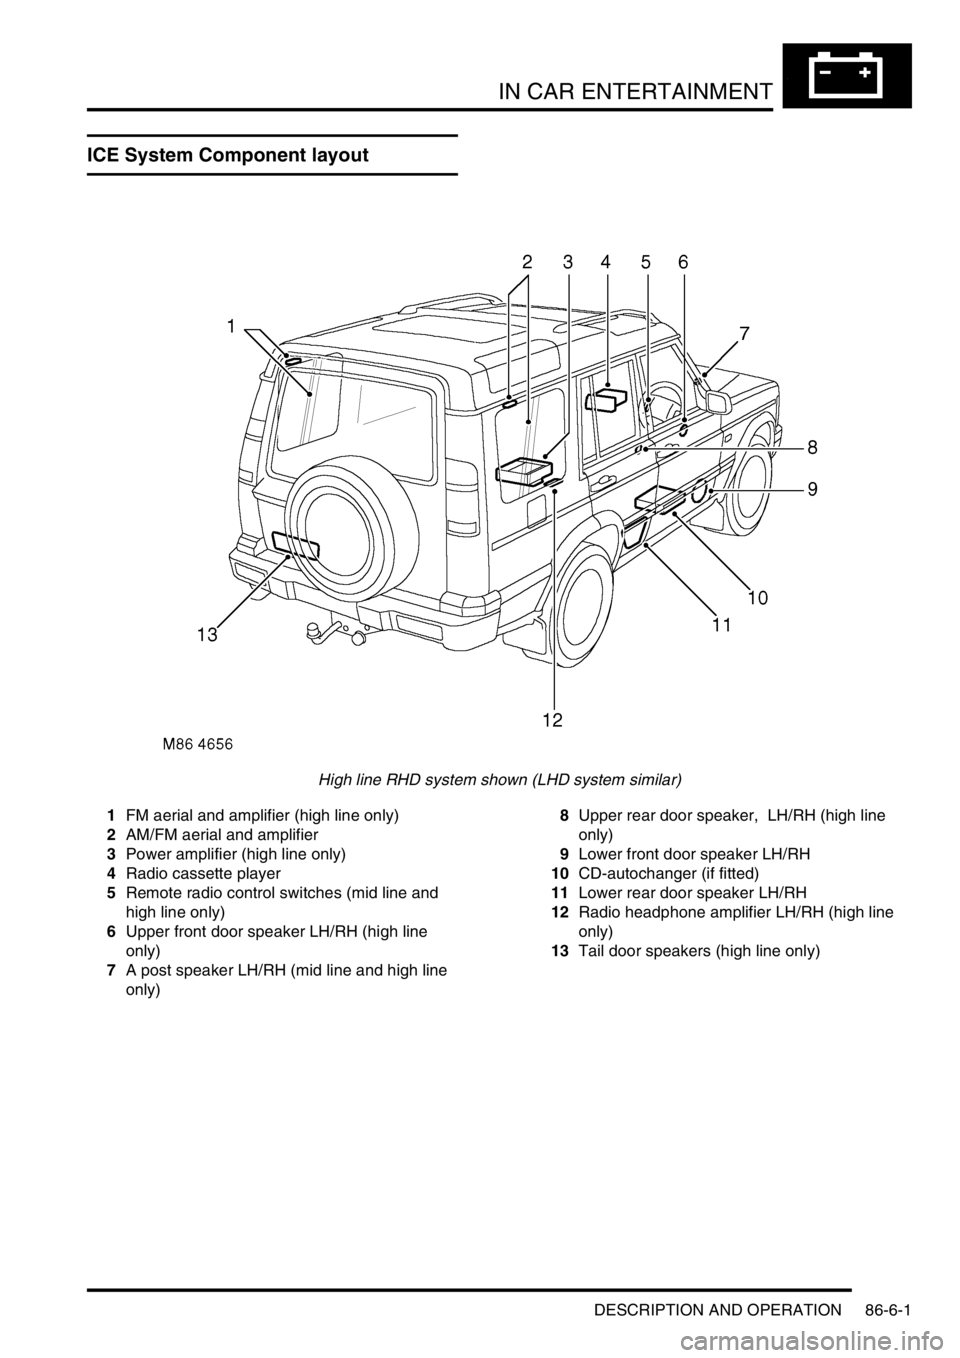
ICE System Component layout
High line RHD system shown (LHD system similar)
1FM aerial and amplifier (high line only)
2AM/FM aerial and amplifier
3Power amplifier (high line only)
4Radio cassette player
5Remote radio control switches (mid line and
high line only)
6Upper front door speaker LH/RH (high line
only)
7A post speaker LH/RH (mid line and high line
only)8Upper rear door speaker, LH/RH (high line
only)
9Lower front door speaker LH/RH
10CD-autochanger (if fitted)
11Lower rear door speaker LH/RH
12Radio headphone amplifier LH/RH (high line
only)
13Tail door speakers (high line only)
Page 1555 of 1672
IN CAR ENTERTAINMENT
86-6-2 DESCRIPTION AND OPERATION
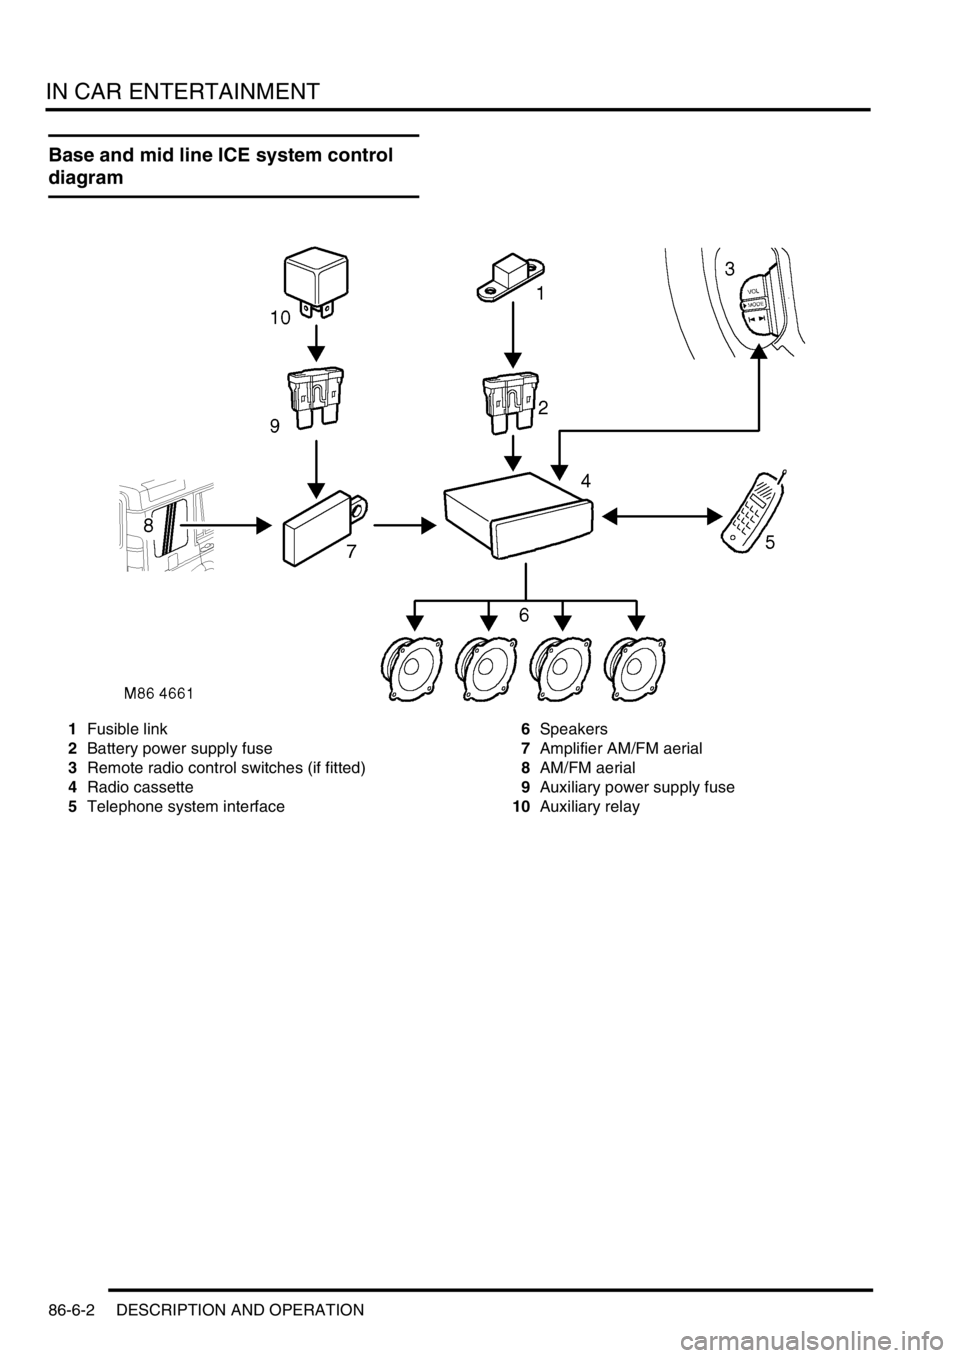
Base and mid line ICE system control
diagram
1Fusible link
2Battery power supply fuse
3Remote radio control switches (if fitted)
4Radio cassette
5Telephone system interface6Speakers
7Amplifier AM/FM aerial
8AM/FM aerial
9Auxiliary power supply fuse
10Auxiliary relay
Page 1556 of 1672
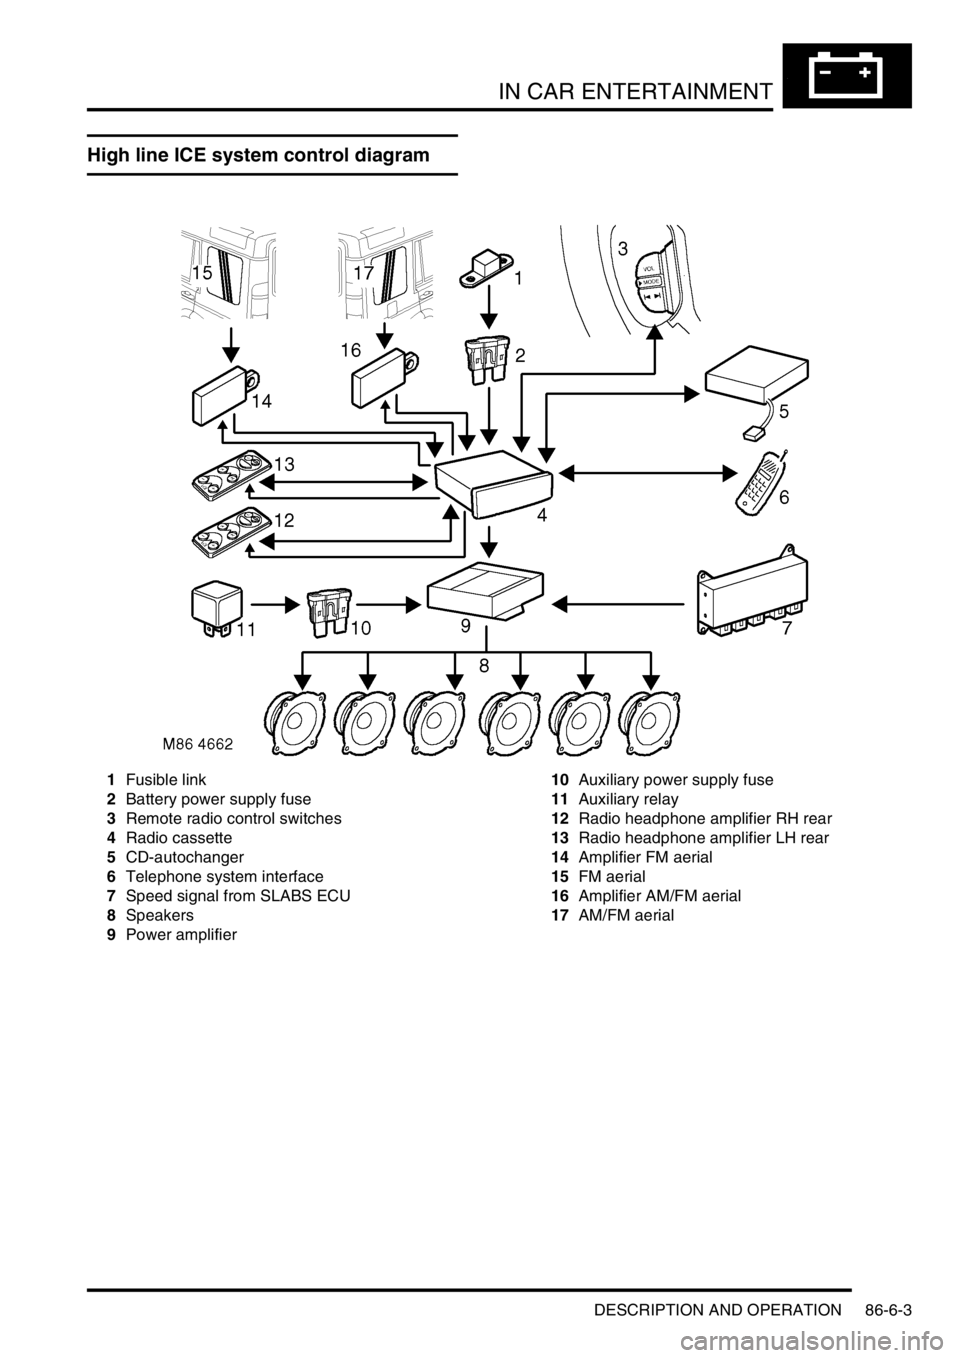
IN CAR ENTERTAINMENT
DESCRIPTION AND OPERATION 86-6-3
High line ICE system control diagram
1Fusible link
2Battery power supply fuse
3Remote radio control switches
4Radio cassette
5CD-autochanger
6Telephone system interface
7Speed signal from SLABS ECU
8Speakers
9Power amplifier10Auxiliary power supply fuse
11Auxiliary relay
12Radio headphone amplifier RH rear
13Radio headphone amplifier LH rear
14Amplifier FM aerial
15FM aerial
16Amplifier AM/FM aerial
17AM/FM aerial
Page 1557 of 1672

IN CAR ENTERTAINMENT
86-6-4 DESCRIPTION AND OPERATION
Description
General
The in car entertainment (ICE) system allows the driver and passengers to listen to audio output from the speakers
or optional headphones inside the vehicle. Buttons or knobs on the radio cassette allow changes of levels or
selections during the various modes of operation. The system can be controlled from the fascia mounted radio
cassette, or optional remote control switches on the left hand side of the steering wheel. High line systems may also
have rear headphone amplifiers that have some control of the system via the radio cassette player.
One or two amplified aerials located in the rear side windows send radio signals to the radio cassette player. On high
line systems a power amplifier and a CD-autochanger may be located under the front seats. Speakers are located in
the lower door panels, additional speakers may be located in upper door trim, the A-post and the tail door. A display
screen shows the user the current system status.
The ICE supplied varies with trim level and market. Vehicles may not have all of the speakers, amplified aerials, CD-
autochanger, rear headphone amplifiers or power amplifier.
Base system radio cassette
The base radio cassette has buttons for LD (loudness) AM, FM, EJECT (tape), Reverse, Base/Balance, treble, MAN
forward and reverse. The base radio cassette is located in the center of the fascia and contains the radio and tape
player, four clips (accessible through holes in the front of the unit) secure the unit in the fascia. To remove the unit
the four clips must be released with a special tool. The base system can be controlled from the fascia mounted radio
cassette. A logic control circuit in the radio cassette player controls the operation in the various control modes.
The radio cassette has a display screen, the information shown can be the current radio frequency, tape operating,
bass or loudness settings. Power for the illumination on the radio cassette is supplied from the passenger
compartment fuse box. A main fuse is also located in the connector socket area on the back of the radio cassette.
Security code function
A combination of buttons on the radio cassette are used to input and change security codes. Security codes make the
unit unusable if the unit is disconnected from the vehicle without deactivating the security code. The radio cassette
has an internal memory chip that stores the code information, if the power is removed from the unit the chip will
activate the security code feature. For this reason the security code feature must be deactivated before the unit is
removed or the vehicles battery is disconnected.
Audio functions
The radio cassette has buttons for the following audio functions: LD (loudness), bass/balance, fader, treble and
volume.
Cassette functions
The radio cassette has buttons for the following cassette functions: eject, forward, reverse and tape reversal.
Multi function buttons
The function of presets 1-6 and the MAN button depends on current mode of operation and allows selection of radio
band, radio on, tape track and search/seek functions. The MAN button is mode dependent, when pressed the button
allows manual operation or alternate mode selections such as manual tuning.
Internal memory
An internal memory chip stores the station presets and security code, power is supplied internally to the chip via a
permanent power feed, supplied from the passenger compartment fuse box.
Page 1558 of 1672
IN CAR ENTERTAINMENT
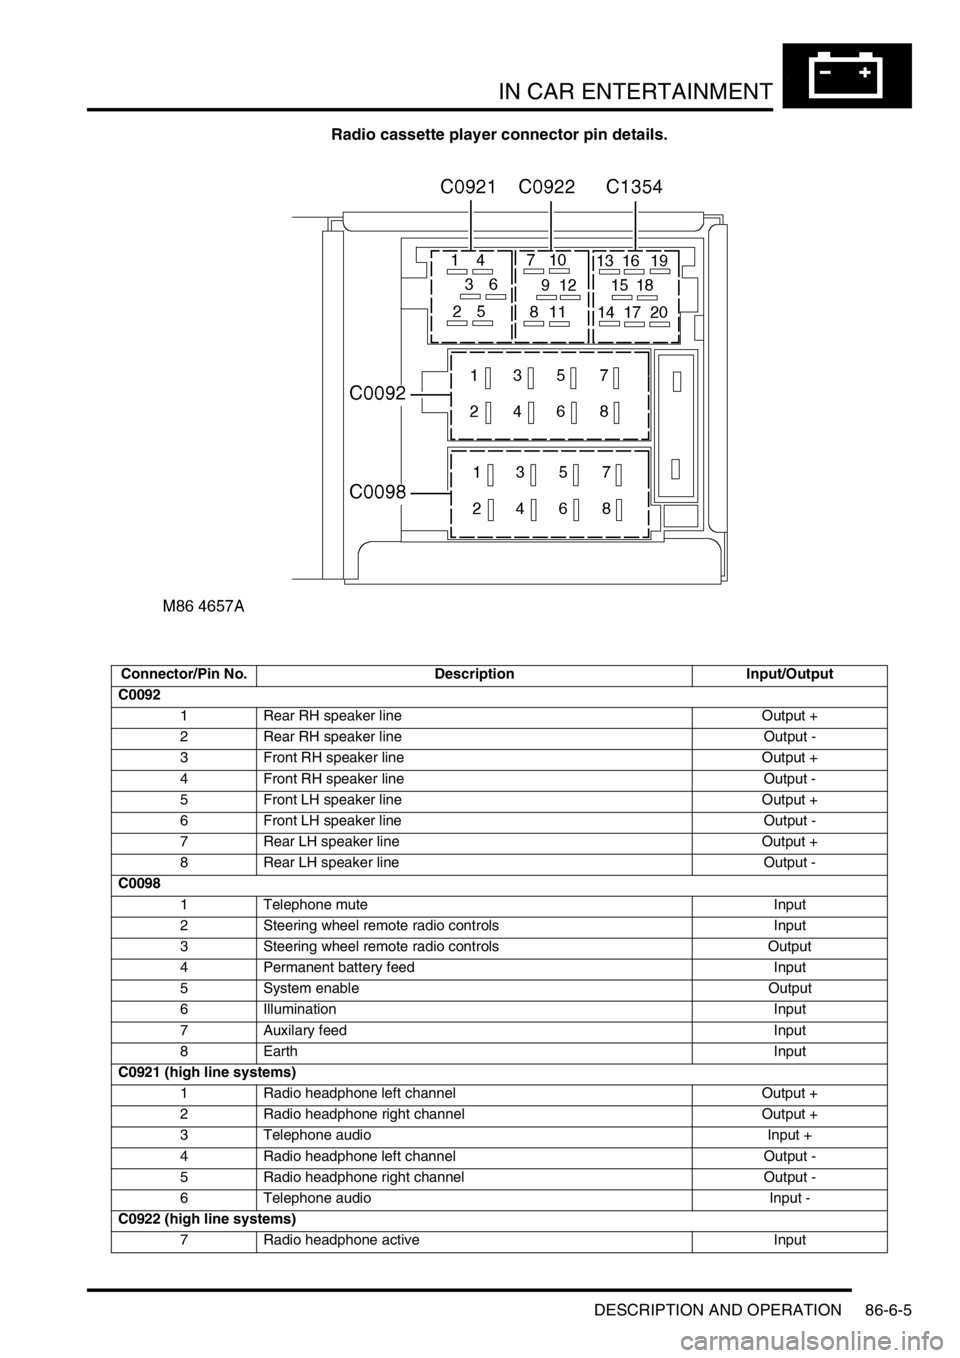
DESCRIPTION AND OPERATION 86-6-5
Radio cassette player connector pin details.
Connector/Pin No. Description Input/Output
C0092
1 Rear RH speaker line Output +
2 Rear RH speaker line Output -
3 Front RH speaker line Output +
4 Front RH speaker line Output -
5 Front LH speaker line Output +
6 Front LH speaker line Output -
7 Rear LH speaker line Output +
8 Rear LH speaker line Output -
C0098
1 Telephone mute Input
2 Steering wheel remote radio controls Input
3 Steering wheel remote radio controls Output
4 Permanent battery feed Input
5 System enable Output
6 Illumination Input
7 Auxilary feed Input
8EarthInput
C0921 (high line systems)
1 Radio headphone left channel Output +
2 Radio headphone right channel Output +
3 Telephone audio Input +
4 Radio headphone left channel Output -
5 Radio headphone right channel Output -
6 Telephone audio Input -
C0922 (high line systems)
7 Radio headphone active Input