2002 JEEP LIBERTY boot
[x] Cancel search: bootPage 556 of 1803

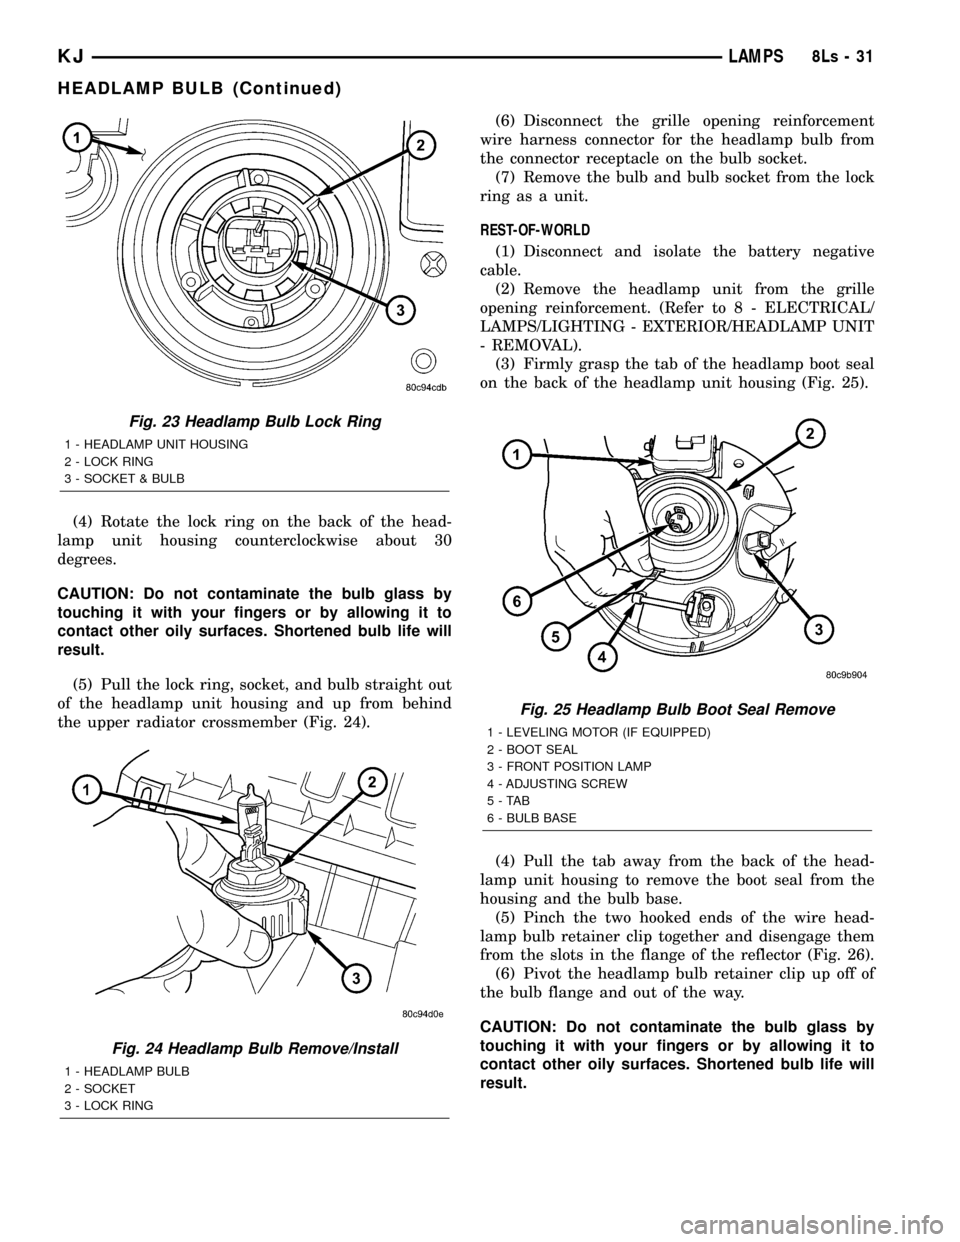
(4) Rotate the lock ring on the back of the head-
lamp unit housing counterclockwise about 30
degrees.
CAUTION: Do not contaminate the bulb glass by
touching it with your fingers or by allowing it to
contact other oily surfaces. Shortened bulb life will
result.
(5) Pull the lock ring, socket, and bulb straight out
of the headlamp unit housing and up from behind
the upper radiator crossmember (Fig. 24).(6) Disconnect the grille opening reinforcement
wire harness connector for the headlamp bulb from
the connector receptacle on the bulb socket.
(7) Remove the bulb and bulb socket from the lock
ring as a unit.
REST-OF-WORLD
(1) Disconnect and isolate the battery negative
cable.
(2) Remove the headlamp unit from the grille
opening reinforcement. (Refer to 8 - ELECTRICAL/
LAMPS/LIGHTING - EXTERIOR/HEADLAMP UNIT
- REMOVAL).
(3) Firmly grasp the tab of the headlamp boot seal
on the back of the headlamp unit housing (Fig. 25).
(4) Pull the tab away from the back of the head-
lamp unit housing to remove the boot seal from the
housing and the bulb base.
(5) Pinch the two hooked ends of the wire head-
lamp bulb retainer clip together and disengage them
from the slots in the flange of the reflector (Fig. 26).
(6) Pivot the headlamp bulb retainer clip up off of
the bulb flange and out of the way.
CAUTION: Do not contaminate the bulb glass by
touching it with your fingers or by allowing it to
contact other oily surfaces. Shortened bulb life will
result.
Fig. 23 Headlamp Bulb Lock Ring
1 - HEADLAMP UNIT HOUSING
2 - LOCK RING
3 - SOCKET & BULB
Fig. 24 Headlamp Bulb Remove/Install
1 - HEADLAMP BULB
2 - SOCKET
3 - LOCK RING
Fig. 25 Headlamp Bulb Boot Seal Remove
1 - LEVELING MOTOR (IF EQUIPPED)
2 - BOOT SEAL
3 - FRONT POSITION LAMP
4 - ADJUSTING SCREW
5-TAB
6 - BULB BASE
KJLAMPS8Ls-31
HEADLAMP BULB (Continued)
Page 557 of 1803

(7) Pull the bulb straight out of the headlamp unit
reflector (Fig. 27).
INSTALLATION
NORTH AMERICA
CAUTION: Always use the correct bulb size and
type for replacement. An incorrect bulb size or type
may overheat and cause damage to the lamp, the
socket and/or the lamp wiring.
CAUTION: Do not contaminate the bulb glass by
touching it with your fingers or by allowing it to
contact other oily surfaces. Shortened bulb life will
result.
(1) Position the headlamp bulb and socket unit
into the lock ring (Fig. 24).
(2) Reconnect the grille opening reinforcement
wire harness connector for the headlamp bulb to the
connector receptacle on the bulb socket.
(3) Position the lock ring, socket, and bulb down
behind the upper radiator crossmember and align
them with the socket opening on the back of the
headlamp unit housing.
(4) Push the socket and bulb straight into the
headlamp unit housing until they are firmly seated.
(5) Position the lock ring over the socket and
engage it with the flange on the back of the head-
lamp unit housing (Fig. 23).
(6) Rotate the lock ring on the back of the head-
lamp unit housing clockwise about 30 degrees.
(7) Reconnect the battery negative cable.
REST-OF-WORLD
CAUTION: Always use the correct bulb size and
type for replacement. An incorrect bulb size or type
may overheat and cause damage to the lamp, the
socket and/or the lamp wiring.
CAUTION: Do not contaminate the bulb glass by
touching it with your fingers or by allowing it to
contact other oily surfaces. Shortened bulb life will
result.
(1) Position the bulb into the headlamp unit reflec-
tor (Fig. 27).
(2) Pivot the headlamp bulb retainer clip back over
the bulb flange.
(3) Pinch the two hooked ends of the wire head-
lamp bulb retainer clip together and engage them
into the slots in the flange of the reflector (Fig. 26).
(4) Position the center opening of the boot seal
over the base of the headlamp bulb and pull it down-
ward until the seal is fully engaged over the bulb
base (Fig. 25).
Fig. 26 Headlamp Bulb Retainer Clip Engage/
Disengage
1 - RETAINER CLIP
2 - BULB BASE
3 - HEADLAMP HOUSING
4 - REFLECTOR
5 - BULB FLANGE
6 - RETAINER SLOTS
Fig. 27 Headlamp Bulb Remove/Install
1 - BULB BASE
2 - RETAINER CLIP
3 - LEVELING MOTOR (IF EQUIPPED)
4 - REFLECTOR
5 - HEADLAMP HOUSING
6 - BULB FLANGE
8Ls - 32 LAMPSKJ
HEADLAMP BULB (Continued)
Page 558 of 1803

(5) Position the outer circumference of the boot
seal over the flange on the back of the headlamp unit
housing and pull it downward until the seal is fully
engaged over the flange.
(6) Reinstall the headlamp unit onto the grille
opening reinforcement. (Refer to 8 - ELECTRICAL/
LAMPS/LIGHTING - EXTERIOR/HEADLAMP UNIT
- INSTALLATION).
(7) Reconnect the battery negative cable.
(8) Confirm proper headlamp unit alignment.
(Refer to 8 - ELECTRICAL/LAMPS/LIGHTING -
EXTERIOR/HEADLAMP UNIT - ADJUSTMENTS).
HEADLAMP HIGH BEAM
RELAY
DESCRIPTION
The headlamp high beam relay is located in the
Junction Block (JB) on the driver side outboard end
of the instrument panel in the passenger compart-
ment of the vehicle. The headlamp high beam relay
is omitted from vehicles manufactured for sale in
Canada, which have a Daytime Running Lamp (DRL)
solid state relay installed in the JB that also per-
forms the function of the headlamp high beam relay.
The headlamp high beam relay is a conventional
International Standards Organization (ISO) micro
relay (Fig. 28). Relays conforming to the ISO specifi-
cations have common physical dimensions, current
capacities, terminal patterns, and terminal functions.
The relay is contained within a small, rectangular,molded plastic housing and is connected to all of the
required inputs and outputs by five integral male
spade-type terminals that extend from the bottom of
the relay base.
The headlamp high beam relay cannot be adjusted
or repaired and, if faulty or damaged, the unit must
be replaced.
OPERATION
The headlamp high beam relay is an electrome-
chanical switch that uses a low current input from
the Body Control Module (BCM) to control a high
current output to the headlamp high beam filaments.
The movable common feed contact point is held
against the fixed normally closed contact point by
spring pressure. When the relay coil is energized, an
electromagnetic field is produced by the coil wind-
ings. This electromagnetic field draws the movable
relay contact point away from the fixed normally
closed contact point, and holds it against the fixed
normally open contact point. When the relay coil is
de-energized, spring pressure returns the movable
contact point back against the fixed normally closed
contact point. A resistor is connected in parallel with
the relay coil in the relay, and helps to dissipate volt-
age spikes and electromagnetic interference that can
be generated as the electromagnetic field of the relay
coil collapses.
The headlamp high beam relay terminals are con-
nected to the vehicle electrical system through a con-
nector receptacle in the Junction Block (JB). The
inputs and outputs of the headlamp high beam relay
include:
²Common Feed Terminal- The common feed
terminal (30) receives battery current at all times
from a fuse in the Power Distribution Center (PDC)
through a fused B(+) circuit.
²Coil Ground Terminal- The coil ground termi-
nal (85) is connected to a control output of the Body
Control Module (BCM) through a head lamp relay
control circuit. The BCM controls head lamp opera-
tion by controlling a ground path through this circuit
²Coil Battery Terminal- The coil battery ter-
minal (86) is connected to a control output of the
Body Control Module (BCM) and to the momentary
optical horn (flash-to-pass) output of the multi-func-
tion switch through a high beam relay control circuit.
The BCM and/or the multi-function switch controls
headlamp high beam operation by controlling a
ground path through this circuit.
²Normally Open Terminal- The normally open
terminal (87) is connected to the headlamp high
beam filaments through the high beam relay output
circuit and provides battery current to the headlamp
high beams whenever the relay is energized.
Fig. 28 ISO Micro Relay
30 - COMMON FEED
85 - COIL GROUND
86 - COIL BATTERY
87 - NORMALLY OPEN
87A - NORMALLY CLOSED
KJLAMPS8Ls-33
HEADLAMP BULB (Continued)
Page 560 of 1803

INSTALLATION
WARNING: ON VEHICLES EQUIPPED WITH AIR-
BAGS, DISABLE THE SUPPLEMENTAL RESTRAINT
SYSTEM BEFORE ATTEMPTING ANY STEERING
WHEEL, STEERING COLUMN, DRIVER AIRBAG,
PASSENGER AIRBAG, SEAT BELT TENSIONER,
FRONT IMPACT SENSORS, SIDE CURTAIN AIRBAG,
OR INSTRUMENT PANEL COMPONENT DIAGNOSIS
OR SERVICE. DISCONNECT AND ISOLATE THE
BATTERY NEGATIVE (GROUND) CABLE, THEN
WAIT TWO MINUTES FOR THE SYSTEM CAPACI-
TOR TO DISCHARGE BEFORE PERFORMING FUR-
THER DIAGNOSIS OR SERVICE. THIS IS THE ONLY
SURE WAY TO DISABLE THE SUPPLEMENTAL
RESTRAINT SYSTEM. FAILURE TO TAKE THE
PROPER PRECAUTIONS COULD RESULT IN ACCI-
DENTAL AIRBAG DEPLOYMENT AND POSSIBLE
PERSONAL INJURY.
(1) Position the headlamp high beam relay to the
proper receptacle in the Junction Block (JB) (Fig. 30).
(2) Align the headlamp high beam relay terminals
with the terminal cavities in the JB receptacle.
(3) Push firmly and evenly on the top of the head-
lamp high beam relay until the terminals are fully
seated in the terminal cavities in the JB receptacle.
(4) Reinstall the end cap onto the driver side out-
board end of the instrument panel. (Refer to 23 -
BODY/INSTRUMENT PANEL/INSTRUMENT
PANEL END CAP - INSTALLATION).
(5) Reconnect the battery negative cable.
HEADLAMP LEVELING MOTOR
DESCRIPTION
The headlamp leveling motor is located on the rear
inboard side of each headlamp unit on models
equipped with the headlamp leveling system, which
is available only in certain markets where required
(Fig. 31). The motor is encased within a molded plas-
tic housing and is secured by an integral wedge-type
mounting boss on its forward surface to a flanged
receptacle on the back of the headlamp unit housing.
A rubber seal around the circumference of the
mounting boss is compressed and seals the motor to
the headlamp unit when the boss is properly
installed in the flanged receptacle. The outside of the
motor housing features an integral molded connector
receptacle on its rearward surface, a hex-headed
adjusting screw extends from the top of the housing,
and a plastic pushrod with a ball formation on its
free end extends from the center of the mounting
boss at the front. Within the motor housing is a
12-volt Direct Current (DC) servo motor, an elec-
tronic controller board that includes the motor logic
circuits, and an integral screw-drive transmission.
The headlamp leveling motor is connected to the
vehicle electrical system through a dedicated take
out and connector of the front fascia wire harness.
The headlamp leveling motor cannot be repaired
and, if faulty or damaged, the unit must be replaced.
Fig. 30 Junction Block - Outboard Side (RHD Shown
- Rotate 180É for LHD)
1 - JB/BCM CONNECTOR
2 - HIGH BEAM RELAY
3 - DRL RELAY
Fig. 31 Headlamp Unit - With Leveling
1 - LEVELING MOTOR (IF EQUIPPED)
2 - BOOT SEAL
3 - ADJUSTING SCREW
4 - LOCATOR TAB
5 - HOUSING
6 - FRONT POSITION LAMP SOCKET & BULB
7 - HEADLAMP BULB
8 - MOUNTING TAB (2)
KJLAMPS8Ls-35
HEADLAMP HIGH BEAM RELAY (Continued)
Page 567 of 1803

(4) Pull the inboard side of the headlamp unit
away from the grille opening reinforcement far
enough to disengage the locator tab on the outboard
side of the unit (Fig. 41) or (Fig. 42) from the engage-
ment slot in the outboard edge of the reinforcement.(5) Pull the headlamp unit away from the grille
opening reinforcement far enough to disconnect the
wire harness connectors from the headlamp bulb
socket (North America), the headlamp bulb base
(Rest-Of-World), the front position lamp socket (if
equipped), and the headlamp leveling motor (if
equipped).
(6) Remove the headlamp unit from the grille
opening reinforcement.
INSTALLATION
(1) Position the headlamp unit to the grille open-
ing reinforcement.
(2) Reconnect the wire harness connectors to the
headlamp bulb socket (North America), the headlamp
bulb base (Rest-Of-World), the front position lamp
socket (if equipped), and the headlamp leveling motor
(if equipped) (Fig. 41) or (Fig. 42).
(3) Engage the locator tab on the outboard side of
the headlamp unit into the engagement slot in the
outboard edge of the grille opening reinforcement.
(4) Align the two mounting tabs on the inboard
side of the headlamp unit housing to the mounting
holes in the grille opening reinforcement (Fig. 40).
(5) Install and tighten the two screws that secure
the mounting tabs on the inboard side of the head-
lamp unit housing to the grille opening reinforce-
ment. Tighten the screws to 3 N´m (30 in. lbs.).
(6) Reinstall the grille panel onto the grille open-
ing reinforcement. (Refer to 23 - BODY/EXTERIOR/
GRILLE - INSTALLATION).
(7) Reconnect the battery negative cable.
(8) Confirm proper headlamp unit alignment.
(Refer to 8 - ELECTRICAL/LAMPS/LIGHTING -
EXTERIOR/HEADLAMP UNIT - ADJUSTMENTS).
ADJUSTMENTS
ADJUSTMENT - HEADLAMP UNIT
VEHICLE PREPARATION FOR HEADLAMP ALIGNMENT
(1) Verify headlamp dimmer (multi-function)
switch and high beam indicator operation.
(2) If the vehicle is equipped with headlamp level-
ing, be certain that the headlamp leveling switch is
in the ª0º position.
(3) Repair or replace any faulty or damaged com-
ponents that could hinder proper lamp alignment.
(4) Verify proper tire inflation.
(5) Clean headlamp lenses.
(6) Verify that cargo area is not heavily loaded.
(7) The fuel tank should be Full. Add 2.94 kilo-
grams (6.5 pounds) of weight over the fuel tank for
each estimated gallon of missing fuel.
Fig. 41 Headlamp Unit - North America
1 - MOUNTING TAB (2)
2 - ADJUSTING SCREW
3 - LOCK RING
4 - HOUSING
5 - LOCATOR TAB
6 - SOCKET & BULB
Fig. 42 Headlamp Unit - Rest-Of-World
1 - LEVELING MOTOR (IF EQUIPPED)
2 - BOOT SEAL
3 - ADJUSTING SCREW
4 - LOCATOR TAB
5 - HOUSING
6 - FRONT POSITION LAMP SOCKET & BULB
7 - HEADLAMP BULB
8 - MOUNTING TAB (2)
8Ls - 42 LAMPSKJ
HEADLAMP UNIT (Continued)
Page 1443 of 1803

GEAR
TABLE OF CONTENTS
page page
GEAR
DESCRIPTION.........................13
OPERATION...........................13
REMOVAL
REMOVAL - 4WD......................13
REMOVAL - 2WD......................14
INSTALLATION
INSTALLATION - 4WD..................14INSTALLATION - 2WD..................14
SPECIFICATIONS
TORQUE CHART......................15
SPECIAL TOOLS
OUTER TIE ROD END REMOVAL TOOL....15
GEAR
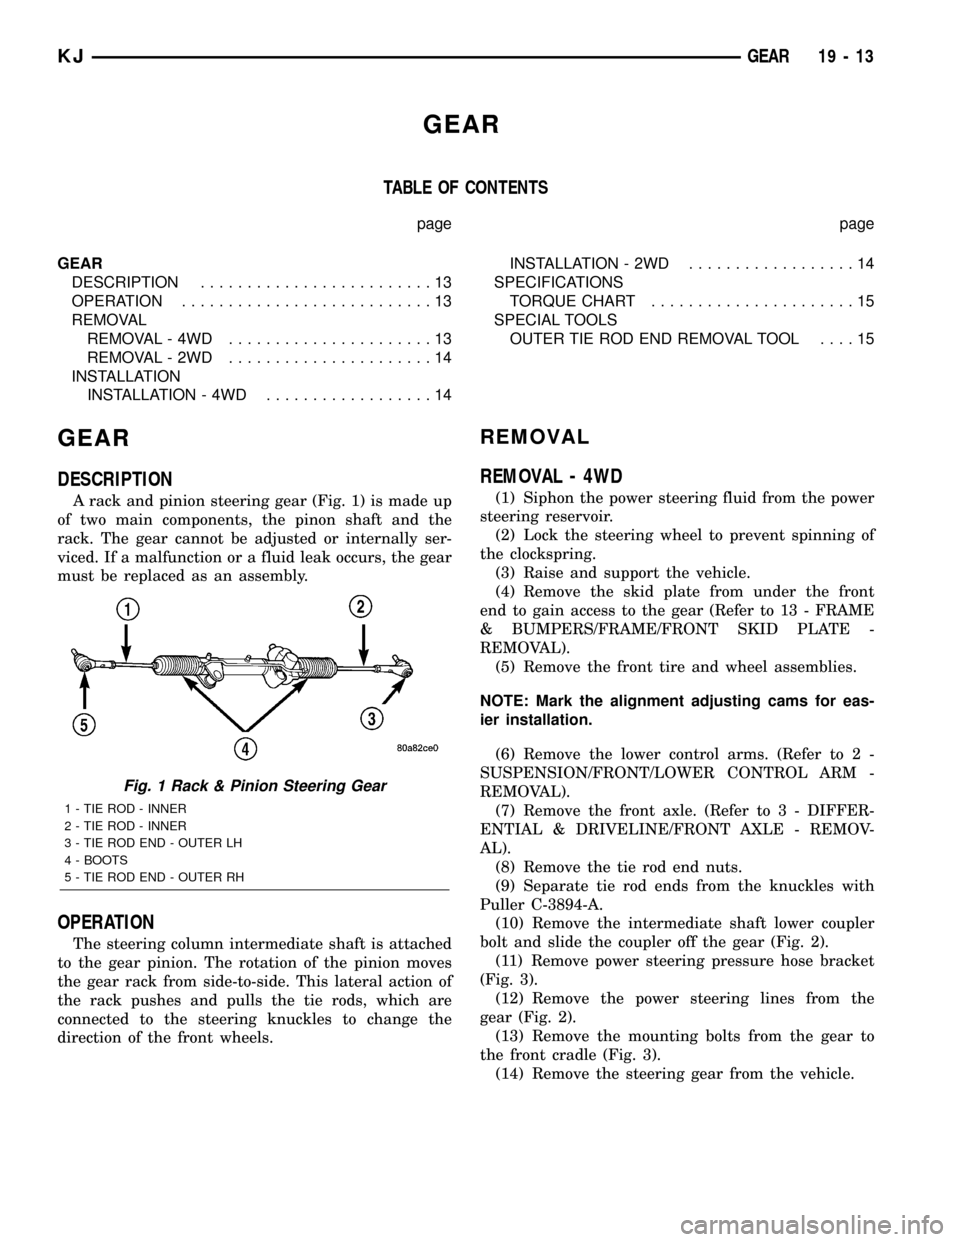
DESCRIPTION
A rack and pinion steering gear (Fig. 1) is made up
of two main components, the pinon shaft and the
rack. The gear cannot be adjusted or internally ser-
viced. If a malfunction or a fluid leak occurs, the gear
must be replaced as an assembly.
OPERATION
The steering column intermediate shaft is attached
to the gear pinion. The rotation of the pinion moves
the gear rack from side-to-side. This lateral action of
the rack pushes and pulls the tie rods, which are
connected to the steering knuckles to change the
direction of the front wheels.
REMOVAL
REMOVAL - 4WD
(1) Siphon the power steering fluid from the power
steering reservoir.
(2) Lock the steering wheel to prevent spinning of
the clockspring.
(3) Raise and support the vehicle.
(4) Remove the skid plate from under the front
end to gain access to the gear (Refer to 13 - FRAME
& BUMPERS/FRAME/FRONT SKID PLATE -
REMOVAL).
(5) Remove the front tire and wheel assemblies.
NOTE: Mark the alignment adjusting cams for eas-
ier installation.
(6) Remove the lower control arms. (Refer to 2 -
SUSPENSION/FRONT/LOWER CONTROL ARM -
REMOVAL).
(7) Remove the front axle. (Refer to 3 - DIFFER-
ENTIAL & DRIVELINE/FRONT AXLE - REMOV-
AL).
(8) Remove the tie rod end nuts.
(9) Separate tie rod ends from the knuckles with
Puller C-3894-A.
(10) Remove the intermediate shaft lower coupler
bolt and slide the coupler off the gear (Fig. 2).
(11) Remove power steering pressure hose bracket
(Fig. 3).
(12) Remove the power steering lines from the
gear (Fig. 2).
(13) Remove the mounting bolts from the gear to
the front cradle (Fig. 3).
(14) Remove the steering gear from the vehicle.
Fig. 1 Rack & Pinion Steering Gear
1 - TIE ROD - INNER
2 - TIE ROD - INNER
3 - TIE ROD END - OUTER LH
4 - BOOTS
5 - TIE ROD END - OUTER RH
KJGEAR 19 - 13
Page 1621 of 1803

INTERIOR
TABLE OF CONTENTS
page page
4WD FLOOR SHIFT BOOT
REMOVAL............................156
INSTALLATION........................156
A-PILLAR TRIM AND GRAB HANDLE
REMOVAL............................156
INSTALLATION........................156
COWL TRIM COVER
REMOVAL............................157
INSTALLATION........................157
DOOR SILL SCUFF PLATE
REMOVAL............................157
INSTALLATION........................157
ASSIST HANDLE
REMOVAL............................157
INSTALLATION........................157
B-PILLAR LOWER TRIM
REMOVAL............................157
INSTALLATION........................157
B-PILLAR UPPER TRIM
REMOVAL............................157
INSTALLATION........................158
CARPETS AND FLOOR MATS
REMOVAL............................158
INSTALLATION........................158
SHIFT BEZEL
REMOVAL............................158
INSTALLATION........................158FLOOR CONSOLE
REMOVAL............................158
INSTALLATION........................158
FLOOR CONSOLE LID LATCH
REMOVAL............................158
INSTALLATION........................158
HEADLINER
REMOVAL............................159
INSTALLATION........................159
QUARTER TRIM PANEL
REMOVAL............................159
INSTALLATION........................159
REAR DOOR SCUFF PLATE
REMOVAL............................160
INSTALLATION........................160
SUN VISOR
REMOVAL............................160
INSTALLATION........................160
SUN VISOR SUPPORT
REMOVAL............................160
INSTALLATION........................160
REAR VIEW MIRROR
REMOVAL............................161
INSTALLATION
INSTALLATION......................161
INSTALLATION - REARVIEW MIRROR
SUPPORT BRACKET..................161
4WD FLOOR SHIFT BOOT
REMOVAL
(1) Remove the shift lever and remove the boot
from the lever. (Refer to 21 - TRANSMISSION/
TRANSAXLE/TRANSFER CASE/SHIFT LEVER -
REMOVAL)
INSTALLATION
(1) Install the shift boot onto the shift lever and
install the lever. (Refer to 21 - TRANSMISSION/
TRANSAXLE/TRANSFER CASE/SHIFT LEVER -
INSTALLATION)
A-PILLAR TRIM AND GRAB
HANDLE
REMOVAL
(1) Using a small pry tool or equivalent, remove
the grab handle trim plugs.
(2) Remove the two grab handle screws.
(3) Remove the grab handle and a-pillar trim from
the a-pillar.
INSTALLATION
(1) Snap a-pillar trim and grab handle into the
a-pillar.
(2) Install the two screws and install the grab han-
dle trim plugs.
23 - 156 INTERIORKJ
Page 1623 of 1803

INSTALLATION
(1) Position the trim panel and seat the retaining
clips.
(2) Install the seat belt turning loop. (Refer to 8 -
ELECTRICAL/RESTRAINTS/SEAT BELT &
RETRACTOR - INSTALLATION)
(3) Install the b-pillar lower trim panel. (Refer to
23 - BODY/INTERIOR/B-PILLAR LOWER TRIM -
INSTALLATION)
CARPETS AND FLOOR MATS
REMOVAL
Front Carpet
(1) Remove front seats. (Refer to 23 - BODY/
SEATS/SEAT - FRONT - REMOVAL)
(2) Remove the floor console. (Refer to 23 - BODY/
INTERIOR/FLOOR CONSOLE - REMOVAL)
(3) Remove the rear seats. (Refer to 23 - BODY/
SEATS/SEAT - REAR - REMOVAL)
(4) Remove the cowl trim panels. (Refer to 23 -
BODY/INTERIOR/COWL TRIM COVER -
REMOVAL)
(5) Remove the b-pillar lower trim. (Refer to 23 -
BODY/INTERIOR/B-PILLAR LOWER TRIM -
REMOVAL)
(6) Remove the jack assembly.
(7) Remove the carpet.
Rear Cargo Carpet
(1) Remove the rivets attaching the cargo hooks to
the floor.
(2) Remove the carpet.
INSTALLATION
Front Carpet
(1) Install the carpet.
(2) Install the jack assembly.
(3) Install the b-pillar lower trim. (Refer to 23 -
BODY/INTERIOR/B-PILLAR LOWER TRIM -
INSTALLATION)
(4) Install the cowl trim panels. (Refer to 23 -
BODY/INTERIOR/COWL TRIM COVER - INSTAL-
LATION)
(5) Install the rear seats. (Refer to 23 - BODY/
SEATS/SEAT - REAR - INSTALLATION)
(6) Install the floor console. (Refer to 23 - BODY/
INTERIOR/FLOOR CONSOLE - INSTALLATION)
(7) Install the front seats. (Refer to 23 - BODY/
SEATS/SEAT - FRONT - INSTALLATION)
Rear Cargo Carpet
(1) Install the carpet and slide under the trim pan-
els.
(2) Install new rivets securing the carpet and
cargo hooks to the floor.
SHIFT BEZEL
REMOVAL
(1) Using a trim stick C-4755 or equivalent, pry
shift bezel out of the floor console.
INSTALLATION
(1) Position the shift bezel and seat the retaining
clips into the floor console.
FLOOR CONSOLE
REMOVAL
(1) Remove the shift bezel, if equipped. (Refer to
23 - BODY/INTERIOR/SHIFT BEZEL - REMOVAL)
(2) Set park brake lever in the up position.
(3) Using a trim stick C-4755 or equivalent, dis-
connect the manual trans shifter boot, if equipped.
(4) Using a trim stick C-4755 or equivalent, dis-
connect the transfer case shifter boot, if equipped.
(5) Remove the four bolts. (Fig. 3)
(6) Lift the console at the back and remove.
INSTALLATION
(1) Position the front of the console and lower the
rear over the shifter and brake levers.
(2) Install the bolts.
(3) Install the shift boots and seat the retainer
clips.
(4) Install the shift bezel. (Refer to 23 - BODY/IN-
TERIOR/SHIFT BEZEL - INSTALLATION)
FLOOR CONSOLE LID LATCH
REMOVAL
(1) Remove the screws and remove the lid.
(2) Remove the screws attaching the lid cover and
remove the latch.
INSTALLATION
(1) Install the latch and the lid cover.
(2) Install the screws attaching the lid cover.
(3) Install the console lid onto the console and
install the screws.
23 - 158 INTERIORKJ
B-PILLAR UPPER TRIM (Continued)