2002 JEEP LIBERTY boot
[x] Cancel search: bootPage 30 of 1803

(5) Install the hub/bearing. (Refer to 2 - SUSPEN-
SION/FRONT/HUB / BEARING - INSTALLATION).
(6) Install the axle shaft nut. Tighten the nut to
135 N´m (96 ft.lbs.).(if equipped with four wheel
drive).
(7) Install the wheel speed sensor. (Refer to 5 -
BRAKES/ELECTRICAL/FRONT WHEEL SPEED
SENSOR - INSTALLATION).
(8) Install the disc brake rotor. (Refer to 5 -
BRAKES/HYDRAULIC/MECHANICAL/ROTORS -
INSTALLATION).
(9) Install the caliper adapter. (Refer to 5 -
BRAKES/HYDRAULIC/MECHANICAL/DISC
BRAKE CALIPER ADAPTER - INSTALLATION).
(10) Install the tire and wheel assembly. (Refer to
22 - TIRES/WHEELS/WHEELS - STANDARD PRO-
CEDURE).
(11) Perform the set toe procedure (Refer to 2 -
SUSPENSION/WHEEL ALIGNMENT - STANDARD
PROCEDURE).
LOWER BALL JOINT
DIAGNOSIS AND TESTING - LOWER BALL
JOINT
(1) Raise the vehicle on a drive-on hoist.
NOTE: If a drive-on hoist is not available, use
wooden blocks with jack stands to support the
lower control arm in the ball joint area. Place the
jack stands appropriately and lower the hoist plac-
ing weight on the lower control arm. The lower con-
trol arms should now be supporting the vehicle
weight.
(2) With the use of jack stands, lift the front end
off the hoist and position wooden blocks underneath
both lower control arms supporting the vehicles
weight.
(3) Remove the tire and wheel assembly.
(4) Attach a dial indicator to the base of the lower
control arm and align the dial indicator's contact
point with the direction of the stud axis, touch the
machined flat on the knuckle and zero the dial indi-
cator. (Fig. 2)
NOTE: Use care when applying the load to the
knuckle, so the parts are not damaged using care
not to tear the boot.
(5) From the front of the vehicle, insert a pry bar
to get it rested on the lower control arm and use
lever principle to push the knuckle up until the arm
of the dial indicator no longer moves.(6) Record the ball joint movement on each side of
the vehicle. The end play is acceptable with no more
than 1.5mm of end play back to back.LOWER CONTROL ARM
REMOVAL
(1) Raise and support the vehicle.
(2) Remove the tire and wheel assembly.
(3) Remove the lower clevis bracket bolt at the
lower control arm.
(4) Remove the stabilizer link bolt at the lower
control arm.
(5) Remove the lower ball joint nut.
(6) Separate the lower ball joint from the lower
control arm using tool C-4150A.
NOTE: Marking the lower control arm pivot bolts
front and rear will aid in the assembly procedure.
(7) Mark the lower control arm pivot bolts front
and rear.
(8) Remove the front cam/pivot bolt. (Fig. 3)
(9) Remove the rear cam/pivot bolt. (Fig. 3)
(10) Remove the lower control arm from the vehi-
cle.
INSTALLATION
(1) Install the lower control arm to the vehicle.
(2) Install the rear cam/pivot bolt.
(3) Install the front cam/pivot bolt.
(4) Install the lower ball joint nut. Tighten the nut
to 81 N´m (60 ft.lbs.)
Fig. 2 SUSPENSION IN THE CURB POSITION
1-PRYBAR
2 - BALL JOINT
3 - DIAL INDICATOR
4 - WOODEN BLOCK OR SUPPORT
5 - CLAMP
2 - 10 FRONTKJ
KNUCKLE (Continued)
Page 46 of 1803

LOWER BALL JOINT
REMOVAL
(1) Remove the tire and wheel assembly.
(2) Remove the brake caliper and rotor (Refer to 5
- BRAKES/HYDRAULIC/MECHANICAL/ROTORS -
REMOVAL).
(3) Disconnect the tie rod from the steering
knuckle (Refer to 19 - STEERING/LINKAGE/TIE
ROD END - REMOVAL).
(4) Remove the steering knuckle (Refer to 2 - SUS-
PENSION/FRONT/KNUCKLE - REMOVAL).
(5) Move the halfshaft to the side and support the
halfshaft out of the way (If Equipped).
NOTE: Extreme pressure lubrication must be used
on the threaded portions of the tool. This will
increase the longevity of the tool and insure proper
operation during the removal and installation pro-
cess.
(6) Secure the steering knuckle in a vise.
(7) Press the ball joint from the steering knuckle
using special tools C-4212±F (PRESS), 8859-2
(RECEIVER) and 8859-1 (DRIVER) (Fig. 7).
INSTALLATION
NOTE: Extreme pressure lubrication must be used
on the threaded portions of the tool. This will
increase the longevity of the tool and insure proper
operation during the removal and installation pro-
cess.(1) Install the ball joint into the steering knuckle
and press in using special tools C-4212±F (press),
8859-3 (driver) and 6761 (receiver) (Fig. 8).
(2) Install the ball joint boot.
(3) Remove the support for the halfshaft and
install into position (If Equipped).
(4) Install the steering knuckle (Refer to 2 - SUS-
PENSION/FRONT/KNUCKLE - INSTALLATION).
(5) Install the tie rod end into the steering knuckle
(Refer to 19 - STEERING/LINKAGE/TIE ROD END -
INSTALLATION).
(6) Install and tighten the halfshaft nut to 136
N´m (100 ft. lbs.).
(7) Install the brake caliper and rotor (Refer to 5 -
BRAKES/HYDRAULIC/MECHANICAL/ROTORS -
INSTALLATION).
(8) Install the tire and wheel assembly (Refer to 22
- TIRES/WHEELS/WHEELS - STANDARD PROCE-
DURE).
(9) Check the vehicle ride height (Refer to 2 - SUS-
PENSION/WHEEL ALIGNMENT - STANDARD
PROCEDURE).
(10) Perform a wheel alignment (Refer to 2 - SUS-
PENSION/WHEEL ALIGNMENT - STANDARD
PROCEDURE).
Fig. 7 LOWER BALL JOINT
1 - 8859-1 DRIVER
2 - C-4212F PRESS
3 - 8859-2 RECEIVER
Fig. 8 LOWER BALL JOINT
1 - 6761 RECEIVER
2 - 8859-3 DRIVER
3 - C-4212F PRESS
KJSUSPENSION 2s - 5
Page 56 of 1803

PROPELLER SHAFT - REAR
REMOVAL
(1) Shift the transmission/transfer case into Neu-
tral.
(2) Raise and support vehicle.
(3) Mark a reference line across the pinion yoke
and propeller shaft for installation.
(4) Remove U-joint strap bolts at the pinion shaft
yoke.
(5) Pry open clamp holding the dust boot to propel-
ler shaft yoke (Fig. 9), if equipped.
(6) Slide slip yoke off of the transmission/transfer
case output shaft and remove the propeller shaft
(Fig. 10).
INSTALLATION
(1) Slide slip yoke on the transmission/transfer
case output shaft.
(2) Align reference marks on the pinion yoke and
propeller shaft.
(3) Install U-joint straps and tighten strap bolts to
18 N´m (13 ft. lbs.).
(4) Tighten dust boot clamp if equipped with
Clamp C-4975A (Fig. 11).
(5) Remove support and lower the vehicle.
Fig. 9 DUST BOOT CLAMP
1 - SLINGER
2 - BOOT
3-AWL
4 - TRANSFER CASE
Fig. 10 REAR PROPELLER SHAFT
1 - CLAMP
2 - YOKE
3 - PROPELLER SHAFT
4 - AXLE YOKE
5 - CLAMP
6 - OUTPUT SHAFT
7 - BOOT
Fig. 11 CRIMPING BOOT CLAMP
1 - CLAMP TOOL
2 - SLINGER
3 - BOOT
4 - CLAMPS
KJPROPELLER SHAFT 3 - 7
Page 59 of 1803

HALF SHAFT
TABLE OF CONTENTS
page page
HALF SHAFT
CAUTION.............................10
DIAGNOSIS AND TESTING - HALF SHAFT....10
REMOVAL.............................10
INSTALLATION.........................11
SPECIFICATIONS
HALF SHAFT.........................11SPECIAL TOOLS.......................12
CV JOINT/BOOT-OUTER
REMOVAL.............................12
INSTALLATION.........................13
CV JOINT/BOOT-INNER
REMOVAL.............................15
INSTALLATION.........................17
HALF SHAFT
CAUTION
CAUTION:: Never grasp half shaft assembly by the
boots. This may cause the boot to pucker or crease
and reduce the service life of the boot.
Avoid over angulating or stroking the C/V joints
when handling the half shaft.
Half shafts exposed to battery acid, transmission
fluid, brake fluid, differential fluid or gasoline may
cause the boots to deteriorate.
DIAGNOSIS AND TESTING - HALF SHAFT
Check for grease at the inboard and outboard C/V
joint. This is a sign of boot or boot clamp damage.
NOISE AND/OR VIBRATION IN TURNS
A clicking noise or a vibration in turns could be
caused by a damaged outer C/V or inner tripod joint
seal boot or seal boot clamps. This will result in the
loss/contamination of the joint grease, resulting in
inadequate lubrication of the joint. Noise could also
be caused by another component of the vehicle com-
ing in contact with the half shafts.
CLUNKING NOISE DURING ACCELERATION
This noise may be a result of a damaged or worn
C/V joint. A torn boot or loose/missing clamp on the
inner/outer joint which has allowed the grease to be
lost will damage the C/V joint.
SHUDDER OR VIBRATION DURING ACCELERATION
This problem could be a result of a worn/damaged
inner tripod joint or a sticking tripod joint. Improper
wheel alignment may also cause a shudder or vibration.
VIBRATION AT HIGHWAY SPEEDS
This problem could be a result of out of balance
front tires or tire/wheel runout. Foreign material
(mud, etc.) packed on the backside of the wheel(s)
will also cause a vibration.
REMOVAL
(1) Raise and support vehicle.
(2) Remove wheel and tire assembly.
(3) Remove half shaft hub nut.
(4) Remove stabilizer link (Fig. 1).
Fig. 1 STABILIZER BAR LINK
1 - STABILIZER BAR
2 - STABILIZER BAR LINK
3 - 10 HALF SHAFTKJ
Page 61 of 1803

SPECIAL TOOLS
CV JOINT/BOOT-OUTER
REMOVAL
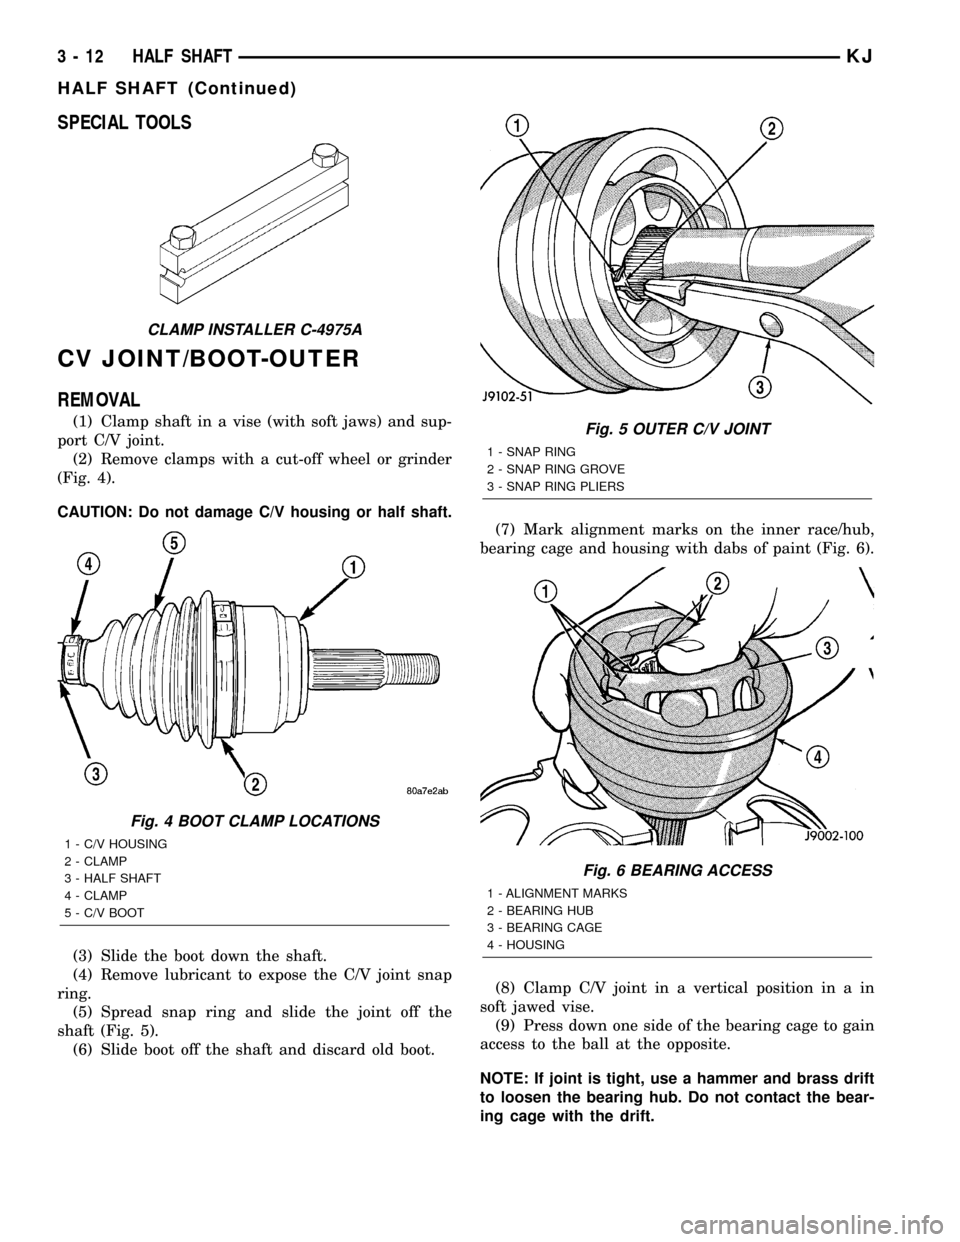
(1) Clamp shaft in a vise (with soft jaws) and sup-
port C/V joint.
(2) Remove clamps with a cut-off wheel or grinder
(Fig. 4).
CAUTION: Do not damage C/V housing or half shaft.
(3) Slide the boot down the shaft.
(4) Remove lubricant to expose the C/V joint snap
ring.
(5) Spread snap ring and slide the joint off the
shaft (Fig. 5).
(6) Slide boot off the shaft and discard old boot.(7) Mark alignment marks on the inner race/hub,
bearing cage and housing with dabs of paint (Fig. 6).
(8) Clamp C/V joint in a vertical position in a in
soft jawed vise.
(9) Press down one side of the bearing cage to gain
access to the ball at the opposite.
NOTE: If joint is tight, use a hammer and brass drift
to loosen the bearing hub. Do not contact the bear-
ing cage with the drift.
CLAMP INSTALLER C-4975A
Fig. 4 BOOT CLAMP LOCATIONS
1 - C/V HOUSING
2 - CLAMP
3 - HALF SHAFT
4 - CLAMP
5 - C/V BOOT
Fig. 5 OUTER C/V JOINT
1 - SNAP RING
2 - SNAP RING GROVE
3 - SNAP RING PLIERS
Fig. 6 BEARING ACCESS
1 - ALIGNMENT MARKS
2 - BEARING HUB
3 - BEARING CAGE
4 - HOUSING
3 - 12 HALF SHAFTKJ
HALF SHAFT (Continued)
Page 62 of 1803

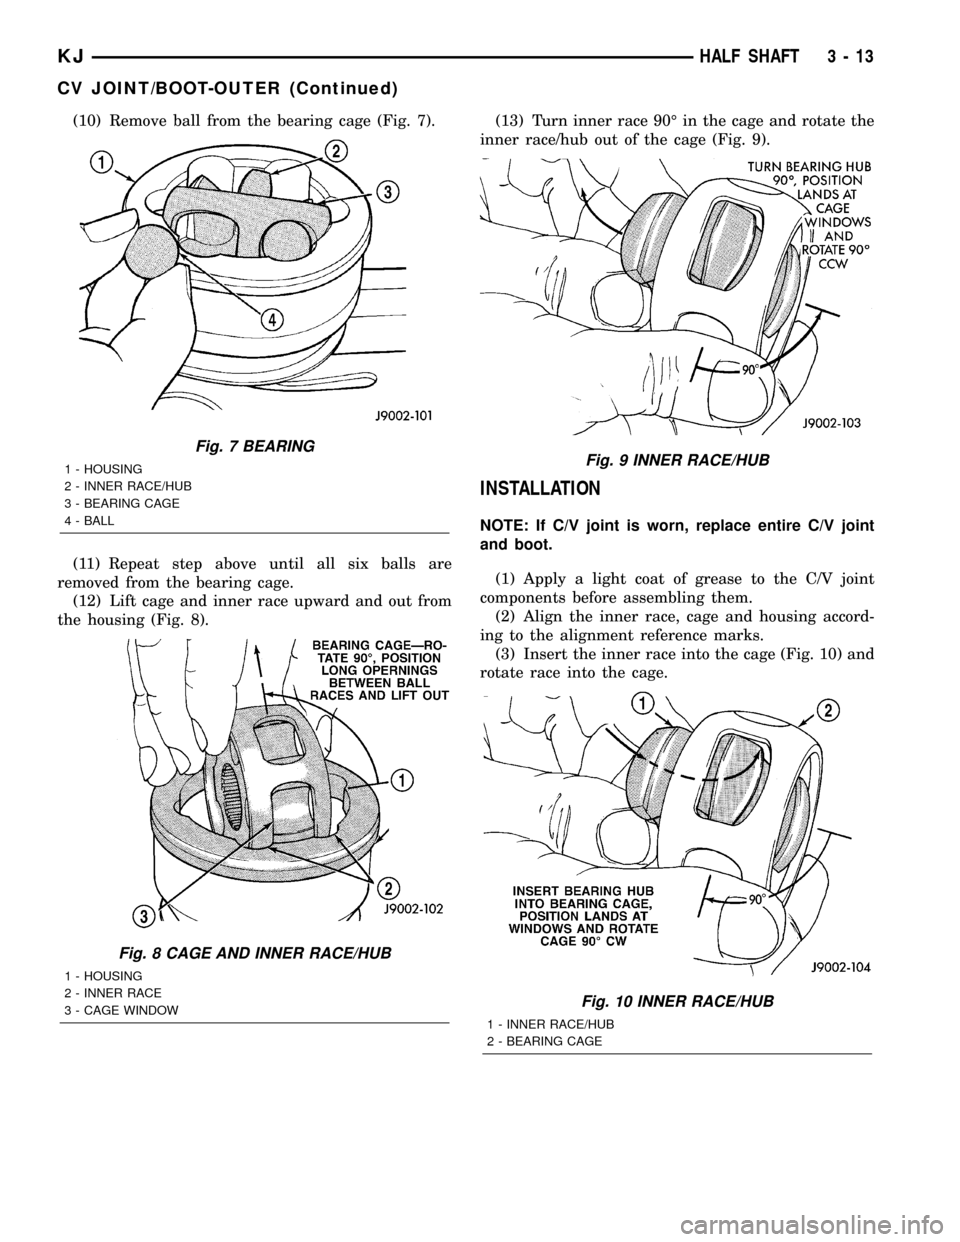
(10) Remove ball from the bearing cage (Fig. 7).
(11) Repeat step above until all six balls are
removed from the bearing cage.
(12) Lift cage and inner race upward and out from
the housing (Fig. 8).(13) Turn inner race 90É in the cage and rotate the
inner race/hub out of the cage (Fig. 9).
INSTALLATION
NOTE: If C/V joint is worn, replace entire C/V joint
and boot.
(1) Apply a light coat of grease to the C/V joint
components before assembling them.
(2) Align the inner race, cage and housing accord-
ing to the alignment reference marks.
(3) Insert the inner race into the cage (Fig. 10) and
rotate race into the cage.
Fig. 7 BEARING
1 - HOUSING
2 - INNER RACE/HUB
3 - BEARING CAGE
4 - BALL
Fig. 8 CAGE AND INNER RACE/HUB
1 - HOUSING
2 - INNER RACE
3 - CAGE WINDOW
Fig. 9 INNER RACE/HUB
Fig. 10 INNER RACE/HUB
1 - INNER RACE/HUB
2 - BEARING CAGE
KJHALF SHAFT 3 - 13
CV JOINT/BOOT-OUTER (Continued)
Page 63 of 1803

(4) Rotate the inner race/hub in the cage (Fig. 11).
(5) Insert cage into the housing (Fig. 12). Rotate
the cage 90É into the housing (Fig. 13).
(6) Apply the lubricant included with the replace-
ment boot to the ball races. Spread the lubricant
equally between all the races.
(7) Tilt inner race/hub and cage and install the
balls (Fig. 14).
Fig. 11 CAGE AND INNER RACE/HUB
1 - CAGE WINDOWS
2 - SNAP RING
Fig. 12 BEARING CAGE AND HOUSING
1 - OUTER RACE
2 - BEARING CAGE WINDOW
3 - CV JOINT HOUSING
Fig. 13 CAGE AND INNER RACE/HUB
1 - C/V HOUSING
2 - BEARING HUB LARGE COUNTERBORE OUTWARD
3 - BOOT RETAINING SHOULDER
4 - BEARING HUB SMALL COUNTERBORE INWARD
5 - SLINGER
Fig. 14 BALL BEARING
1 - C/V HOUSING
2 - INNER RACE/HUB
3 - BEARING CAGE
4 - BEARING
3 - 14 HALF SHAFTKJ
CV JOINT/BOOT-OUTER (Continued)
Page 64 of 1803

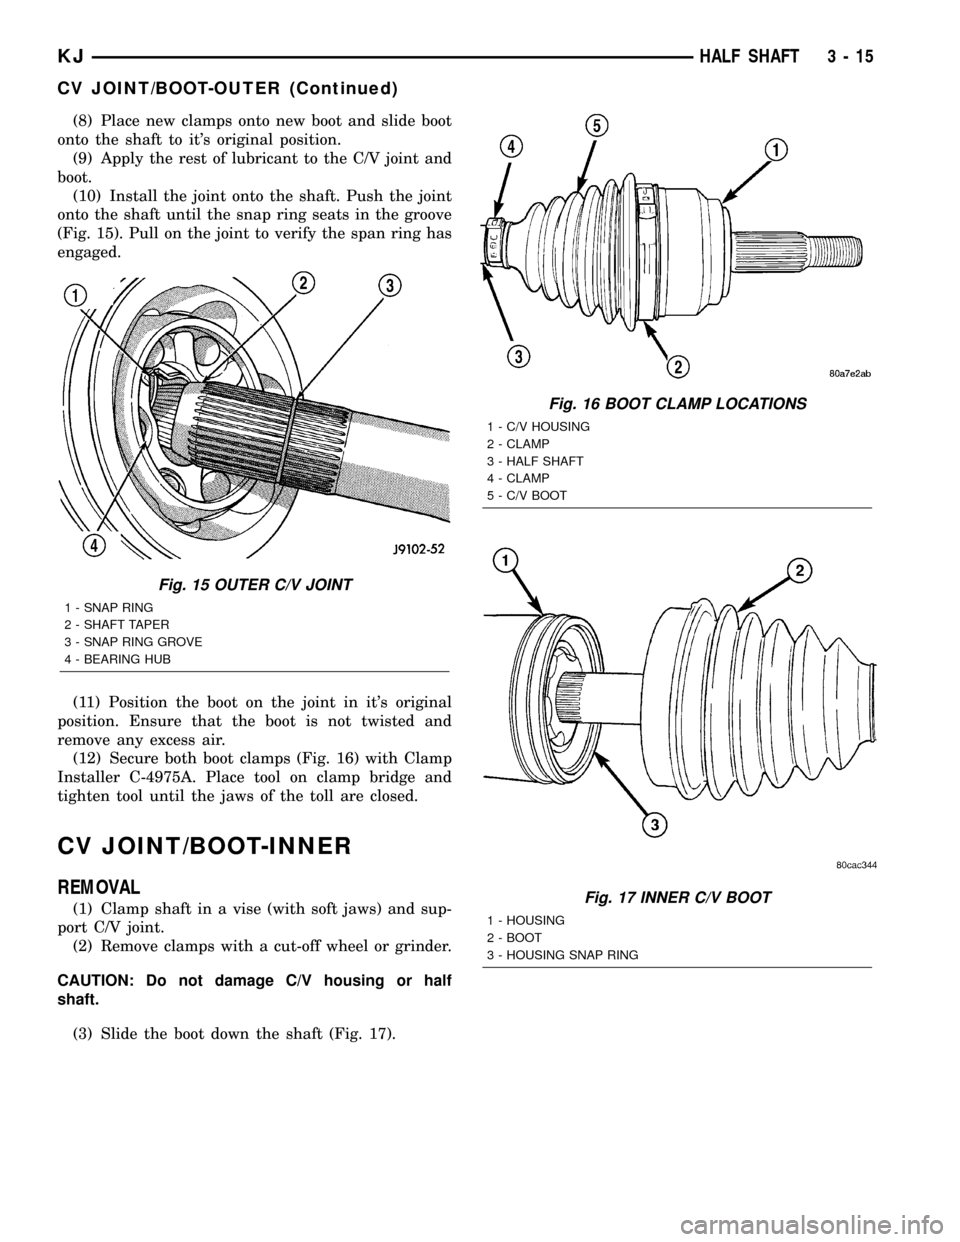
(8) Place new clamps onto new boot and slide boot
onto the shaft to it's original position.
(9) Apply the rest of lubricant to the C/V joint and
boot.
(10) Install the joint onto the shaft. Push the joint
onto the shaft until the snap ring seats in the groove
(Fig. 15). Pull on the joint to verify the span ring has
engaged.
(11) Position the boot on the joint in it's original
position. Ensure that the boot is not twisted and
remove any excess air.
(12) Secure both boot clamps (Fig. 16) with Clamp
Installer C-4975A. Place tool on clamp bridge and
tighten tool until the jaws of the toll are closed.
CV JOINT/BOOT-INNER
REMOVAL
(1) Clamp shaft in a vise (with soft jaws) and sup-
port C/V joint.
(2) Remove clamps with a cut-off wheel or grinder.
CAUTION: Do not damage C/V housing or half
shaft.
(3) Slide the boot down the shaft (Fig. 17).
Fig. 15 OUTER C/V JOINT
1 - SNAP RING
2 - SHAFT TAPER
3 - SNAP RING GROVE
4 - BEARING HUB
Fig. 16 BOOT CLAMP LOCATIONS
1 - C/V HOUSING
2 - CLAMP
3 - HALF SHAFT
4 - CLAMP
5 - C/V BOOT
Fig. 17 INNER C/V BOOT
1 - HOUSING
2 - BOOT
3 - HOUSING SNAP RING
KJHALF SHAFT 3 - 15
CV JOINT/BOOT-OUTER (Continued)