2002 JEEP LIBERTY interior
[x] Cancel search: interiorPage 1617 of 1803
(8) Install the two roll down bracket bolts at the
right cowl side panel and tighten to 54 N´m (40 ft.
lbs.).
(9) Install the HVAC mounting bolt at the lower
outside corner of the glove box opening and tighten
to 6 N´m (55 in. lbs.).
(10) Install the HVAC mounting bolt above the
glove box striker.
(11) Install the passenger side trim bezel. (Refer to
23 - BODY/INSTRUMENT PANEL/INSTRUMENT
PANEL PASSENGER SIDE BEZEL - INSTALLA-
TION)
(12) Install the passenger side cowl trim cover.
(Refer to 23 - BODY/INTERIOR/COWL TRIM
COVER - INSTALLATION)
(13) Install the glove box. (Refer to 23 - BODY/IN-
STRUMENT PANEL/GLOVE BOX - INSTALLA-
TION)
NOTE: Do not push or pull bracket. Tighten at the
rest position.
(14) Install the two roll down bracket bolts at the
drivers cowl side panel and tighten to 54 N´m (40 ft.
lbs.).
(15) Install the two bolts at the bottom side of the
pedal support bracket.
(16) Install the two bolts at the front of the pedal
support bracket.
(17) Connect the electrical connector at the inner
side of the pedal support bracket.
(18) Connect the wiring harness electrical connec-
tors at the junction block.
(19) Connect the wire harness electrical connector
behind the drivers side cowl trim cover.
(20) Install the left cowl trim cover. (Refer to 23 -
BODY/INTERIOR/COWL TRIM COVER - INSTAL-
LATION)
(21) Install the steering column. (Refer to 19 -
STEERING/COLUMN - INSTALLATION)
(22) Install the two HVAC mounting bolts behind
the center trim.
(23) Install the ground strap and bolt and connect
the restraint module electrical connector.
(24) Install the center support bracket and hold it
tight against the instrument panel.
(25) Tighten the lower nuts to 23 N´m (17 ft. lbs.).
(26) Tighten the upper bracket nuts to 23 N´m (17
ft. lbs.).
(27) Install the radio. (Refer to 8 - ELECTRICAL/
AUDIO/RADIO - INSTALLATION)
(28) Install the floor console. (Refer to 23 - BODY/
INTERIOR/FLOOR CONSOLE - INSTALLATION)
(29) Install the speakers.
(30) Install the instrument panel top cover. (Refer
to 23 - BODY/INSTRUMENT PANEL/INSTRUMENT
PANEL TOP COVER - INSTALLATION)(31) Reconnect the battery ground cable.
INSTRUMENT PANEL TOP
COVER
REMOVAL
WARNING: ON VEHICLES EQUIPPED WITH AIR-
BAGS, DISABLE THE AIRBAG SYSTEM BEFORE
ATTEMPTING ANY STEERING WHEEL, STEERING
COLUMN, SEAT BELT TENSIONER, OR INSTRU-
MENT PANEL COMPONENT DIAGNOSIS OR SER-
VICE. DISCONNECT AND ISOLATE THE BATTERY
NEGATIVE (GROUND) CABLE, THEN WAIT TWO
MINUTES FOR THE AIRBAG SYSTEM CAPACITOR
TO DISCHARGE BEFORE PERFORMING FURTHER
DIAGNOSIS OR SERVICE. THIS IS THE ONLY SURE
WAY TO DISABLE THE AIRBAG SYSTEM. FAILURE
TO TAKE THE PROPER PRECAUTIONS COULD
RESULT IN ACCIDENTAL AIRBAG DEPLOYMENT
AND POSSIBLE PERSONAL INJURY.
(1) Remove the a-pillar trim. (Refer to 23 - BODY/
INTERIOR/A-PILLAR TRIM AND GRAB HANDLE -
REMOVAL)
(2) Using a trim stick C-4755 or equivalent,
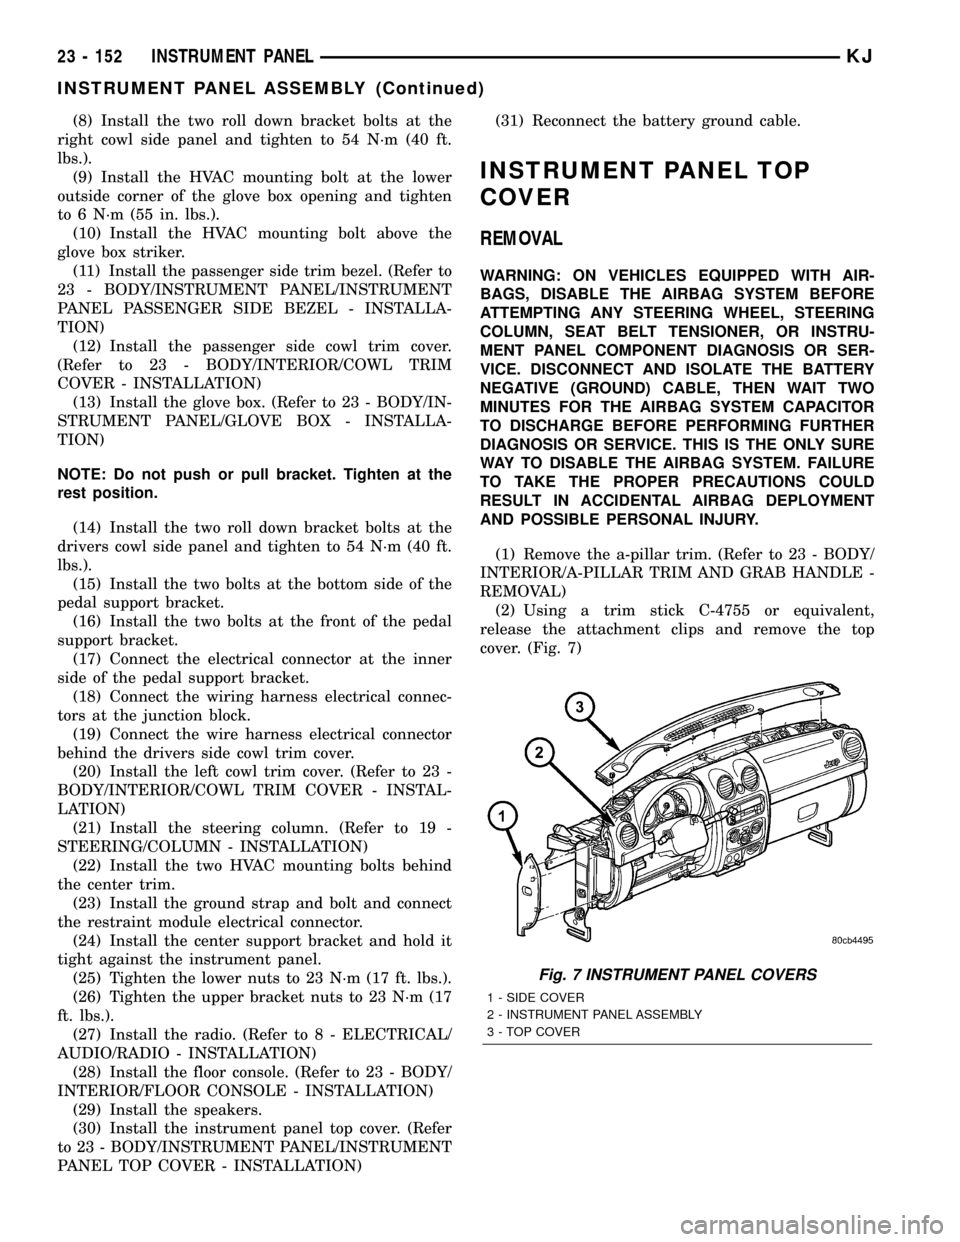
release the attachment clips and remove the top
cover. (Fig. 7)
Fig. 7 INSTRUMENT PANEL COVERS
1 - SIDE COVER
2 - INSTRUMENT PANEL ASSEMBLY
3 - TOP COVER
23 - 152 INSTRUMENT PANELKJ
INSTRUMENT PANEL ASSEMBLY (Continued)
Page 1618 of 1803
INSTALLATION
WARNING: ON VEHICLES EQUIPPED WITH AIR-
BAGS, DISABLE THE AIRBAG SYSTEM BEFORE
ATTEMPTING ANY STEERING WHEEL, STEERING
COLUMN, SEAT BELT TENSIONER, OR INSTRU-
MENT PANEL COMPONENT DIAGNOSIS OR SER-
VICE. DISCONNECT AND ISOLATE THE BATTERY
NEGATIVE (GROUND) CABLE, THEN WAIT TWO
MINUTES FOR THE AIRBAG SYSTEM CAPACITOR
TO DISCHARGE BEFORE PERFORMING FURTHER
DIAGNOSIS OR SERVICE. THIS IS THE ONLY SURE
WAY TO DISABLE THE AIRBAG SYSTEM. FAILURE
TO TAKE THE PROPER PRECAUTIONS COULD
RESULT IN ACCIDENTAL AIRBAG DEPLOYMENT
AND POSSIBLE PERSONAL INJURY.
(1) Position the top cover and seat the clips fully.
(2) Install the a-pillar trim panels. (Refer to 23 -
BODY/INTERIOR/A-PILLAR TRIM AND GRAB
HANDLE - INSTALLATION)
INSTRUMENT PANEL END CAP
REMOVAL
WARNING: ON VEHICLES EQUIPPED WITH AIR-
BAGS, DISABLE THE AIRBAG SYSTEM BEFORE
ATTEMPTING ANY STEERING WHEEL, STEERING
COLUMN, SEAT BELT TENSIONER, OR INSTRU-
MENT PANEL COMPONENT DIAGNOSIS OR SER-
VICE. DISCONNECT AND ISOLATE THE BATTERY
NEGATIVE (GROUND) CABLE, THEN WAIT TWO
MINUTES FOR THE AIRBAG SYSTEM CAPACITOR
TO DISCHARGE BEFORE PERFORMING FURTHER
DIAGNOSIS OR SERVICE. THIS IS THE ONLY SURE
WAY TO DISABLE THE AIRBAG SYSTEM. FAILURE
TO TAKE THE PROPER PRECAUTIONS COULD
RESULT IN ACCIDENTAL AIRBAG DEPLOYMENT
AND POSSIBLE PERSONAL INJURY.
(1) Open the door.
(2) Using the finger indent, grasp and remove the
side cover. (Fig. 7)
INSTALLATION
WARNING: ON VEHICLES EQUIPPED WITH AIR-
BAGS, DISABLE THE AIRBAG SYSTEM BEFORE
ATTEMPTING ANY STEERING WHEEL, STEERING
COLUMN, SEAT BELT TENSIONER, OR INSTRU-
MENT PANEL COMPONENT DIAGNOSIS OR SER-
VICE. DISCONNECT AND ISOLATE THE BATTERY
NEGATIVE (GROUND) CABLE, THEN WAIT TWO
MINUTES FOR THE AIRBAG SYSTEM CAPACITOR
TO DISCHARGE BEFORE PERFORMING FURTHERDIAGNOSIS OR SERVICE. THIS IS THE ONLY SURE
WAY TO DISABLE THE AIRBAG SYSTEM. FAILURE
TO TAKE THE PROPER PRECAUTIONS COULD
RESULT IN ACCIDENTAL AIRBAG DEPLOYMENT
AND POSSIBLE PERSONAL INJURY.
(1) Position the side panels and seat the clips fully.
INSTRUMENT PANEL DRIVER
SIDE BEZELS
REMOVAL
WARNING: ON VEHICLES EQUIPPED WITH AIR-
BAGS, DISABLE THE AIRBAG SYSTEM BEFORE
ATTEMPTING ANY STEERING WHEEL, STEERING
COLUMN, SEAT BELT TENSIONER, OR INSTRU-
MENT PANEL COMPONENT DIAGNOSIS OR SER-
VICE. DISCONNECT AND ISOLATE THE BATTERY
NEGATIVE (GROUND) CABLE, THEN WAIT TWO
MINUTES FOR THE AIRBAG SYSTEM CAPACITOR
TO DISCHARGE BEFORE PERFORMING FURTHER
DIAGNOSIS OR SERVICE. THIS IS THE ONLY SURE
WAY TO DISABLE THE AIRBAG SYSTEM. FAILURE
TO TAKE THE PROPER PRECAUTIONS COULD
RESULT IN ACCIDENTAL AIRBAG DEPLOYMENT
AND POSSIBLE PERSONAL INJURY.
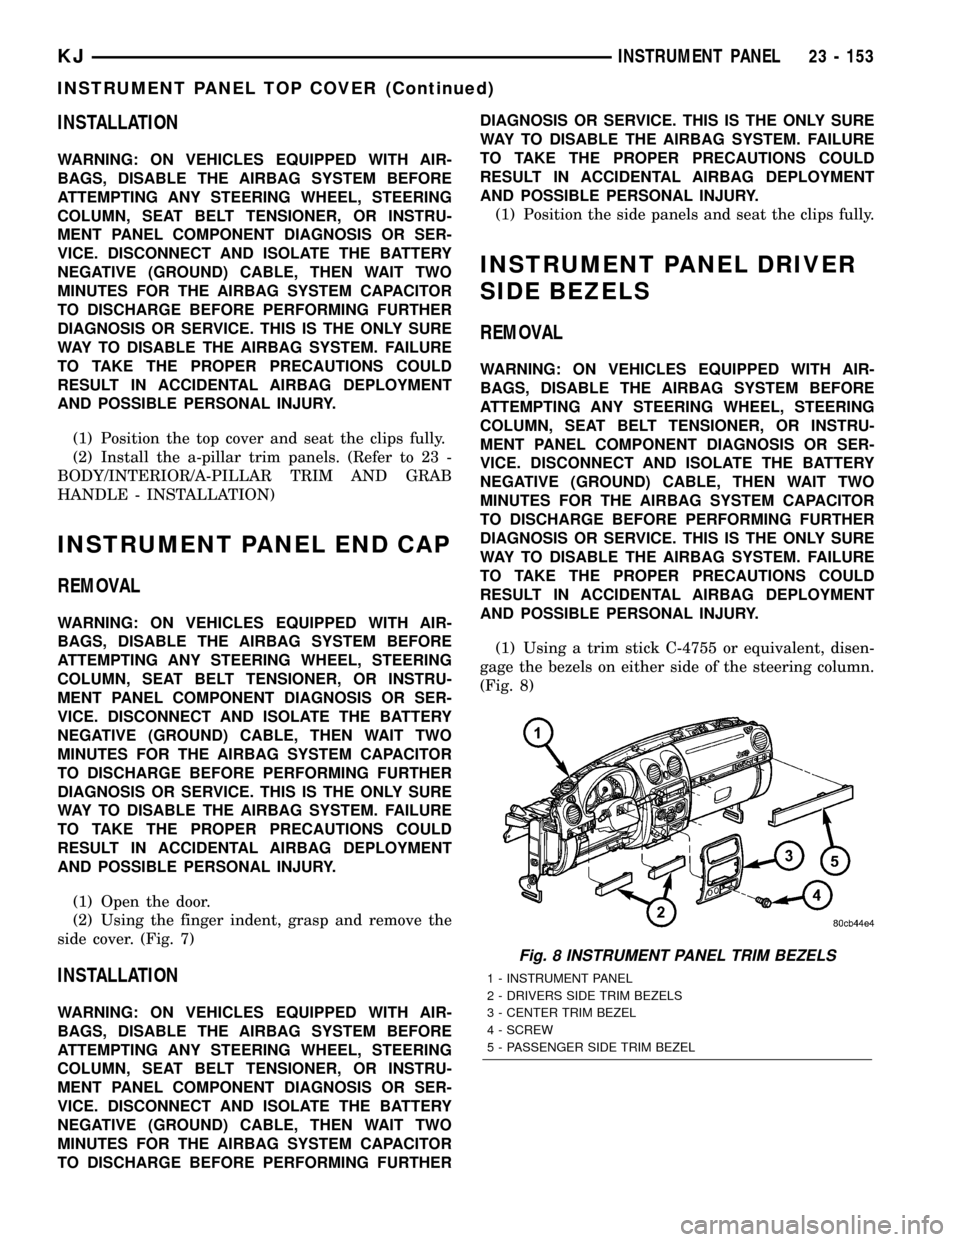
(1) Using a trim stick C-4755 or equivalent, disen-
gage the bezels on either side of the steering column.
(Fig. 8)
Fig. 8 INSTRUMENT PANEL TRIM BEZELS
1 - INSTRUMENT PANEL
2 - DRIVERS SIDE TRIM BEZELS
3 - CENTER TRIM BEZEL
4 - SCREW
5 - PASSENGER SIDE TRIM BEZEL
KJINSTRUMENT PANEL 23 - 153
INSTRUMENT PANEL TOP COVER (Continued)
Page 1621 of 1803
INTERIOR
TABLE OF CONTENTS
page page
4WD FLOOR SHIFT BOOT
REMOVAL............................156
INSTALLATION........................156
A-PILLAR TRIM AND GRAB HANDLE
REMOVAL............................156
INSTALLATION........................156
COWL TRIM COVER
REMOVAL............................157
INSTALLATION........................157
DOOR SILL SCUFF PLATE
REMOVAL............................157
INSTALLATION........................157
ASSIST HANDLE
REMOVAL............................157
INSTALLATION........................157
B-PILLAR LOWER TRIM
REMOVAL............................157
INSTALLATION........................157
B-PILLAR UPPER TRIM
REMOVAL............................157
INSTALLATION........................158
CARPETS AND FLOOR MATS
REMOVAL............................158
INSTALLATION........................158
SHIFT BEZEL
REMOVAL............................158
INSTALLATION........................158FLOOR CONSOLE
REMOVAL............................158
INSTALLATION........................158
FLOOR CONSOLE LID LATCH
REMOVAL............................158
INSTALLATION........................158
HEADLINER
REMOVAL............................159
INSTALLATION........................159
QUARTER TRIM PANEL
REMOVAL............................159
INSTALLATION........................159
REAR DOOR SCUFF PLATE
REMOVAL............................160
INSTALLATION........................160
SUN VISOR
REMOVAL............................160
INSTALLATION........................160
SUN VISOR SUPPORT
REMOVAL............................160
INSTALLATION........................160
REAR VIEW MIRROR
REMOVAL............................161
INSTALLATION
INSTALLATION......................161
INSTALLATION - REARVIEW MIRROR
SUPPORT BRACKET..................161
4WD FLOOR SHIFT BOOT
REMOVAL
(1) Remove the shift lever and remove the boot
from the lever. (Refer to 21 - TRANSMISSION/
TRANSAXLE/TRANSFER CASE/SHIFT LEVER -
REMOVAL)
INSTALLATION
(1) Install the shift boot onto the shift lever and
install the lever. (Refer to 21 - TRANSMISSION/
TRANSAXLE/TRANSFER CASE/SHIFT LEVER -
INSTALLATION)
A-PILLAR TRIM AND GRAB
HANDLE
REMOVAL
(1) Using a small pry tool or equivalent, remove
the grab handle trim plugs.
(2) Remove the two grab handle screws.
(3) Remove the grab handle and a-pillar trim from
the a-pillar.
INSTALLATION
(1) Snap a-pillar trim and grab handle into the
a-pillar.
(2) Install the two screws and install the grab han-
dle trim plugs.
23 - 156 INTERIORKJ
Page 1622 of 1803
COWL TRIM COVER
REMOVAL
(1) Remove the lower b-pillar trim. (Refer to 23 -
BODY/INTERIOR/B-PILLAR LOWER TRIM -
REMOVAL)
(2) Remove the cowl trim cover by pulling it away
from the a-pillar and releasing the clips.
INSTALLATION
(1) Install the cowl trim cover and seat the retain-
ing clips.
(2) Install the lower b-pillar trim. (Refer to 23 -
BODY/INTERIOR/B-PILLAR LOWER TRIM -
INSTALLATION)
DOOR SILL SCUFF PLATE
REMOVAL
(1) Using a trim stick C-4755 or equivalent, pry up
the scuff plate releasing the retaining clips.
INSTALLATION
(1) Position the scuff plate and seat the retaining
clips.
ASSIST HANDLE
REMOVAL
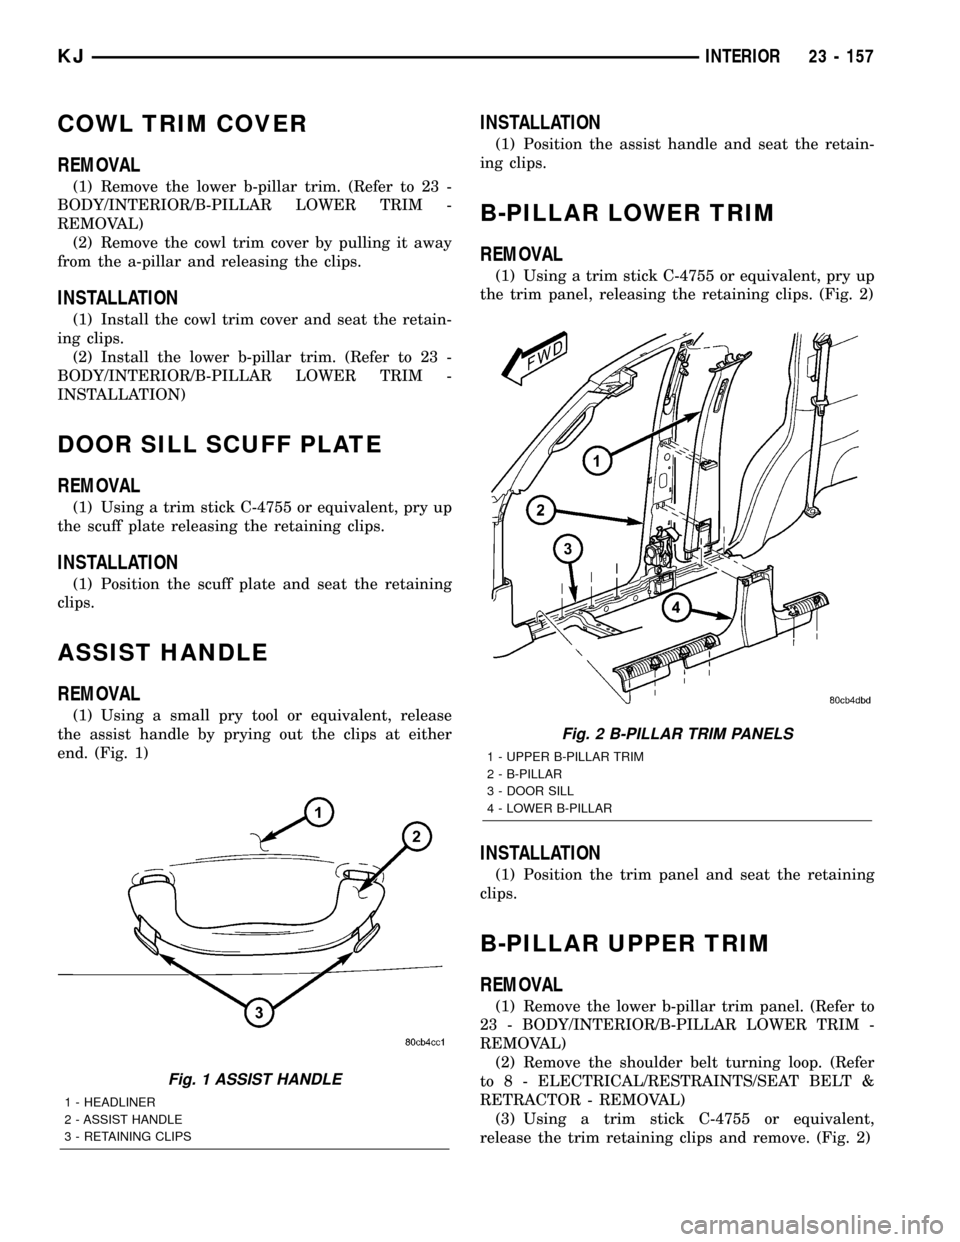
(1) Using a small pry tool or equivalent, release
the assist handle by prying out the clips at either
end. (Fig. 1)
INSTALLATION
(1) Position the assist handle and seat the retain-
ing clips.
B-PILLAR LOWER TRIM
REMOVAL
(1) Using a trim stick C-4755 or equivalent, pry up
the trim panel, releasing the retaining clips. (Fig. 2)
INSTALLATION
(1) Position the trim panel and seat the retaining
clips.
B-PILLAR UPPER TRIM
REMOVAL
(1) Remove the lower b-pillar trim panel. (Refer to
23 - BODY/INTERIOR/B-PILLAR LOWER TRIM -
REMOVAL)
(2) Remove the shoulder belt turning loop. (Refer
to 8 - ELECTRICAL/RESTRAINTS/SEAT BELT &
RETRACTOR - REMOVAL)
(3) Using a trim stick C-4755 or equivalent,
release the trim retaining clips and remove. (Fig. 2)
Fig. 1 ASSIST HANDLE
1 - HEADLINER
2 - ASSIST HANDLE
3 - RETAINING CLIPS
Fig. 2 B-PILLAR TRIM PANELS
1 - UPPER B-PILLAR TRIM
2 - B-PILLAR
3 - DOOR SILL
4 - LOWER B-PILLAR
KJINTERIOR 23 - 157
Page 1623 of 1803
INSTALLATION
(1) Position the trim panel and seat the retaining
clips.
(2) Install the seat belt turning loop. (Refer to 8 -
ELECTRICAL/RESTRAINTS/SEAT BELT &
RETRACTOR - INSTALLATION)
(3) Install the b-pillar lower trim panel. (Refer to
23 - BODY/INTERIOR/B-PILLAR LOWER TRIM -
INSTALLATION)
CARPETS AND FLOOR MATS
REMOVAL
Front Carpet
(1) Remove front seats. (Refer to 23 - BODY/
SEATS/SEAT - FRONT - REMOVAL)
(2) Remove the floor console. (Refer to 23 - BODY/
INTERIOR/FLOOR CONSOLE - REMOVAL)
(3) Remove the rear seats. (Refer to 23 - BODY/
SEATS/SEAT - REAR - REMOVAL)
(4) Remove the cowl trim panels. (Refer to 23 -
BODY/INTERIOR/COWL TRIM COVER -
REMOVAL)
(5) Remove the b-pillar lower trim. (Refer to 23 -
BODY/INTERIOR/B-PILLAR LOWER TRIM -
REMOVAL)
(6) Remove the jack assembly.
(7) Remove the carpet.
Rear Cargo Carpet
(1) Remove the rivets attaching the cargo hooks to
the floor.
(2) Remove the carpet.
INSTALLATION
Front Carpet
(1) Install the carpet.
(2) Install the jack assembly.
(3) Install the b-pillar lower trim. (Refer to 23 -
BODY/INTERIOR/B-PILLAR LOWER TRIM -
INSTALLATION)
(4) Install the cowl trim panels. (Refer to 23 -
BODY/INTERIOR/COWL TRIM COVER - INSTAL-
LATION)
(5) Install the rear seats. (Refer to 23 - BODY/
SEATS/SEAT - REAR - INSTALLATION)
(6) Install the floor console. (Refer to 23 - BODY/
INTERIOR/FLOOR CONSOLE - INSTALLATION)
(7) Install the front seats. (Refer to 23 - BODY/
SEATS/SEAT - FRONT - INSTALLATION)
Rear Cargo Carpet
(1) Install the carpet and slide under the trim pan-
els.
(2) Install new rivets securing the carpet and
cargo hooks to the floor.
SHIFT BEZEL
REMOVAL
(1) Using a trim stick C-4755 or equivalent, pry
shift bezel out of the floor console.
INSTALLATION
(1) Position the shift bezel and seat the retaining
clips into the floor console.
FLOOR CONSOLE
REMOVAL
(1) Remove the shift bezel, if equipped. (Refer to
23 - BODY/INTERIOR/SHIFT BEZEL - REMOVAL)
(2) Set park brake lever in the up position.
(3) Using a trim stick C-4755 or equivalent, dis-
connect the manual trans shifter boot, if equipped.
(4) Using a trim stick C-4755 or equivalent, dis-
connect the transfer case shifter boot, if equipped.
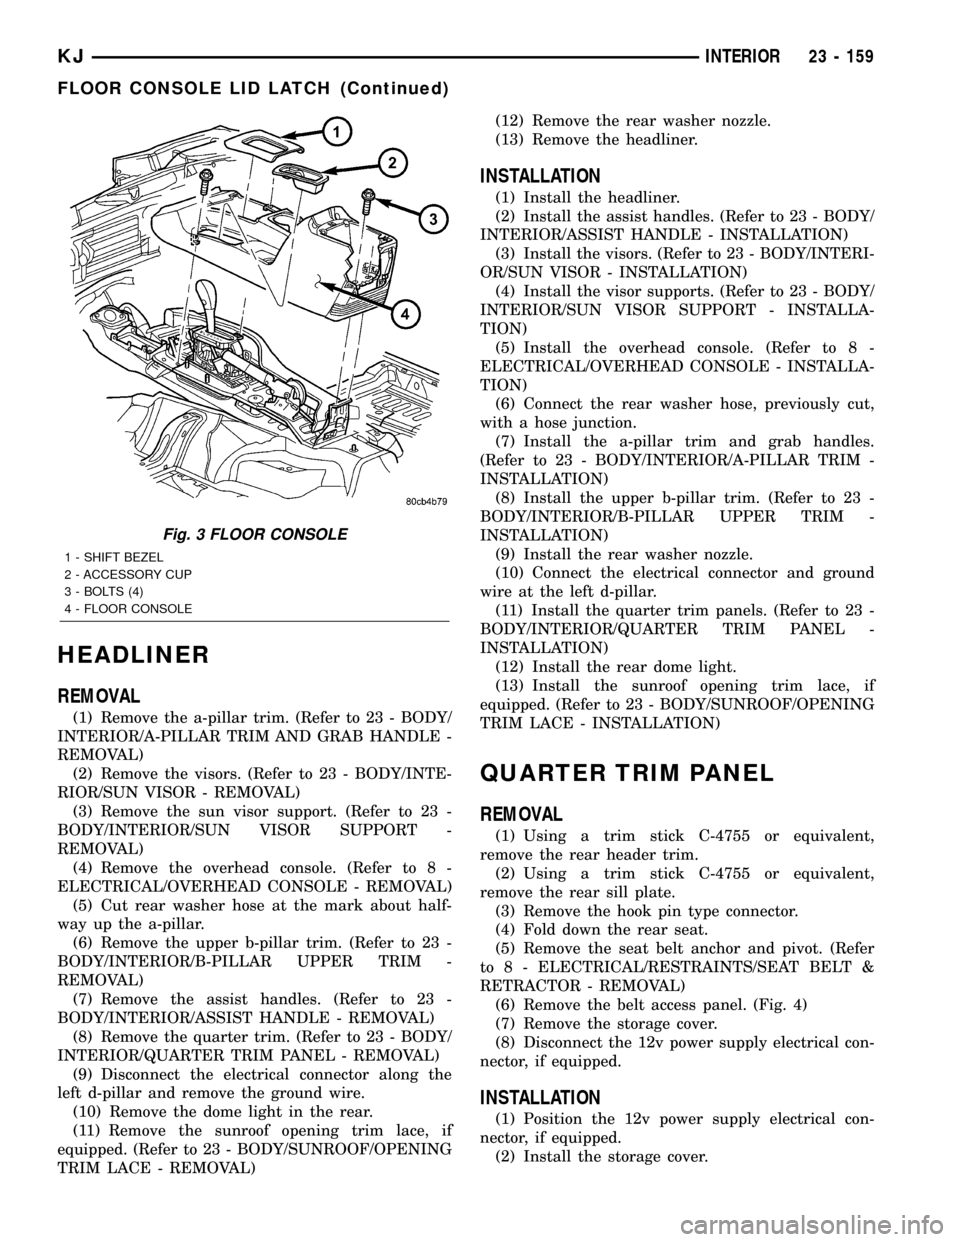
(5) Remove the four bolts. (Fig. 3)
(6) Lift the console at the back and remove.
INSTALLATION
(1) Position the front of the console and lower the
rear over the shifter and brake levers.
(2) Install the bolts.
(3) Install the shift boots and seat the retainer
clips.
(4) Install the shift bezel. (Refer to 23 - BODY/IN-
TERIOR/SHIFT BEZEL - INSTALLATION)
FLOOR CONSOLE LID LATCH
REMOVAL
(1) Remove the screws and remove the lid.
(2) Remove the screws attaching the lid cover and
remove the latch.
INSTALLATION
(1) Install the latch and the lid cover.
(2) Install the screws attaching the lid cover.
(3) Install the console lid onto the console and
install the screws.
23 - 158 INTERIORKJ
B-PILLAR UPPER TRIM (Continued)
Page 1624 of 1803
HEADLINER
REMOVAL
(1) Remove the a-pillar trim. (Refer to 23 - BODY/
INTERIOR/A-PILLAR TRIM AND GRAB HANDLE -
REMOVAL)
(2) Remove the visors. (Refer to 23 - BODY/INTE-
RIOR/SUN VISOR - REMOVAL)
(3) Remove the sun visor support. (Refer to 23 -
BODY/INTERIOR/SUN VISOR SUPPORT -
REMOVAL)
(4) Remove the overhead console. (Refer to 8 -
ELECTRICAL/OVERHEAD CONSOLE - REMOVAL)
(5) Cut rear washer hose at the mark about half-
way up the a-pillar.
(6) Remove the upper b-pillar trim. (Refer to 23 -
BODY/INTERIOR/B-PILLAR UPPER TRIM -
REMOVAL)
(7) Remove the assist handles. (Refer to 23 -
BODY/INTERIOR/ASSIST HANDLE - REMOVAL)
(8) Remove the quarter trim. (Refer to 23 - BODY/
INTERIOR/QUARTER TRIM PANEL - REMOVAL)
(9) Disconnect the electrical connector along the
left d-pillar and remove the ground wire.
(10) Remove the dome light in the rear.
(11) Remove the sunroof opening trim lace, if
equipped. (Refer to 23 - BODY/SUNROOF/OPENING
TRIM LACE - REMOVAL)(12) Remove the rear washer nozzle.
(13) Remove the headliner.
INSTALLATION
(1) Install the headliner.
(2) Install the assist handles. (Refer to 23 - BODY/
INTERIOR/ASSIST HANDLE - INSTALLATION)
(3) Install the visors. (Refer to 23 - BODY/INTERI-
OR/SUN VISOR - INSTALLATION)
(4) Install the visor supports. (Refer to 23 - BODY/
INTERIOR/SUN VISOR SUPPORT - INSTALLA-
TION)
(5) Install the overhead console. (Refer to 8 -
ELECTRICAL/OVERHEAD CONSOLE - INSTALLA-
TION)
(6) Connect the rear washer hose, previously cut,
with a hose junction.
(7) Install the a-pillar trim and grab handles.
(Refer to 23 - BODY/INTERIOR/A-PILLAR TRIM -
INSTALLATION)
(8) Install the upper b-pillar trim. (Refer to 23 -
BODY/INTERIOR/B-PILLAR UPPER TRIM -
INSTALLATION)
(9) Install the rear washer nozzle.
(10) Connect the electrical connector and ground
wire at the left d-pillar.
(11) Install the quarter trim panels. (Refer to 23 -
BODY/INTERIOR/QUARTER TRIM PANEL -
INSTALLATION)
(12) Install the rear dome light.
(13) Install the sunroof opening trim lace, if
equipped. (Refer to 23 - BODY/SUNROOF/OPENING
TRIM LACE - INSTALLATION)
QUARTER TRIM PANEL
REMOVAL
(1) Using a trim stick C-4755 or equivalent,
remove the rear header trim.
(2) Using a trim stick C-4755 or equivalent,
remove the rear sill plate.
(3) Remove the hook pin type connector.
(4) Fold down the rear seat.
(5) Remove the seat belt anchor and pivot. (Refer
to 8 - ELECTRICAL/RESTRAINTS/SEAT BELT &
RETRACTOR - REMOVAL)
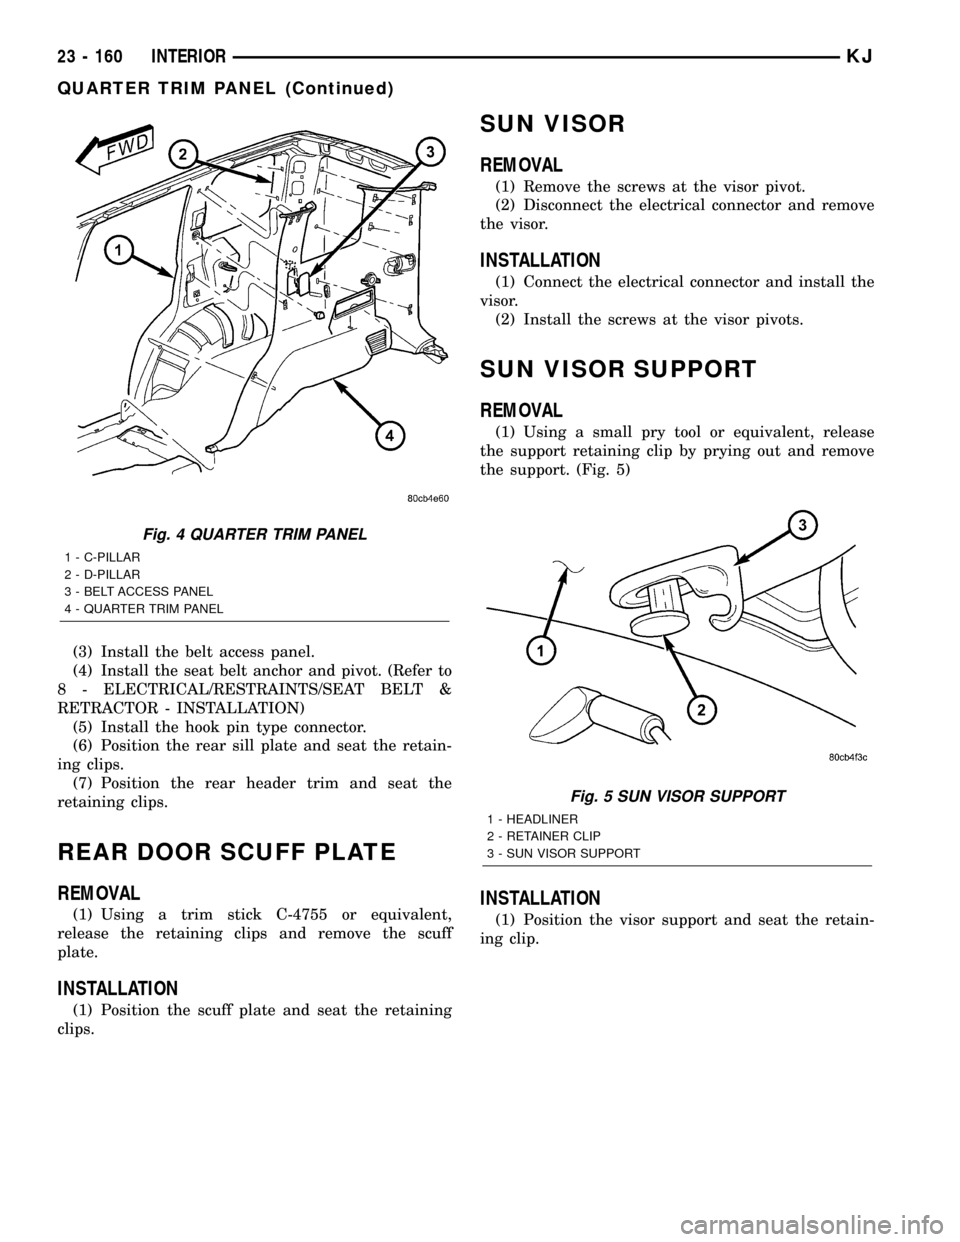
(6) Remove the belt access panel. (Fig. 4)
(7) Remove the storage cover.
(8) Disconnect the 12v power supply electrical con-
nector, if equipped.
INSTALLATION
(1) Position the 12v power supply electrical con-
nector, if equipped.
(2) Install the storage cover.
Fig. 3 FLOOR CONSOLE
1 - SHIFT BEZEL
2 - ACCESSORY CUP
3 - BOLTS (4)
4 - FLOOR CONSOLE
KJINTERIOR 23 - 159
FLOOR CONSOLE LID LATCH (Continued)
Page 1625 of 1803
(3) Install the belt access panel.
(4) Install the seat belt anchor and pivot. (Refer to
8 - ELECTRICAL/RESTRAINTS/SEAT BELT &
RETRACTOR - INSTALLATION)
(5) Install the hook pin type connector.
(6) Position the rear sill plate and seat the retain-
ing clips.
(7) Position the rear header trim and seat the
retaining clips.
REAR DOOR SCUFF PLATE
REMOVAL
(1) Using a trim stick C-4755 or equivalent,
release the retaining clips and remove the scuff
plate.
INSTALLATION
(1) Position the scuff plate and seat the retaining
clips.
SUN VISOR
REMOVAL
(1) Remove the screws at the visor pivot.
(2) Disconnect the electrical connector and remove
the visor.
INSTALLATION
(1) Connect the electrical connector and install the
visor.
(2) Install the screws at the visor pivots.
SUN VISOR SUPPORT
REMOVAL
(1) Using a small pry tool or equivalent, release
the support retaining clip by prying out and remove
the support. (Fig. 5)
INSTALLATION
(1) Position the visor support and seat the retain-
ing clip.
Fig. 4 QUARTER TRIM PANEL
1 - C-PILLAR
2 - D-PILLAR
3 - BELT ACCESS PANEL
4 - QUARTER TRIM PANEL
Fig. 5 SUN VISOR SUPPORT
1 - HEADLINER
2 - RETAINER CLIP
3 - SUN VISOR SUPPORT
23 - 160 INTERIORKJ
QUARTER TRIM PANEL (Continued)
Page 1626 of 1803
REAR VIEW MIRROR
REMOVAL
(1) If equipped, disconnect mirror harness connec-
tor.
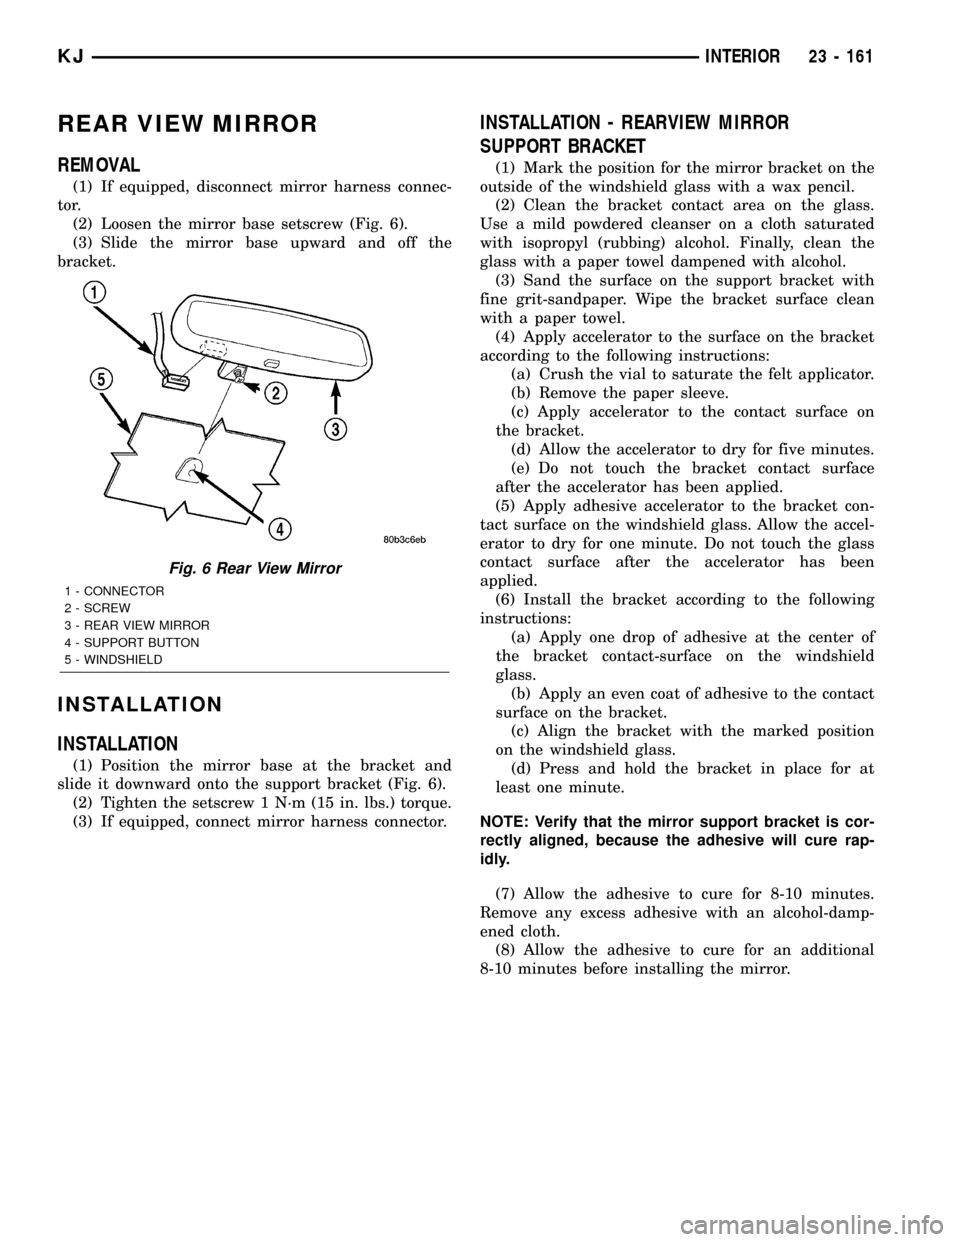
(2) Loosen the mirror base setscrew (Fig. 6).
(3) Slide the mirror base upward and off the
bracket.
INSTALLATION
INSTALLATION
(1) Position the mirror base at the bracket and
slide it downward onto the support bracket (Fig. 6).
(2) Tighten the setscrew 1 N´m (15 in. lbs.) torque.
(3) If equipped, connect mirror harness connector.
INSTALLATION - REARVIEW MIRROR
SUPPORT BRACKET
(1) Mark the position for the mirror bracket on the
outside of the windshield glass with a wax pencil.
(2) Clean the bracket contact area on the glass.
Use a mild powdered cleanser on a cloth saturated
with isopropyl (rubbing) alcohol. Finally, clean the
glass with a paper towel dampened with alcohol.
(3) Sand the surface on the support bracket with
fine grit-sandpaper. Wipe the bracket surface clean
with a paper towel.
(4) Apply accelerator to the surface on the bracket
according to the following instructions:
(a) Crush the vial to saturate the felt applicator.
(b) Remove the paper sleeve.
(c) Apply accelerator to the contact surface on
the bracket.
(d) Allow the accelerator to dry for five minutes.
(e) Do not touch the bracket contact surface
after the accelerator has been applied.
(5) Apply adhesive accelerator to the bracket con-
tact surface on the windshield glass. Allow the accel-
erator to dry for one minute. Do not touch the glass
contact surface after the accelerator has been
applied.
(6) Install the bracket according to the following
instructions:
(a) Apply one drop of adhesive at the center of
the bracket contact-surface on the windshield
glass.
(b) Apply an even coat of adhesive to the contact
surface on the bracket.
(c) Align the bracket with the marked position
on the windshield glass.
(d) Press and hold the bracket in place for at
least one minute.
NOTE: Verify that the mirror support bracket is cor-
rectly aligned, because the adhesive will cure rap-
idly.
(7) Allow the adhesive to cure for 8-10 minutes.
Remove any excess adhesive with an alcohol-damp-
ened cloth.
(8) Allow the adhesive to cure for an additional
8-10 minutes before installing the mirror.
Fig. 6 Rear View Mirror
1 - CONNECTOR
2 - SCREW
3 - REAR VIEW MIRROR
4 - SUPPORT BUTTON
5 - WINDSHIELD
KJINTERIOR 23 - 161