2002 JEEP LIBERTY interior
[x] Cancel search: interiorPage 1585 of 1803
LATCH
REMOVAL
(1) Remove the grill. (Refer to 23 - BODY/EXTERI-
OR/GRILLE - REMOVAL)
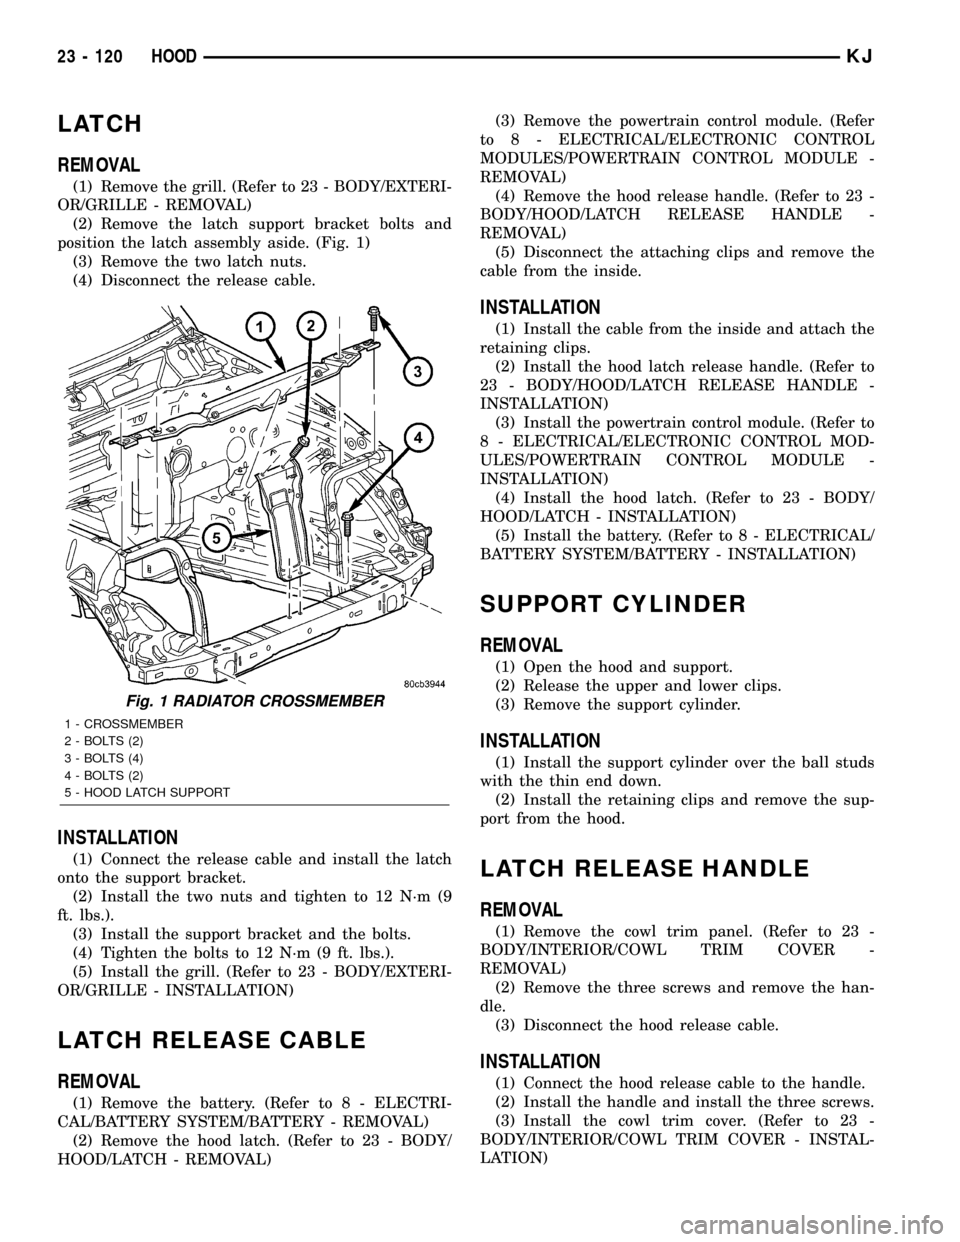
(2) Remove the latch support bracket bolts and
position the latch assembly aside. (Fig. 1)
(3) Remove the two latch nuts.
(4) Disconnect the release cable.
INSTALLATION
(1) Connect the release cable and install the latch
onto the support bracket.
(2) Install the two nuts and tighten to 12 N´m (9
ft. lbs.).
(3) Install the support bracket and the bolts.
(4) Tighten the bolts to 12 N´m (9 ft. lbs.).
(5) Install the grill. (Refer to 23 - BODY/EXTERI-
OR/GRILLE - INSTALLATION)
LATCH RELEASE CABLE
REMOVAL
(1) Remove the battery. (Refer to 8 - ELECTRI-
CAL/BATTERY SYSTEM/BATTERY - REMOVAL)
(2) Remove the hood latch. (Refer to 23 - BODY/
HOOD/LATCH - REMOVAL)(3) Remove the powertrain control module. (Refer
to 8 - ELECTRICAL/ELECTRONIC CONTROL
MODULES/POWERTRAIN CONTROL MODULE -
REMOVAL)
(4) Remove the hood release handle. (Refer to 23 -
BODY/HOOD/LATCH RELEASE HANDLE -
REMOVAL)
(5) Disconnect the attaching clips and remove the
cable from the inside.
INSTALLATION
(1) Install the cable from the inside and attach the
retaining clips.
(2) Install the hood latch release handle. (Refer to
23 - BODY/HOOD/LATCH RELEASE HANDLE -
INSTALLATION)
(3) Install the powertrain control module. (Refer to
8 - ELECTRICAL/ELECTRONIC CONTROL MOD-
ULES/POWERTRAIN CONTROL MODULE -
INSTALLATION)
(4) Install the hood latch. (Refer to 23 - BODY/
HOOD/LATCH - INSTALLATION)
(5) Install the battery. (Refer to 8 - ELECTRICAL/
BATTERY SYSTEM/BATTERY - INSTALLATION)
SUPPORT CYLINDER
REMOVAL
(1) Open the hood and support.
(2) Release the upper and lower clips.
(3) Remove the support cylinder.
INSTALLATION
(1) Install the support cylinder over the ball studs
with the thin end down.
(2) Install the retaining clips and remove the sup-
port from the hood.
LATCH RELEASE HANDLE
REMOVAL
(1) Remove the cowl trim panel. (Refer to 23 -
BODY/INTERIOR/COWL TRIM COVER -
REMOVAL)
(2) Remove the three screws and remove the han-
dle.
(3) Disconnect the hood release cable.
INSTALLATION
(1) Connect the hood release cable to the handle.
(2) Install the handle and install the three screws.
(3) Install the cowl trim cover. (Refer to 23 -
BODY/INTERIOR/COWL TRIM COVER - INSTAL-
LATION)
Fig. 1 RADIATOR CROSSMEMBER
1 - CROSSMEMBER
2 - BOLTS (2)
3 - BOLTS (4)
4 - BOLTS (2)
5 - HOOD LATCH SUPPORT
23 - 120 HOODKJ
Page 1596 of 1803
HINGE
REMOVAL
(1) Remove the door. (Refer to 23 - BODY/DOORS
- REAR/DOOR - REMOVAL)
(2) Remove the upper b-pillar trim. (Refer to 23 -
BODY/INTERIOR/B-PILLAR UPPER TRIM -
REMOVAL)
(3) Remove the two door hinge bolts from the
inside of the b-pillar.
(4) Remove the exterior bolts attaching the door
hinges to the b-pillar.
INSTALLATION
(1) Install the hinges.
(2) Install the exterior bolts and tighten to 28 N´m
(21 ft. lbs.).
(3) Install the two inner hinge bolts and tighten to
28 N´m (21 ft. lbs.).
(4) Adjust the door as necessary. (Refer to 23 -
BODY/BODY STRUCTURE/GAP AND FLUSH -
SPECIFICATIONS)
(5) Install the upper b-pillar trim. (Refer to 23 -
BODY/INTERIOR/B-PILLAR UPPER TRIM -
INSTALLATION)
(6) Install the door. (Refer to 23 - BODY/DOORS -
REAR/DOOR - INSTALLATION)
LATCH
REMOVAL
(1) Remove the door glass. (Refer to 23 - BODY/
DOORS - REAR/DOOR GLASS - REMOVAL)(2) Disconnect the actuator rods.
(3) Remove the screws and remove the latch
assembly. (Fig. 7)
(4) Disconnect the electrical connectors.
INSTALLATION
(1) Connect the latch electrical connectors.
(2) Install the latch assembly into the door and
install the screws.
(3) Tighten the latch screws to 11 N´m (95 in. lbs.).
(4) Connect the actuator rods.
(5) Install the door glass. (Refer to 23 - BODY/
DOORS - REAR/DOOR GLASS - INSTALLATION)
(6) Adjust the latch as needed. (Refer to 23 -
BODY/DOORS - REAR/LATCH - ADJUSTMENTS)
ADJUSTMENTS
ADJUSTMENT
(1) Locate access hole and remove the mylar tape
covering it. (Fig. 8)
(2) Insert a 5/32-inch hex-wrench through hole and
into adjustment screw. Loosen screw.
(3) Operate outside handle several times to release
any restriction because of mis-alignment.
(4) Tighten adjustment screw to 3 N´m (30 in.
lbs.).
(5) Test handle and lock cylinder for proper opera-
tion.
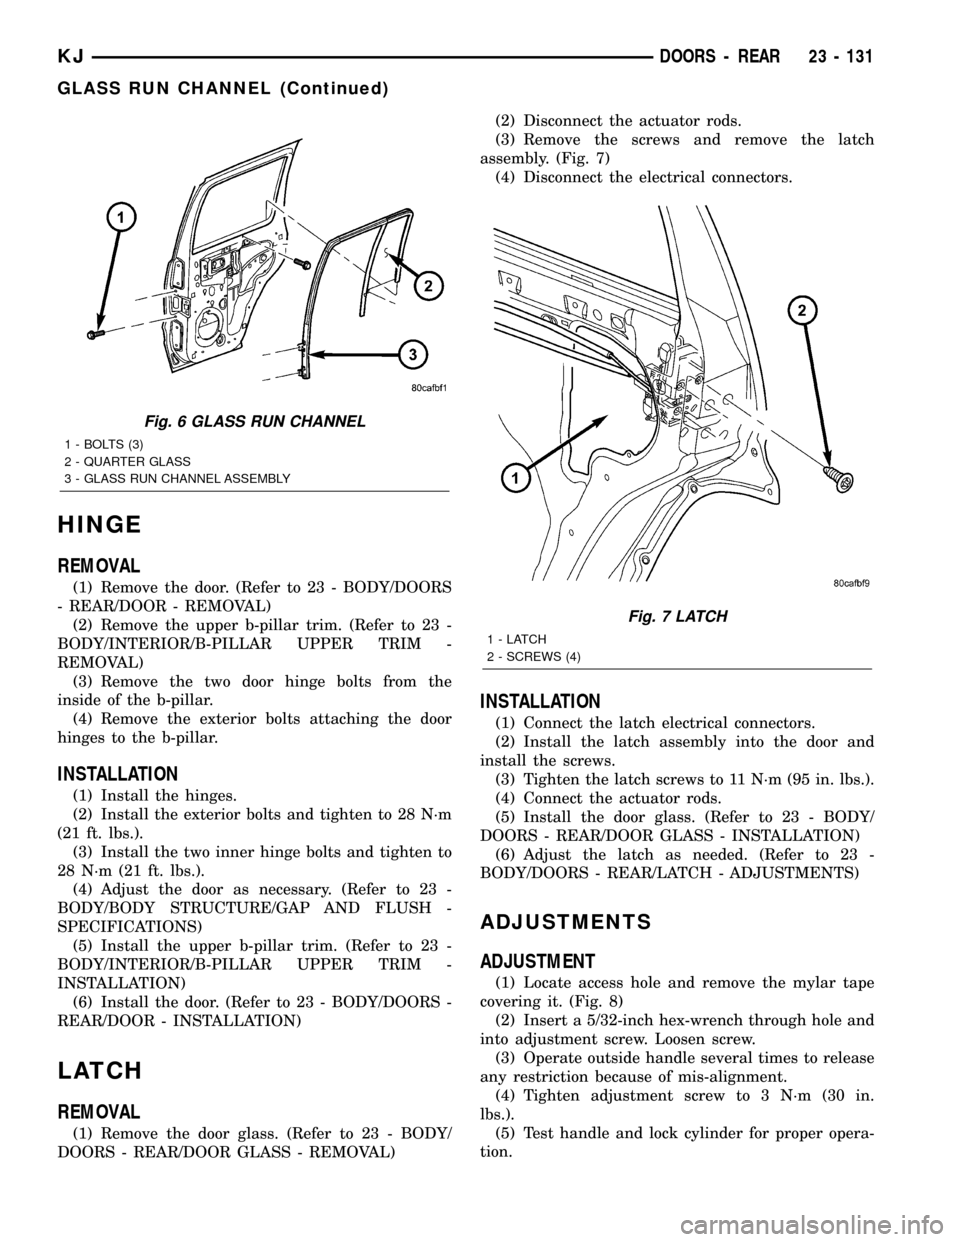
Fig. 6 GLASS RUN CHANNEL
1 - BOLTS (3)
2 - QUARTER GLASS
3 - GLASS RUN CHANNEL ASSEMBLY
Fig. 7 LATCH
1-LATCH
2 - SCREWS (4)
KJDOORS - REAR 23 - 131
GLASS RUN CHANNEL (Continued)
Page 1597 of 1803
LATCH STRIKER
REMOVAL
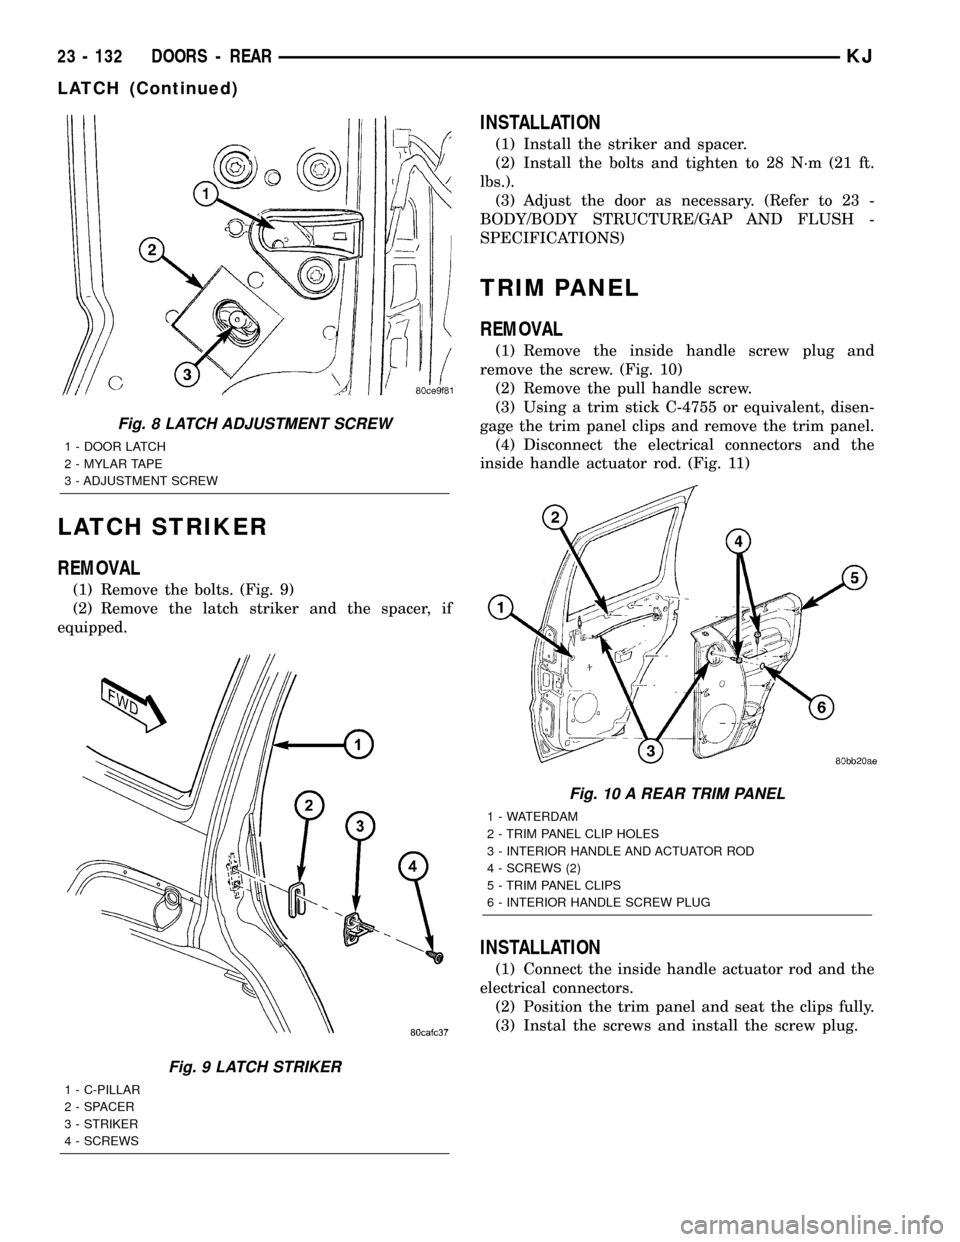
(1) Remove the bolts. (Fig. 9)
(2) Remove the latch striker and the spacer, if
equipped.
INSTALLATION
(1) Install the striker and spacer.
(2) Install the bolts and tighten to 28 N´m (21 ft.
lbs.).
(3) Adjust the door as necessary. (Refer to 23 -
BODY/BODY STRUCTURE/GAP AND FLUSH -
SPECIFICATIONS)
TRIM PANEL
REMOVAL
(1) Remove the inside handle screw plug and
remove the screw. (Fig. 10)
(2) Remove the pull handle screw.
(3) Using a trim stick C-4755 or equivalent, disen-
gage the trim panel clips and remove the trim panel.
(4) Disconnect the electrical connectors and the
inside handle actuator rod. (Fig. 11)
INSTALLATION
(1) Connect the inside handle actuator rod and the
electrical connectors.
(2) Position the trim panel and seat the clips fully.
(3) Instal the screws and install the screw plug.
Fig. 8 LATCH ADJUSTMENT SCREW
1 - DOOR LATCH
2 - MYLAR TAPE
3 - ADJUSTMENT SCREW
Fig. 9 LATCH STRIKER
1 - C-PILLAR
2 - SPACER
3 - STRIKER
4 - SCREWS
Fig. 10 A REAR TRIM PANEL
1 - WATERDAM
2 - TRIM PANEL CLIP HOLES
3 - INTERIOR HANDLE AND ACTUATOR ROD
4 - SCREWS (2)
5 - TRIM PANEL CLIPS
6 - INTERIOR HANDLE SCREW PLUG
23 - 132 DOORS - REARKJ
LATCH (Continued)
Page 1598 of 1803
WATERDAM
REMOVAL
(1) Remove the trim panel. (Refer to 23 - BODY/
DOORS - REAR/TRIM PANEL - REMOVAL)
(2) Remove the door speaker.
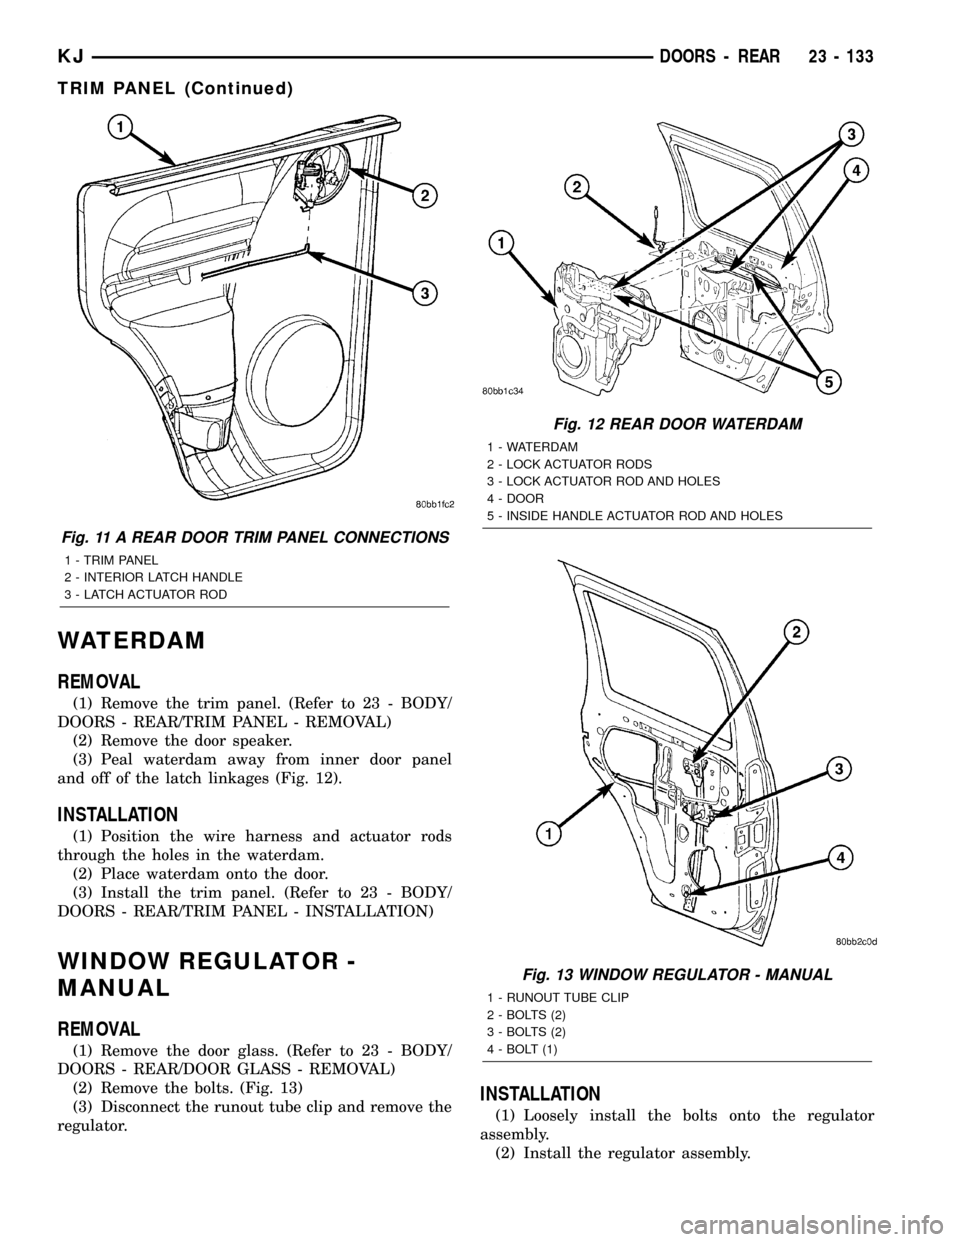
(3) Peal waterdam away from inner door panel
and off of the latch linkages (Fig. 12).
INSTALLATION
(1) Position the wire harness and actuator rods
through the holes in the waterdam.
(2) Place waterdam onto the door.
(3) Install the trim panel. (Refer to 23 - BODY/
DOORS - REAR/TRIM PANEL - INSTALLATION)
WINDOW REGULATOR -
MANUAL
REMOVAL
(1) Remove the door glass. (Refer to 23 - BODY/
DOORS - REAR/DOOR GLASS - REMOVAL)
(2) Remove the bolts. (Fig. 13)
(3) Disconnect the runout tube clip and remove the
regulator.
INSTALLATION
(1) Loosely install the bolts onto the regulator
assembly.
(2) Install the regulator assembly.
Fig. 11 A REAR DOOR TRIM PANEL CONNECTIONS
1 - TRIM PANEL
2 - INTERIOR LATCH HANDLE
3 - LATCH ACTUATOR ROD
Fig. 12 REAR DOOR WATERDAM
1 - WATERDAM
2 - LOCK ACTUATOR RODS
3 - LOCK ACTUATOR ROD AND HOLES
4 - DOOR
5 - INSIDE HANDLE ACTUATOR ROD AND HOLES
Fig. 13 WINDOW REGULATOR - MANUAL
1 - RUNOUT TUBE CLIP
2 - BOLTS (2)
3 - BOLTS (2)
4 - BOLT (1)
KJDOORS - REAR 23 - 133
TRIM PANEL (Continued)
Page 1600 of 1803

SWING GATE
TABLE OF CONTENTS
page page
CHECK STRAP
REMOVAL............................135
INSTALLATION........................135
EXTERIOR HANDLE
REMOVAL............................136
INSTALLATION........................136
FLIP-UP GLASS
REMOVAL............................136
INSTALLATION........................136
FLIP-UP GLASS LATCH
REMOVAL............................136
INSTALLATION........................136
HINGE
REMOVAL............................137
INSTALLATION........................137
LATCH
REMOVAL............................137
INSTALLATION........................137
LATCH STRIKER
REMOVAL............................137INSTALLATION........................137
LOCK CYLINDER
REMOVAL............................137
INSTALLATION........................138
SWING GATE
REMOVAL............................138
INSTALLATION........................138
TRIM PANEL
REMOVAL............................138
INSTALLATION........................138
LATCH - ACCESS PANEL
DESCRIPTION........................139
REMOVAL............................139
INSTALLATION........................139
FLIP-UP GLASS SUPPORT CYLINDER
REMOVAL............................139
INSTALLATION........................139
CHECK STRAP
REMOVAL
(1) Remove the swing gate trim panel. (Refer to 23
- BODY/SWING GATE/TRIM PANEL - REMOVAL)
(2) Remove the quarter trim panel. (Refer to 23 -
BODY/INTERIOR/QUARTER TRIM PANEL -
REMOVAL)
(3) Remove the bolts attaching the check strap to
the d-pillar. (Fig. 1)
(4) Peel back the waterdam.
(5) Remove the nuts and remove the check strap
from the swing gate.
INSTALLATION
(1) Install the check strap.
(2) Install the nuts and tighten to 10 N´m (89 in.
lbs.).
(3) Reposition the waterdam.
(4) Install the trim panel. (Refer to 23 - BODY/
SWING GATE/TRIM PANEL - INSTALLATION)
(5) Install the bolts attaching the check strap to
the d-pillar and tighten to 11 N´m (8 ft. lbs.).
(6) Install the quarter trim panel. (Refer to 23 -
BODY/INTERIOR/QUARTER TRIM PANEL -
INSTALLATION)Fig. 1 CHECK STRAP
1 - CHECK STRAP
2 - NUTS (2)
3 - BOLTS (2)
4 - D-PILLAR
KJSWING GATE 23 - 135
Page 1603 of 1803

(2) Remove the clip and remove the lock cylinder
switch.
(3) Remove the screw and remove the lock cylin-
der. (Fig. 6)
INSTALLATION
(1) Install the lock cylinder.
(2) Install the screw and tighten to 6 N´m (50 in.
lbs.).
(3) Install the lock cylinder switch and retaining
clip.
(4) Install the exterior handle. (Refer to 23 -
BODY/SWING GATE/EXTERIOR HANDLE -
INSTALLATION)
SWING GATE
REMOVAL
(1) Remove the spare tire. (Refer to 22 - TIRES/
WHEELS/TIRES/SPARE TIRE - REMOVAL)
(2) Remove the quarter trim panel. (Refer to 23 -
BODY/INTERIOR/QUARTER TRIM PANEL -
REMOVAL)
(3) Support the swing gate with a suitable lifting
device.
(4) Disconnect the wire harness.(5) Disconnect the check strap from the d-pillar.
(Refer to 23 - BODY/SWING GATE/CHECK STRAP -
REMOVAL)
(6) Remove the bolts and remove the swing gate.
INSTALLATION
(1) Install the swing gate and install the bolts.
(2) Tighten the bolts to 31 N´m (23 ft. lbs.).
(3) Adjust the swing gate as needed adding 4 mm
on the right side to compensate for sag after the
spare tire is installed. (Refer to 23 - BODY/BODY
STRUCTURE/GAP AND FLUSH - SPECIFICA-
TIONS)
(4) Connect the wire harness electrical connector.
(5) Connect the check strap. (Refer to 23 - BODY/
SWING GATE/CHECK STRAP - INSTALLATION)
(6) Install the quarter trim panel. (Refer to 23 -
BODY/INTERIOR/QUARTER TRIM PANEL -
INSTALLATION)
(7) Install the spare tire. (Refer to 22 - TIRES/
WHEELS/TIRES/SPARE TIRE - INSTALLATION)
TRIM PANEL
REMOVAL
(1) Using a trim stick C-4755 or equivalent,
release the push pin fasteners. (Fig. 7)
(2) Lift trim panel up off of the upper trim panel
clips
INSTALLATION
(1) Position the trim panel and seat the upper
clips.
(2) Fully seat the lower trim panel clips
Fig. 6 LOCK CYLINDER
1 - SCREW
2 - LOCK CYLINDER
3 - EXTERIOR HANDLE
Fig. 7 SWING GATE TRIM PANEL
1 - TRIM PANEL
2 - UPPER TRIM PANEL CLIPS
3 - UPPER TRIM CLIP HOLES
4 - TRIM PANEL LOCATOR HOLES
5 - SWING GATE LOCATOR PINS
6 - PUSH IN FASTENERS
23 - 138 SWING GATEKJ
LOCK CYLINDER (Continued)
Page 1614 of 1803

(1) Open the glove box.
(2) Remove the two striker screws and remove the
latch striker.
INSTALLATION
WARNING: ON VEHICLES EQUIPPED WITH AIR-
BAGS, DISABLE THE AIRBAG SYSTEM BEFORE
ATTEMPTING ANY STEERING WHEEL, STEERING
COLUMN, SEAT BELT TENSIONER, OR INSTRU-
MENT PANEL COMPONENT DIAGNOSIS OR SER-
VICE. DISCONNECT AND ISOLATE THE BATTERY
NEGATIVE (GROUND) CABLE, THEN WAIT TWO
MINUTES FOR THE AIRBAG SYSTEM CAPACITOR
TO DISCHARGE BEFORE PERFORMING FURTHER
DIAGNOSIS OR SERVICE. THIS IS THE ONLY SURE
WAY TO DISABLE THE AIRBAG SYSTEM. FAILURE
TO TAKE THE PROPER PRECAUTIONS COULD
RESULT IN ACCIDENTAL AIRBAG DEPLOYMENT
AND POSSIBLE PERSONAL INJURY.
(1) Install the striker and install the two screws.
(2) Loosen the screws to adjust if necessary.
INSTRUMENT PANEL
ASSEMBLY
REMOVAL
WARNING: ON VEHICLES EQUIPPED WITH AIR-
BAGS, DISABLE THE AIRBAG SYSTEM BEFORE
ATTEMPTING ANY STEERING WHEEL, STEERING
COLUMN, OR INSTRUMENT PANEL COMPONENT
DIAGNOSIS OR SERVICE. DISCONNECT AND ISO-
LATE THE BATTERY NEGATIVE (GROUND) CABLE,
THEN WAIT TWO MINUTES FOR THE AIRBAG SYS-
TEM CAPACITOR TO DISCHARGE BEFORE PER-
FORMING FURTHER DIAGNOSIS OR SERVICE. THIS
IS THE ONLY SURE WAY TO DISABLE THE AIRBAG
SYSTEM. FAILURE TO TAKE THE PROPER PRE-
CAUTIONS COULD RESULT IN ACCIDENTAL AIR-
BAG DEPLOYMENT AND POSSIBLE PERSONAL
INJURY.
NOTE: Before starting this procedure, be certain to
turn the steering wheel until the front wheels are in
the straight-ahead position.(1) Disconnect and isolate the battery negative
cable.
(2) Remove the instrument panel top cover. (Refer
to 23 - BODY/INSTRUMENT PANEL/INSTRUMENT
PANEL TOP COVER - REMOVAL)
(3) Remove the speakers.
(4) Remove the floor console. (Refer to 23 - BODY/
INTERIOR/FLOOR CONSOLE - REMOVAL)
(5) Remove the radio. (Refer to 8 - ELECTRICAL/
AUDIO/RADIO - REMOVAL)
(6) Remove the four nuts and remove the center
support bracket. (Fig. 6)
(7) Remove the steering column. (Refer to 19 -
STEERING/COLUMN - REMOVAL)
(8) Remove the drivers side cowl trim cover. (Refer
to 23 - BODY/INTERIOR/COWL TRIM COVER -
REMOVAL)
(9) Disconnect the wire harness connector behind
the drivers side cowl trim cover.
(10) Disconnect the green and light blue wire har-
ness bulk connectors at the junction block. (Fig. 1)
(11) Disconnect the electrical connector at the
inner side of the pedal support bracket. (Fig. 2)
(12) Remove the two bolts at the front of the pedal
support bracket. (Fig. 2)
(13) Remove the two bolts from the bottom side of
the pedal support bracket. (Fig. 2)
Fig. 1 JUNCTION BLOCK CONNECTORS
1 - ELECTRICAL CONNECTOR
2 - ELECTRICAL CONNECTOR
3 - PEDAL SUPPORT BRACKET
4 - JUNCTION BLOCK
KJINSTRUMENT PANEL 23 - 149
GLOVE BOX LATCH STRIKER (Continued)
Page 1615 of 1803
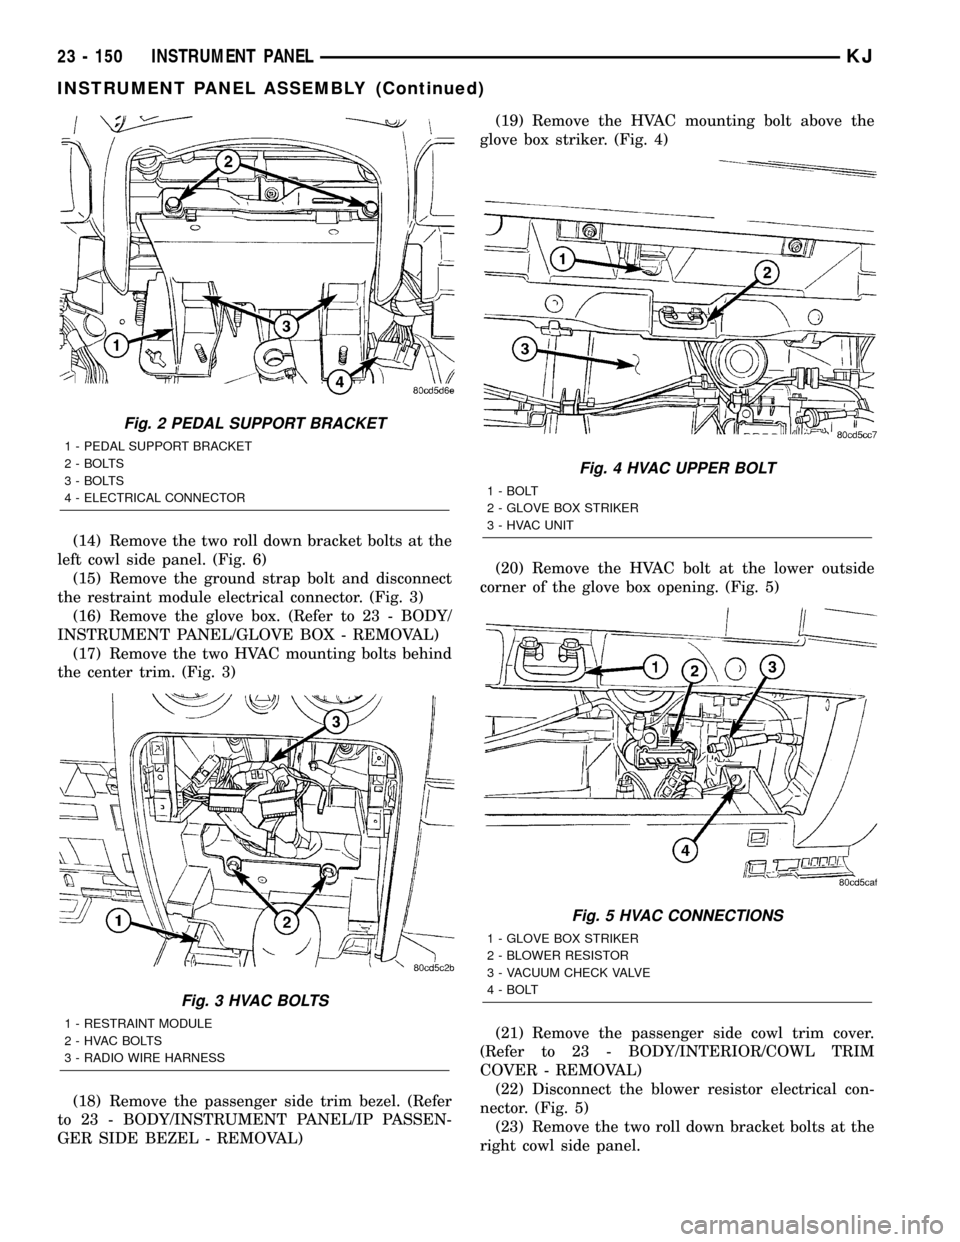
(14) Remove the two roll down bracket bolts at the
left cowl side panel. (Fig. 6)
(15) Remove the ground strap bolt and disconnect
the restraint module electrical connector. (Fig. 3)
(16) Remove the glove box. (Refer to 23 - BODY/
INSTRUMENT PANEL/GLOVE BOX - REMOVAL)
(17) Remove the two HVAC mounting bolts behind
the center trim. (Fig. 3)
(18) Remove the passenger side trim bezel. (Refer
to 23 - BODY/INSTRUMENT PANEL/IP PASSEN-
GER SIDE BEZEL - REMOVAL)(19) Remove the HVAC mounting bolt above the
glove box striker. (Fig. 4)
(20) Remove the HVAC bolt at the lower outside
corner of the glove box opening. (Fig. 5)
(21) Remove the passenger side cowl trim cover.
(Refer to 23 - BODY/INTERIOR/COWL TRIM
COVER - REMOVAL)
(22) Disconnect the blower resistor electrical con-
nector. (Fig. 5)
(23) Remove the two roll down bracket bolts at the
right cowl side panel.
Fig. 2 PEDAL SUPPORT BRACKET
1 - PEDAL SUPPORT BRACKET
2 - BOLTS
3 - BOLTS
4 - ELECTRICAL CONNECTOR
Fig. 3 HVAC BOLTS
1 - RESTRAINT MODULE
2 - HVAC BOLTS
3 - RADIO WIRE HARNESS
Fig. 4 HVAC UPPER BOLT
1 - BOLT
2 - GLOVE BOX STRIKER
3 - HVAC UNIT
Fig. 5 HVAC CONNECTIONS
1 - GLOVE BOX STRIKER
2 - BLOWER RESISTOR
3 - VACUUM CHECK VALVE
4 - BOLT
23 - 150 INSTRUMENT PANELKJ
INSTRUMENT PANEL ASSEMBLY (Continued)