Page 1516 of 2100
6E±549
6VE1 3.5L ENGINE DRIVEABILITY AND EMISSIONS
Air Cleaner/Air Filter
Removal Procedure
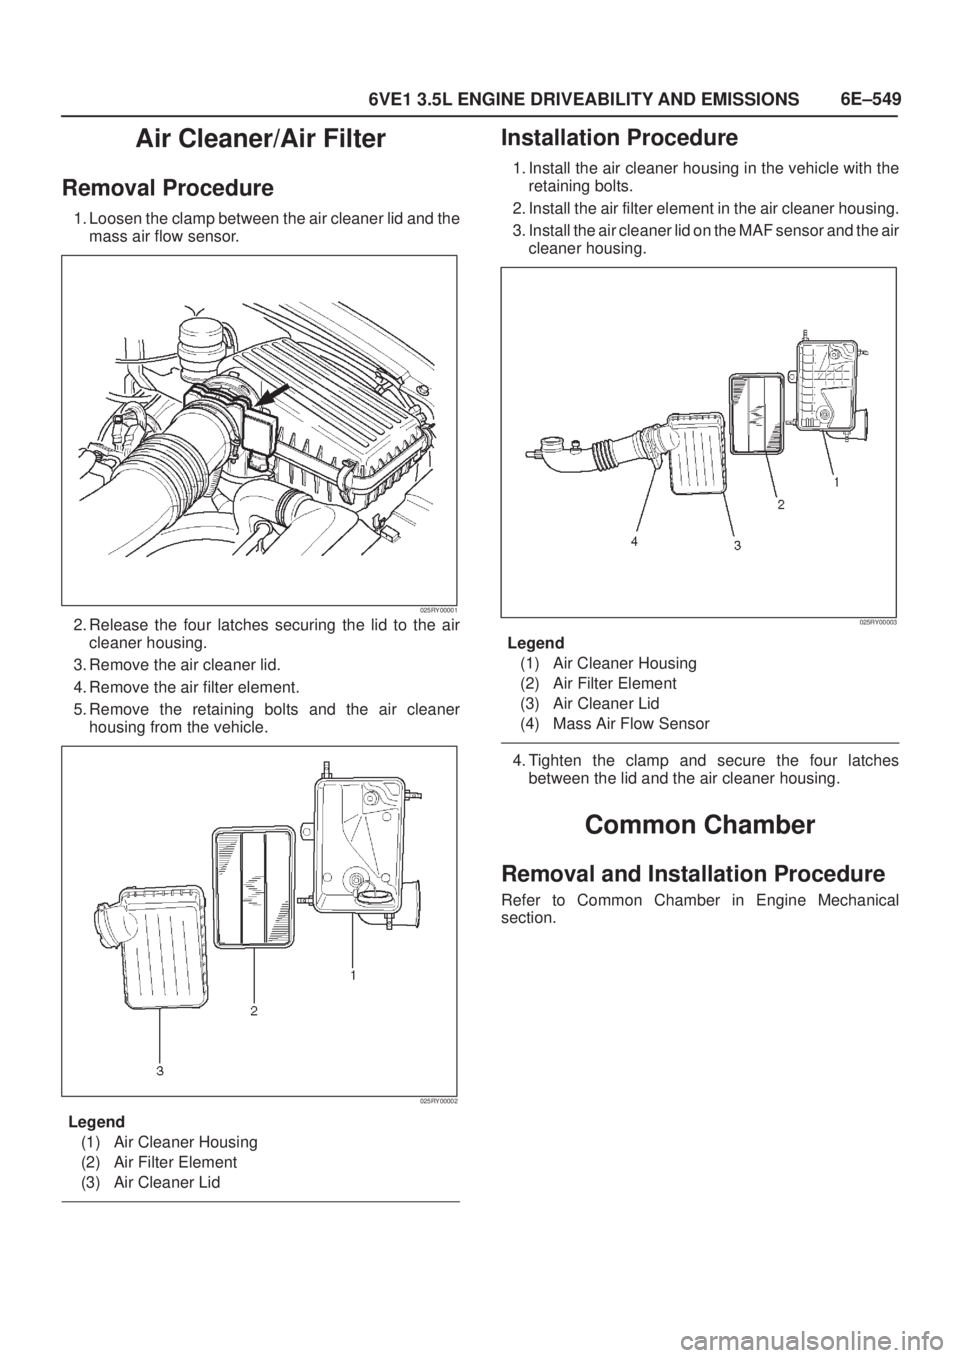
1. Loosen the clamp between the air cleaner lid and the
mass air flow sensor.
025RY00001
2. Release the four latches securing the lid to the air
cleaner housing.
3. Remove the air cleaner lid.
4. Remove the air filter element.
5. Remove the retaining bolts and the air cleaner
housing from the vehicle.
025RY00002
Legend
(1) Air Cleaner Housing
(2) Air Filter Element
(3) Air Cleaner Lid
Installation Procedure
1. Install the air cleaner housing in the vehicle with the
retaining bolts.
2. Install the air filter element in the air cleaner housing.
3. Install the air cleaner lid on the MAF sensor and the air
cleaner housing.
025RY00003
Legend
(1) Air Cleaner Housing
(2) Air Filter Element
(3) Air Cleaner Lid
(4) Mass Air Flow Sensor
4. Tighten the clamp and secure the four latches
between the lid and the air cleaner housing.
Common Chamber
Removal and Installation Procedure
Refer to Common Chamber in Engine Mechanical
section.
Page 1517 of 2100
6E±550
6VE1 3.5L ENGINE DRIVEABILITY AND EMISSIONS
Accelerator Pedal Replacement
Removal Procedure
1. Disconnect the negative battery cable.
2. Disconnect the electrical harness from the
accelerator position sensor.
101RY00006
Legend
(1) Accelerator Position Sensor
(2) Accelerator Pedal Assembly
3. Remove the two screws from the accelerator pedal
assembly.
101RY00007
4. Remove the accelerator pedal assembly from the
bulkhead.
Installation Procedure
1. Install the accelerator pedal assembly on the
bulkhead.
2. Install the two screws to the accelerator pedal
assembly.
Tighten
�Tighten the screws to 22 N´m (16 lb ft.).
101RY00007
3. Connect the electrical harness to the accelerator
position sensor.
101RY00006
Legend
(1) Accelerator Position Sensor
(2) Accelerator Pedal Assembly
4. Install the negative battery cable.
Page 1518 of 2100
6E±551
6VE1 3.5L ENGINE DRIVEABILITY AND EMISSIONS
Accelerator Position Sensor
Replacement
CAUTION: R e m o v e t h e Accelerator (A) pedal
assembly as a unit to have it serviced. Do not remove
the Accelerator Position (AP) sensor on the A pedal.
If the AP sensor is removed for emergency cause,
refer to following items as necessary.
Removal Procedure
1. Disconnect the negative battery cable.
2. Disconnect the electrical harness from the AP sensor.
101RY00006
Legend
(1) AP Sensor
(2) A Pedal Assembly
3. Remove the AP sensor.
101RY00009
Legend
(1) AP Sensor
(2) AP Screw
Installation Procedure
1. Install the accelerator position (AP) sensor to bolts
with accelerator (A) pedal.
2. Connect the connector to AP sensor.
3. Install the negative battery cable.
Accelerator Position Sensor
Adjustment
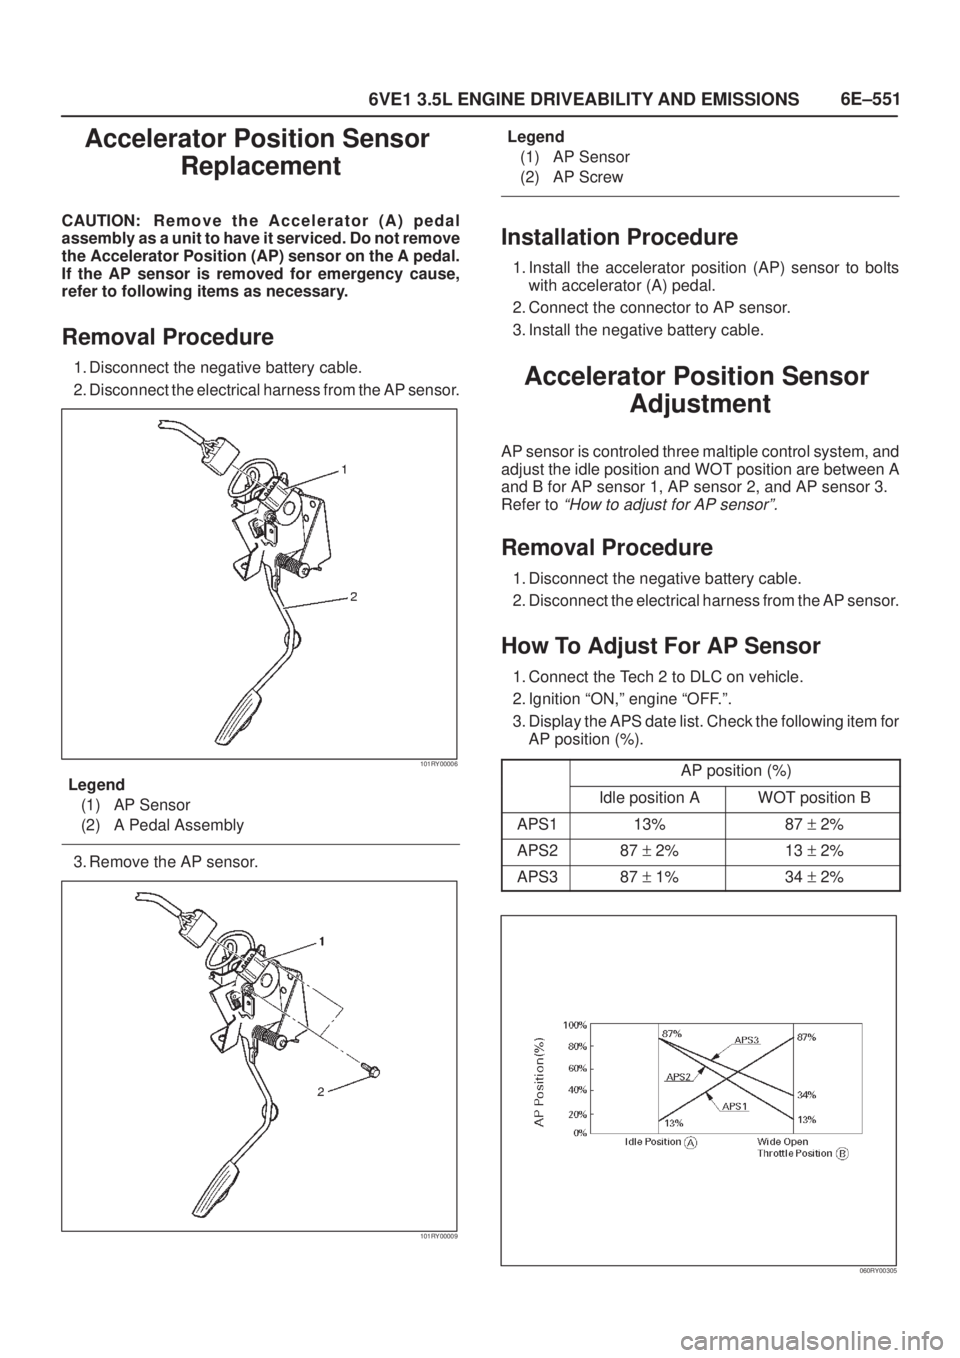
AP sensor is controled three maltiple control system, and
adjust the idle position and WOT position are between A
and B for AP sensor 1, AP sensor 2, and AP sensor 3.
Refer to
ªHow to adjust for AP sensorº.
Removal Procedure
1. Disconnect the negative battery cable.
2. Disconnect the electrical harness from the AP sensor.
How To Adjust For AP Sensor
1. Connect the Tech 2 to DLC on vehicle.
2. Ignition ªON,º engine ªOFF.º.
3. Display the APS date list. Check the following item for
AP position (%).
AP position (%)
Idle position AWOT position B
APS113%87 + 2%
APS287 + 2%13 + 2%
APS387 + 1%34 + 2%
060RY00305
Page 1524 of 2100
6E±557
6VE1 3.5L ENGINE DRIVEABILITY AND EMISSIONS
Fuel Rail Assembly
Removal Procedure
NOTE:
�Do not attempt to remove the fuel inlet fitting on the
fuel rail. It is staked in place. Removing the fuel inlet
fitting will result in damage to the fuel rail or the
internal O-ring seal.
�Use care when removing the fuel rail assembly in
order to prevent damage to the injector electrical
connector terminals and the injector spray tips.
�Fittings should be capped and holes plugged during
servicing to prevent dirt and other contaminants from
entering open lines and passages.
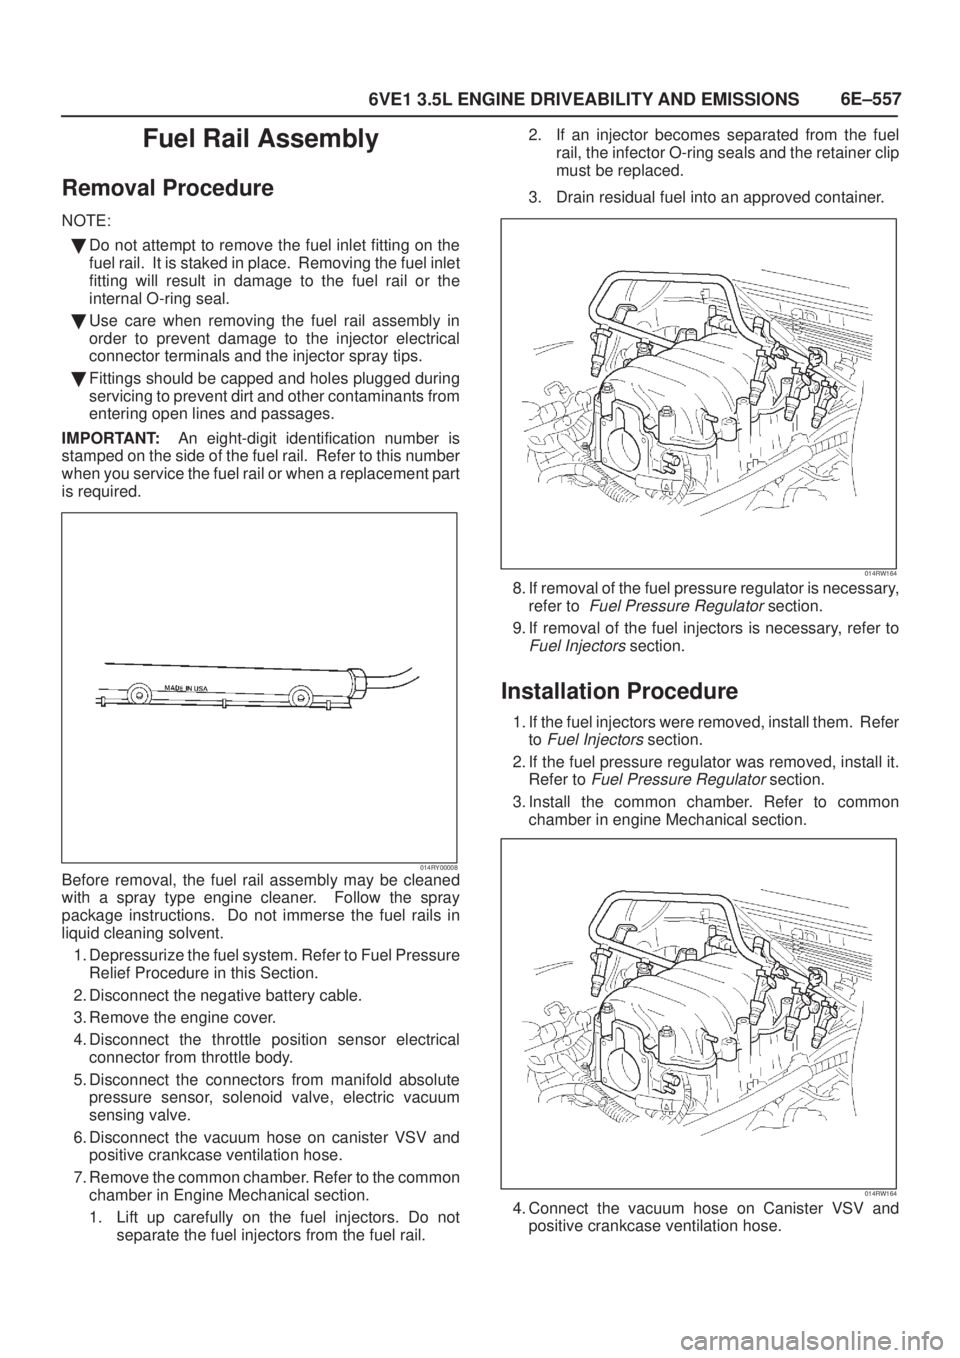
IMPORTANT:An eight-digit identification number is
stamped on the side of the fuel rail. Refer to this number
when you service the fuel rail or when a replacement part
is required.
014RY00008Before removal, the fuel rail assembly may be cleaned
with a spray type engine cleaner. Follow the spray
package instructions. Do not immerse the fuel rails in
liquid cleaning solvent.
1. Depressurize the fuel system. Refer to Fuel Pressure
Relief Procedure in this Section.
2. Disconnect the negative battery cable.
3. Remove the engine cover.
4. Disconnect the throttle position sensor electrical
connector from throttle body.
5. Disconnect the connectors from manifold absolute
pressure sensor, solenoid valve, electric vacuum
sensing valve.
6. Disconnect the vacuum hose on canister VSV and
positive crankcase ventilation hose.
7. Remove the common chamber. Refer to the common
chamber in Engine Mechanical section.
1. Lift up carefully on the fuel injectors. Do not
separate the fuel injectors from the fuel rail.2. If an injector becomes separated from the fuel
rail, the infector O-ring seals and the retainer clip
must be replaced.
3. Drain residual fuel into an approved container.
014RW164
8. If removal of the fuel pressure regulator is necessary,
refer to
Fuel Pressure Regulator section.
9. If removal of the fuel injectors is necessary, refer to
Fuel Injectors section.
Installation Procedure
1. If the fuel injectors were removed, install them. Refer
to
Fuel Injectors section.
2. If the fuel pressure regulator was removed, install it.
Refer to
Fuel Pressure Regulator section.
3. Install the common chamber. Refer to common
chamber in engine Mechanical section.
014RW164
4. Connect the vacuum hose on Canister VSV and
positive crankcase ventilation hose.
Page 1525 of 2100
6E±558
6VE1 3.5L ENGINE DRIVEABILITY AND EMISSIONS
5. Connect the connectors to manifold absolute
pressure sensor, solenoid valve, electric vacuum
sensing valve.
6. Connect the throttle position sensor electrical
connector to throttle body.
7. Install the engine cover.
8. Connect the negative battery cable.
9. Crank the engine until it starts. Cranking the engine
may take longer than usual due to trapped air in the
fuel rail and in the injectors.
Fuel Tank
Removal Procedure
Refer to Fuel Tank In Fuel Pump Relay
014RW134
Throttle Body (TB)
Removal Procedure
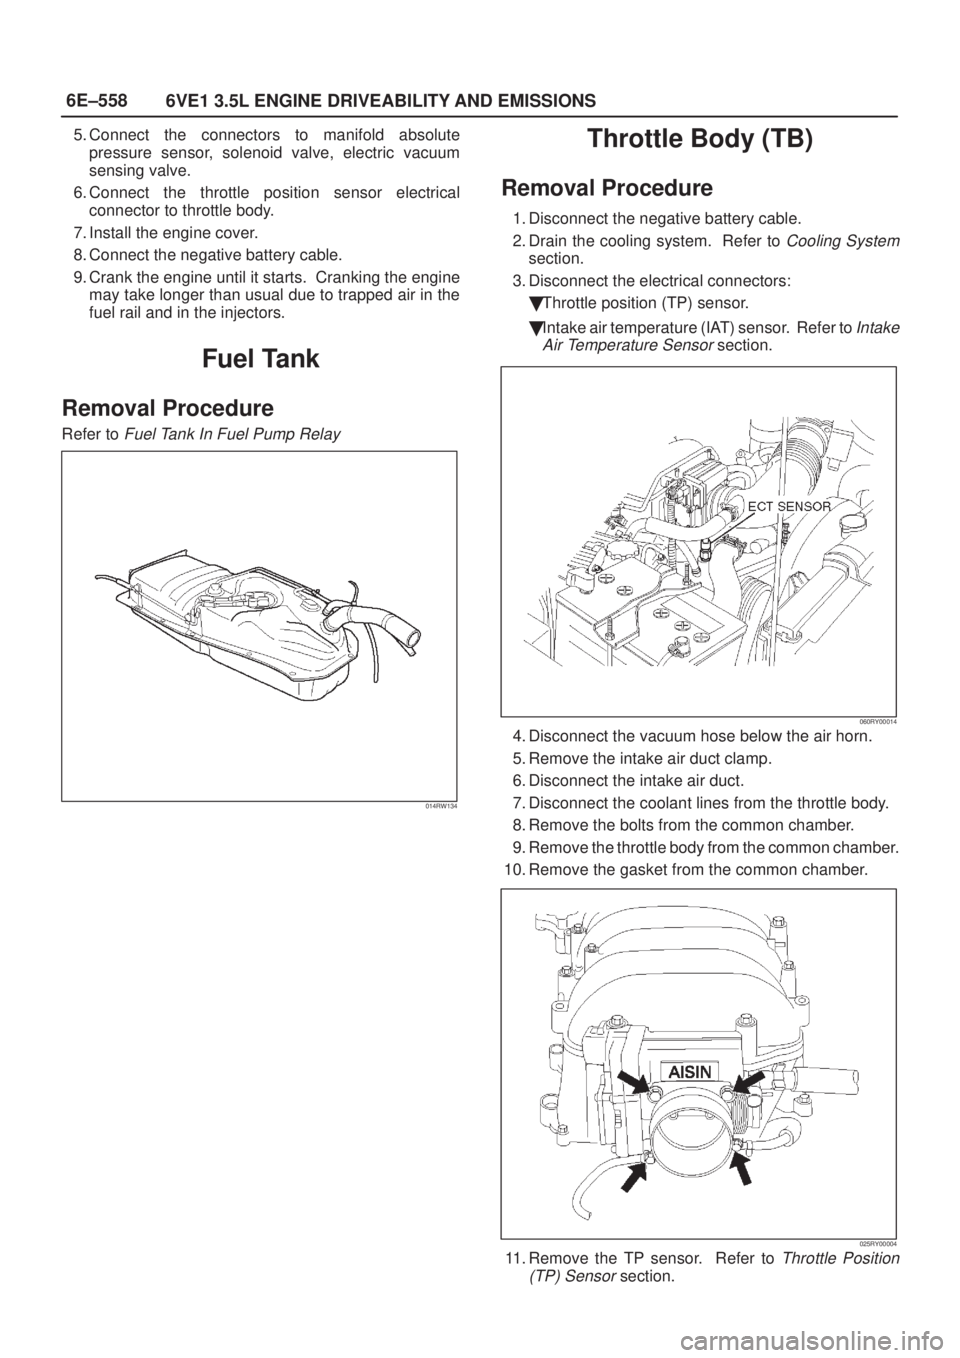
1. Disconnect the negative battery cable.
2. Drain the cooling system. Refer to
Cooling System
section.
3. Disconnect the electrical connectors:
�Throttle position (TP) sensor.
�Intake air temperature (IAT) sensor. Refer to
Intake
Air Temperature Sensor
section.
060RY00014
4. Disconnect the vacuum hose below the air horn.
5. Remove the intake air duct clamp.
6. Disconnect the intake air duct.
7. Disconnect the coolant lines from the throttle body.
8. Remove the bolts from the common chamber.
9. Remove the throttle body from the common chamber.
10. Remove the gasket from the common chamber.
025RY00004
11. Remove the TP sensor. Refer to Throttle Position
(TP) Sensor
section.
Page 1526 of 2100
6E±559
6VE1 3.5L ENGINE DRIVEABILITY AND EMISSIONS
Inspection Procedure
NOTE: Do not use solvent of any type when you clean the
gasket surfaces on the intake manifold and the throttle
body assembly. The gasket surfaces and the throttle
body assembly may be damaged as a result.
�If the throttle body gasket needs to be replaced,
remove any gasket material that may be stuck to the
mating surfaces of the manifold.
�Do not leave any scratches in the aluminum casting.
Installation Procedure
1. Install the TP sensor. Refer to Throttle Position (TP)
Sensor
section.
2. Install the gasket on the common chamber.
3. Install the throttle body on the common chamber.
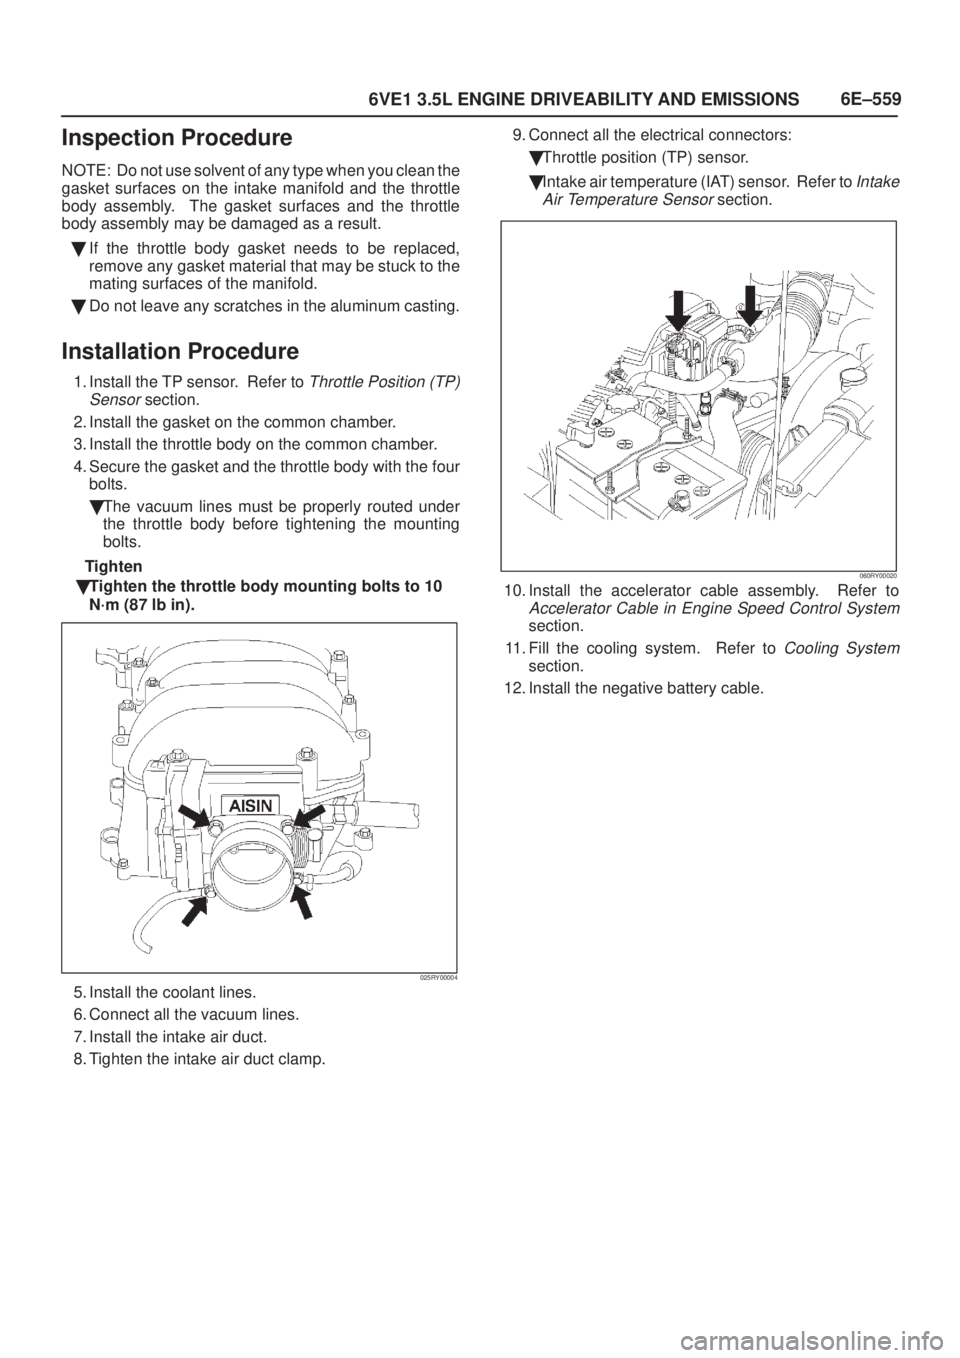
4. Secure the gasket and the throttle body with the four
bolts.
�The vacuum lines must be properly routed under
the throttle body before tightening the mounting
bolts.
Tighten
�Tighten the throttle body mounting bolts to 10
N´m (87 lb in).
025RY00004
5. Install the coolant lines.
6. Connect all the vacuum lines.
7. Install the intake air duct.
8. Tighten the intake air duct clamp.9. Connect all the electrical connectors:
�Throttle position (TP) sensor.
�Intake air temperature (IAT) sensor. Refer to
Intake
Air Temperature Sensor
section.
060RY00020
10. Install the accelerator cable assembly. Refer to
Accelerator Cable in Engine Speed Control System
section.
11. Fill the cooling system. Refer to
Cooling System
section.
12. Install the negative battery cable.
Page 1530 of 2100
6E±563
6VE1 3.5L ENGINE DRIVEABILITY AND EMISSIONS
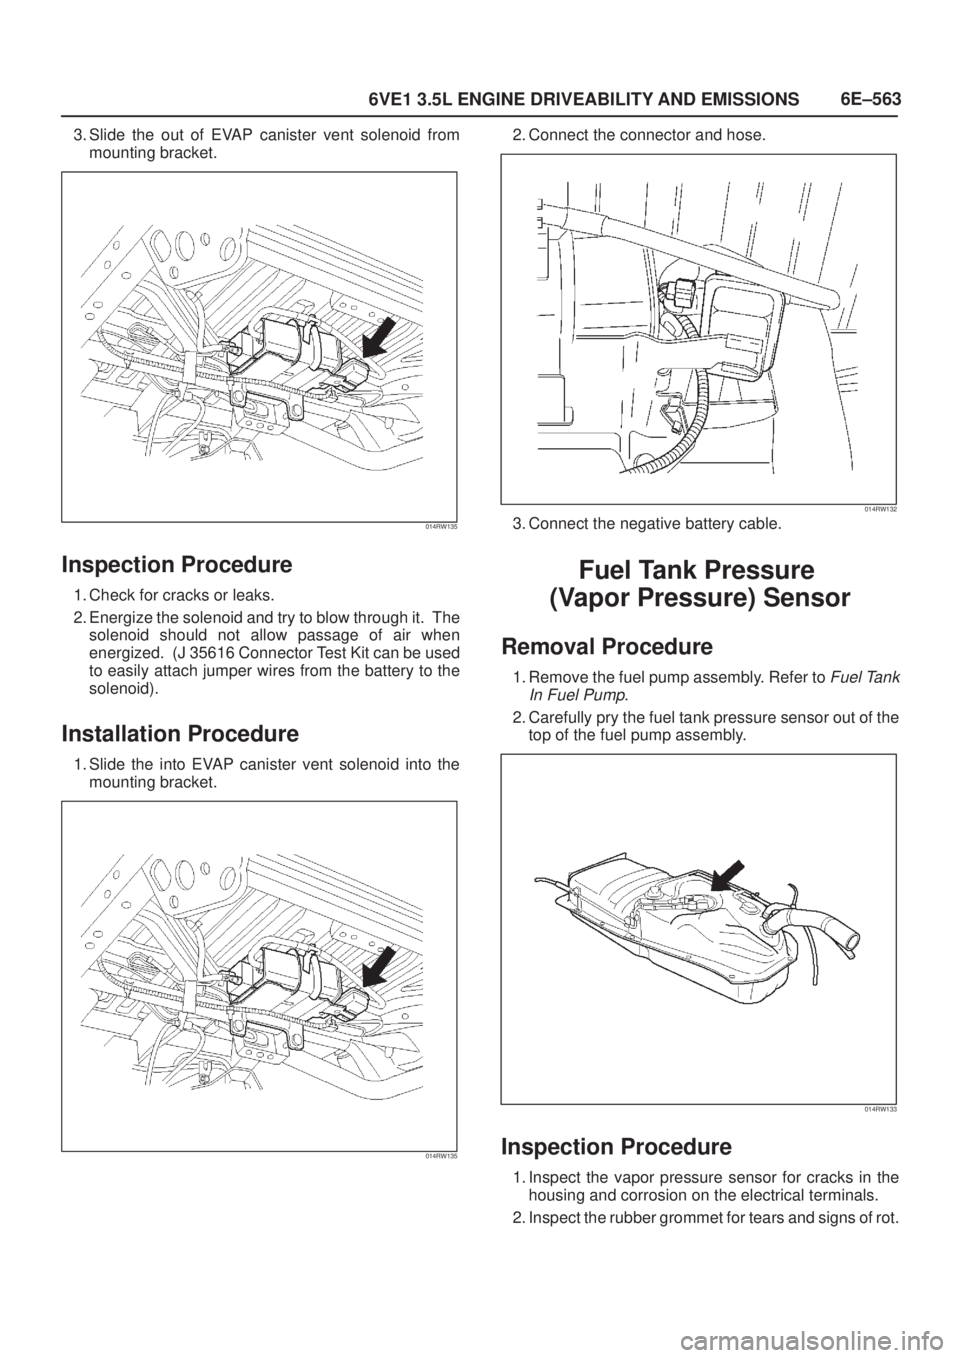
3. Slide the out of EVAP canister vent solenoid from
mounting bracket.
014RW135
Inspection Procedure
1. Check for cracks or leaks.
2. Energize the solenoid and try to blow through it. The
solenoid should not allow passage of air when
energized. (J 35616 Connector Test Kit can be used
to easily attach jumper wires from the battery to the
solenoid).
Installation Procedure
1. Slide the into EVAP canister vent solenoid into the
mounting bracket.
014RW135
2. Connect the connector and hose.
014RW132
3. Connect the negative battery cable.
Fuel Tank Pressure
(Vapor Pressure) Sensor
Removal Procedure
1. Remove the fuel pump assembly. Refer to Fuel Tank
In Fuel Pump
.
2. Carefully pry the fuel tank pressure sensor out of the
top of the fuel pump assembly.
014RW133
Inspection Procedure
1. Inspect the vapor pressure sensor for cracks in the
housing and corrosion on the electrical terminals.
2. Inspect the rubber grommet for tears and signs of rot.
Page 1531 of 2100
6E±564
6VE1 3.5L ENGINE DRIVEABILITY AND EMISSIONS
Installation Procedure
1. Install the rubber grommet on the fuel pump
assembly.
014RW133
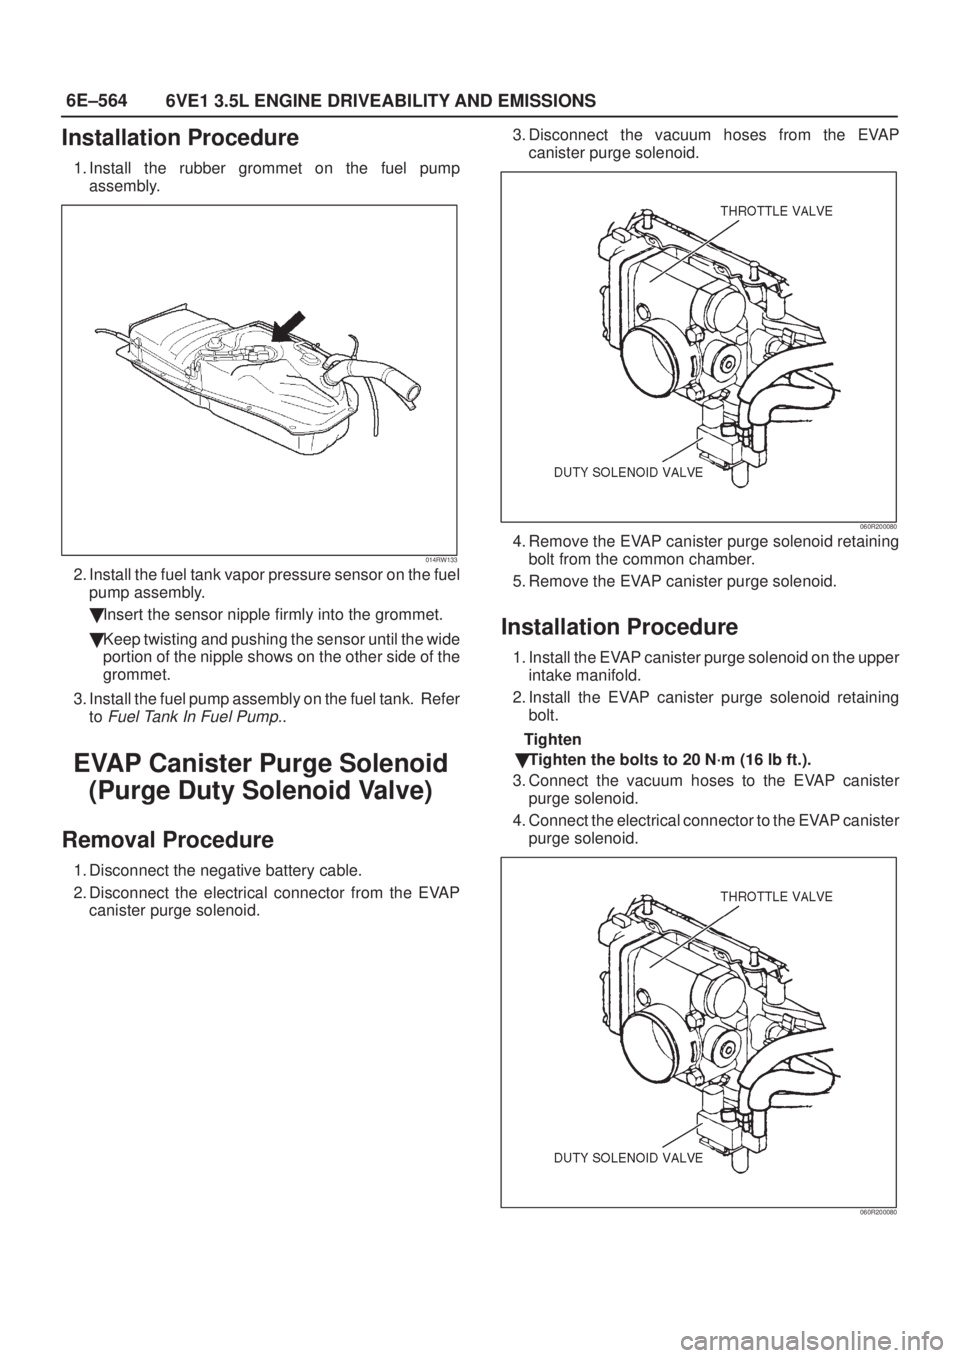
2. Install the fuel tank vapor pressure sensor on the fuel
pump assembly.
�Insert the sensor nipple firmly into the grommet.
�Keep twisting and pushing the sensor until the wide
portion of the nipple shows on the other side of the
grommet.
3. Install the fuel pump assembly on the fuel tank. Refer
to
Fuel Tank In Fuel Pump..
EVAP Canister Purge Solenoid
(Purge Duty Solenoid Valve)
Removal Procedure
1. Disconnect the negative battery cable.
2. Disconnect the electrical connector from the EVAP
canister purge solenoid.3. Disconnect the vacuum hoses from the EVAP
canister purge solenoid.
060R200080
4. Remove the EVAP canister purge solenoid retaining
bolt from the common chamber.
5. Remove the EVAP canister purge solenoid.
Installation Procedure
1. Install the EVAP canister purge solenoid on the upper
intake manifold.
2. Install the EVAP canister purge solenoid retaining
bolt.
Tighten
�Tighten the bolts to 20 N´m (16 lb ft.).
3. Connect the vacuum hoses to the EVAP canister
purge solenoid.
4. Connect the electrical connector to the EVAP canister
purge solenoid.
060R200080